

Spring笔记
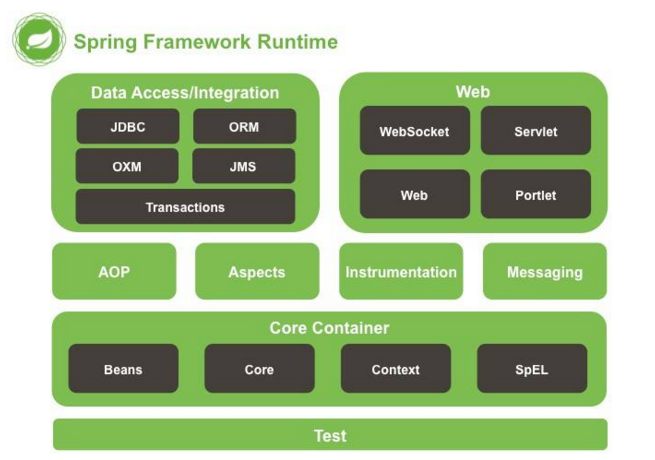
Spring的框架组成:它是对web层、业务层、数据访问层的每层都有解决方案;web层:Spring MVC;持久层:JDBC Template ;
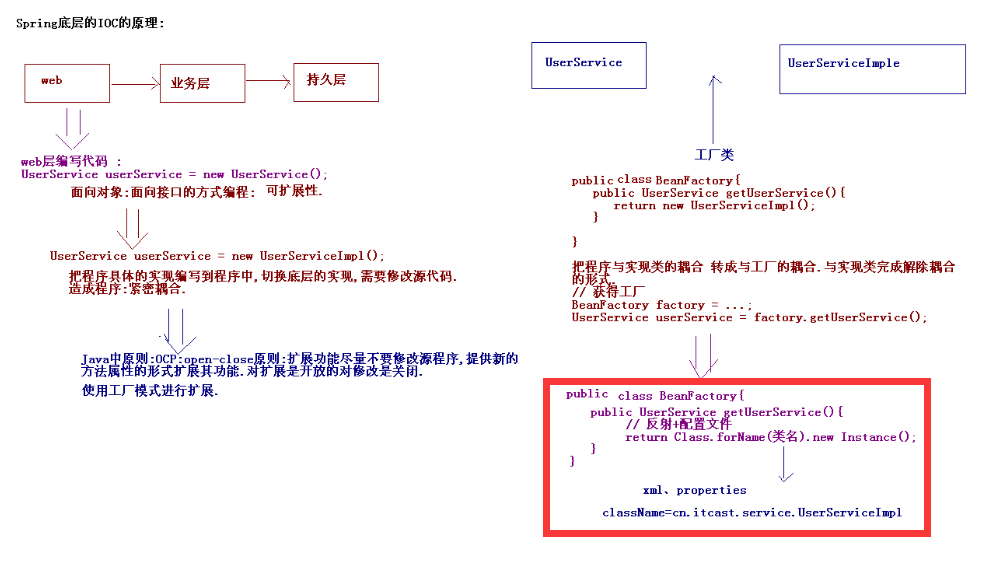
业务层:Spring的Bean管理(类的实例化托管给Spring,即Ioc,Spring利用动态代理给类进行增强,即AOP;从另一个角色看,对象都是你Spring管理的,那将来对这些对象进行修改,你Spring部应该负责到底吗?);
首先知道,实现AOP的方法有很多,Spring默认使用JDK动态代理,在需要代理类而不是代理接口的时候,Spring会自动切换为使用CGLIB代理,不过现在的项目都是面向接口编程,所以JDK动态代理相对来说用的还是多一些。
一、核心部分之IOC
1.1 相关概念 IOC:控制反转:将对象的创建权由Spring管理。 DI:依赖注入:在Spring创建对象的过程中,把对象依赖的属性注入到类中。
ApplicationContext 应用上下文,加载Spring 框架配置文件; ApplicationContext类继承了BeanFactory;BeanFactory在使用到这个类的时候,getBean()方法的时候才会加载这个类而ApplicationContext类加载配置文件的时候,创建所有的类;ApplicationContext对BeanFactory提供了扩展: 国际化处理、事件传递、Bean自动装配、各种不同应用层的Context实现;早期开发使用BeanFactory。
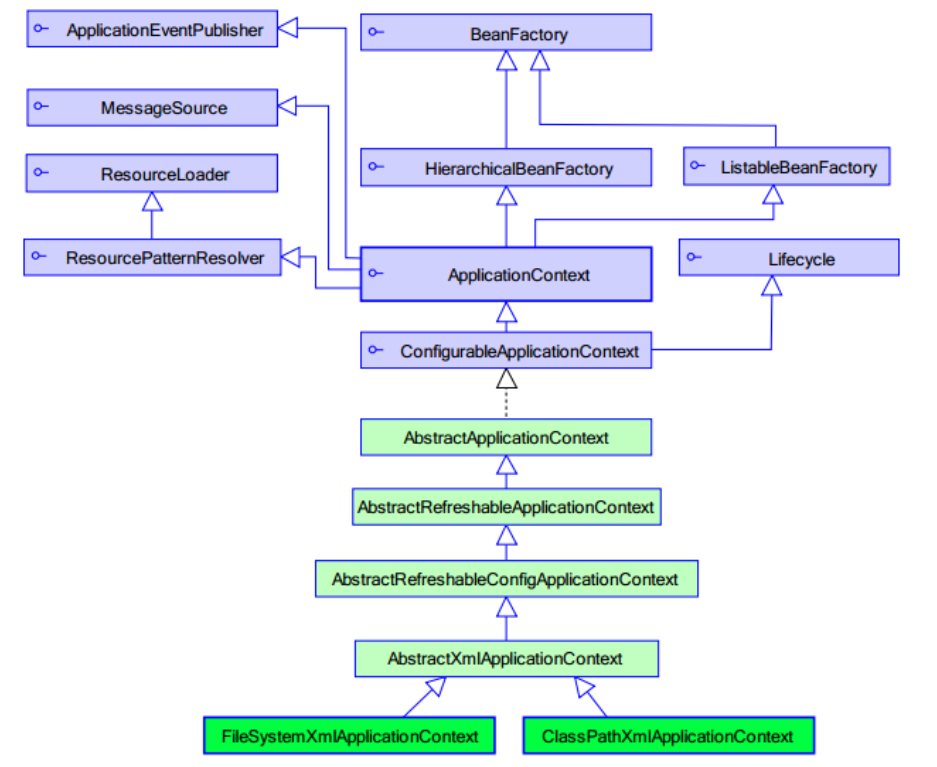
下面为ApplicationContext加载配置文件的两个子类:


 new ClassPathXmlApplicationContext("applicationContext.xml");加载classpath下面配置文件。
 new FileSystemXmlApplicationContext("applicationContext.xml");加载磁盘下配置文件。
1.2 IOC实例;前提,导入相关jar包。接口:HelloService.java
public interface HelloService {
    public void sayHello();
}
接口实现类:HelloServiceImpl.java
public class HelloServiceImpl implements HelloService {
    private String info;

    public void setInfo(String info) {
        this.info = info;
    }

    public void sayHello() {
        System.out.println("Hello Spring..."+info);
    }

}
配置文件:applicationContext.xml
<?xml version="1.0" encoding="UTF-8"?>
<beans xmlns="http://www.springframework.org/schema/beans"
       xmlns:p="http://www.springframework.org/schema/p"
       xmlns:xsi="http://www.w3.org/2001/XMLSchema-instance"
       xsi:schemaLocation="
http://www.springframework.org/schema/beans http://www.springframework.org/schema/beans/spring-beans.xsd">

    <!-- 通过一个<bean>标签设置类的信息,通过id属性为类起个标识. -->
    <bean id="userService" class="cn.itcast.spring3.demo1.HelloServiceImpl">
        <!-- 使用<property>标签注入属性 -->
        <property name="info" value="传智播客"/>
    </bean>

</beans>
测试: SpringTest1.java
public class SpringTest1 {

    @Test
    // 传统方式
    public void demo1() {
        // 造成程序紧密耦合.
        HelloService helloService = new HelloServiceImpl();
        helloService.sayHello();
    }

    @Test
    // Spring开发
    public void demo2() {
        // 创建一个工厂类.
        ApplicationContext applicationContext = new ClassPathXmlApplicationContext(
                "applicationContext.xml");
        HelloService helloService = (HelloService) applicationContext
                .getBean("userService");
        helloService.sayHello();
    }

    @Test
    // 加载磁盘路径下的配置文件:
    public void demo3() {
        ApplicationContext applicationContext = new FileSystemXmlApplicationContext(
                "applicationContext.xml");
        HelloService helloService = (HelloService) applicationContext
                .getBean("userService");
        helloService.sayHello();
    }

    @Test
    public void demo4(){
        // ClassPathResource  FileSystemResource
        BeanFactory beanFactory = new XmlBeanFactory(new FileSystemResource("applicationContext.xml"));
        HelloService helloService = (HelloService) beanFactory.getBean("userService");
        helloService.sayHello();
    }
}
1.3 IOC装配Bean
1- Spring提供三种装配Bean的方法:构造方法实例化(默认无参数)、静态工厂实例化、实例工厂实例化
<!-- 默认情况下使用的就是无参数的构造方法. -->
<bean id="bean1" class="cn.itcast.spring3.demo2.Bean1"></bean>
<!-- 第二种使用静态工厂实例化 -->
<bean id="bean2" class="cn.itcast.spring3.demo2.Bean2Factory" factory-method="getBean2"></bean>
<!-- 第三种使用实例工厂实例化 -->
    <bean id="bean3" factory-bean="bean3Factory" factory-method="getBean3"></bean>
    <bean id="bean3Factory" class="cn.itcast.spring3.demo2.Bean3Factory"/>
2- Bean的配置
1- id和name的区别:
id遵守XML约束的id的约束.id约束保证这个属性的值是唯一的,而且必须以字母开始,可以使用字母、数字、连字符、下划线、句话、冒号
name没有这些要求
***** 如果bean标签上没有配置id,那么name可以作为id.
***** 开发中Spring和Struts1整合的时候, /login.
<bean name=”/login” class=””>
现在的开发中都使用id属性即可.

2-类的作用范围:
scope属性 :
* singleton        :单例的.(默认的值.)
* prototype        :多例的.
* request        :web开发中.创建了一个对象,将这个对象存入request范围,request.setAttribute();
* session        :web开发中.创建了一个对象,将这个对象存入session范围,session.setAttribute();
* globalSession    :一般用于Porlet应用环境.指的是分布式开发.不是porlet环境,globalSession等同于session;
实际开发中主要使用singleton,prototype

3-Bean的生命周期:
配置Bean的初始化和销毁的方法:
配置初始化和销毁的方法:
* init-method=”setup”
* destroy-method=”teardown”
执行销毁的时候,必须手动关闭工厂,而且只对scope=”singleton”有效.

Bean的生命周期的11个步骤:
1.instantiate bean对象实例化
2.populate properties 封装属性
3.如果Bean实现BeanNameAware 执行 setBeanName
4.如果Bean实现BeanFactoryAware 或者 ApplicationContextAware 设置工厂 setBeanFactory 或者上下文对象 setApplicationContext
5.如果存在类实现 BeanPostProcessor(后处理Bean) ,执行postProcessBeforeInitialization
6.如果Bean实现InitializingBean 执行 afterPropertiesSet
7.调用<bean init-method="init"> 指定初始化方法 init
8.如果存在类实现 BeanPostProcessor(处理Bean) ,执行postProcessAfterInitialization
9.执行业务处理
10.如果Bean实现 DisposableBean 执行 destroy
11.调用<bean destroy-method="customerDestroy"> 指定销毁方法 customerDestroy
在CustomerService类的add方法之前进行权限校验?
Spring生命周期 示例:接口CustomerService.java
public interface CustomerService {
    public void add();
    public void find();
}
CustomerServiceImpl.java
import org.springframework.beans.BeansException;
import org.springframework.beans.factory.BeanNameAware;
import org.springframework.beans.factory.DisposableBean;
import org.springframework.beans.factory.InitializingBean;
import org.springframework.context.ApplicationContext;
import org.springframework.context.ApplicationContextAware;

public class CustomerServiceImpl implements CustomerService, BeanNameAware,ApplicationContextAware,InitializingBean,DisposableBean   {
    private String name;

    public void setName(String name) {
        System.out.println("第二步:属性的注入.");
        this.name = name;
    }

    public CustomerServiceImpl() {
        super();
        System.out.println("第一步:实例化类.");
    }

    public void add(){
        System.out.println("添加客户...");
    }

    public void find(){
        System.out.println("查询客户...");
    }

    public void setBeanName(String name) {
        System.out.println("第三步:注入配置的类的名称"+name);
    }

    public void setApplicationContext(ApplicationContext applicationContext)
            throws BeansException {
        System.out.println("第四步:注入applicationContext"+applicationContext);
    }

    public void afterPropertiesSet() throws Exception {
        System.out.println("第六步:属性设置后执行...");
    }

    public void setup(){
        System.out.println("第七步:调用手动设置的初始化方法...");
    }

    public void destroy() throws Exception {
        System.out.println("第十步:调用销毁的方法...");
    }

    public void teardown(){
        System.out.println("第十一步:调用手动销毁方法...");
    }
}
MyBeanPostProcessor.java
import java.lang.reflect.InvocationHandler;
import java.lang.reflect.Method;
import java.lang.reflect.Proxy;
import org.springframework.beans.BeansException;
import org.springframework.beans.factory.config.BeanPostProcessor;

public class MyBeanPostProcessor implements BeanPostProcessor{
    /**
     * bean:实例对象
     * beanName:在配置文件中配置的类的标识.
     */
    public Object postProcessBeforeInitialization(Object bean, String beanName)
            throws BeansException {
        System.out.println("第五步:初始化之前执行...");
        return bean;
    }

    public Object postProcessAfterInitialization(final Object bean, String beanName)
            throws BeansException {
        System.out.println("第八步:初始化后执行...");
        // 动态代理:
        if(beanName.equals("customerService")){
            Object proxy = Proxy.newProxyInstance(bean.getClass().getClassLoader(), bean.getClass().getInterfaces() , new InvocationHandler() {
                // 调用目标方法的时候,调用invoke方法.
                public Object invoke(Object proxy, Method method, Object[] args)
                        throws Throwable {
                    if("add".equals(method.getName())){
                        System.out.println("权限校验...");
                        Object result = method.invoke(bean, args);
                        //System.out.println(System.currentTimeMillis());
                        return result;
                    }
                    return method.invoke(bean, args);
                }
            });
            return proxy;
        }
        return bean;
    }

}
配置文件:applicationContext.xml
<?xml version="1.0" encoding="UTF-8"?>
<beans xmlns="http://www.springframework.org/schema/beans"
       xmlns:p="http://www.springframework.org/schema/p"
       xmlns:xsi="http://www.w3.org/2001/XMLSchema-instance"
       xsi:schemaLocation="
http://www.springframework.org/schema/beans http://www.springframework.org/schema/beans/spring-beans.xsd">

<bean id="customerService" class="cn.itcast.spring3.demo4.CustomerServiceImpl" init-method="setup" destroy-method="teardown">
        <property name="name" value="itcast"></property>
    </bean>

    <bean class="cn.itcast.spring3.demo4.MyBeanPostProcessor"></bean>

</beans>
测试SpringTest4.java
import org.junit.Test;
import org.springframework.context.support.ClassPathXmlApplicationContext;

public class SpringTest4 {

    @Test
    // Bean完整的生命周期
    public void demo1() {
        ClassPathXmlApplicationContext applicationContext = new ClassPathXmlApplicationContext(
                "applicationContext.xml");

        CustomerService customerService = (CustomerService) applicationContext.getBean("customerService");
        customerService.add();
        customerService.find();

        applicationContext.close();
    }
}
结果示例: 
3- Bean属性注入

使用配置文件注入:
1-Bean中属性注入:Spring支持构造方法注入和setter方法注入:
 * 构造器注入:
<bean id="car" class="cn.itcast.spring3.demo5.Car">
        <!-- <constructor-arg name="name" value="宝马"/>
        <constructor-arg name="price" value="1000000"/> -->
        <constructor-arg index="0" type="java.lang.String" value="奔驰"/>
        <constructor-arg index="1" type="java.lang.Double" value="2000000"/>
</bean>
 * setter方法注入:
<bean id="car2" class="cn.itcast.spring3.demo5.Car2">
<!-- <property>标签中name就是属性名称,value是普通属性的值,ref:引用其他的对象 -->
        <property name="name" value="保时捷"/>
        <property name="price" value="5000000"/>
</bean>

 * setter方法注入对象属性:<property name="car2" ref="car2"/>

 * 名称空间p:注入属性:
 Spring2.5版本引入了名称空间p. p:<属性名>="xxx" 引入常量值
 p:<属性名>-ref="xxx" 引用其它Bean对象.引入名称空间:
<beans xmlns="http://www.springframework.org/schema/beans"
       xmlns:p="http://www.springframework.org/schema/p"
       xmlns:xsi="http://www.w3.org/2001/XMLSchema-instance"
       xsi:schemaLocation="
http://www.springframework.org/schema/beans http://www.springframework.org/schema/beans/spring-beans.xsd">

<bean id="car2" class="cn.itcast.spring3.demo5.Car2" p:name="宝马" p:price="400000"/>
<bean id="person" class="cn.itcast.spring3.demo5.Person" p:name="童童" p:car2-ref="car2"/>

 * SpEL:属性的注入:
 Spring3.0提供注入属性方式:语法:#{表达式}<bean id="" value="#{表达式}">

    <bean id="car2" class="cn.itcast.spring3.demo5.Car2">
        <property name="name" value="#{'大众'}"></property>
        <property name="price" value="#{'120000'}"></property>
    </bean>
    <bean id="person" class="cn.itcast.spring3.demo5.Person">
        <!--<property name="name" value="#{personInfo.name}"/>-->
     <property name="name" value="#{personInfo.showName()}"/>
        <property name="car2" value="#{car2}"/>
    </bean>
   <bean id="personInfo" class="cn.itcast.spring3.demo5.PersonInfo">
        <property name="name" value="张三"/>
   </bean>

2-集合属性的注入:

    <bean id="collectionBean" class="cn.itcast.spring3.demo6.CollectionBean">
        <!-- 注入List集合 -->
        <property name="list">
            <list>
                <value>童童</value>
                <value>小凤</value>
            </list>
        </property>

        <!-- 注入set集合 -->
        <property name="set">
            <set>
                <value>杜宏</value>
                <value>如花</value>
            </set>
        </property>

        <!-- 注入map集合 -->
        <property name="map">
            <map>
                <entry key="刚刚" value="111"/>
                <entry key="娇娇" value="333"/>
            </map>
        </property>

        <property name="properties">
            <props>
                <prop key="username">root</prop>
                <prop key="password">123</prop>
            </props>
        </property>
    </bean>
4-加载配置文件
第一种写法:ApplicationContext applicationContext = new ClassPathXmlApplicationContext("bean1.xml",”bean2.xml”);
第二种方法:    <import resource="applicationContext2.xml"/>
5- 使用注解装配Bean spring使用JavaConfig进行配置
pring的注解装配Bean:

Spring2.5 引入使用注解去定义Bean;@Component  描述Spring框架中Bean
Spring的框架中提供了与@Component注解等效的三个注解:
@Repository 用于对DAO实现类进行标注
@Service 用于对Service实现类进行标注
@Controller 用于对Controller实现类进行标注
***** 三个注解为了后续版本进行增强的.

Bean的属性注入:

普通属性;
@Value(value="itcast")
private String info;
对象属性:
@Autowired:自动装配默认使用类型注入.
@Autowired
@Qualifier("userDao")        --- 按名称进行注入.
@Autowired
@Qualifier("userDao")
private UserDao userDao;
等价于
@Resource(name="userDao")
private UserDao userDao;

Bean其他的属性的配置

配置Bean初始化方法和销毁方法:
* init-method 和 destroy-method.
@PostConstruct 初始化
@PreDestroy  销毁

配置Bean的作用范围: @Scope

Spring3.0提供使用Java类定义Bean信息的方法

@Configuration
public class BeanConfig {

    @Bean(name="car")
    public Car showCar(){
        Car car = new Car();
        car.setName("长安");
        car.setPrice(40000d);
        return car;
    }

    @Bean(name="product")
    public Product initProduct(){
        Product product = new Product();
        product.setName("空调");
        product.setPrice(3000d);
        return product;
    }
}


两种方式结合;一般使用XML注册Bean,使用注解进行属性的注入.
6- Spring整合Servlet
正常整合Servlet和Spring没有问题的但是每次执行Servlet的时候加载Spring配置,加载Spring环境.
* 解决办法:在Servlet的init方法中加载Spring配置文件?
* 当前这个Servlet可以使用,但是其他的Servlet的用不了了!!!
* 将加载的信息内容放到ServletContext中.ServletContext对象时全局的对象.服务器启动的时候创建的.在创建ServletContext的时候就加载Spring的环境.
* ServletContextListener:用于监听ServletContext对象的创建和销毁的.

导入;spring-web-3.2.0.RELEASE.jar
在web.xml中配置:
 <listener>
     <listener-class>org.springframework.web.context.ContextLoaderListener</listener-class>
 </listener>

 <context-param>
     <param-name>contextConfigLocation</param-name>
     <param-value>classpath:applicationContext.xml</param-value>
 </context-param>
修改程序的代码:
WebApplicationContext applicationContext = WebApplicationContextUtils.getWebApplicationContext(getServletContext());
WebApplicationContext applicationContext = (WebApplicationContext) getServletContext().getAttribute(WebApplicationContext.ROOT_WEB_APPLICATION_CONTEXT_ATTRIBUTE);
二、核心部分之AOP
1.1 相关概念
AOP Aspect Oriented Programing 面向切面编程; AOP采取横向抽取机制,取代了传统纵向继承体系重复性代码(性能监视、事务管理、安全检查、缓存); Spring AOP使用纯Java实现,不需要专门的编译过程和类加载器,在运行期通过代理方式向目标类织入增强代码; AspecJ是一个基于Java语言的AOP框架,Spring2.0开始,Spring AOP引入对Aspect的支持,AspectJ扩展了Java语言,提供了一个专门的编译器,在编译时提供横向代码的织入。

AOP底层原理:就是代理机制; 动态代理:(JDK中使用); JDK的动态代理对实现了接口的类生成代理。 Spring的AOP代理:JDK动态代理:对实现了接口的类生成代理;CGLib代理机制:对类生成代理。Spring框架,如果类实现了接口,就使用JDK的动态代理生成代理对象,如果这个类没有实现任何接口,使用CGLIB生成代理对象。
JDK动态代理:
public class JDKProxy implements InvocationHandler{
    private UserDao userDao;

    public JDKProxy(UserDao userDao) {
        super();
        this.userDao = userDao;
    }

    public UserDao createProxy() {
        UserDao proxy = (UserDao) Proxy.newProxyInstance(userDao.getClass()
                .getClassLoader(), userDao.getClass().getInterfaces(), this);
        return proxy;
    }

    // 调用目标对象的任何一个方法 都相当于调用invoke();
    public Object invoke(Object proxy, Method method, Object[] args)
            throws Throwable {
        if("add".equals(method.getName())){
            // 记录日志:
            System.out.println("日志记录=================");
            Object result = method.invoke(userDao, args);
            return result;
        }
        return method.invoke(userDao, args);
    }
}
CGLIB代理:
CGLIB(Code Generation Library)是一个开源项目!是一个强大的,高性能,高质量的Code生成类库,它可以在运行期扩展Java类与实现Java接口。 Hibernate支持它来实现PO(Persistent Object 持久化对象)字节码的动态生成Hibernate生成持久化类的javassist.
CGLIB生成代理机制:其实生成了一个真实对象的子类.

下载cglib的jar包.
* 现在做cglib的开发,可以不用直接引入cglib的包.已经在spring的核心中集成cglib.

public class CGLibProxy implements MethodInterceptor{
    private ProductDao productDao;

    public CGLibProxy(ProductDao productDao) {
        super();
        this.productDao = productDao;
    }

    public ProductDao createProxy(){
        // 使用CGLIB生成代理:
        // 1.创建核心类:
        Enhancer enhancer = new Enhancer();
        // 2.为其设置父类:
        enhancer.setSuperclass(productDao.getClass());
        // 3.设置回调:
        enhancer.setCallback(this);
        // 4.创建代理:
        return (ProductDao) enhancer.create();
    }


    public Object intercept(Object proxy, Method method, Object[] args,
            MethodProxy methodProxy) throws Throwable {
        if("add".equals(method.getName())){
            System.out.println("日志记录==============");
            Object obj = methodProxy.invokeSuper(proxy, args);
            return obj;
        }
        return methodProxy.invokeSuper(proxy, args);
    }
}
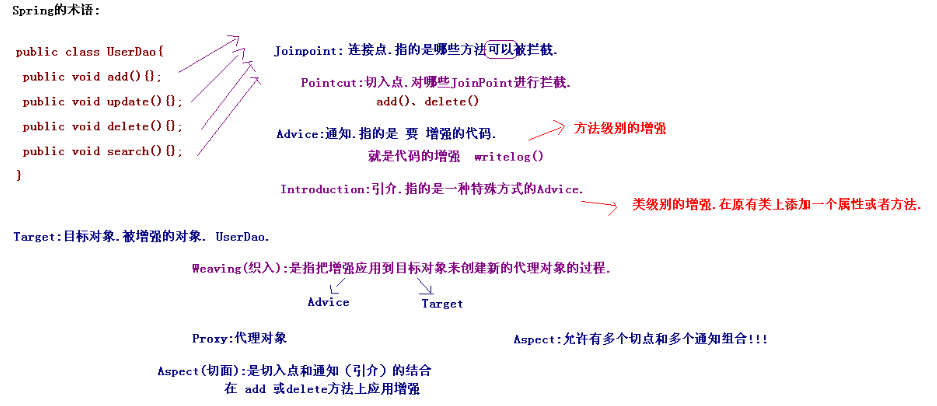
下面打个比方来记忆AOP中的术语:铠甲勇士,有4个人(均可变身,称为Joinpoint:连接点),现在有张三和李四(Target,目标对象)选择对手臂(Pointcut,切入点)变身;;他俩拿着变身器(其实就是代理机制)变身,张三和李四都变成了手臂有盔甲,盔甲就是(Advice,通知);此时,他俩的手臂(Pointcut)+盔甲(Advice)=切面(Aspect)是个组合;其中在给手臂增加盔甲的过程,就是变身也叫织入(Weaving);如果变身改变了他俩的本身属性的话就称做引介(Introduct),比如变成了三头六臂;变身后的他俩就改了一个高逼格的名字叫铠甲勇士(Proxy,代理对象);
1.2 Spring中的AOP
1- Spring的传统AOP:
AOP:不是由Spring定义.AOP联盟的组织定义.
Spring中的通知:(增强代码)
前置通知 org.springframework.aop.MethodBeforeAdvice
* 在目标方法执行前实施增强
后置通知 org.springframework.aop.AfterReturningAdvice
* 在目标方法执行后实施增强
环绕通知 org.aopalliance.intercept.MethodInterceptor
* 在目标方法执行前后实施增强
异常抛出通知 org.springframework.aop.ThrowsAdvice
* 在方法抛出异常后实施增强
引介通知 org.springframework.aop.IntroductionInterceptor(课程不讲.)
* 在目标类中添加一些新的方法和属性

Spring中的切面类型:
Advisor : Spring中传统切面.
* Advisor:都是有一个切点和一个通知组合.
* Aspect:多个切点和多个通知组合.
Advisor : 代表一般切面,Advice本身就是一个切面,对目标类所有方法进行拦截(* 不带有切点的切面.针对所有方法进行拦截)
PointcutAdvisor : 代表具有切点的切面,可以指定拦截目标类哪些方法(带有切点的切面,针对某个方法进行拦截)
IntroductionAdvisor : 代表引介切面,针对引介通知而使用切面(不要求掌握)
1.1 针对所有方法的增强:(不带有切点的切面)
第一步:导入相应jar包.

* spring-aop-3.2.0.RELEASE.jar

* com.springsource.org.aopalliance-1.0.0.jar

第二步:编写被代理对象:

* CustomerDao接口

* CustoemrDaoImpl实现类

第三步:编写增强的代码:

public class MyBeforeAdvice implements MethodBeforeAdvice{

/**

 * method:执行的方法

 * args:参数

 * target:目标对象

 */

public void before(Method method, Object[] args, Object target)

         throws Throwable {

     System.out.println("前置增强...");

}

}

第四步:生成代理:(配置生成代理:)

* 生成代理Spring基于ProxyFactoryBean类.底层自动选择使用JDK的动态代理还是CGLIB的代理.

* 属性:

target : 代理的目标对象

proxyInterfaces : 代理要实现的接口

如果多个接口可以使用以下格式赋值

<list>

    <value></value>

    ....

</list>

proxyTargetClass : 是否对类代理而不是接口,设置为true时,使用CGLib代理

interceptorNames : 需要织入目标的Advice

singleton : 返回代理是否为单实例,默认为单例

optimize : 当设置为true时,强制使用CGLib


<!-- 定义目标对象 -->

<bean id="customerDao" class="cn.itcast.spring3.demo3.CustomerDaoImpl"></bean>


<!-- 定义增强 -->

<bean id="beforeAdvice" class="cn.itcast.spring3.demo3.MyBeforeAdvice"></bean>


<!-- Spring支持配置生成代理: -->

<bean id="customerDaoProxy" class="org.springframework.aop.framework.ProxyFactoryBean">

     <!-- 设置目标对象 -->

     <property name="target" ref="customerDao"/>

     <!-- 设置实现的接口 ,value中写接口的全路径 -->

     <property name="proxyInterfaces" value="cn.itcast.spring3.demo3.CustomerDao"/>

     <!-- 需要使用value:要的名称 -->

     <property name="interceptorNames" value="beforeAdvice"/>

</bean>


***** 注入的时候要注入代理对象:

@Autowired

// @Qualifier("customerDao")// 注入是真实的对象,必须注入代理对象.

@Qualifier("customerDaoProxy")

private CustomerDao customerDao;
1.2 带有切点的切面:(针对目标对象的某些方法进行增强)
PointcutAdvisor 接口:

DefaultPointcutAdvisor 最常用的切面类型,它可以通过任意Pointcut和Advice 组合定义切面

RegexpMethodPointcutAdvisor 构造正则表达式切点切面


第一步:创建被代理对象.

* OrderDao

第二步:编写增强的类:

public class MyAroundAdvice implements MethodInterceptor{
public Object invoke(MethodInvocation methodInvocation) throws Throwable {

    System.out.println("环绕前增强...");

     Object result = methodInvocation.proceed();// 执行目标对象的方法

     System.out.println("环绕后增强...");

     return result;

}


}


第三步:生成代理:

<!-- 带有切点的切面 -->

<!-- 定义目标对象 -->

<bean id="orderDao" class="cn.itcast.spring3.demo4.OrderDao"></bean>

 <!-- 定义增强 -->

<bean id="aroundAdvice" class="cn.itcast.spring3.demo4.MyAroundAdvice"></bean>


<!-- 定义切点切面: -->

<bean id="myPointcutAdvisor" class="org.springframework.aop.support.RegexpMethodPointcutAdvisor">

     <!-- 定义表达式,规定哪些方法执行拦截 -->

     <!-- . 任意字符  * 任意个 -->

     <!-- <property name="pattern" value=".*"/> -->

     <!-- <property name="pattern" value="cn\.itcast\.spring3\.demo4\.OrderDao\.add.*"/> -->

     <!-- <property name="pattern" value=".*add.*"></property> -->

     <property name="patterns" value=".*add.*,.*find.*"></property>

     <!-- 应用增强 -->

     <property name="advice" ref="aroundAdvice"/>

</bean>


<!-- 定义生成代理对象 -->

<bean id="orderDaoProxy" class="org.springframework.aop.framework.ProxyFactoryBean">

     <!-- 配置目标 -->

     <property name="target" ref="orderDao"></property>

     <!-- 针对类的代理 -->

     <property name="proxyTargetClass" value="true"></property>

     <!-- 在目标上应用增强 -->

     <property name="interceptorNames" value="myPointcutAdvisor"></property>

</bean>
1.3 自动代理
前面的案例中,每个代理都是通过ProxyFactoryBean织入切面代理,在实际开发中,非常多的Bean每个都配置ProxyFactoryBean开发维护量巨大; 自动创建代理(基于后处理Bean。在Bean创建的过程中完成的增强;生成Bean就是代理)。
1- BeanNameAutoProxyCreator 根据Bean名称创建代理
<!-- 定义目标对象 -->
    <bean id="customerDao" class="cn.itcast.spring3.demo3.CustomerDaoImpl"></bean>
    <bean id="orderDao" class="cn.itcast.spring3.demo4.OrderDao"></bean>

    <!-- 定义增强 -->
    <bean id="beforeAdvice" class="cn.itcast.spring3.demo3.MyBeforeAdvice"></bean>
    <bean id="aroundAdvice" class="cn.itcast.spring3.demo4.MyAroundAdvice"></bean>

    <!-- 自动代理:按名称的代理 基于后处理Bean,后处理Bean不需要配置ID-->
    <bean class="org.springframework.aop.framework.autoproxy.BeanNameAutoProxyCreator">
        <property name="beanNames" value="*Dao"/>
        <property name="interceptorNames" value="beforeAdvice"/>
    </bean>
2- DefaultAdvisorAutoProxyCreator 根据Advisor本身包含信息创建代理
    <!-- 定义目标对象 -->
    <bean id="customerDao" class="cn.itcast.spring3.demo3.CustomerDaoImpl"></bean>
    <bean id="orderDao" class="cn.itcast.spring3.demo4.OrderDao"></bean>

    <!-- 定义增强 -->
    <bean id="beforeAdvice" class="cn.itcast.spring3.demo3.MyBeforeAdvice"></bean>
    <bean id="aroundAdvice" class="cn.itcast.spring3.demo4.MyAroundAdvice"></bean>

    <!-- 定义一个带有切点的切面 -->
    <bean id="myPointcutAdvisor" class="org.springframework.aop.support.RegexpMethodPointcutAdvisor">
        <property name="pattern" value=".*add.*"/>
        <property name="advice" ref="aroundAdvice"/>
    </bean>

    <!-- 自动生成代理 -->
    <bean class="org.springframework.aop.framework.autoproxy.DefaultAdvisorAutoProxyCreator"></bean>

区分基于ProxyFattoryBean的代理与自动代理区别?
***** ProxyFactoryBean:先有被代理对象,将被代理对象传入到代理类中生成代理.
   自动代理基于后处理Bean.在Bean的生成过程中,就产生了代理对象,把代理对象返回.生成Bean已经是代理对象.
3- AnnotationAwareAspectJAutoProxyCreator 基于Bean中的AspectJ 注解进行自动代理
2- Spring的AspectJ的AOP https://blog.csdn.net/weixin_43468667/article/details/88831441
AspectJ是一个面向切面的框架,它扩展了Java语言。AspectJ定义了AOP语法所以它有一个专门的编译器用来生成遵守Java字节编码规范的Class文件。
AspectJ是一个基于Java语言的AOP框架
Spring2.0以后新增了对AspectJ切点表达式支持
@AspectJ 是AspectJ1.5新增功能,通过JDK5注解技术,允许直接在Bean类中定义切面
新版本Spring框架,建议使用AspectJ方式来开发AOP

AspectJ表达式:
* 语法:execution(表达式)
execution(<访问修饰符>?<返回类型><方法名>(<参数>)<异常>)

* execution(“* cn.itcast.spring3.demo1.dao.*(..)”)        ---只检索当前包
* execution(“* cn.itcast.spring3.demo1.dao..*(..)”)        ---检索包及当前包的子包.
* execution(* cn.itcast.dao.GenericDAO+.*(..))            ---检索GenericDAO及子类

AspectJ的通知类型:
@Before 前置通知,相当于BeforeAdvice
* 就在方法之前执行.没有办法阻止目标方法执行的.
@AfterReturning 后置通知,相当于AfterReturningAdvice
* 后置通知,获得方法返回值.
@Around 环绕通知,相当于MethodInterceptor
* 在可以方法之前和之后来执行的,而且可以阻止目标方法的执行.
@AfterThrowing抛出通知,相当于ThrowAdvice
@After 最终final通知,不管是否异常,该通知都会执行
@DeclareParents 引介通知,相当于IntroductionInterceptor (不要求掌握)

切点的定义:
@Pointcut("execution(* cn.itcast.spring3.demo1.UserDao.find(..))")
    private void myPointcut(){}

面试:
* Advisor和Aspect的区别?
* Advisor:Spring传统意义上的切面:支持一个切点和一个通知的组合.
* Aspect:可以支持多个切点和多个通知的组合.
2.1 基于注解
第一步:引入相应jar包.
* aspectj依赖aop环境.
* spring-aspects-3.2.0.RELEASE.jar
* com.springsource.org.aspectj.weaver-1.6.8.RELEASE.jar

第二步:编写被增强的类:
* UserDao

第三步:使用AspectJ注解形式:
@Aspect
public class MyAspect {

    @Before("execution(* cn.itcast.spring3.demo1.UserDao.add(..))")
    public void before(){
        System.out.println("前置增强....");
    }

}

第四步:创建applicationContext.xml
* 引入aop的约束:
* <aop:aspectj-autoproxy /> --- 自动生成代理:
* 底层就是AnnotationAwareAspectJAutoProxyCreator

    <aop:aspectj-autoproxy />
    <bean id="userDao" class="cn.itcast.spring3.demo1.UserDao"></bean>
    <bean id="myAspect" class="cn.itcast.spring3.demo1.MyAspect"></bean>
2.2 基于XML
第一步:编写被增强的类:
* ProductDao

第二步:定义切面

第三步:配置applicationContext.xmll

前置通知:
* 代码:
    public void before(){
        System.out.println("前置通知...");
    }

* 配置:
<aop:config>
        <!-- 定义切点: -->
        <aop:pointcut expression="execution(* cn.itcast.spring3.demo2.ProductDao.add(..))" id="mypointcut"/>
        <aop:aspect ref="myAspectXML">
            <!-- 前置通知 -->
            <aop:before method="before" pointcut-ref="mypointcut"/>
        </aop:aspect>
    </aop:config>

后置通知:
* 代码:
    public void afterReturing(Object returnVal){
        System.out.println("后置通知...返回值:"+returnVal);
    }

* 配置:
    <aop:config>
        <!-- 定义切点: -->
        <aop:pointcut expression="execution(* cn.itcast.spring3.demo2.ProductDao.add(..))" id="mypointcut"/>
        <aop:aspect ref="myAspectXML">
            <!-- 后置通知 -->
            <aop:after-returning method="afterReturing" pointcut-ref="mypointcut" returning="returnVal"/>
        </aop:aspect>
    </aop:config>

环绕通知:
* 代码:
    public Object around(ProceedingJoinPoint proceedingJoinPoint) throws Throwable{
        System.out.println("环绕前增强....");
        Object result = proceedingJoinPoint.proceed();
        System.out.println("环绕后增强....");
        return result;
    }

* 配置:
    <aop:config>
        <!-- 定义切点: -->
        <aop:pointcut expression="execution(* cn.itcast.spring3.demo2.ProductDao.add(..))" id="mypointcut"/>
        <aop:aspect ref="myAspectXML">
            <!-- 前置通知 -->
            <!-- <aop:before method="before" pointcut-ref="mypointcut"/> -->
            <!-- 后置通知 -->
            <!-- <aop:after-returning method="afterReturing" pointcut-ref="mypointcut" returning="returnVal"/> -->
            <!-- 环绕通知 -->
            <aop:around method="around" pointcut-ref="mypointcut"/>
        </aop:aspect>
    </aop:config>

异常通知:
* 代码;
    public void afterThrowing(Throwable e){
        System.out.println("异常通知..."+e.getMessage());
    }

* 配置;
    <aop:config>
        <!-- 定义切点: -->
        <aop:pointcut expression="execution(* cn.itcast.spring3.demo2.ProductDao.add(..))" id="mypointcut"/>
        <aop:aspect ref="myAspectXML">
            <!-- 异常通知 -->
            <aop:after-throwing method="afterThrowing" pointcut-ref="mypointcut" throwing="e"/>
        </aop:aspect>
    </aop:config>

最终通知:
* 代码:
    public void after(){
        System.out.println("最终通知....");
    }

* 配置:
    <aop:config>
        <!-- 定义切点: -->
        <aop:pointcut expression="execution(* cn.itcast.spring3.demo2.ProductDao.add(..))" id="mypointcut"/>
        <aop:aspect ref="myAspectXML">
            <!-- 最终通知 -->
            <aop:after method="after" pointcut-ref="mypointcut"/>
        </aop:aspect>
    </aop:config>
三、核心部分之数据访问
JdbcTemplate模板与DbUtils工具类比较类似。Spring对持久层技术支持:
JDBC:org.springframework.jdbc.core.JdbcTemplate

     Hibernate3.0:org.springframework.orm.hibernate3.HibernateTemplate

    IBatis(MyBatis):org.springframework.orm.ibatis.SqlMapClientTemplate

    JPA:org.springframework.orm.jpa.JpaTemplate
1、JDBCTemplate
1.1 配置连接池
1-Spring默认的连接池:
    <!-- 配置Spring默认的连接池 -->
    <bean id="dataSource" class="org.springframework.jdbc.datasource.DriverManagerDataSource">
        <property name="driverClassName" value="com.mysql.jdbc.Driver"/>
        <property name="url" value="jdbc:mysql:///spring3_day02"/>
        <property name="username" value="root"/>
        <property name="password" value="123"/>
    </bean>

2-DBCP连接池:
导入jar包:
* com.springsource.org.apache.commons.dbcp-1.2.2.osgi.jar
* com.springsource.org.apache.commons.pool-1.5.3.jar

    <!-- 配置DBCP连接池 -->
    <bean id="dataSource" class="org.apache.commons.dbcp.BasicDataSource">
        <property name="driverClassName" value="com.mysql.jdbc.Driver"/>
        <property name="url" value="jdbc:mysql:///spring3_day02"/>
        <property name="username" value="root"/>
        <property name="password" value="123"/>
    </bean>

3- C3P0连接池:
导入jar包:
* com.springsource.com.mchange.v2.c3p0-0.9.1.2.jar
    <!-- 配置c3p0连接池 -->
    <bean id="dataSource" class="com.mchange.v2.c3p0.ComboPooledDataSource">
        <property name="driverClass" value="com.mysql.jdbc.Driver"/>
        <property name="jdbcUrl" value="jdbc:mysql:///spring3_day02"/>
        <property name="user" value="root"/>
        <property name="password" value="123"/>
    </bean>


参数设置到属性文件中

 在src下创建jdbc.properties
jdbc.driver = com.mysql.jdbc.Driver
jdbc.url = jdbc:mysql:///spring3_day02
jdbc.user = root
jdbc.password = 123

需要在applicationContext.xml 中使用属性文件配置的内容.
* 第一种写法:
<bean class="org.springframework.beans.factory.config.PropertyPlaceholderConfigurer">
          <property name="location" value="classpath:jdbc.properties"></property>
</bean>

* 第二种写法:
<context:property-placeholder location="classpath:jdbc.properties"/>
1.2 JdbcTemplate的CRUD
Spring框架中提供了对持久层技术支持的类:
JDBC            :    org.springframework.jdbc.core.support.JdbcDaoSupport
Hibernate 3.0    :    org.springframework.orm.hibernate3.support.HibernateDaoSupport
iBatis        :    org.springframework.orm.ibatis.support.SqlMapClientDaoSupport

编写DAO的时候:
Public class UserDao extends JdbcDaoSupport{

}

进行CRUD的操作;
* 保存:update(String sql,Object... args)
* 修改:update(String sql,Object... args)
* 删除:update(String sql,Object... args)

查询:
* 简单查询:
* select count(*) from user;            --- queryForInt(String sql);
* select name from user where id = ?;    --- queryForObject(String sql,Class clazz,Object... args);

* 复杂查询:(返回对象,和对象集合)
* select * from user where id = ?        --- queryForObjectString sql,RowMapper<T> rowMapper,Object... args);
* select * from user;                    --- query(String sql,RowMapper<T> rowMapper,Object... args);
2、Spring事务管理
事务处在Service层.
Spring提供事务管理API:

PlatformTransactionManager:平台事务管理器.
commit(TransactionStatus status)
getTransaction(TransactionDefinition definition)
rollback(TransactionStatus status)


TransactionDefinition:事务定义
ISOLation_XXX:事务隔离级别.
PROPAGATION_XXX:事务的传播行为.(不是JDBC中有的,为了解决实际开发问题.)
过期时间:
TransactionStatus:事务状态
是否有保存点
是否一个新的事务
事务是否已经提交

关系:PlatformTransactionManager通过TransactionDefinition设置事务相关信息管理事务,管理事务过程中,产生一些事务状态:状态由TransactionStatus记录.

API详解:
PlatformTransactionManager:接口.
Spring为不同的持久化框架提供了不同PlatformTransactionManager接口实现

org.springframework.jdbc.datasource.DataSourceTransactionManager    :
使用Spring JDBC或iBatis 进行持久化数据时使用
org.springframework.orm.hibernate3.HibernateTransactionManager:
使用Hibernate3.0版本进行持久化数据时使用
org.springframework.orm.jpa.JpaTransactionManager:使用JPA进行持久化时使用
org.springframework.jdo.JdoTransactionManager:当持久化机制是Jdo时使用
org.springframework.transaction.jta.JtaTransactionManager:使用一个JTA实现来管理事务,在一个事务跨越多个资源时必须使用
TransactionDefinition:
* ISOLATION_DEFAULT:默认级别.
Mysql  repeatable_read        oracle read_commited
ISOLATION_READ_UNCOMMITTED
ISOLATION_READ_COMMITTED
ISOLATION_REPEATABLE_READ
ISOLATION_SERIALIZABLE

* 事务的传播行为:(不是JDBC事务管理,用来解决实际开发的问题.)传播行为:解决业务层之间的调用的事务的关系.
PROPAGATION_REQUIRED        :支持当前事务,如果不存在 就新建一个
* A,B    如果A有事务,B使用A的事务,如果A没有事务,B就开启一个新的事务.(A,B是在一个事务中。)
PROPAGATION_SUPPORTS        :支持当前事务,如果不存在,就不使用事务
* A,B    如果A有事务,B使用A的事务,如果A没有事务,B就不使用事务.
PROPAGATION_MANDATORY    :支持当前事务,如果不存在,抛出异常
* A,B    如果A有事务,B使用A的事务,如果A没有事务,抛出异常.
PROPAGATION_REQUIRES_NEW    如果有事务存在,挂起当前事务,创建一个新的事务
* A,B    如果A有事务,B将A的事务挂起,重新创建一个新的事务.(A,B不在一个事务中.事务互不影响.)
PROPAGATION_NOT_SUPPORTED    以非事务方式运行,如果有事务存在,挂起当前事务
* A,B    非事务的方式运行,A有事务,就会挂起当前的事务.
PROPAGATION_NEVER     以非事务方式运行,如果有事务存在,抛出异常
PROPAGATION_NESTED    如果当前事务存在,则嵌套事务执行
* 基于SavePoint技术.
* A,B    A有事务,A执行之后,将A事务执行之后的内容保存到SavePoint.B事务有异常的话,用户需要自己设置事务提交还是回滚.

* 常用:(重点)
PROPAGATION_REQUIRED
PROPAGATION_REQUIRES_NEW
PROPAGATION_NESTED
Spring的事务管理分成两类: * 编程式事务管理: 手动编写代码完成事务管理; * 声明式事务管理:不需要手动编写代码,配置。事务管理参考
2.1 事务操作的环境搭建
CREATE TABLE `account` (
  `id` int(11) NOT NULL AUTO_INCREMENT,
  `name` varchar(20) NOT NULL,
  `money` double DEFAULT NULL,
  PRIMARY KEY (`id`)
) ENGINE=InnoDB AUTO_INCREMENT=4 DEFAULT CHARSET=utf8;
INSERT INTO `account` VALUES ('1', 'aaa', '1000');
INSERT INTO `account` VALUES ('2', 'bbb', '1000');
INSERT INTO `account` VALUES ('3', 'ccc', '1000');

创建一个web项目:
* 导入相应jar包
* 引入配置文件:
* applicationContext.xml、log4j.properties、jdbc.properties

创建类:
* AccountService
* AccountDao

在Spring中注册:
    <!-- 业务层类 -->
    <bean id="accountService" class="cn.itcast.spring3.demo1.AccountServiceImpl">
        <!-- 在业务层注入Dao -->
        <property name="accountDao" ref="accountDao"/>
    </bean>

    <!-- 持久层类 -->
    <bean id="accountDao" class="cn.itcast.spring3.demo1.AccountDaoImpl">
        <!-- 注入连接池的对象,通过连接池对象创建模板. -->
        <property name="dataSource" ref="dataSource"/>
    </bean>

编写一个测试类:
2.2 编程式事务
需要事务管理器:真正管理事务对象.
* Spring提供了事务管理的模板(工具类.)

第一步:注册事务管理器:
<!-- 配置事务管理器 -->
    <bean id="transactionManager" class="org.springframework.jdbc.datasource.DataSourceTransactionManager">
        <!-- 需要注入连接池,通过连接池获得连接 -->
        <property name="dataSource" ref="dataSource"/>
    </bean>

第二步:注册事务模板类:
    <!-- 事务管理的模板 -->
    <bean id="transactionTemplate" class="org.springframework.transaction.support.TransactionTemplate">
        <property name="transactionManager" ref="transactionManager"/>
    </bean>

第三步:在业务层注入模板类:(模板类管理事务)
    <!-- 业务层类 -->
    <bean id="accountService" class="cn.itcast.spring3.demo1.AccountServiceImpl">
        <!-- 在业务层注入Dao -->
        <property name="accountDao" ref="accountDao"/>
        <!-- 在业务层注入事务的管理模板 -->
        <property name="transactionTemplate" ref="transactionTemplate"/>
    </bean>

第四步:在业务层代码上使用模板:
    public void transfer(final String from, final String to, final Double money) {
        transactionTemplate.execute(new TransactionCallbackWithoutResult() {
            @Override
            protected void doInTransactionWithoutResult(TransactionStatus status) {
                accountDao.out(from, money);
                int d = 1 / 0;
                accountDao.in(to, money);
            }
        });
    }

手动编码方式缺点:
* 代码量增加,代码有侵入性.
2.3 声明式事务-原始方式
基于TransactionProxyFactoryBean.
导入:aop相应jar包.

第一步:注册平台事务管理器:
    <!-- 事务管理器 -->
    <bean id="transactionManager" class="org.springframework.jdbc.datasource.DataSourceTransactionManager">
        <!-- 注入连接池 -->
        <property name="dataSource" ref="dataSource"/>
    </bean>

第二步:创建业务层代理对象:
    <!-- 配置生成代理对象 -->
    <bean id="accountServiceProxy" class="org.springframework.transaction.interceptor.TransactionProxyFactoryBean">
        <!-- 目标对象 -->
        <property name="target" ref="accountService"/>
        <!-- 注入事务管理器 -->
        <property name="transactionManager" ref="transactionManager"/>
        <!-- 事务的属性设置 -->
        <property name="transactionAttributes">
            <props>
                <prop key="transfer">PROPAGATION_REQUIRED</prop>
            </props>
        </property>
    </bean>

第三步:编写测试类:
***** 千万注意:注入代理对象
@Autowired
@Qualifier("accountServiceProxy")
private AccountService accountService;

prop格式:PROPAGATION,ISOLATION,readOnly,-Exception,+Exception
* 顺序:传播行为、隔离级别、事务是否只读、发生哪些异常可以回滚事务(所有的异常都回滚)、发生了哪些异常不回滚.

***** 缺点:就是需要为每一个管理事务的类生成代理.需要为每个类都需要进行配置.
2.4 声明式事务-自动代理
第一步:导入相应jar包.
* aspectj

第二步:引入相应约束:
* aop、tx约束.
<beans xmlns="http://www.springframework.org/schema/beans"
    xmlns:xsi="http://www.w3.org/2001/XMLSchema-instance"
    xmlns:context="http://www.springframework.org/schema/context"
    xmlns:aop="http://www.springframework.org/schema/aop"
    xmlns:tx="http://www.springframework.org/schema/tx"
    xsi:schemaLocation="http://www.springframework.org/schema/beans
    http://www.springframework.org/schema/beans/spring-beans.xsd
    http://www.springframework.org/schema/context
    http://www.springframework.org/schema/context/spring-context.xsd
    http://www.springframework.org/schema/aop
    http://www.springframework.org/schema/aop/spring-aop.xsd
    http://www.springframework.org/schema/tx
    http://www.springframework.org/schema/tx/spring-tx.xsd">

第三步:注册事务管理器;
    <!-- 事务管理器 -->
    <bean id="transactionManager" class="org.springframework.jdbc.datasource.DataSourceTransactionManager">
        <property name="dataSource" ref="dataSource"/>
    </bean>

第四步:定义增强(事务管理)
    <!-- 定义一个增强 -->
    <tx:advice id="txAdvice" transaction-manager="transactionManager">
        <!-- 增强(事务)的属性的配置 -->
        <tx:attributes>
            <!--
                isolation:DEFAULT    :事务的隔离级别.
                propagation            :事务的传播行为.
                read-only            :false.不是只读
                timeout                :-1
                no-rollback-for        :发生哪些异常不回滚
                rollback-for        :发生哪些异常回滚事务
             -->
            <tx:method name="transfer"/>
        </tx:attributes>
    </tx:advice>

第五步:定义aop的配置(切点和通知的组合)
    <!-- aop配置定义切面和切点的信息 -->
    <aop:config>
        <!-- 定义切点:哪些类的哪些方法应用增强 -->
        <aop:pointcut expression="execution(* cn.itcast.spring3.demo3.AccountService+.*(..))" id="mypointcut"/>
        <!-- 定义切面: -->
        <aop:advisor advice-ref="txAdvice" pointcut-ref="mypointcut"/>
    </aop:config>

第六步:编写测试类:
* 注入Service对象,不需要注入代理对象(生成这个类的时候,已经是代理对象.)
2.5 基于注解的事务管理
第一步:事务管理器:
    <!-- 事务管理器 -->
    <bean id="transactionManager" class="org.springframework.jdbc.datasource.DataSourceTransactionManager">
        <property name="dataSource" ref="dataSource"/>
    </bean>

第二步:注解事务:
    <!-- 开启注解的事务管理 -->
    <tx:annotation-driven transaction-manager="transactionManager"/>

第三步:在Service上使用注解
@Transactional
* 注解中有属性值:
* isolation
* propagation
* readOnly
