webpack+react+antd 单页面应用实例
React框架已经火了好长一段时间了,再不学就out了!
对React还没有了解的同学可以看看我之前的一篇文章,可以快速简单的认识一下React。***
自己从开始接触react一窍不通,到慢慢的似懂非懂,通过各种途径学习也有一阵了。学习过程中还会接触到很多新的东西,比如ES6、webpack,过程艰辛谁人懂,见坑填坑慢慢来。今天把学习过程过滤了一下,只说项目实际需要用的东西,总结了一套能看到的东西,分享给大家,希望能让读者少踩一些坑!
本文看点
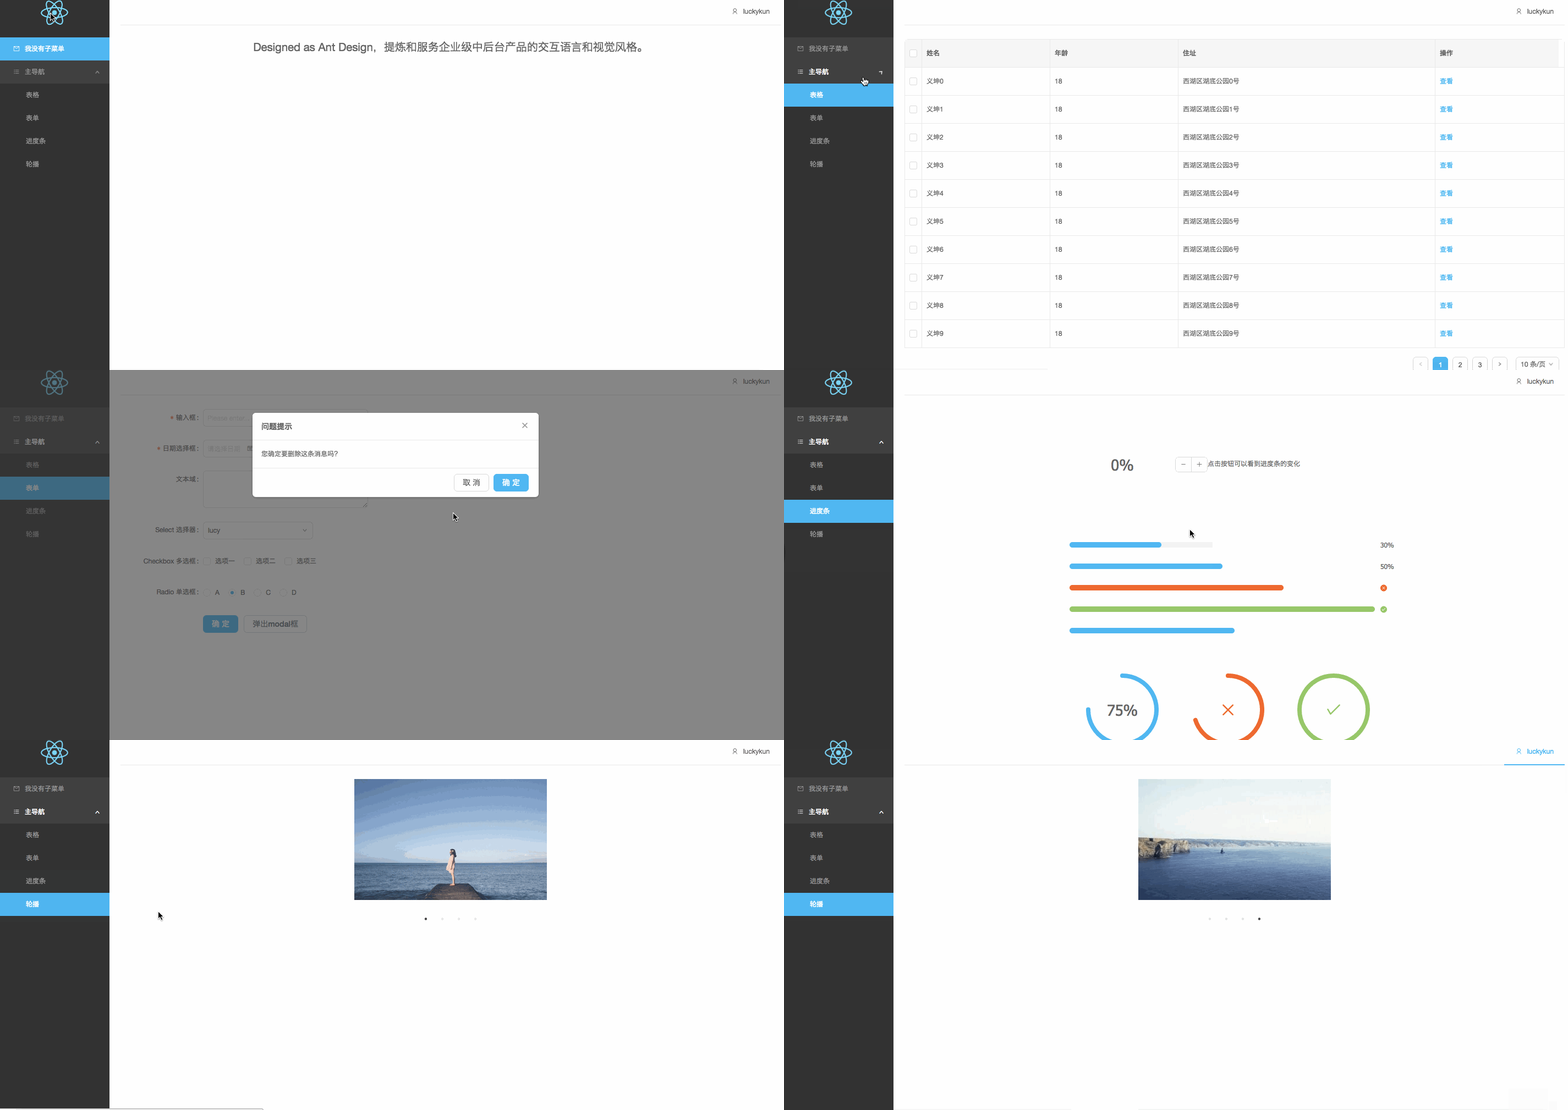
实际项目效果:最终你只需要在本地启一个服务,就能看到运行效果。webpack的配置:项目实战中常用的插件和配置方法。React用法:React在MVC(模型Model-视图View-控制器Controller)层面上主要扮演了视图的作用。我们可以学习它在项目中到底该如何使用。React-router配置:单页面应用(SPA)离不开路由,我们可以学习在项目中React-router如何配置。ES6语法:我们会用到一些在项目中常见的ES6语法。antd的使用:蚂蚁金服出的一款基于React的框架,我们可以学习如何去使用。
项目效果
项目代码已经上传至github,项目代码github地址。大家把代码下载下来之后,跟随以下步骤即可在本地看到效果。
-
首先安装node环境。
-
全局安装webpack
npm install webpack -g -
安装项目依赖
npm install -
开发模式,启动本地服务
npm run dev至这一步成功后,在浏览器输入
localhost:8888就能看到如下图的效果了。
-
在build文件夹下打包
npm run build
webpack配置
基于React的项目配合webpack来打包管理最合适不过了。但是不学不知道,一学吓一跳,webpack的学习TM复杂了,各种报错,各种坑,就是webpack让我在学习的过程中一度想要放弃。然而过来人告诉你,坚持就是胜利!
学会怎么配置webpack,是独立管理项目的第一步。每个用webpack管理的项目都有一个webpack.config.js文件,先来看看这个项目的webpack.config.js文件:
'use strict';
var ExtractTextPlugin = require("extract-text-webpack-plugin");  //css单独打包
var CommonsChunkPlugin = require("webpack/lib/optimize/CommonsChunkPlugin");
module.exports = {
    devtool: 'eval-source-map',
    entry: {
        main: './src/entry.js', //唯一入口文件
        vendor: ['react']   //这里是依赖的库文件配置,和CommonsChunkPlugin配合使用可以单独打包
    },
    output: {
        path: './build', //打包后的文件存放的地方
        filename: 'main.js', //打包后输出文件的文件名
        publicPath: 'http://localhost:8888/build/'  //启动本地服务后的根目录
    },
    module: {
        loaders: [
            { test: /\.js$/, loader: "jsx!babel", include: /src/},
            { test: /\.css$/, loader: ExtractTextPlugin.extract("style", "css!postcss")},
            { test: /\.scss$/, loader: ExtractTextPlugin.extract("style", "css!postcss!sass")},
            { test: /\.(png|jpg|gif)$/, loader: 'url?limit=819200'}
        ]
    },
    babel: {
        presets: ['es2015', 'stage-0', 'react'],
        plugins: ['transform-runtime', ['import', {
          libraryName: 'antd',
          style: 'css'
        }]]
    },
    postcss: [
        require('autoprefixer')    //调用autoprefixer插件,css3自动补全
    ],
    devServer: {
        // contentBase: './src/views'  //本地服务器所加载的页面所在的目录
        port: 8888,
        colors: true,  //终端中输出结果为彩色
        historyApiFallback: true,  //不跳转
        inline: true  //实时刷新
    },
    plugins: [
        new ExtractTextPlugin('main.css'),
        new CommonsChunkPlugin({
           name: 'vendor',
           filename: 'vendor.js'
        })
    ]
}
一个完整项目的基本webpack配置就是这些了,重要的配置项已经在上述代码中作了注释。另外,也可以深入学习,推荐看看这篇文章。webpack详细指南
React用法
React本身真的非常简单。你可以把一个页面分为很多个组件的组成,而React就是开发这些组件的。所以React其实就是view层,说白了就是html,只不过每个组件是通过js创建的,每个组件还有自己的状态和自己的方法。
React Component(一个组件)提供一个render方法以及其他可选的生命周期函数、组件相关的事件或方法定义。常用API就以下几个:
-
constructor:构造函数class component extends React.Component { constructor(props) { super(props); this.state = { color: props.initialColor }; } } -
render:组件返回的dom内容(必须) -
componentWillMount:在render之前自动调用,你可以在这个方法里面调用setState改变状态,并且不会导致额外调用一次render -
componentDidMount:在render之后自动调用,从这里开始可以通过this.getDOMNode()获取到组件的DOM节点 -
componentWillUpdate: 组件收到新的state,更新view之前自动调用 -
componentDidUpdate: 组件收到新的state,更新view完成之后自动调用
然后回到我们这个项目实例,拿代码中的进度条组件(src-components-progress.js)代码作为展示:
import React from 'react';    //引入react
import { Progress, Button } from 'antd';    //引入antd
const ButtonGroup = Button.Group;
class myProgress extends React.Component {
    constructor(props) {
        super(props)
        this.state = {   //初始化组件的状态
            percent: 0
        }
    }
    increase() {   //自定义函数
        let percent = this.state.percent + 10;
        if (percent > 100) {
            percent = 100;
        }
        this.setState({ percent });   //设置组件的状态
    }
    decline() {   //自定义函数
        let percent = this.state.percent - 10;
        if (percent < 0) {
            percent = 0;
        }
        this.setState({ percent });
    }
    render() {
        return (
            <div className="progress-wrap">    //类名使用className
                <Progress percent={this.state.percent} />
                <Progress type="circle" percent={this.state.percent} />
                <ButtonGroup>
                    <Button type="ghost" onClick={this.decline.bind(this)} icon="minus" />
                    <Button type="ghost" onClick={this.increase.bind(this)} icon="plus" />
                </ButtonGroup>
                <span>点击按钮可以看到进度条的变化</span>
            </div>
        )
    }
}
export default myProgress;  //导出这个组件(ES6语法)
代码我已经给出了注释,不做赘述。
React-router配置
独立的前端应用离不开路由配置,就像angular框架也有自己的路由一样。在React项目中使用路由,需要依赖React-Router模块。我们直接来看看此项目中的路由配置:
import ReactDom from 'react-dom';
import { Router, Route, Link, hashHistory, IndexRoute, Redirect, IndexLink} from 'react-router';
ReactDom.render((
    <Router history={hashHistory}>   //路由容器
        <Route path="/" component={Sider}>    //一级路由,路径为"/"时,加载“Sider”组件
            <IndexRoute component={myIntroduce} />   //默认路由,加载“Sider”和“myIntroduce”组件
            <Route path="myIntroduce" component={myIntroduce} />   //二级路由
            <Route path="myTable" component={myTable} />    //二级路由
            <Route path="myForm" component={myForm} />   //二级路由
            <Route path="myProgress" component={myProgress} />   //二级路由
            <Route path="myCarousel" component={myCarousel} />   //二级路由
        </Route>
    </Router>
), document.getElementById('app'));
React的路由配置其实很简单,就是把路径和定义好的组件一一对应起来就好了。上述代码结合实际运行效果,一看就明白。
ES6语法
我之前写过一篇关于ES6常见语法的文章,***。
。
另外,上述贴出的代码中已经出现过很多的ES6语法。ES6的学习就是见多学多的过程,多使用,多总结,自然就会了。
antd的使用
antd可以理解为是一个基于react的ui组件库。引入这个库之后,我们就可以直接使用很多现成的组件,比如按钮、图标、表单、菜单、导航等等。去antd官网发现更多牛逼的组件。
比如上面已经贴过的进度条组件:
import { Progress, Button } from 'antd';    //引入antd
const ButtonGroup = Button.Group;   //按钮组
......
<Progress percent={this.state.percent} />    //使用进度条组件,percent是组件提供的配置项
<Progress type="circle" percent={this.state.percent} />
<ButtonGroup>
	<Button type="ghost" onClick={this.decline.bind(this)} icon="minus" />
	<Button type="ghost" onClick={this.increase.bind(this)} icon="plus" />
</ButtonGroup>
......
另外,由于antd组件比较多,所以库文件比较大,所以我们在开发的时候可以按需引入对应的库。webpack配置需要用到babel-plugin-import模块。
babel: {
	presets: ['es2015', 'stage-0', 'react'],
	plugins: ['transform-runtime', ['import', {
		libraryName: 'antd',
		style: 'css'
	}]]
}
总结
上面的项目我已放到了Github上。基于react+antd的项目实例,喜欢的看管麻烦star一下啦!谢谢~
学习的过程枯燥艰辛,但是取得的成果却令人兴奋。所以我们还是要不忘初心,不忘学习!

