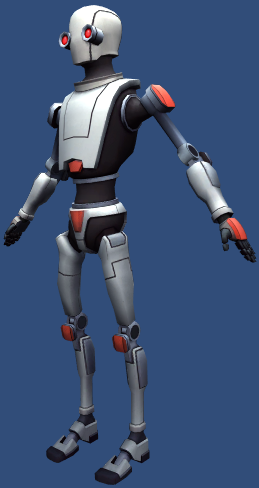
Unity 为队伍设置不同颜色的shader
在魔兽争霸等一些游戏中,我们通过模型的颜色就能很轻松的区分队伍,如下:


实现的方法有很多,比如:
1,为不同队伍各出一张不同颜色的贴图(Hmmm,war3有的地图可以容纳12只队伍,美术大大们会很[bu4] 感[da3] 谢[si3]你的)
2,额外用一张灰度图标记要变色的区域,通过程序来操作这一块区域变色(much better)
3,不需要任何额外的贴图,通过分析原图,直接改变需要变色的区域的颜色。
我们的目的是要实现第3种方法。
环境:Win 10,Unity 5.4.3f1
下图是萌萌哒的Kyle Robot,左图(红色)是原型,右图(绿色)是我们要达成的目标:


不完美的尝试1:
我的第一反应是提取与红色相近的颜色,然后变到绿色就可以了,代码如下:
Shader "Custom/TeamMaskRgb" {
       Properties {
              _MainTex ("Base (RGB)", 2D) = "white" {}
              _From("From Color",Color) = (1,1,1,1)
              _To("To Color",Color) = (1,1,1,1)
              _RgbRange("Rgb Range",Range(0,1))=0.1
       }
       SubShader {
              Tags { "RenderType"="Opaque" }
              LOD 150

       CGPROGRAM
       #pragma surface surf Lambert noforwardadd

       sampler2D _MainTex;
       fixed4 _From;
       fixed4 _To;
       fixed _RgbRange;

       struct Input {
              float2 uv_MainTex;
       } ;

       void surf (Input IN, inout SurfaceOutput o) {
              fixed4 c = tex2D(_MainTex, IN.uv_MainTex);
              // 老师傅们都说不要用if,所以就改成step了!
              fixed con = step(abs(_From.r-c.r),_RgbRange);
              con = con + step(abs(_From.g-c.g),_RgbRange);
              con = con + step(abs(_From.b-c.b),_RgbRange);
              con = step(3,con);

              o.Albedo = lerp(c.rgb,c.rgb+_To-_From,con);
              o.Alpha = c.a;
       }
       ENDCG
       }

       Fallback "Mobile/VertexLit"
}
但是,结果与我的设想却不大一样,小Kyle变成了:

这很怪异,Kyle身上的红色并不纯,而我们取色却只能取一种,虽然我们给了一个允许的范围,但RGB色彩模式的本质决定了我们取不到我们想要的所有红色,
还会取到一些我们不想要的颜色。因为:
Kyle肩膀处的红色是接近RGB(255,106,89),我们以此颜色作为要改变的基色调。
Kyle膝盖处的红色是接近RGB(135,44,36),虽然数值上与肩膀处的红色相差很大,但明显是红色的,这也是我们想要改变的部位。
Kyle两眼中间的灰色接近RGB(171,171,173)
我们取_RgbRange=0.38.
那R值允许的范围就是255-255*0.38<R<255+255*0.38,即158<R<352(大于255我们另外处理,不影响下面的结论),可以发现两眼中间的灰色的R值在取色范围
内,而膝盖处的暗红色却不在范围内。这就解释了为什么两眼中间变绿了,而膝盖为什么没变绿。
不完美的尝试2
尝试着去优化一下,像下面这样做一下插值,用颜色的RGB空间距离来判断距离:
Shader "Custom/TeamMaskRgbEx1" {
       Properties {
              _MainTex ("Base (RGB)", 2D) = "white" {}
              _From ("From Color", Color) = (1,1,1,1)
              _To ("To Color", Color) = (1,1,1,1)
              _Range ("Range", Range (0.0, 2.0)) = 0.01
       }
       SubShader {
              Tags { "RenderType"="Opaque" }
              LOD 150

              CGPROGRAM
              #pragma surface surf Lambert noforwardadd

              sampler2D _MainTex;
              fixed4 _From;
              fixed4 _To;
              half _Range;

              struct Input {
                     float2 uv_MainTex;
              } ;

              void surf (Input IN, inout SurfaceOutput o) {
                     fixed4 c = tex2D(_MainTex, IN.uv_MainTex);
                     fixed colorDistance = (c.r - _From.r)*(c.r - _From.r) + (c.g - _From.g)*(c.g - _From.g) + (c.b - _From.b)*(c.b - _From.b);
                     o.Albedo = lerp(c.rgb,(_To.rgb - _From.rgb + c.rgb),
                                     saturate(1 - colorDistance / (_Range * _Range)));
                     o.Alpha = c.a;
              }
              ENDCG
       }

       Fallback "Mobile/VertexLit"
}
但效果却依然不能让我满意:

那到底怎样才能准确取到与红色相近的颜色呢?答案是利用颜色的HSV模型。
HSV模型的定义以及其与RGB模型之间的转换请参考:https://zh.wikipedia.org/wiki/HSL%E5%92%8CHSV%E8%89%B2%E5%BD%A9%E7%A9%BA%E9%97%B4
这里不赘述了。
不完美的尝试3
如果你了解了颜色的HSV模型,应该就会想到只要找到红色色相(Hue)附近的颜色,然后改变他们就可以了,我也是这样想的:
Shader "Custom/TeamMaskHue" {
       Properties {
              _Color ("Color", Color) = (1,1,1,1)
              _MainTex ("Albedo (RGB)", 2D) = "white" {}
              _From("From Color",Color) = (1,1,1,1)
              _To("To Color",Color) = (1,1,1,1)
              _FaultTolerant("hue fault-tolerant",range(0,359)) = 2
       }
       SubShader {
              Tags { "RenderType"="Opaque" }
              LOD 200

              CGPROGRAM
              #pragma surface surf Standard fullforwardshadows

              sampler2D _MainTex;

              struct Input {
                     float2 uv_MainTex;
              } ;

              fixed4 _Color;
              fixed4 _From;
              fixed4 _To;
              float _FaultTolerant;

              float getHue(float3 col) {
                     float r=col.r,g=col.g,b=col.b;
                     float _max = max(r,max(g,b));
                     float _min = min(r,min(g,b));
                     float _gradient = _max - _min;
                     float ret = 0;
                     if(_max == r) {
                           ret = (g-b)/_gradient;
                     }

                     else if(_max == g) {
                           ret = 2 + (b-r)/_gradient;
                     }

                     else if(_max == b) {
                           ret = 4 + (r-g)/_gradient;
                     }

                     ret = ret*60.0;

                     if(ret<0) {
                           ret = ret + 360;
                     }
                     return ret;
              }

              void surf (Input IN, inout SurfaceOutputStandard o) {
                     fixed4 c = tex2D (_MainTex, IN.uv_MainTex) * _Color;
                     float hc = getHue(c.rgb);
                     float hFrom = getHue(_From.rgb);
                     float differ = abs(hc-hFrom);
                     differ = lerp(differ,abs(differ-360),step(180,differ));
                     o.Albedo = lerp(c.rgb,c.rgb - _From.rgb + _To.rgb,
                           step(differ,_FaultTolerant));
                     o.Alpha = c.a;
              }
              ENDCG
       }
       FallBack "Diffuse"
}
Emmm,效果如下:

这是怎么回事呢?难道用色相(Hue)也不能取到真正意义上相近的颜色吗?那些该死的意料之外的绿色是怎么回事呢?
上图是HSV空间模型,从图中可以很直观的看到圆锥中心线附近的颜色呈灰色,也就是说不管哪种色相,在其饱和度过低的时候都会表现为灰色,
在其明暗度(Brightness)过低时会表现为黑色。
所以,为了准确找到与指定颜色看上去近似的颜色,我们还需要考虑饱和度(Saturation)和明暗度 (Brightness ,HSV 用Value表示)。
一般的,Hue十分接近,Saturation和Brightness的误差各不超过0.7的颜色,它们看起来是相似的颜色。
最终代码如下(含branch优化):
Shader "Custom/TeamMaskFinal" {
       Properties {
              _MainTex ("Base (RGB)", 2D) = "white" {}
              _From("From Color",Color) = (1,1,1,1)
              _To("To Color",Color) = (1,1,1,1)
              _HError("Hue Error",range(0,1)) = 0 // 允许的色相误差
              _SError("Saturation Error",range(0,1)) = 0 // 允许的饱和度误差
              _VError("Brightness Error",range(0,1)) = 0 // 允许的亮度误差
       }
       SubShader {
              Tags { "RenderType"="Opaque" }
              LOD 150

              CGPROGRAM
              #pragma surface surf Lambert noforwardadd

              sampler2D _MainTex;
              fixed4 _From;
              fixed4 _To;
              fixed _HError;
              fixed _SError;
              fixed _VError;

              struct Input {
                     float2 uv_MainTex;
              } ;

              fixed3 RGBtoHSV(fixed3 c)
              {
                  fixed4 K = fixed4(0.0, -1.0 / 3.0, 2.0 / 3.0, -1.0);
                  fixed4 p = lerp(fixed4(c.bg, K.wz), fixed4(c.gb, K.xy), step(c.b, c.g));
                  fixed4 q = lerp(fixed4(p.xyw, c.r), fixed4(c.r, p.yzx), step(p.x, c.r));

                  float d = q.x - min(q.w, q.y);
                  float e = 1.0e-10;
                  return fixed3(abs(q.z + (q.w - q.y) / (6.0 * d + e)), d / (q.x + e), q.x);
              }

              fixed3 HSVtoRGB(fixed3 c)
              {
                  fixed4 K = fixed4(1.0, 2.0 / 3.0, 1.0 / 3.0, 3.0);
                  fixed3 p = abs(frac(c.xxx + K.xyz) * 6.0 - K.www);
                  return c.z * lerp(K.xxx, saturate(p - K.xxx), c.y);
              }

              void surf (Input IN, inout SurfaceOutput o) {
                     fixed4 c = tex2D(_MainTex, IN.uv_MainTex);
                     fixed3 cHSV = RGBtoHSV(c);
                     fixed3 FromHSV= RGBtoHSV(_From);
                     fixed3 ToHSV= RGBtoHSV(_To);

                     fixed diffHue = abs(cHSV.x-FromHSV.x);
                     diffHue = lerp(diffHue,abs(diffHue-1),step(0.5,diffHue));

                     fixed con = step(diffHue,_HError);
                     con = con + step(abs(cHSV.y-FromHSV.y),_SError);
                     con = con + step(abs(cHSV.z-FromHSV.z),_VError);
                     con = step(2.5,con);
                     fixed3 ret = cHSV + ToHSV - FromHSV;
//                   ret.x = lerp(ret.x,ret.x-1,step(1,ret.x));
//                   ret.x = lerp(ret.x,ret.x+1,step(ret.x,0));

                     o.Albedo = lerp(c.rgb,HSVtoRGB(ret),fixed3(con,con,con));

                     o.Alpha = c.a;
              }
              ENDCG
       }

       Fallback "Mobile/VertexLit"
}
最终效果图:

用到RGB、HSV互相转换的优化算法链接:


