【.NET Core项目实战-统一认证平台】第十五章 网关篇-使用二级缓存提升性能
【.NET Core项目实战-统一认证平台】开篇及目录索引
一、背景
首先说声抱歉,可能是因为假期综合症(其实就是因为懒哈)的原因,已经很长时间没更新博客了,现在也调整的差不多了,准备还是以每周1-2篇的进度来更新博客,并完成本项目所有功能。
言归正传,本重构项目是在我根据实际需求重构,由于还未完全写完,所以也没进行压测,在2月份时,张善友老师给我留言说经过压测发现我重构的Ocelot网关功能性能较差,其中根本原因就是缓存模块,由于重构项目的缓存强依赖Redis缓存,造成性能瓶颈,发现问题后,我也第一时间进行测试,性能影响很大,经过跟张老师请教,可以使用二级缓存来解决性能问题,首先感谢张老师关注并指点迷津,于是就有了这篇文章,如何把现有缓存改成二级缓存并使用。
二、改造思路
为了解决redis的强依赖性,首先需要把缓存数据存储到本地,所有请求都优先从本地提取,如果提取不到再从redis提取,如果redis无数据,在从数据库中提取。提取流程如下:
MemoryCache > Redis > db
此种方式减少提取缓存的网络开销,也合理利用了分布式缓存,并最终减少数据库的访问开销。但是使用此种方案也面临了一个问题是如何保证集群环境时每个机器本地缓存数据的一致性,这时我们会想到redis的发布、订阅特性,在数据发生变动时更新redis数据并发布缓存更新通知,由每个集群机器订阅变更事件,然后处理本地缓存记录,最终达到集群缓存的缓存一致性。
但是此方式对于缓存变更非常频繁的业务不适用,比如限流策略(准备还是使用分布式redis缓存实现),但是可以扩展配置单机限流时使用本地缓存实现,如果谁有更好的实现方式,也麻烦告知下集群环境下限流的实现,不胜感激。
三、改造代码
首先需要分析下目前改造后的Ocelot网关在哪些业务中使用的缓存,然后把使用本地缓存的的业务重构,增加提取数据流程,最后提供网关外部缓存初始化接口,便于与业务系统进行集成。
1.重写缓存方法
找到问题的原因后,就可以重写缓存方法,增加二级缓存支持,默认使用本地的缓存,新建CzarMemoryCache类,来实现IOcelotCache<T>方法,实现代码如下。
using Czar.Gateway.Configuration;
using Czar.Gateway.RateLimit;
using Microsoft.Extensions.Caching.Memory;
using Ocelot.Cache;
using System;

namespace Czar.Gateway.Cache
{
    /// <summary>
    /// 金焰的世界
    /// 2019-03-03
    /// 使用二级缓存解决集群环境问题
    /// </summary>
    public class CzarMemoryCache<T> : IOcelotCache<T>
    {
        private readonly CzarOcelotConfiguration _options;
        private readonly IMemoryCache _cache;
        public CzarMemoryCache(CzarOcelotConfiguration options,IMemoryCache cache)
        {
            _options = options;
            _cache = cache;
        }
        public void Add(string key, T value, TimeSpan ttl, string region)
        {
            key = CzarOcelotHelper.GetKey(_options.RedisOcelotKeyPrefix,region, key);
            if (_options.ClusterEnvironment)
            {
                var msg = value.ToJson();
                if (typeof(T) == typeof(CachedResponse))
                {//带过期时间的缓存
                    _cache.Set(key, value, ttl); //添加本地缓存
                    RedisHelper.Set(key, msg); //加入redis缓存
                    RedisHelper.Publish(key, msg); //发布
                }
                else if (typeof(T) == typeof(CzarClientRateLimitCounter?))
                {//限流缓存,直接使用redis
                    RedisHelper.Set(key, value, (int)ttl.TotalSeconds);
                }
                else
                {//正常缓存,发布
                    _cache.Set(key, value, ttl); //添加本地缓存
                    RedisHelper.Set(key, msg); //加入redis缓存
                    RedisHelper.Publish(key, msg); //发布
                }
            }
            else
            {
                _cache.Set(key, value, ttl); //添加本地缓存
            }
        }

        public void AddAndDelete(string key, T value, TimeSpan ttl, string region)
        {
            Add(key, value, ttl, region);
        }

        public void ClearRegion(string region)
        {
            if (_options.ClusterEnvironment)
            {
                var keys = RedisHelper.Keys(region + "*");
                RedisHelper.Del(keys);
                foreach (var key in keys)
                {
                    RedisHelper.Publish(key, ""); //发布key值为空,处理时删除即可。
                }
            }
            else
            {
                _cache.Remove(region);
            }
        }

        public T Get(string key, string region)
        {
            key = CzarOcelotHelper.GetKey(_options.RedisOcelotKeyPrefix, region, key);
            if(region== CzarCacheRegion.CzarClientRateLimitCounterRegion&& _options.ClusterEnvironment)
            {//限流且开启了集群支持,默认从redis取
                return RedisHelper.Get<T>(key);
            }
            var result = _cache.Get<T>(key);
            if (result == null&& _options.ClusterEnvironment)
            {
                result= RedisHelper.Get<T>(key);
                if (result != null)
                {
                    if (typeof(T) == typeof(CachedResponse))
                    {//查看redis过期时间
                        var second = RedisHelper.Ttl(key);
                        if (second > 0)
                        {
                            _cache.Set(key, result, TimeSpan.FromSeconds(second));
                        }
                    }
                    else
                    {
                        _cache.Set(key, result, TimeSpan.FromSeconds(_options.CzarCacheTime));
                    }
                }
            }
            return result;
        }
    }
}
上面就段代码实现了本地缓存和Redis缓存的支持,优先从本地提取,如果在集群环境使用,增加redis缓存支持,但是此种方式不适用缓存变更非常频繁场景,比如客户端限流的实现,所以在代码中把客户端限流的缓存直接使用redis缓存实现。
2.注入实现和订阅
有了实现代码后,发现还缺少添加缓存注入和配置信息修改。首先需要修改配置文件来满足是否开启集群判断,然后需要实现redis的不同部署方式能够通过配置文件配置进行管理,避免硬编码导致的不可用问题。
配置文件CzarOcelotConfiguration.cs修改代码如下:
namespace Czar.Gateway.Configuration
{
    /// <summary>
    /// 金焰的世界
    /// 2018-11-11
    /// 自定义配置信息
    /// </summary>
    public class CzarOcelotConfiguration
    {
        /// <summary>
        /// 数据库连接字符串,使用不同数据库时自行修改,默认实现了SQLSERVER
        /// </summary>
        public string DbConnectionStrings { get; set; }

        /// <summary>
        /// 金焰的世界
        /// 2018-11-12
        /// 是否启用定时器,默认不启动
        /// </summary>
        public bool EnableTimer { get; set; } = false;

        /// <summary>
        /// 金焰的世界
        /// 2018-11.12
        /// 定时器周期,单位(毫秒),默认30分总自动更新一次
        /// </summary>
        public int TimerDelay { get; set; } = 30 * 60 * 1000;

        /// <summary>
        /// 金焰的世界
        /// 2018-11-14
        /// Redis连接字符串
        /// </summary>
        public string RedisConnectionString { get; set; }

        /// <summary>
        /// 金焰的世界
        /// 2019-03-03
        /// 配置哨兵或分区时使用
        /// </summary>
        public string[] RedisSentinelOrPartitionConStr { get; set; }

        /// <summary>
        /// 金焰的世界
        /// 2019-03-03
        /// Redis部署方式,默认使用普通方式
        /// </summary>
        public RedisStoreMode RedisStoreMode { get; set; } = RedisStoreMode.Normal;

        /// <summary>
        /// 金焰的计界
        /// 2019-03-03
        /// 做集群缓存同步时使用,会订阅所有正则匹配的事件
        /// </summary>
        public string RedisOcelotKeyPrefix { get; set; } = "CzarOcelot";

        /// <summary>
        /// 金焰的世界
        /// 2019-03-03
        /// 是否启用集群环境,如果非集群环境直接本地缓存+数据库即可
        /// </summary>
        public bool ClusterEnvironment { get; set; } = false;

        /// <summary>
        /// 金焰的世界
        /// 2018-11-15
        /// 是否启用客户端授权,默认不开启
        /// </summary>
        public bool ClientAuthorization { get; set; } = false;

        /// <summary>
        /// 金焰的世界
        /// 2018-11-15
        /// 服务器缓存时间,默认30分钟
        /// </summary>
        public int CzarCacheTime { get; set; } = 1800;
        /// <summary>
        /// 金焰的世界
        /// 2018-11-15
        /// 客户端标识,默认 client_id
        /// </summary>
        public string ClientKey { get; set; } = "client_id";

        /// <summary>
        /// 金焰的世界
        /// 2018-11-18
        /// 是否开启自定义限流,默认不开启
        /// </summary>
        public bool ClientRateLimit { get; set; } = false;
    }
}
在配置文件中修改了redis相关配置,支持使用redis的普通模式、集群模式、哨兵模式、分区模式,配置方式可参考csrediscore开源项目。
然后修改ServiceCollectionExtensions.cs代码,注入相关实现和redis客户端。
			builder.Services.AddMemoryCache(); //添加本地缓存
            #region 启动Redis缓存,并支持普通模式 官方集群模式  哨兵模式 分区模式
            if (options.ClusterEnvironment)
            {
                //默认使用普通模式
                var csredis = new CSRedis.CSRedisClient(options.RedisConnectionString);
                switch (options.RedisStoreMode)
                {
                    case RedisStoreMode.Partition:
                        var NodesIndex = options.RedisSentinelOrPartitionConStr;
                        Func<string, string> nodeRule = null;
                        csredis = new CSRedis.CSRedisClient(nodeRule, options.RedisSentinelOrPartitionConStr);
                        break;
                    case RedisStoreMode.Sentinel:
                        csredis = new CSRedis.CSRedisClient(options.RedisConnectionString, options.RedisSentinelOrPartitionConStr);
                        break;
                }
                //初始化 RedisHelper
                RedisHelper.Initialization(csredis);
            }
            #endregion
            builder.Services.AddSingleton<IOcelotCache<FileConfiguration>, CzarMemoryCache<FileConfiguration>>();
            builder.Services.AddSingleton<IOcelotCache<InternalConfiguration>, CzarMemoryCache<InternalConfiguration>>();
            builder.Services.AddSingleton<IOcelotCache<CachedResponse>, CzarMemoryCache<CachedResponse>>();
            builder.Services.AddSingleton<IInternalConfigurationRepository, RedisInternalConfigurationRepository>();
            builder.Services.AddSingleton<IOcelotCache<ClientRoleModel>, CzarMemoryCache<ClientRoleModel>>();
            builder.Services.AddSingleton<IOcelotCache<RateLimitRuleModel>, CzarMemoryCache<RateLimitRuleModel>>();
            builder.Services.AddSingleton<IOcelotCache<RemoteInvokeMessage>, CzarMemoryCache<RemoteInvokeMessage>>();
            builder.Services.AddSingleton<IOcelotCache<CzarClientRateLimitCounter?>, CzarMemoryCache<CzarClientRateLimitCounter?>>();
现在需要实现redis订阅来更新本地的缓存信息,在项目启动时判断是否开启集群模式,如果开启就启动订阅,实现代码如下:
public static async Task<IApplicationBuilder> UseCzarOcelot(this IApplicationBuilder builder, OcelotPipelineConfiguration pipelineConfiguration)
{
    //重写创建配置方法
    var configuration = await CreateConfiguration(builder);
    ConfigureDiagnosticListener(builder);
    CacheChangeListener(builder);
    return CreateOcelotPipeline(builder, pipelineConfiguration);
}
/// <summary>
/// 金焰的世界
/// 2019-03-03
/// 添加缓存数据变更订阅
/// </summary>
/// <param name="builder"></param>
/// <returns></returns>
private static void CacheChangeListener(IApplicationBuilder builder)
{
    var config= builder.ApplicationServices.GetService<CzarOcelotConfiguration>();
    var _cache= builder.ApplicationServices.GetService<IMemoryCache>();
    if (config.ClusterEnvironment)
    {
        //订阅满足条件的所有事件
        RedisHelper.PSubscribe(new[] { config.RedisOcelotKeyPrefix + "*" }, message =>
              {
                  var key = message.Channel;
                  _cache.Remove(key); //直接移除,如果有请求从redis里取
                  //或者直接判断本地缓存是否存在,如果存在更新,可自行实现。
              });
    }
}
使用的是从配置文件提取的正则匹配的所有KEY都进行订阅,由于本地缓存增加了定时过期策略,所以为了实现方便,当发现redis数据发生变化,所有订阅端直接移除本地缓存即可,如果有新的请求直接从redis取,然后再次缓存,防止集群客户端缓存信息不一致。
为了区分不同的缓存实体,便于在原始数据发送变更时进行更新,定义CzarCacheRegion类。
namespace Czar.Gateway.Configuration
{
    /// <summary>
    /// 缓存所属区域
    /// </summary>
    public class CzarCacheRegion
    {
        /// <summary>
        /// 授权
        /// </summary>
        public const string AuthenticationRegion = "CacheClientAuthentication";

        /// <summary>
        /// 路由配置
        /// </summary>
        public const string FileConfigurationRegion = "CacheFileConfiguration";

        /// <summary>
        /// 内部配置
        /// </summary>
        public const string InternalConfigurationRegion = "CacheInternalConfiguration";

        /// <summary>
        /// 客户端权限
        /// </summary>
        public const string ClientRoleModelRegion = "CacheClientRoleModel";

        /// <summary>
        /// 限流规则
        /// </summary>
        public const string RateLimitRuleModelRegion = "CacheRateLimitRuleModel";

        /// <summary>
        /// Rpc远程调用
        /// </summary>
        public const string RemoteInvokeMessageRegion = "CacheRemoteInvokeMessage";

        /// <summary>
        /// 客户端限流
        /// </summary>
        public const string CzarClientRateLimitCounterRegion = "CacheCzarClientRateLimitCounter";
    }
}
现在只需要修改缓存的region为定义的值即可,唯一需要改动的代码就是把之前写死的代码改成如下代码即可。
var enablePrefix = CzarCacheRegion.AuthenticationRegion;
3.开发缓存变更接口
现在整个二级缓存基本完成,但是还遇到一个问题就是外部如何根据数据库变更数据时来修改缓存数据,这时就需要提供外部修改api来实现。
添加CzarCacheController.cs对外部提供缓存更新相关接口,详细代码如下:
using Czar.Gateway.Authentication;
using Czar.Gateway.Configuration;
using Czar.Gateway.RateLimit;
using Czar.Gateway.Rpc;
using Microsoft.AspNetCore.Authorization;
using Microsoft.AspNetCore.Mvc;
using Microsoft.Extensions.Caching.Memory;
using Ocelot.Configuration;
using Ocelot.Configuration.Creator;
using Ocelot.Configuration.Repository;
using System;
using System.Threading.Tasks;

namespace Czar.Gateway.Cache
{
    /// <summary>
    /// 提供外部缓存处理接口
    /// </summary>
    [Authorize]
    [Route("CzarCache")]
    public class CzarCacheController : Controller
    {
        private readonly CzarOcelotConfiguration _options;
        private readonly IClientAuthenticationRepository _clientAuthenticationRepository;
        private IFileConfigurationRepository _fileConfigurationRepository;
        private IInternalConfigurationCreator _internalConfigurationCreator;
        private readonly IClientRateLimitRepository _clientRateLimitRepository;
        private readonly IRpcRepository _rpcRepository;
        private readonly IMemoryCache _cache;
        public CzarCacheController(IClientAuthenticationRepository clientAuthenticationRepository, CzarOcelotConfiguration options,
          IFileConfigurationRepository fileConfigurationRepository,
          IInternalConfigurationCreator internalConfigurationCreator,
          IClientRateLimitRepository clientRateLimitRepository,
          IRpcRepository rpcRepository,
          IMemoryCache cache)
        {
            _clientAuthenticationRepository = clientAuthenticationRepository;
            _options = options;
            _fileConfigurationRepository = fileConfigurationRepository;
            _internalConfigurationCreator = internalConfigurationCreator;
            _clientRateLimitRepository = clientRateLimitRepository;
            _rpcRepository = rpcRepository;
            _cache = cache;
        }

        /// <summary>
        /// 更新客户端地址访问授权接口
        /// </summary>
        /// <param name="clientid">客户端ID</param>
        /// <param name="path">请求模板</param>
        /// <returns></returns>
        [HttpPost]
        [Route("ClientRule")]
        public async Task UpdateClientRuleCache(string clientid, string path)
        {
            var region = CzarCacheRegion.AuthenticationRegion;
            var key = CzarOcelotHelper.ComputeCounterKey(region, clientid, "", path);
            key = CzarOcelotHelper.GetKey(_options.RedisOcelotKeyPrefix, region, key);
            var result = await _clientAuthenticationRepository.ClientAuthenticationAsync(clientid, path);
            var data = new ClientRoleModel() { CacheTime = DateTime.Now, Role = result };
            if (_options.ClusterEnvironment)
            {
                RedisHelper.Set(key, data); //加入redis缓存
                RedisHelper.Publish(key, data.ToJson()); //发布事件
            }
            else
            {
                _cache.Remove(key);
            }
        }

        /// <summary>
        /// 更新网关配置路由信息
        /// </summary>
        /// <returns></returns>
        [HttpPost]
        [Route("InternalConfiguration")]
        public async Task UpdateInternalConfigurationCache()
        {
            var key = CzarCacheRegion.InternalConfigurationRegion;
            key = CzarOcelotHelper.GetKey(_options.RedisOcelotKeyPrefix, "", key);
            var fileconfig = await _fileConfigurationRepository.Get();
            var internalConfig = await _internalConfigurationCreator.Create(fileconfig.Data);
            var config = (InternalConfiguration)internalConfig.Data;
            if (_options.ClusterEnvironment)
            {
                RedisHelper.Set(key, config); //加入redis缓存
                RedisHelper.Publish(key, config.ToJson()); //发布事件
            }
            else
            {
                _cache.Remove(key);
            }
        }

        /// <summary>
        /// 删除路由配合的缓存信息
        /// </summary>
        /// <param name="region">区域</param>
        /// <param name="downurl">下端路由</param>
        /// <returns></returns>
        [HttpPost]
        [Route("Response")]
        public async Task DeleteResponseCache(string region,string downurl)
        {
            var key = CzarOcelotHelper.GetKey(_options.RedisOcelotKeyPrefix, region, downurl);
            if (_options.ClusterEnvironment)
            {
                await RedisHelper.DelAsync(key);
                RedisHelper.Publish(key, "");//发布时间
            }
            else
            {
                _cache.Remove(key);
            }
        }

        /// <summary>
        /// 更新客户端限流规则缓存
        /// </summary>
        /// <param name="clientid">客户端ID</param>
        /// <param name="path">路由模板</param>
        /// <returns></returns>
        [HttpPost]
        [Route("RateLimitRule")]
        public async Task UpdateRateLimitRuleCache(string clientid, string path)
        {
            var region = CzarCacheRegion.RateLimitRuleModelRegion;
            var key = clientid + path;
            key = CzarOcelotHelper.GetKey(_options.RedisOcelotKeyPrefix, region, key);
            var result = await _clientRateLimitRepository.CheckClientRateLimitAsync(clientid, path);
            var data = new RateLimitRuleModel() { RateLimit = result.RateLimit, rateLimitOptions = result.rateLimitOptions };
            if (_options.ClusterEnvironment)
            {
                RedisHelper.Set(key, data); //加入redis缓存
                RedisHelper.Publish(key, data.ToJson()); //发布事件
            }
            else
            {
                _cache.Remove(key);
            }
        }

        /// <summary>
        /// 更新客户端是否开启限流缓存
        /// </summary>
        /// <param name="path"></param>
        /// <returns></returns>
        [HttpPost]
        [Route("ClientRole")]
        public async Task UpdateClientRoleCache(string path)
        {
            var region = CzarCacheRegion.ClientRoleModelRegion;
            var key = path;
            key = CzarOcelotHelper.GetKey(_options.RedisOcelotKeyPrefix, region, key);
            var result = await _clientRateLimitRepository.CheckReRouteRuleAsync(path);
            var data = new ClientRoleModel() { CacheTime = DateTime.Now, Role = result };
            if (_options.ClusterEnvironment)
            {
                RedisHelper.Set(key, data); //加入redis缓存
                RedisHelper.Publish(key, data.ToJson()); //发布事件
            }
            else
            {
                _cache.Remove(key);
            }
        }

        /// <summary>
        /// 更新呢客户端路由白名单缓存
        /// </summary>
        /// <param name="clientid"></param>
        /// <param name="path"></param>
        /// <returns></returns>
        [HttpPost]
        [Route("ClientReRouteWhiteList")]
        public async Task UpdateClientReRouteWhiteListCache(string clientid, string path)
        {
            var region = CzarCacheRegion.ClientReRouteWhiteListRegion;
            var key = clientid + path;
            key = CzarOcelotHelper.GetKey(_options.RedisOcelotKeyPrefix, region, key);
            var result = await _clientRateLimitRepository.CheckClientReRouteWhiteListAsync(clientid, path);
            var data = new ClientRoleModel() { CacheTime = DateTime.Now, Role = result };
            if (_options.ClusterEnvironment)
            {
                RedisHelper.Set(key, data); //加入redis缓存
                RedisHelper.Publish(key, data.ToJson()); //发布事件
            }
            else
            {
                _cache.Remove(key);
            }
        }

        [HttpPost]
        [Route("Rpc")]
        public async Task UpdateRpcCache(string UpUrl)
        {
            var region = CzarCacheRegion.RemoteInvokeMessageRegion;
            var key = UpUrl;
            key = CzarOcelotHelper.GetKey(_options.RedisOcelotKeyPrefix, region, key);
            var result = await _rpcRepository.GetRemoteMethodAsync(UpUrl);
            if (_options.ClusterEnvironment)
            {
                RedisHelper.Set(key, result); //加入redis缓存
                RedisHelper.Publish(key, result.ToJson()); //发布事件
            }
            else
            {
                _cache.Remove(key);
            }
        }
    }
}
现在基本实现整个缓存的更新策略,只要配合后台管理界面,在相关缓存原始数据发送变更时,调用对应接口即可完成redis缓存的更新,并自动通知集群的所有本机清理缓存等待重新获取。
接口的调用方式参考之前我写的配置信息接口变更那篇即可。
四、性能测试
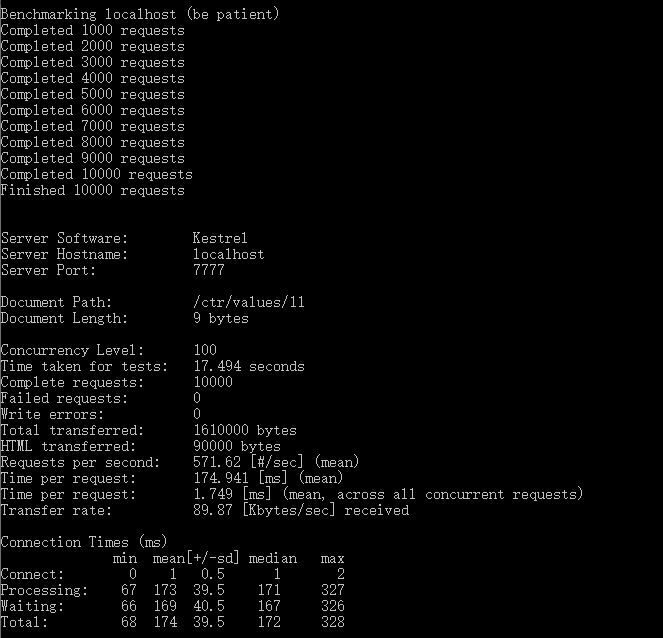
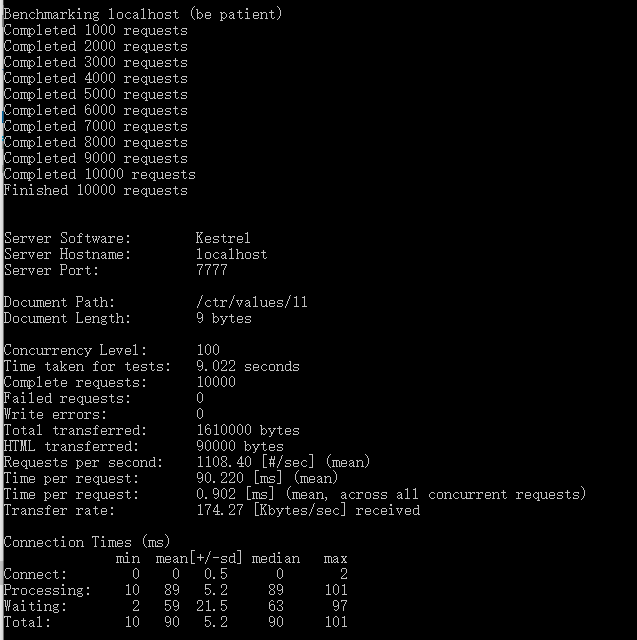
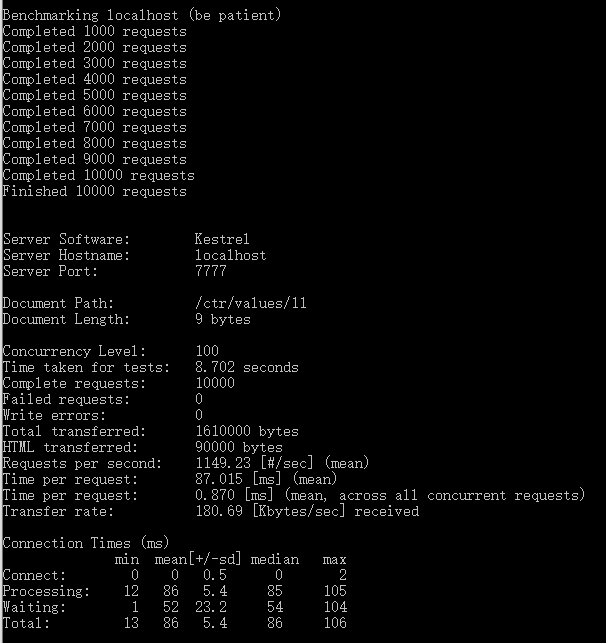
完成了改造后,我们拿改造前网关、改造后网关、原始Ocelot、直接调用API四个环境分别测试性能指标,由于测试环境有效,我直接使用本机环境,然后是Apache ab测试工具测试下相关性能(本测试不一定准确,只作为参考指标),测试的方式是使用100个并发请求10000次,测试结果分别如下。
1、改造前网关性能

2、改造后网关性能

3、Ocelot默认网关性能

4、直接调用API性能

本测试仅供参考,因为由于网关和服务端都在本机环境部署,所以使用网关和不使用网关性能差别非常小,如果分开部署可能性别差别会明显写,这不是本篇讨论的重点。
从测试中可以看到,重构的网关改造前和改造后性能有2倍多的提升,且与原生的Ocelot性能非常接近。
五、总结
本篇主要讲解了如何使用redis的发布订阅来实现二级缓存功能,并提供了缓存的更新相关接口供外部程序调用,避免出现集群环境下无法更新缓存数据导致提取数据不一致情况,但是针对每个客户端独立限流这块集群环境目前还是采用的redis的方式未使用本地缓存,如果有写的不对或有更好方式的,也希望多提宝贵意见。
如果您认为这篇文章还不错或者有所收获,您可以点击右下角的【推荐】按钮精神支持,因为这种支持是我继续写作,分享的最大动力!


