


React学习笔记
React中几个核心概念
-
DOM的本质是什么:浏览器中的概念,用JS对象来表示 页面上的元素,并提供了操作 DOM 对象的API;
-
什么是React中的虚拟DOM:是框架中的概念,是程序员 用JS对象来模拟 页面上的 DOM 和 DOM嵌套;
-
为什么要实现虚拟DOM(虚拟DOM的目的):为了实现页面中, DOM 元素的高效更新
-
DOM和虚拟DOM的区别:
-
DOM:浏览器中,提供的概念;用JS对象,表示页面上的元素,并提供了操作元素的API;
-
虚拟DOM:是框架中的概念;而是开发框架的程序员,手动用JS对象来模拟DOM元素和嵌套关系;
-
本质: 用JS对象,来模拟DOM元素和嵌套关系;
-
目的:就是为了实现页面元素的高效更新;
-
-
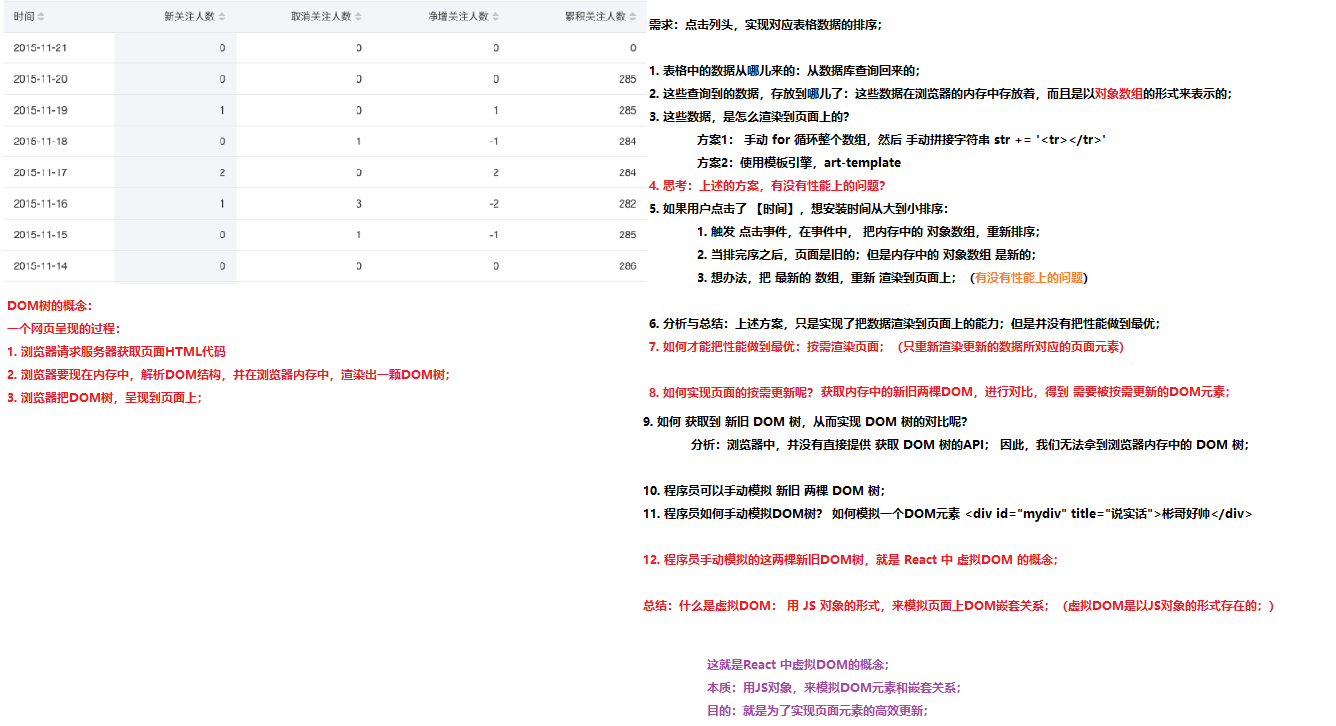
模板引擎和for循环,会把所有(包括不需要的)都渲染一遍,浪费性能(不能按需更新)==>如何实现?新旧DOM树对比
为什么要减少DOM操作? DOM操作会涉及到页面的重绘的重排
-
tree diff:新旧两棵DOM树,逐层对比的过程,就是 Tree Diff; 当整颗DOM逐层对比完毕,则所有需要被按需更新的元素,必然能够找到;
-
component diff:在进行Tree Diff的时候,每一层中,组件级别的对比,叫做 Component Diff;
-
如果对比前后,组件的类型相同,则暂时认为此组件不需要被更新;
-
如果对比前后,组件类型不同,则需要移除旧组件,创建新组件,并追加到页面上;
-
element diff:在进行组件对比的时候,如果两个组件类型相同,则需要进行 元素级别的对比,这叫做 Element Diff;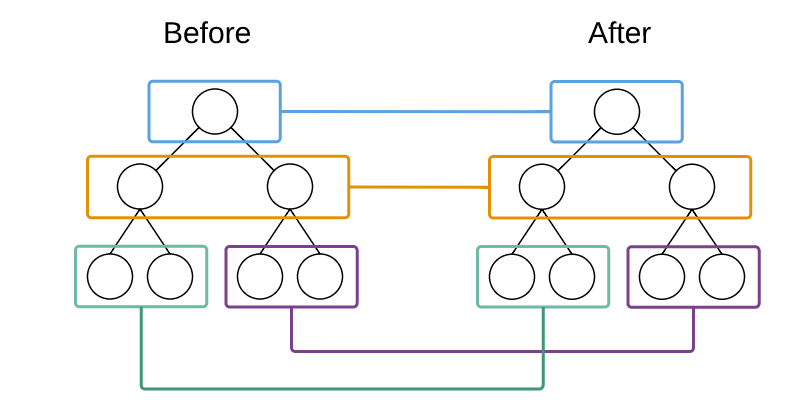
1.运行 cnpm i react react-dom -S 安装包
react: 专门用于创建组件和虚拟DOM的,同时组件的生命周期都在这个包中

react-dom: 专门进行DOM操作的,最主要的应用场景,就是ReactDOM.render()
2.在index.html页面中,创建容器:
<!-- 容器,将来,使用 React 创建的虚拟DOM元素,都会被渲染到这个指定的容器中 -->
<div id="app"></div>
3.导入 包:
import React from 'react'
import ReactDOM from 'react-dom'
4.创建虚拟DOM元素:
// 这是 创建虚拟DOM元素的 API   <h1 title="啊,五环" id="myh1">你比四环多一环</h1>
// 第一个参数: 字符串类型的参数,表示要创建的标签的名称
// 第二个参数:对象类型的参数, 表示 创建的元素的属性节点
// 第三个参数: 子节点
// 第四个参数:其他同级子节点

const myh1 = React.createElement('h1', { title: '啊,五环', id: 'myh1' }, '你比四环多一环')
5.渲染:
// 渲染虚拟DOM元素
// 参数1: 表示要渲染的虚拟DOM对象
// 参数2: 指定容器,注意:这里不能直接放 容器元素的Id字符串,需要放一个容器的DOM对象
ReactDOM.render(myh1, document.getElementById('app'))
6.
什么是JSX语法:就是符合 xml 规范的 JS 语法;(语法格式相对来说,要比HTML严谨很多)
-
如何启用 jsx 语法?
-
安装
babel插件-
运行
cnpm i babel-core babel-loader babel-plugin-transform-runtime -D -
运行
cnpm i babel-preset-env babel-preset-stage-0 -D
-
-
安装能够识别转换jsx语法的包
babel-preset-react-
运行
cnpm i babel-preset-react -D
-
-
添加
.babelrc配置文件
{
  "presets": ["env", "stage-0", "react"],
  "plugins": ["transform-runtime"]
} -
添加babel-loader配置项:
module: { //要打包的第三方模块
    rules: [
      { test: /\.js|jsx$/, use: 'babel-loader', exclude: /node_modules/ }
    ]
}
-
-
jsx 语法的本质:并不是直接把 jsx 渲染到页面上,而是 内部先转换成了 createElement 形式,再渲染的;
-
在 jsx 中混合写入 js 表达式:在 jsx 语法中,要把 JS代码写到
{ }中-
渲染数字
-
渲染字符串
-
渲染布尔值
-
为属性绑定值
-
渲染jsx元素
-
渲染jsx元素数组
-
将普通字符串数组,转为jsx数组并渲染到页面上【两种方案】
-
-
在 jsx 中 写注释:推荐使用
{ /* 这是注释 */ } -
为 jsx 中的元素添加class类名:需要使用
className来替代class;htmlFor替换label的for属性 -
在JSX创建DOM的时候,所有的节点,必须有唯一的根元素进行包裹;
-
在 jsx 语法中,标签必须 成对出现,如果是单标签,则必须自闭和!
当 编译引擎,在编译JSX代码的时候,如果遇到了
<那么就把它当作 HTML代码去编译,如果遇到了{ }就把 花括号内部的代码当作 普通JS代码去编译;
什么时候用 { } 呢?当我们在需要JSX控制的区域内,写JS表达式了,则需要把JS代码写到 { } 中
1.在React 组件中申明方法 并调用
    constructor(){
        }
   //写在constructor下面
    toDecimal=(x)=>{
        var f = parseFloat(x);
        if (isNaN(f)) {
          return;
        }
        f = Math.round(x*1000000)/1000000;
        return f;
    }
    //处理时间戳
    timestampToTime = (timestamp) => {
        var date = new Date(timestamp * 1000);//时间戳为10位需*1000,时间戳为13位的话不需乘1000
        var Y = date.getFullYear() + '-';
        var M = (date.getMonth()+1 < 10 ? '0'+(date.getMonth()+1) : date.getMonth()+1) + '-';
        var D = date.getDate() + ' ';
        var h = date.getHours() + ':';
        var m = date.getMinutes() + ':';
        var s = date.getSeconds();
        return Y+M+D+h+m+s;
    }


调用 :
2.
抽离单独样式表style.js模块 暴露出去


1 export default {
2     item: { border: '1px dashed #ccc', margin: '10px', padding: '10px', boxShadow: '0 0 10px #ccc' },
3     user: { fontSize: '14px' },
4     content: { fontSize: '12px' }
5 }
使用样式模块:
 1 import React from 'react'
 2
 3 import styles from '../css/style'
 4 export default function CmtItem(props) {
 4   return <div style={styles.item}>
 6     <h1 style={styles.user}>评论人:{props.user}</h1>
 7     <p style={styles.content}>评论内容:{props.content}</p>
 8   </div>
 9 }
3.React图片如何引用?
-
<img src={require('../../assets/image/iphone_help_search@3x.png')} />
-
import nav2x from './image/nav@2x.png';<img className="navButton more1920" src={nav2x} alt=''></img>
4.ref
React提供的这个ref属性,表示为对组件真正实例的引用,其实就是ReactDOM.render()返回的组件实例;
<CustomTable
                        scroll={{x: 1600}}
                        url={'/api/follow/release/list'} columns={this.columns} ref={(me) => {
                        this.custom_table = me
}}/>
5. 父组件通过 this.custom_table.xxx 可以直接获取子组件里面的值和属性
6. 组件根据状态切换
/* eslint-disable no-fallthrough */
/* eslint-disable default-case */
import React, { Component } from 'react';
import '../order/Order.less'
import OrderClose from '../OtcOrderClose'
import PlaceOrder from '../PlaceOrder'
import WaitRelease from '../WaitRelease'
import BuyerAppeal from '../BuyerAppeal'
import OrderComplete from '../OrderComplete'


class OrderDetail extends Component {
    constructor(props) {
        super(props)
        this.state = {
            status:1
        }
    }

    handStatus = (status) => {
        switch (status) {
            case 1:
            return  this.setState({
                    status:1
                })
            case 2:
            return    this.setState({
                    status:2
                })
            case 3:
            return    this.setState({
                    status:3
                })
            case 4:
            return     this.setState({
                    status:4
                })
            case 5:
            return     this.setState({
                    status:5
                })
            default:
            return  this.setState({
                    status:1
                })
        }
        console.log(status);
    }


    renderOredrStatus = (status) => {
        // eslint-disable-next-line default-case
        switch (status) {
            case 1:
                return (
                    <PlaceOrder {...this.props} res={this.state.details}  getStatus={this.handStatus} />
                )
            case 2:
                return (
                    <WaitRelease {...this.props} res={this.state.details}  getStatus={this.handStatus}/>
                )
            case 3:
                return (
                    <BuyerAppeal {...this.props} res={this.state.details}  getStatus={this.handStatus}/>
                )
            case 4:
                return (
                    <OrderClose {...this.props} res={this.state.details}  getStatus={this.handStatus}/>
                )
            case 5:
                return (
                    <OrderComplete {...this.props} res={this.state.details}  getStatus={this.handStatus}/>
                )
        }
    }


    render() {
        const {status} = this.state;
        return (
            <div>
                {this.renderOredrStatus(status)}
            </div>
        )
    }
}

export default OrderDetail;
遇到的坑 :
1.Switch 忘记加return了 每次传了值之后,都直接跳到了最后一个组件
2.子组件的this.props用不了, 是因为本身没有这个函数 ,要从父组件传过去 <Child { ...this.props }> </Child>
7.页面跳转
输出this.props 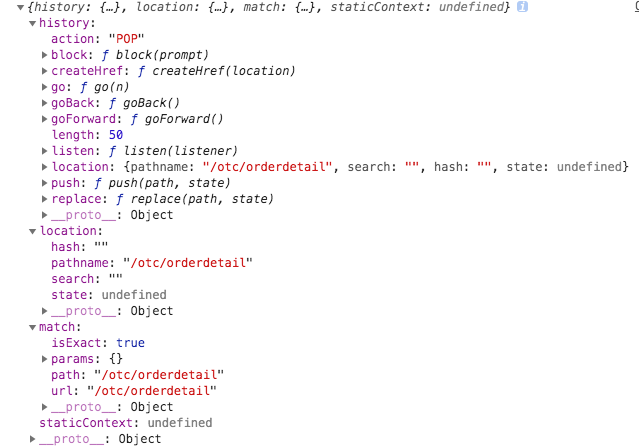 ·页面跳转:history.push(pathname,state) ·回退 history.goback() · history.go(-1)
8.标记按钮切换
/* eslint-disable default-case */
import React, { Component } from 'react';
import  { Button , Modal ,Row ,Col , Statistic ,Checkbox} from 'antd'
import CancalPay from './components/CancelPay'
import ConfirmPay from './components/ConfirmPay'
import ConfirmBuy from './components/ConfirmBuy'

import './Otc.less'
const { Countdown } = Statistic

const ShopQRcode = require('../../assets/image/transaction/ShopQRcode.png')
const time = require('../../assets/icon/transaction/time.png')
const QRcode = require('../../assets/icon/transaction/QRcode.png')
const tip = require('../../assets/icon/transaction/tip.png')
const question = require('../../assets/icon/transaction/question.png')
const timeblue = require('../../assets/icon/transaction/timeblue.png')
const goback = require('../../assets/icon/transaction/return.png')


const accountTypes = [
    { key:0, type: '银行卡',content:'收款人昵称 65131651616616 中国工商 背景大街支行',color:'#F3B664' ,img:''},
    { key:1, type: '支付宝',content:'收款人昵称 nickname',color:'#1784DA',img:QRcode },
    { key:2, type: '微信',content:'收款人昵称 jackandros',color:'#4BB874' ,img:QRcode},
]
const tradeTips = [
    { content:'您的汇款将直接进入卖家账户,交易过程中卖家出售的数字资产由平台冻结保护' },
    { content:'请在汇款规定时间之内完成付款,并务必点击“标记为已支付”卖家确认收款后,将同意放行划币' },
    { content:'如果买家当日取消订单达3次,将会被限制当日的买入功能' },
]

const orderContent = [
    { name:'单价*数量(CNY/BTC)' ,content:'70000*0.11' },
    { name:'BTC到账数量' ,content:'0.11' },
    { name:'订单号' ,content:'12345678945612' },

]
const deadline = Date.now() + 1000 * 60 * 60 * 1/4 ; // Moment is also OK

    class Order extends Component{
        constructor(props) {
            super(props)
            this.state = {
                visible: false,
                visible2:false,
                visible_ali: false,
                confirmLoading: false,
                visible_img: false,
                visible_cancal: false,
                checked: false,
            }
        }


    showModal = () => {
        this.setState({
        visible: true,
        });
    };
    showModalSmall = () => {
        this.setState({
        visible2: true,
        visible: false,
        visible_ali: false
        });
    };
    showCancal = () => {
        this.setState({
        visible_cancal: true,
        visible: false
        });
    };

    handleCancel = () => {
        this.setState({
            visible_cancal: false,
            visible: false,
            visible2: false,
            visible_ali:false
        })
    }

    goback =() => {
        this.props.history.go(-1)
    }

    waitRelease = () => {
        this.props.getStatus(2)
    }
    onChange =(e) => {
        this.setState({
            checked: e.target.checked
        })
      }

    bankPay = () => {
        this.setState({
            visible_Bank: true
        })
        // this.handleCancel()
    }

    Pay = () => {
        this.setState({
            visible: true
        })
        this.handleCancel()
    }
    markType = (item) => {
        switch (item.key) {
            case 0: return this.setState({ tempPay: 0 }); //银行卡
            case 1: return this.setState({ tempPay: 1 }); //支付宝
            case 2: return this.setState({ tempPay: 2 }); //微信
        }
    }
        aliPay = () => {
            this.setState({
                visible_ali:true
            })
    }

    handleBuy = () => {
        console.log(this.state.tempPay);
        switch (this.state.tempPay) {
            case 0:
                return this.bankPay,this.setState({ tempPay:null });
            case 1: return this.aliPay();
            case 2: return this.showModal;
        }

        ;
    }

    render() {
        const { visible, visible2, confirmLoading, checked ,visible_cancal ,visible_ali} = this.state;
        return (
            <div>
                    <div className='common_contain order_contain'>
                    <div className='common_goback' onClick={this.goback}> <div className='goback_right'> <img src={goback} /> <span>返回</span> </div></div>
                        <div className='r1'>
                            <div className='row_right20'>
                                <img className='diameter36 ' src={timeblue} /><span className='common_h2'>请付款</span>
                            </div>
                            <span className='common_amount'><span className='rmb'>¥</span>1000 CNY</span>
                        </div>


                         <Row >
                            <div className='row mt10'>
                                <Col span={9}><div className='flex_row'><p className='common_p'>请在</p><Countdown valueStyle={{color:'#FA5353',fontSize:18}} format="mm:ss" title="" value={deadline} onFinish='' /><p className='common_p'>内向毕文韬支付1000CNY</p></div></Col>
                                <Col span={12}> <div className='row_right10'><span  >标识号:123456</span> <img src={question} /></div> </Col>
                            </div>
                        </Row>
                        <div className='common_row'>
                                {orderContent.map( (item,index) =>  (
                                 <Row >
                                    <div className='r1' index={index}>
                                        <Col span={6}><span className='common_left'>{item.name}</span></Col>
                                        <Col span={15}><span className='common_right'>{item.content}</span></Col>
                                    </div>
                                </Row>
                           ))}
                            <p className='common_charge mt10'>交易成功后收取3%FOT作为平台手续费</p>
                                <div className='line_contain'>
                                     <p className='common_left receive' >卖家收款方式</p>
                                     <p className='order_line'></p>
                                </div>

                                <p>请使用本人 <span className='order_username'>实名为(*花)</span> 的账户向以下账户</p>
                                    {
                                        accountTypes.map( (item,index) => (
                                                <div className='order_payType'>
                                                    <div className='order_single'>
                                                    <Button shape='circle' size='small' key={item.type} key={index} onClick={()=>{this.markType(item)}}/>
                                                        <Button
                                                        className='order_btn btn1'
                                                        key={item.type}
                                                        onClick={() => {

                                                        }}> <span style={{ color: item.color}}>{item.type}</span>
                                                        </Button>
                                                        <span >{item.content}</span>
                                                        <img src={item.img} />
                                                    </div>
                                                </div>

                                        ) )
                                            }
                        <div className='order_pay'>
                             <Button
                                disabled={this.state.tempPay?false:true}
                                type='primary'
                                onClick={this.handleBuy}
                            > 去支付</Button>
                            <Button
                            onClick={this.goback}
                            > 取消</Button>
                        </div>
                        <p className='order_deposit'>对方已支付5000保证金</p>
                        <div className='orde_tradeTips'>
                            <div className='line_contain'>
                                     <img src={tip} />
                                     <p className='common_left receive' >交易提醒</p>
                                     <p className='order_line'></p>
                            </div>
                            {
                                tradeTips.map( (item,index) => (
                                    <ul>
                                        <li className='order_tips'><span className='circle'></span> {item.content}</li>
                                    </ul>
                                ) )
                           }
                        </div>
                    </div>
                    </div>
                {/* 支付宝确认付款 */}
                <ConfirmPay visible={visible_ali} handleCancel={this.handleCancel} showModalSmall={this.showModalSmall} />
                {/* 确认付款2 */}
               <ConfirmBuy  visible2={visible2} handleCancel={this.handleCancel} waitRelease={this.waitRelease} handleCancel={this.handleCancel}  />
                {/* 取消支付 */}
                <CancalPay />
            </div>
        )
    }
}

export default Order;
markTransaction = (item,index) => {
        console.log(item,index);
        if (item.key === "buy" ) {
            this.setState({
                tempTransaction:'buy'
            })
        }else if(item.key === "sell"){
            this.setState({
                tempTransaction:'sell'
            })
        }
    }

  {
   transactionTypes.map((item,index) => (
   <Button
    type={this.state.tempTransaction ===item.key ? 'primary' : 'null'}
    onClick={()=>{this.markTransaction(item,index)}}
     >{item.name}</Button>
    ))
  }
遇到的坑
1. 在onClikc时 直接this.xxx(item) 这样不行,会报错, 应该要 onClick(() => { this.xxx(props) } )
2.switch 后 发现不能禁止按钮 , 因为这里我用的是 return ( 直接结束整个函数) 应该要用 break 来结束Switch (只是switch 依然可以进行下面的函数)
9.行内样式
<span style={{color: this.state.shop === 1 ? '#f00' : '#131625'}}>商家入口</span>
10.跳转页面切换样式
 ,
, 
   render() {
        return (
              <div className='order_nav'>
                <div className='entrance' ref='shop' onClick={this.businessEntrance}><img src={this.props.shop === 1 ? businessclick : shop} alt='' /> <span style={{color:  this.props.shop === 1 ? '#1F8CEB' : '#131625'}}>商家入口</span> </div>
                <span className='i'></span>
                <div className='entrance' onClick={this.orderRecord} ><img src={this.props.order===1?orderclick:order} alt='' /> <span style={{color:  this.props.order === 1 ? '#1F8CEB' : '#131625'}}>订单记录</span> </div>
            </div>
        )
    }
在具体的页面上直接固定死 ( 不然要点两下才会变蓝色,因为跳转了页面)
<OrderNav {...this.props} businessUid={businessUid} shop={shop}/>
11.点击按钮切换样式
<Button shape='circle' size='small' key={item.type} key={index} onClick={() => { this.markType(item) }}>
     {this.state.tempPay === item.key &&
     <span className='smallCircle'></span>}   和的意思是 , 只有前面的条件成立了,那么后面的样式才会出现。
</Button>
只有this.state.tempPay === item.key的时候 , 蓝色小点 <span> 才会出现
12.提交参数给后台,使用展开运算符和父组件提供的user_id
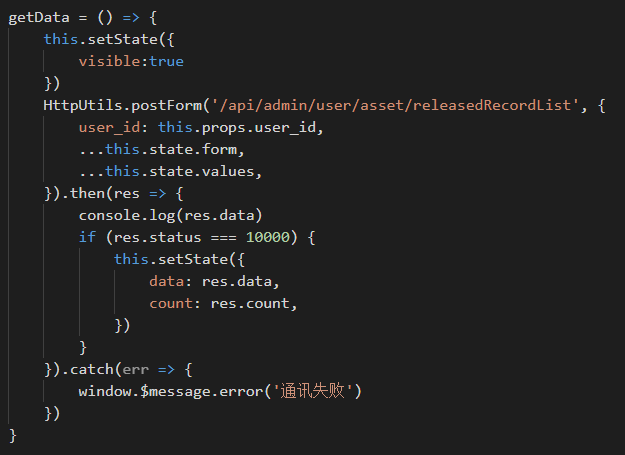

子组件

13. this.props.history.push 路由跳转传值
this.props.history.push({pathname:`/room/details`,data:{name:item.name}})}
获取路由参数
跳转的页面: this.props.location.data
如果没有 传data 直接push('/xxx/xx',{id:xxx})
那么就 this.props.location.state
其他: 1.获取url (this.props.match)
2.打开新的窗口 window.open(`log?dm_user_quantity_record_id=${this.props.item.id}`, '_blank').focus()
14.把数据储存到store中
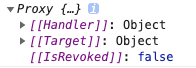
import {inject, observer} from "mobx-react";  //最好的react状态管理工具

export default @inject('store') @observer //注入store

class Tabs extends Component {
   _getUserInfo() {
        HttpUtils.postForm('/api/xxx', {}).then(res => {
            if (res.status === 10000) {
                this.props.store.App.setUser(res.data) 储存数据到store中

                if(res.data.status === 403){
                    this.props.history.push('/auth/error')
                    return
                }
            } else {
                Toast.info('获取信息失败', 1);
            }
        })
    }
}
存储以后,就可以直接读取了
this.props.store.App.user.xxx
注意 :
1. store中的数据不能打印出来 ,但是可以直接取
2.刷新页面有后store中的数据会丢失,所以每次打开APP/首页的的时候要获取信息存到store中
store文件夹下的App文件
import {observable, action} from "mobx";

class App {
    @observable user = {};
    @observable roomCategory = undefined;

    @action setUser(user) {
        this.user = user
    }
    @action setRoomCategory(roomCategory) {
        this.roomCategory = roomCategory
    }
}

export default new App();
15.input 输入框
<input
    className={'input'}
    value={this.state.name}
    placeholder="请输入姓名"
    style={{fontSize: 14, color: '#193459', border: 0}}
    onChange={(e) => {
        this.setState({
        name: e.target.value,
    })
}}/>
16.axios拦截器
      axios.interceptors.response.use(
                response => {
                    console.log('拦截器 response success ')
                    console.log(response.status)
                    return response
                },
                error => {
                    console.log('拦截器 response error ')
                    console.log(error)
                    if(error.request){
                        console.log(error.request)
                    } else if(error.response){
                        console.log(error.response.data);
                        console.log(error.response.status);
                        console.log(error.response.headers);
                    }
                    if (error && error.response) {
                        switch (error.response.status) {
                            case 400: error.message = `请求错误(400)` ; break;
                            case 401: error.message = `未授权,请重新登录(401)`; break;
                            case 403: error.message = `拒绝访问(403)`; break;
                            case 404: error.message = `请求出错(404)`; break;
                            case 408: error.message = `请求超时(408)`; break;
                            case 500: error.message = `服务器错误(500)`; break;
                            case 501: error.message = `服务未实现(501)`; break;
                            case 502: error.message = `网络错误(502)`; break;
                            case 503: error.message = `服务不可用(503)`; break;
                            case 504: error.message = `网络超时(504)`; break;
                            case 505: error.message = `HTTP版本不受支持(505)`; break;
                            default: error.message = `连接出错(${error.response.status})!`;
                        }
                    }else{
                        error.message = `连接服务器失败`
                    }
                    return Promise.reject(error)
                }
            );
坑:
- 1. import abc from ‘xxx/xxx/xxx.css’ console.log(abc) 是一个空对象, 因为JS文件想要拿到东西 必须要export default 而css文件不能暴露出去。
无论在哪里导入的css样式表 默认全局生效 在哪里都可以用里面的声明 ====》解决样式冲突 (vue中使用 <style scoped> </style> 解决 ,而React中没有指令的概念):
(安装了CSS-loader后报错 This relative module was not found:) 是因为没有装 style-loader
   {
        test: /\.css$/,
        //css-loader?后的固定参数modules启用模块化
        use: ['style-loader', 'css-loader?modules'], modules&localIdentName[path][name]-[local]-[hash:10]//后面可加四个参数
      },
有个条件 只针对类/id选择器生效
className一起写: <h1 className={ cssObj.title + "test" }></h1> 或者 <h1 className={ [ cssObj.title , "test" ].join( ' ' ) }></h1>(给数组中每个项空格起来)
样式全局:
1 :global(.nav){
2
3 }
2.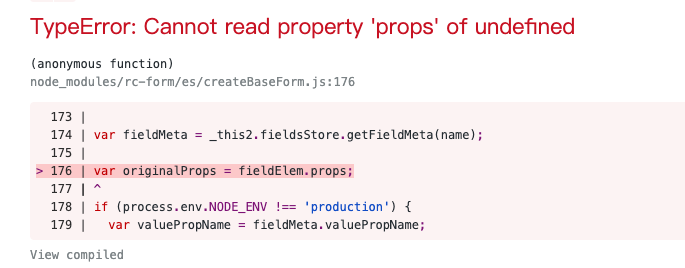
TypeError: Cannot read property 'props' of undefined
(anonymous function)
node_modules/rc-form/es/createBaseForm.js:176
  173 |
  174 | var fieldMeta = _this2.fieldsStore.getFieldMeta(name);
  175 |
> 176 | var originalProps = fieldElem.props;
      | ^  177 |
  178 | if (process.env.NODE_ENV !== 'production') {
  179 |   var valuePropName = fieldMeta.valuePropName;
解决办法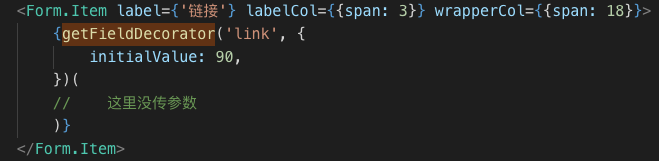
放个标签进去就行了
