Django基础(一)-web框架
一、简单web框架
WSGI:Web Server Gateway Interface
一个简单的web框架:
step1:
#!/usr/bin/env python
# -*- coding: utf-8 -*-
from wsgiref.simple_server import make_server

def application(environ,start_response):
    start_response("200 OK",[("Content-Type","text/html")])
    return [b'<h1>Hello,web!!</h1>']

httpd=make_server("",8080,application)
print("Serving HTTP on port 8080....")

#开始监听http请求
httpd.serve_forever()
注意:
整个application()函数本身没有涉及到任何解析HTTP的部分,也就是说,底层代码不需要我们自己编写,我们只负责在更高层次上考虑如何响应请求就可以了。

application()函数必须由WSGI服务器来调用。有很多符合WSGI规范的服务器,我们可以挑选一个来用。

Python内置了一个WSGI服务器,这个模块叫wsgiref

application()函数就是符合WSGI标准的一个HTTP处理函数,它接收两个参数:
        //environ:一个包含所有HTTP请求信息的dict对象;
        //start_response:一个发送HTTP响应的函数。

在application()函数中,调用start_response('200 OK', [('Content-Type', 'text/html')])就发送了HTTP响应的Header,注意Header只能发送一次,也就是只能调用一次start_response()函数。start_response()函数接收两个参数,一个是HTTP响应码,一个是一组list表示的HTTP Header,每
个Header用一个包含两个str的tuple表示。

通常情况下,都应该把Content-Type头发送给浏览器。其他很多常用的HTTP Header也应该发送。

然后,函数的返回值b'<h1>Hello, web!</h1>'将作为HTTP响应的Body发送给浏览器。

有了WSGI,我们关心的就是如何从environ这个dict对象拿到HTTP请求信息,然后构造HTML,
通过start_response()发送Header,最后返回Body。
step2:
print(environ['PATH_INFO'])
    path=environ['PATH_INFO']
    start_response('200 OK', [('Content-Type', 'text/html')])
    f1=open("index1.html","rb")
    data1=f1.read()
    f2=open("index2.html","rb")
    data2=f2.read()

    if path=="/yuan":
        return [data1]
    elif path=="/alex":
        return [data2]
    else:
        return ["<h1>404</h1>".encode('utf8')]
step3:
from wsgiref.simple_server import make_server

def f1():
    f1=open("index1.html","rb")
    data1=f1.read()
    return [data1]

def f2():
    f2=open("index2.html","rb")
    data2=f2.read()
    return [data2]

def application(environ, start_response):

    print(environ['PATH_INFO'])
    path=environ['PATH_INFO']
    start_response('200 OK', [('Content-Type', 'text/html')])


    if path=="/yuan":
        return f1()

    elif path=="/alex":
        return f2()

    else:
        return ["<h1>404</h1>".encode("utf8")]


httpd = make_server('', 8502, application)

print('Serving HTTP on port 8084...')

# 开始监听HTTP请求:
httpd.serve_forever()
step4:
from wsgiref.simple_server import make_server


def f1(req):
    print(req)
    print(req["QUERY_STRING"])

    f1=open("index1.html","rb")
    data1=f1.read()
    return [data1]

def f2(req):

    f2=open("index2.html","rb")
    data2=f2.read()
    return [data2]

import time

def f3(req):        #模版以及数据库

    f3=open("index3.html","rb")
    data3=f3.read()
    times=time.strftime("%Y-%m-%d %X", time.localtime())
    data3=str(data3,"utf8").replace("!time!",str(times))


    return [data3.encode("utf8")]


def routers():

    urlpatterns = (
        ('/yuan',f1),
        ('/alex',f2),
        ("/cur_time",f3)
    )
    return urlpatterns


def application(environ, start_response):

    print(environ['PATH_INFO'])
    path=environ['PATH_INFO']
    start_response('200 OK', [('Content-Type', 'text/html')])


    urlpatterns = routers()
    func = None
    for item in urlpatterns:
        if item[0] == path:
            func = item[1]
            break
    if func:
        return func(environ)
    else:
        return ["<h1>404</h1>".encode("utf8")]

httpd = make_server('', 8518, application)

print('Serving HTTP on port 8084...')

# 开始监听HTTP请求:

httpd.serve_forever()
二、 MVC和MTV模式
MVC模式:所谓MVC就是把web应用分为模型(M),控制器(C),视图(V)三层;他们之间以一种插件似的,松耦合的方式连接在一起。模型负责业务对象与数据库的对象(ORM),视图负责与用户的交互(页面),控制器(C)接受用户的输入调用模型和视图完成用户的请求。
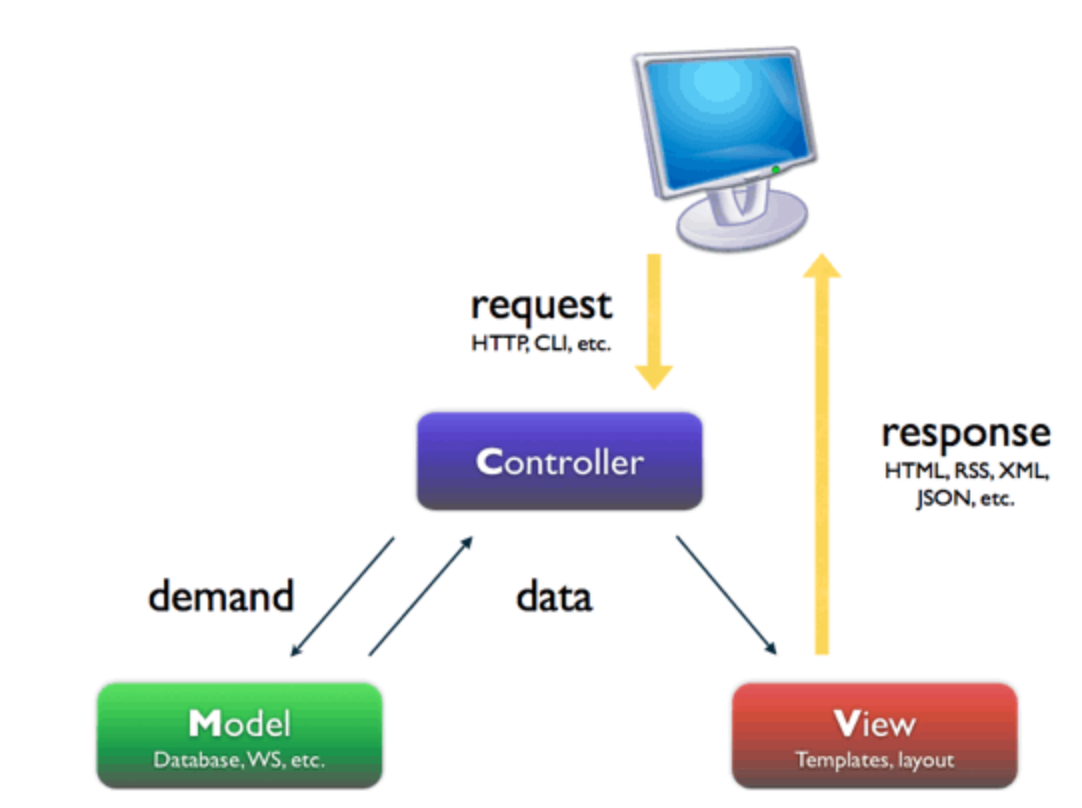
Django的MTV模式本质上与MVC模式没有什么差别,也是各组件之间为了保持松耦合关系,只是定义上有些许不同,Django的MTV分别代表:
- Model(模型):负责业务对象与数据库的对象(ORM)
- Template(模版):负责如何把页面展示给用户
- View(视图):负责业务逻辑,并在适当的时候调用Model和Template
此外,Django还有一个url分发器,它的作用是将一个个URL的页面请求分发给不同的view处理,view再调用相应的Model和Template

三、django流程和命令行工具
3.1、django实现流程
1)安装django
pip3 install django #需要添加环境变量
2)创建project
django-admin startproject mysite

#创建后会生成如下文件
       #---mysite
          ---settings.py
          ---url.py
          ---wsgi.py
       #---- manage.py(启动文件)
3)创建app
cd mysite
python manage.py startapp blog
4)settings配置
INSTALLED_APPS = [
    'django.contrib.admin',
    'django.contrib.auth',
    'django.contrib.contenttypes',
    'django.contrib.sessions',
    'django.contrib.messages',
    'django.contrib.staticfiles',
    'blog',  #添加
]

#------------------------------------

STATICFILES_DIRS=(
     os.path.join(BASE_DIR,"statics"),
)
5)根据需求设计代码
url.py,
view.py
6)使用模板
render(req,"index.html")
7)启动项目
python manage.py runserver 127.0.0.1:8090
8)连接数据库,操作数据
model.py
3.2、django的命令行工具
四、django配置文件设置
4.1、静态文件设置
以在pycharm中创建项目为例:

1)创建视图
#编辑blog下的views.py

def show_time(request):
    # return HttpResponse("hello")
    t=time.ctime()
    # return render(request,"index.html",locals())
    return render(request,"index.html",{"time":t})
2)修改urls.py
from django.contrib import admin
from django.urls import path
from blog import views

urlpatterns = [
    path('admin/', admin.site.urls),
    path('show_time/',views.show_time ),  #添加
]
3)修改setting.py
STATIC_URL = '/static/'  #别名

STATICFILES_DIRS=(
    # os.path.join(BASE_DIR, "blog/static"), #加逗号 绝对路径
    os.path.join(BASE_DIR,"blog","static"), #加逗号 绝对路径
)
4)在templates中创建html文件
<!DOCTYPE html>
<html lang="en">
<head>
    <meta charset="UTF-8">
    {% load staticfiles %}
    <title>Title</title>
</head>
<body>
<h1>hello {{ time }}</h1>
{#<script src="/static/jquery-3.1.1.js"></script>#}
<script src="{% static 'jquery-3.1.1.js' %}"></script>
<script>
    $("h1").css("color","red")
</script>
</body>
</html>
5)启动服务

6)查看状态

五、Django URL(路由系统)
URL配置就像Django 所支撑网站的目录。它的本质是URL模式以及要为该URL模式调用的视图函数之间的映射表
urlpatterns = [
    url(正则表达式, views视图函数,参数,别名),
]
参数说明:
- 一个正则表达式字符串
- 一个可调用对象,通常为一个视图函数或一个指定视图函数路径的字符串
- 可选的要传递给视图函数的默认参数(字典形式)
- 一个可选的name参数
5.1、no_named group
from django.conf.urls import url
from django.contrib import admin

from app01 import views

urlpatterns = [

    url(r'^articles/2003/$', views.special_case_2003),

    #url(r'^articles/[0-9]{4}/$', views.year_archive),

    url(r'^articles/([0-9]{4})/$', views.year_archive),  #no_named group

    url(r'^articles/([0-9]{4})/([0-9]{2})/$', views.month_archive),

    url(r'^articles/([0-9]{4})/([0-9]{2})/([0-9]+)/$', views.article_detail),

]

#----------------------------------------------------------------------------------

#1   There’s no need to add a leading slash, because every URL has that. For
#    example, it’s ^articles, not ^/articles.

#2   A request to /articles/2005/03/ would match the third entry in the list.
#    Django would call the function views.month_archive(request, '2005', '03').

#3   /articles/2005/3/ would not match any URL patterns

#4   /articles/2003/ would match the first pattern in the list, not the second one

#5   /articles/2003/03/03/ would match the final pattern. Django would call the
#    functionviews.article_detail(request, '2003', '03', '03').
5.2、named group
The above example used simple, non-named regular-expression groups (via parenthesis) to capture bits of the URL and pass them as positional arguments to a view. In more advanced usage, it’s possible to use named regular-expression groups to capture URL bits and pass them as keyword arguments to a view.
In Python regular expressions, the syntax for named regular-expression groups is (?P<name>pattern), where name is the name of the group and pattern is some pattern to match.
Here’s the above example URLconf, rewritten to use named groups:
import re
ret=re.search('(?P<id>\d{3})/(?P<name>\w{3})','weeew34ttt123/ooo')
print(ret.group())  #123/ooo
print(ret.group('id'))  #123
print(ret.group('name'))  #ooo

#-----------------------------------------------------------------

from django.conf.urls import url

from . import views

urlpatterns = [
    url(r'^articles/2003/$', views.special_case_2003),
    url(r'^articles/(?P<year>[0-9]{4})/$', views.year_archive),
    url(r'^articles/(?P<year>[0-9]{4})/(?P<month>[0-9]{2})/$', views.month_archive),
    url(r'^articles/(?P<year>[0-9]{4})/(?P<month>[0-9]{2})/(?P<day>[0-9]{2})/$', views.article_detail),
]
5.3、传递额外参数给视图函数
from django.conf.urls import url
from . import views

urlpatterns = [
    url(r'^blog/(?P<year>[0-9]{4})/$', views.year_archive, {'foo': 'bar'}),
]

#In this example, for a request to /blog/2005/, Django will call views.year_archive(request,year='2005',foo='bar')
5.4、实例
1)配置url.py
from django.contrib import admin
from django.urls import path,re_path  #导入re_path ==>匹配正则
from blog import views

urlpatterns = [
    path('admin/', admin.site.urls),
    path('show_time/',views.show_time ),
    re_path('article/(\d{4})$',views.article_year), #无名分组
    re_path('article/(?P<year>\d{4})/(?P<month>\d{2})/', views.article_year_month),
    re_path('article/(?P<year>\d{4})/(?P<month>\d{2})/\d+/', views.article_year_month),
    path("register/", views.register, name="reg"),  #别名
]
2)配置视图函数
def article_year(request,y):

    return HttpResponse(y)

def article_year_month(request,year,month):  #year,month名称不可变

    return HttpResponse("year:%s  month:%s"%(year,month))

def register(request):

    if request.method=="POST":
        print(request.POST.get("user"))
        print(request.POST.get("age"))
        return HttpResponse("success!")

    return render(request,"register.html")
3)编写register.html
<!DOCTYPE html>
<html lang="en">
<head>
    {% load staticfiles %}
    <meta charset="UTF-8">
    <script src="/static/jquery-3.1.1.js"></script>
    <title>Title</title>

    <style>
        * {
            margin: 0;
            padding: 0
        }


    </style>
</head>
<body>

<h1>学生注册</h1>
<hr>
<form action="{% url 'reg' %}" method="post">   #使用别名
   <p>姓名<input type="text" name="user"></p>
   <p>年龄<input type="text" name="age"></p>
   <p>爱好<input type="checkbox" name="hobby" value="1">篮球
          <input type="checkbox" name="hobby" value="2">足球
          <input type="checkbox" name="hobby" value="3">乒乓球
   </p>
   <p><input type="submit">提交</p>
</form>

</body>
</html>
5.5、include


-------------------------------------------
个性签名:独学而无友,则孤陋而寡闻。做一个灵魂有趣的人!