android 中IntentService的作用及使用
IntentService是继承于Service并处理异步请求的一个类,在IntentService内有一个工作线程来处理耗时操作,启动IntentService的方式和启动传统Service一样,同时,当任务执行完后,IntentService会自动停止,而不需要我们去手动控制。另外,可以启动IntentService多次,而每一个耗时操作会以工作队列的方式在IntentService的onHandleIntent回调方法中执行,并且,每次只会执行一个工作线程,执行完第一个再执行第二个,以此类推。
IntentService与Service的不同:
(1)直接 创建一个默认的工作线程,该线程执行所有的intent传递给onStartCommand()区别于应用程序的主线程。
(2)直接创建一个工作队列,将一个意图传递给你onHandleIntent()的实现,所以我们就永远不必担心多线程。
(3)当请求完成后自己会调用stopSelf(),所以你就不用调用该方法了。
(4)提供的默认实现onBind()返回null,所以也不需要重写这个方法。so easy啊
(5)提供了一个默认实现onStartCommand(),将意图工作队列,然后发送到你onHandleIntent()实现。真是太方便了
我们需要做的就是实现onHandlerIntent()方法,还有一点就是经常被遗忘的,构造函数是必需的。
简单说呢?第一,我们省去了在Service中手动开线程的麻烦,第二,当操作完成时,我们不用手动停止Service,第三,it's so easy to use!
接下来让我们来看看如何使用,我写了一个Demo来模拟两个耗时操作,Operation1与Operation2,先执行1,2必须等1执行完才能执行:
新建工程,新建一个继承IntentService的类,我这里是IntentServiceDemo.java
 1 public class IntentServiceDemo extends IntentService {
 2
 3     public IntentServiceDemo() {
 4         //必须实现父类的构造方法
 5         super("IntentServiceDemo");
 6     }
 7
 8     @Override
 9     public IBinder onBind(Intent intent) {
10         System.out.println("onBind");
11         return super.onBind(intent);
12     }
13
14
15     @Override
16     public void onCreate() {
17         System.out.println("onCreate");
18         super.onCreate();
19     }
20
21     @Override
22     public void onStart(Intent intent, int startId) {
23         System.out.println("onStart");
24         super.onStart(intent, startId);
25     }
26
27
28     @Override
29     public int onStartCommand(Intent intent, int flags, int startId) {
30         System.out.println("onStartCommand");
31         return super.onStartCommand(intent, flags, startId);
32     }
33
34
35     @Override
36     public void setIntentRedelivery(boolean enabled) {
37         super.setIntentRedelivery(enabled);
38         System.out.println("setIntentRedelivery");
39     }
40
41     @Override
42     protected void onHandleIntent(Intent intent) {
43         //Intent是从Activity发过来的,携带识别参数,根据参数不同执行不同的任务
44         String action = intent.getExtras().getString("param");
45         if (action.equals("oper1")) {
46             System.out.println("Operation1");
47         }else if (action.equals("oper2")) {
48             System.out.println("Operation2");
49         }
50
51         try {
52             Thread.sleep(2000);
53         } catch (InterruptedException e) {
54             e.printStackTrace();
55         }
56     }
57
58     @Override
59     public void onDestroy() {
60         System.out.println("onDestroy");
61         super.onDestroy();
62     }
63
64 }
我把生命周期方法全打印出来了,待会我们来看看它执行的过程是怎样的。接下来是Activity,在Activity中来启动IntentService:
 1 public class TestActivity extends Activity {
 2     /** Called when the activity is first created. */
 3     @Override
 4     public void onCreate(Bundle savedInstanceState) {
 5         super.onCreate(savedInstanceState);
 6         setContentView(R.layout.main);
 7
 8         //可以启动多次,每启动一次,就会新建一个work thread,但IntentService的实例始终只有一个
 9         //Operation 1
10         Intent startServiceIntent = new Intent("com.test.intentservice");
11         Bundle bundle = new Bundle();
12         bundle.putString("param", "oper1");
13         startServiceIntent.putExtras(bundle);
14         startService(startServiceIntent);
15
16         //Operation 2
17         Intent startServiceIntent2 = new Intent("com.test.intentservice");
18         Bundle bundle2 = new Bundle();
19         bundle2.putString("param", "oper2");
20         startServiceIntent2.putExtras(bundle2);
21         startService(startServiceIntent2);
22     }
23 }
最后记得在Android中进行注册,
1 <service android:name=".IntentServiceDemo">
2             <intent-filter >
3                 <action android:name="com.test.intentservice"/>
4             </intent-filter>
5         </service>
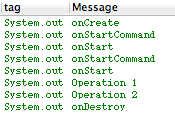
我们来看看结果:

从结果可以看到,onCreate方法只执行了一次,而onStartCommand和onStart方法执行了两次,开启了两个Work Thread,这就证实了之前所说的,启动多次,但IntentService的实例只有一个,这跟传统的Service是一样的。Operation1也是先于Operation2打印,并且我让两个操作间停顿了2s,最后是onDestroy销毁了IntentService。
这就是IntentService,一个方便我们处理业务流程的类,它是一个Service,但是比Service更智能。


