

SpringMVC 完美解决PUT请求参数绑定问题(普通表单和文件表单)
一 适用场景
1. Jsp表单提交 模拟发送的PUT请求
2. 客户端(android ios...) 直接发送的PUT请求
网上针对PUT请求参数绑定问题的回答可谓是五花八门 但是试用下来我发现普遍存在一个问题 要么只支持Jsp提交的参数 要么只支持客户端(android ios...)提交的参数 这两兄弟不能共存 这样肯定是不行滴 在我一顿操作下 终于解决了 可以同时支持Jsp和客户端(android ios...)提交的参数
二 解决方案
1. 自定义文件上传实现类PostAndPutMultipartResolver 解决客户端(android ios...) PUT提交文件表单异常
public class PostAndPutMultipartResolver extends StandardServletMultipartResolver {

    @Override
    public boolean isMultipart(HttpServletRequest request) {
        if ("POST".equalsIgnoreCase(request.getMethod()) || "PUT".equalsIgnoreCase(request.getMethod())) {
            return StringUtils.startsWithIgnoreCase(request.getContentType(), "multipart/");
        }
        return false;
    }
}
2. 修改spring配置文件 resources/application.xml 添加文件上传实现类bean
<!-- 文件上传实现类 id名称必须固定 -->
<bean id="multipartResolver" class="com.hy.ssm.resolver.PostAndPutMultipartResolver" />
3. 修改web.xml配置文件
<?xml version="1.0" encoding="UTF-8"?>
<web-app xmlns="http://xmlns.jcp.org/xml/ns/javaee"
         xmlns:xsi="http://www.w3.org/2001/XMLSchema-instance"
         xsi:schemaLocation="http://xmlns.jcp.org/xml/ns/javaee http://xmlns.jcp.org/xml/ns/javaee/web-app_3_1.xsd"
         version="3.1">

    <!-- 指定Spring配置文件的位置 -->
    <context-param>
        <param-name>contextConfigLocation</param-name>
        <param-value>classpath:application.xml</param-value>
    </context-param>
    <!-- 让Spring容器随项目的启动而创建 随项目的关闭而销毁 -->
    <!-- 容器创建时 会把所有单例对象都创建出来 -->
    <listener>
        <listener-class>org.springframework.web.context.ContextLoaderListener</listener-class>
    </listener>

    <!-- Jsp支持RESTful -->
    <filter>
        <filter-name>hiddenHttpMethodFilter</filter-name>
        <filter-class>org.springframework.web.filter.HiddenHttpMethodFilter</filter-class>
    </filter>
    <filter-mapping>
        <filter-name>hiddenHttpMethodFilter</filter-name>
        <servlet-name>spring-mvc</servlet-name>
    </filter-mapping>

    <!-- 客户端(android ios...)支持RESTful -->
    <filter>
        <filter-name>httpPutFormContentFilter</filter-name>
        <filter-class>org.springframework.web.filter.HttpPutFormContentFilter</filter-class>
    </filter>
    <filter-mapping>
        <filter-name>httpPutFormContentFilter</filter-name>
        <!-- 拦截所有 -->
        <url-pattern>/*</url-pattern>
    </filter-mapping>

    <!-- 处理POST提交乱码 -->
    <filter>
        <filter-name>characterEncodingFilter</filter-name>
        <filter-class>org.springframework.web.filter.CharacterEncodingFilter</filter-class>
        <init-param>
            <param-name>encoding</param-name>
            <param-value>UTF-8</param-value>
        </init-param>
    </filter>
    <filter-mapping>
        <filter-name>characterEncodingFilter</filter-name>
        <!-- 拦截所有 -->
        <url-pattern>/*</url-pattern>
    </filter-mapping>

    <!-- 前端控制器 -->
    <servlet>
        <servlet-name>spring-mvc</servlet-name>
        <servlet-class>org.springframework.web.servlet.DispatcherServlet</servlet-class>
        <init-param>
            <param-name>contextConfigLocation</param-name>
            <param-value>classpath:/spring-mvc.xml</param-value>
        </init-param>
        <!-- 配置SpringMVC启动时机
                1. 第一次被访问时启动 值为负数
                2. 随着容器启动而启动 值为0或正数 -->
        <load-on-startup>1</load-on-startup>
        <multipart-config>
            <!-- 文件上传大小(单位B) 5M = 5 * 1024 * 1024 -->
            <max-file-size>5242880</max-file-size>
            <!-- 文件上传请求大小(单位B) 10M = 10 * 1024 * 1024 -->
            <max-request-size>10485760</max-request-size>
        </multipart-config>
    </servlet>
    <servlet-mapping>
        <servlet-name>spring-mvc</servlet-name>
        <!-- 拦截所有(不包含jsp 包含js png css...) -->
        <url-pattern>/</url-pattern>
    </servlet-mapping>
</web-app>
4. 创建控制器TestController
@Controller
@RequestMapping("/test")
public class TestController {

    @PutMapping("/update/{id}")
    @ResponseBody
    public Map update(@PathVariable Integer id, String name) {
        Map<String, Object> map = new HashMap<>();
        map.put("id", id);
        map.put("name", name);
        return map;
    }

    @PutMapping("/updateX/{id}")
    @ResponseBody
    public Map updateX(@PathVariable Integer id, HttpServletRequest request, String name, MultipartFile file) throws Exception {
        Map<String, Object> map = new HashMap<>();
        map.put("id", id);
        map.put("name", name);
        map.put("path", saveFile(request, file));
        return map;
    }

    private String saveFile(HttpServletRequest request, MultipartFile file) throws Exception {
        if (null != file && !file.isEmpty()) {
            String fileName = UUID.randomUUID().toString().replace("-", ""); //文件名
            String originalFilename = file.getOriginalFilename();
            String substring = originalFilename.substring(originalFilename.lastIndexOf("."));
            String path = request.getServletContext().getRealPath("/upload") + "/" + fileName + substring;
            file.transferTo(new File(path));
            return path;
        }
        return "";
    }
}
以上就能完美解决PUT请求参数绑定问题 赶时间的老哥可以忽略下文
三 解决思路
1. 先bb一下起因
我最近再重构一个自己的项目 打算把接口交互修改成RESTful风格 浅显的说一下RESTful风格 增删改查对应POST DELETE PUT GET请求
2. 环境
网页端: Jsp 使用Form表单发送请求
客户端: Android 使用Retrofit发送请求
服务端: Java 使用SpringMVC处理请求
3. 思路
处理网页端的交互
浏览器Form表单只支持GET POST方式的请求
Spring3.0添加了一个过滤器org.springframework.web.filter.HiddenHttpMethodFilter 通过隐藏字段_method可以将POST请求转换为DELETE PUT请求
这样就可以接收普通表单数据和文件表单数据
注意 文件上传请使用org.springframework.web.multipart.support.StandardServletMultipartResolver 并配置web.xml
如果 文件上传使用org.springframework.web.multipart.commons.CommonsMultipartResolver 一定得让spring加载bean 而非springmvc 否则不生效
处理客户端交互
客户端使用PUT请求发送表单数据 不管是普通表单还是文件表单 服务端Controller层参数绑定均为null
为了避免重复造轮子 我用Google解决了普通表单数据接收不到 也就是使用上面说的org.springframework.web.filter.HttpPutFormContentFilter就可以解决该问题
但是 文件表单数据还是接收不到 Google也不好用了 不知道是不是我姿势不对
自己一番尝试 终于解决
使用上面说的PostAndPutMultipartResolver就可以解决该问题
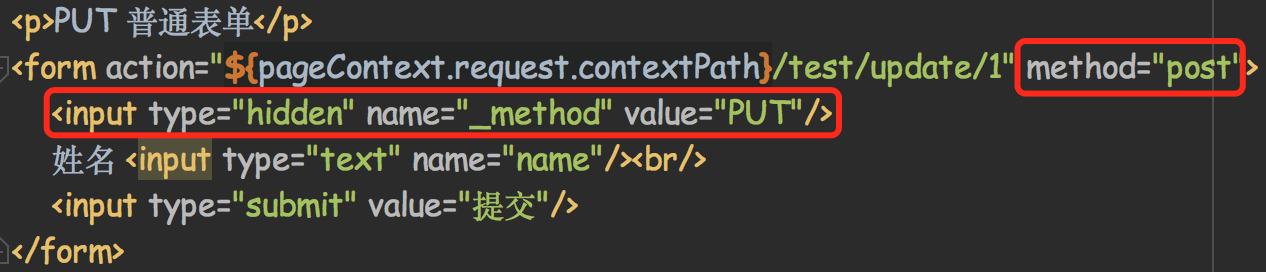
4. jsp网页端核心代码
<%@ page contentType="text/html;charset=UTF-8" language="java" %>
<html>
<head>
    <title>Title</title>
</head>
<body>

<p>PUT 普通表单</p>
<form action="${pageContext.request.contextPath}/test/update/1" method="post">
    <input type="hidden" name="_method" value="PUT"/>
    姓名 <input type="text" name="name"/><br/>
    <input type="submit" value="提交"/>
</form>

<p>PUT 文件表单</p>
<form action="${pageContext.request.contextPath}/test/updateX/1" enctype="multipart/form-data" method="post">
    <input type="hidden" name="_method" value="PUT"/>
    姓名 <input type="text" name="name"/><br/>
    文件 <input type="file" name="file"/><br/>
    <input type="submit" value="提交"/>
</form>

</body>
</html>
5. android客户端核心代码
public interface Api {

    @PUT("/test/update/{id}")
    @FormUrlEncoded
    Call<ResponseBody> update(@Path("id") Integer id, @Field("name") String name);

    @PUT("/test/updateX/{id}")
    @Multipart
    Call<ResponseBody> updateX(@Path("id") Integer id, @Part MultipartBody.Part name, @Part MultipartBody.Part file);
}
private void update() {
    Call<ResponseBody> call = mApi.update(3, "黄祎");
    call.enqueue(new Callback<ResponseBody>() {
        @Override
        public void onResponse(Call<ResponseBody> call, Response<ResponseBody> response) {}

        @Override
        public void onFailure(Call<ResponseBody> call, Throwable t) {}
    });
}

private void updateX() {
    MultipartBody.Part name = MultipartBody.Part.createFormData("name", "黄祎");
    RequestBody body = RequestBody.create(MediaType.parse("application/octet-stream"), card("text.txt"));
    MultipartBody.Part file = MultipartBody.Part.createFormData("file", "text.txt", body);
    Call<ResponseBody> call = mApi.updateX(3, name, file);
    call.enqueue(new Callback<ResponseBody>() {
        @Override
        public void onResponse(Call<ResponseBody> call, Response<ResponseBody> response) {}

        @Override
        public void onFailure(Call<ResponseBody> call, Throwable t) {}
    });
}
四 总结
虽然只是寥寥几句 但是我走完这几步也花了一下午时间 哈哈哈 技术有限技术有限
希望能帮助到你 如果你的问题得到解决 请给个推荐点个赞 谢谢老板
