Django实战(13):在session中保存购物车
现在,我们有了一个产品目录界面,用户如果看到满意的产品,就可以将其放入购物车。下面就让我们来实现购物车的功能。
首先要做一下简单的分析和设计。购物车应该显示一系列产品的清单,其中列出了买方选中的产品。但是这个清单没有必要马上保存到数据库,因为直到付款之前,用户随时都有可能改变主意。我们只需要在用户的session中记录这些产品就可以了。
购物车中的条目
购物车中的条目与产品(Product)很 类似,但是我们没有必要将这些信息再重复记录一次,而只需要让条目关联到产品即可。此外在条目中还会记录一些产品中没有的信息,比如数量。最后,我们想要 在条目中记录一下单价——虽然产品中包含了价格信息,但是有时候可能会有一些折扣,所以需要记录下来用户购买时的价格。基于这些分析,我们设计了条目这一 模型类:
class LineItem(models.Model):
    product = models.ForeignKey(Product)
    unit_price = models.DecimalField(max_digits=8,decimal_places=2)
    quantity = models.IntegerField()
购物车
购物车是这些条目的容器。我们希望实现一个“聪明的”购物车,它可以有自己的一些行为:比如,如果放入已经有的产品,就更改该产品的数量而不是再增加一个 条目;能够查询当前购物车中的产品数量,等等。所以购物车也应该是一个模型类。但是与LineItem不同,购物车并不需要记录到数据库中,就好像超市并 不关注顾客使用了哪量购物车而只关注他买了什么商品一样。所以购物车不应该继承自models.Model,而仅仅应该是一个普通类:
    class Cart(object):
    def __init__(self, *args, **kwargs):
    self.items = []
    self.total_price = 0
    def add_product(self,product):
    self.total_price += product.price
    for item inself.items:
    if item.product.id == product.id:
    item.quantity += 1
    return
    self.items.append(LineItem(product=product,unit_price=product.price,quantity=1))
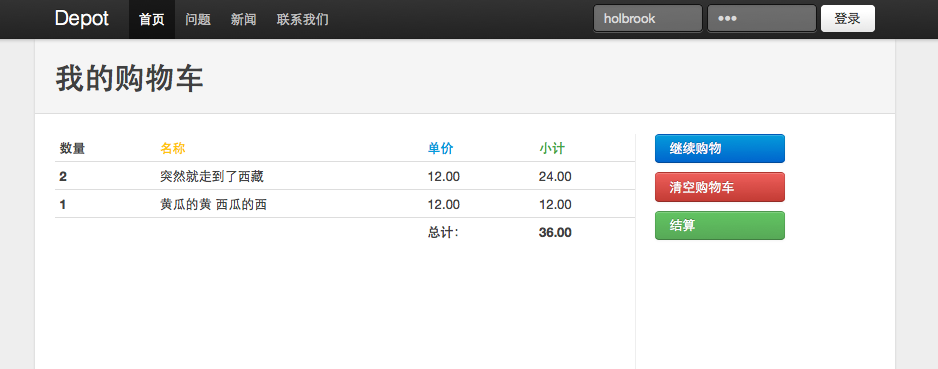
在我们设计模型的同时,界面设计师也为我们设计好了购物车的界面:

接下来就可以实现url映射,view函数和模板。首先我们希望购物车的url为”http://localhost:8000/depotapp/cart/view/“,这需要在depotapp/urls.py的urlpatterns中增加一行:
(r'cart/view/', view_cart),
然后在depotapp/views.py中定义视图函数。注意购物车是保存在session中的,需要通过request.session.get获取:
    def view_cart(request):
    cart = request.session.get("cart",None)
    t = get_template('depotapp/view_cart.html')
    ifnot cart:
    cart = Cart()
    request.session["cart"] = cart
    c = RequestContext(request,locals())
    return HttpResponse(t.render(c))
最后实现模板界面:
    {% extends "base.html" %}
    {% block title %} 我的购物车{% endblock %}
    {% block pagename %} 我的购物车  {% endblock %}
    {% block content %}
    <divclass="row">
    <divclass="span10">
    <tableclass="condensed-table">
    <thead>
    <tr>
    <thclass="header">数量</th>
    <thclass="yellow header">名称</th>
    <thclass="blue header">单价</th>
    <thclass="green header">小计</th>
    </tr>
    </thead>
    <tbody>
    {% for item in cart.items %}
    <tr>
    <th>{{item.quantity}}</th>
    <td>{{item.product.title}}</td>
    <td>{{item.unit_price}}</td>
    <td>{% widthratio item.quantity 1 item.unit_price %} </td>
    </tr>
    {% endfor %}
    <tr>
    <th></th>
    <td></td>
    <th>总计:</th>
    <th>{{cart.total_price}}</th>
    </tr>
    </tbody>
    </table>
    </div>
    <divclass="span4">
    <p><aclass="btn primary span2"href="#">继续购物</a></a></p>
    <p><aclass="btn danger span2"href="#">清空购物车</a></p>
    <p><aclass="btn success span2"href="#">结算</a></p>
    </div>
    </div>
    {% endblock %}
这里面有一个技巧。因为Django模板的设计理念是”业务逻辑应该和表现逻辑相对分开“,所以在Django模板中不建议执行过多的代码。在计算 条目小计的时候,使用的是Django模板的widthratio标签。该标签的原意是按比例计算宽度:根据当前值(this_value)和最大值 (max_value)之间的比例,以及最大宽度(max_width)计算出当前的宽度(this_width),即{% widthratio this_value max_value max_width %} = max_width * this_value / max_value。但是如果我们设定max_value=1,就可以通过width ratio在Django模板中进行乘法计算了。同理还可以进行除法计算。而总计价格的计算是通过模型(Cart)类实现的。
为Django增加session支持
好了,我们已经做了大量的工作,现在让我们欣赏一下自己的作品。但是启动server并访问http://localhost:8000 /depotapp/cart/view/时,却提示”找不到django_session表“。这是因为Django对session的支持是通过内置 的django.contrib.sessions应用实现的,该应用会将session数据保存在数据库中。但是创建project是Django并没 有默认安装该app——Django不会瞒着你做任何事情。所以如果我们”显式地“决定要使用session,需要更改project的设置,在 depot/settings.py的INSTALLED_APPS中去掉session的注释:
    INSTALLED_APPS = (
    #'django.contrib.auth',
    #'django.contrib.contenttypes',
    'django.contrib.sessions',
    #'django.contrib.sites',
    #'django.contrib.messages',
    #'django.contrib.staticfiles',
    # Uncomment the next line to enable the admin:
    # 'django.contrib.admin',
    # Uncomment the next line to enable admin documentation:
    # 'django.contrib.admindocs',
    'depot.depotapp',
    'django-groundwork',
    )
然后还要同步一下数据库:
$ python manage.py syncdb
Creating tables ...
Creating table django_session
Installing custom SQL ...
Installing indexes ...
No fixtures found.
这是再启动服务器,就可以看到我们实现的购物车了。但是这个购物车能看不能用,无法将商品加入购物车,也无法从中去掉商品。下一节,让我们继续完善购物车的功能。

