WPF 4 Ribbon 开发 之 应用程序菜单(Application Menu)
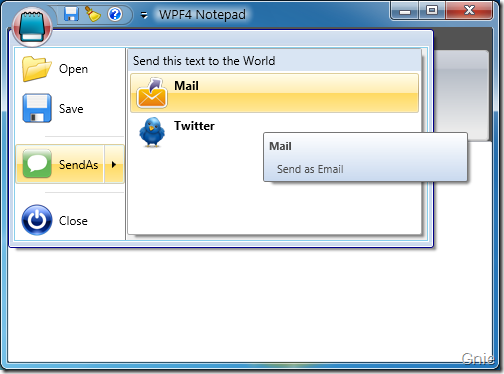
在上一篇中我们完成了快捷工具栏的开发,本篇将讲解应用程序菜单开发的相关内容。如下图所示,点击程序窗口左上角的记事本图标(Application Button)会显示出应用程序菜单(Application Menu)列表,列表中的按键即为软件的一些基本功能。

RibbonCommand
以“Open”按键为例,首先仍然需要在<RibbonWindow.Resources>中定义其<RibbonCommand>内容。
<r:RibbonCommand x:Key="OpenCommand" LabelTitle="Open"
                 CanExecute="OpenCommand_CanExecute"
                 Executed="OpenCommand_Executed"
                 SmallImageSource="Images/Open.png"
                 LargeImageSource="Images/Open.png"
                 ToolTipTitle="Open"
                 ToolTipDescription="Open document" />
为<RibbonCommand>添加Command 事件实现打开文档功能:
private void OpenCommand_CanExecute(object sender, CanExecuteRoutedEventArgs e)
{
    e.CanExecute = true;
}

private void OpenCommand_Executed(object sender, ExecutedRoutedEventArgs e)
{
    ShellContainer sc = KnownFolders.DocumentsLibrary as ShellContainer;
    CommonOpenFileDialog cofd = new CommonOpenFileDialog();
    cofd.InitialDirectoryShellContainer = sc;
    cofd.DefaultExtension = ".txt";
    cofd.Filters.Add(new CommonFileDialogFilter("Text Files", "*.txt"));
    if (cofd.ShowDialog() == CommonFileDialogResult.OK)
    {
        txtBox.Text = File.ReadAllText(cofd.FileName, Encoding.Default);
    }
}
ApplicationMenu
<RibbonCommand>完成后继续在<Ribbon>中添加<RibbonApplicationMenu>用于设置菜单列表中的内容。其中<RibbonApplicationMenuItem>即为菜单按键,将相应的<RibbonCommand>添加到Command 属性中。另,按键之间可用<Separator>作为分隔。
<r:Ribbon DockPanel.Dock="Top" FocusManager.IsFocusScope="True" Title="WPF4 Notepad">
    <r:Ribbon.ApplicationMenu>
        <r:RibbonApplicationMenu Command="{StaticResource AppMenuCommand}">
            <r:RibbonApplicationMenuItem Command="{StaticResource OpenCommand}" />
            <r:RibbonApplicationMenuItem Command="{StaticResource SaveCommand}" />
            <Separator/>
            <r:RibbonApplicationSplitMenuItem Command="{StaticResource SendAsCommand}">
                <r:RibbonApplicationMenuItem Command="{StaticResource MailCommand}" />
                <r:RibbonApplicationMenuItem Command="{StaticResource TwitterCommand}" />
            </r:RibbonApplicationSplitMenuItem>
            <Separator/>
            <r:RibbonApplicationMenuItem Command="{StaticResource CloseCommand}" />
        </r:RibbonApplicationMenu>
    </r:Ribbon.ApplicationMenu>
</r:Ribbon>
上面代码中对于存在子菜单的按键(例如,SendAs 按键)可用<RibbonApplicationSplitMenuItem>对其进行扩展。子菜单标题内容可通过<RibbonCommand>的LabelDescription 属性进行设置(如下代码)。
<r:RibbonCommand x:Key="SendAsCommand" LabelTitle="SendAs"
                 LabelDescription="Send this text to the World"
                 CanExecute="SendAsCommand_CanExecute"
                 SmallImageSource="Images/SendAs.png"
                 LargeImageSource="Images/SendAs.png"
                 ToolTipTitle="SendAs"
                 ToolTipDescription="Send this text to the World" />

ApplicationButton
最后来完成应用程序菜单图标(记事本图标)的开发。当然也需要通过<RibbonCommand>进行设置,与之前不同之处在于不用添加CanExecute 和Executed 内容。
<r:RibbonCommand x:Key="AppMenuCommand" LabelTitle="Application Button"
                 SmallImageSource="Images/Notepad.png"
                 LargeImageSource="Images/Notepad.png"
                 ToolTipTitle="WPF4 Notepad"
                 ToolTipDescription="Notepad Application with Ribbon Sample" />
将<RibbonCommand>加入<RibbonApplicationMenu> Command 属性后默认情况呈现下图样式,图标的形状并不与Office 2007 一样为圆形。

如果想要圆形效果其实也很简单,Ribbon 控件库为我们提供了三种样式模板:Office2007Black、Office2007Blue、Office2007Silver,只需在MainWindow() 中加入一行代码即可实现圆形效果和不同的Ribbon 样式。
public MainWindow()
{
    InitializeComponent();
    this.Resources.MergedDictionaries.Add(PopularApplicationSkins.Office2007Black);
}


本篇关于应用程序菜单的开发就介绍到这里,下篇将正式进行标签工具栏(Tab Toolbar)的开发内容。同时本示例源代码也将一同公布。敬请关注… …
出处:{GnieTech} (http://www.cnblogs.com/gnielee/)
版权声明:本文的版权归作者与博客园共有。转载时须注明本文的详细链接,否则作者将保留追究其法律责任。
 在上一篇中我们完成了快捷工具栏的开发,本篇将讲解应用程序菜单开发的相关内容。如下图所示,点击程序窗口左上角的记事本图标(Application Button)会显示出应用程序菜单(Application Menu)列表,列表中的按键即为软件的一些基本功能。

