
[js高手之路] html5 canvas系列教程 - 掌握画直线图形的常用API
我们接着上文[js高手之路] html5 canvas系列教程 - 认识canvas以及基本使用方法继续.
一、直线的绘制
cxt.moveTo( x1, y1 ): 将画笔移动到x1, y1这个点
cxt.lineTo( x2, y2 ):将画笔从起点开始画直线,一直画到终点坐标( x2, y2 )
cxt.stroke();用画笔连线,moveTo,lineTo并不会产生实际的线条
x1,y1,x2,y2是点的坐标,canvas的坐标原点在canvas的左上角.
画一根直线:
 1 <style>
 2     body {
 3         background:#000;
 4     }
 5     #canvas {
 6         background:white;
 7     }
 8 </style>
 9 <script>
10     window.onload = function(){
11         var oCanvas = document.querySelector( "#canvas" ),
12             oGc = oCanvas.getContext( '2d' );
13         oGc.moveTo( 50, 50 );
14         oGc.lineTo( 250, 50 );
15         oGc.stroke();
16     }
17 </script>
18 </head>
19 <body>
20 <canvas id="canvas"></canvas>
21 </body>
如果把stroke注释了,是不会出现线条的,stoke的作用就是用来将点连起来
通过2个实例来区分,moveTo与lineTo的区别
 1 <style>
 2     body {
 3         background:#000;
 4     }
 5     #canvas {
 6         background:white;
 7     }
 8 </style>
 9 <script>
10     window.onload = function(){
11         var oCanvas = document.querySelector( "#canvas" ),
12             oGc = oCanvas.getContext( '2d' );
13         oGc.moveTo( 50, 50 );
14         oGc.lineTo( 250, 50 );
15         oGc.moveTo( 50, 200 );
16         oGc.lineTo( 250, 200 );
17         oGc.stroke();
18
19         oGc.moveTo( 300, 50 );
20         oGc.lineTo( 500, 50 );
21         oGc.lineTo( 300, 200 );
22         oGc.lineTo( 500, 200 );
23         oGc.stroke();
24     }
25 </script>
26 </head>
27 <body>
28 <canvas id="canvas" width="600" height="400"></canvas>
29 </body>
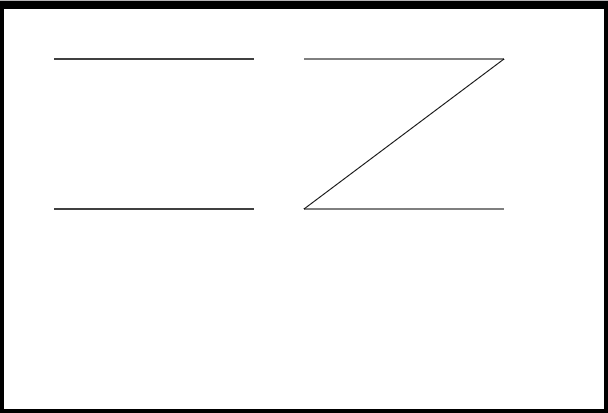
左右两边的线形图,代码就一点区别,左边图形是第二个点用了lineTo, 第三个点用了moveTo, 右边图形第二个点用了lineTo,第三个点还是lineTo,从图中你应该能感受到这两个方法的区别吧?
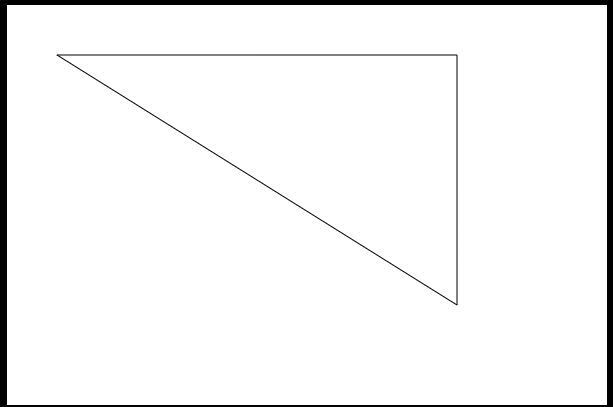
画三角形
 1 <style>
 2     body {
 3         background:#000;
 4     }
 5     #canvas {
 6         background:white;
 7     }
 8 </style>
 9 <script>
10     window.onload = function(){
11         var oCanvas = document.querySelector( "#canvas" ),
12             oGc = oCanvas.getContext( '2d' );
13
14         oGc.moveTo( 50, 50 );
15         oGc.lineTo( 450, 50 );
16         oGc.lineTo( 450, 300 );
17         oGc.lineTo( 50, 50 );
18         oGc.stroke();
19     }
20 </script>
21 </head>
22 <body>
23 <canvas id="canvas" width="600" height="400"></canvas>
24 </body>
把上面的代码,稍微修改下,就能画出一个矩形了
 1 <style>
 2     body {
 3         background:#000;
 4     }
 5     #canvas {
 6         background:white;
 7     }
 8 </style>
 9 <script>
10     window.onload = function(){
11         var oCanvas = document.querySelector( "#canvas" ),
12             oGc = oCanvas.getContext( '2d' );
13
14         oGc.moveTo( 50, 50 );
15         oGc.lineTo( 450, 50 );
16         oGc.lineTo( 450, 300 );
17         oGc.lineTo( 50, 300 );
18         oGc.lineTo( 50, 50 );
19         oGc.stroke();
20     }
21 </script>
22 </head>
23 <body>
24 <canvas id="canvas" width="600" height="400"></canvas>
25 </body>

二,canvas提供了画矩形的API
通过线条我们也能拼接出一个矩形,但是代码太多,每个点都要把握,显得比较麻烦,canvas为我们提供了画矩形的API,有两种,一种是描边矩形,一种是填充矩形.
cxt.strokeStyle = 属性值
cxt.strokeRect( x, y, width, height )
strokeStyle后面的属性是为了修饰线条的,主要包括( 颜色值,渐变色,图案 ),颜色支持英文单词,十六进制,RGB, RGBA格式的颜色设置.
strokeRect: x, y为矩形的左上角坐标,width和height为矩形的宽度和高度
 1     <script>
 2         window.onload = function(){
 3             var oCanvas = document.querySelector( "#canvas" ),
 4                 oGc = oCanvas.getContext( '2d' );
 5
 6             oGc.strokeStyle = '#09f';
 7             oGc.strokeRect( 50, 50, 500, 300 );
 8         }
 9     </script>
10     </head>
11     <body>
12     <canvas id="canvas" width="600" height="400"></canvas>
13     </body>

填充矩形API
cxt.fillStyle = 属性值;
cxt.fillRect( x, y, width, height );
跟上面是一样的,只是把stoke换成了fill,fill就是填充的意思
画一个带有透明度的矩形:
 1 <script>
 2     window.onload = function(){
 3         var oCanvas = document.querySelector( "#canvas" ),
 4             oGc = oCanvas.getContext( '2d' );
 5
 6         oGc.fillStyle = 'rgba( 255, 0, 0, 0.3 )';
 7         oGc.fillRect( 50, 50, 500, 300 );
 8     }
 9 </script>
10 </head>
11 <body>
12 <canvas id="canvas" width="600" height="400"></canvas>
13 </body>

另一种绘制矩形的API:cxt.rect( x, y, width, height );
他与strokeRect和fillRect有什么区别呢?
1,共同点:参数的意思相同
2,不同点,调用strokeRect和fillRect会立即绘制出矩形,而rect并不会,他需要调用stoke()或者fill()方法,才能把矩形绘制出来
 1 <script>
 2     window.onload = function(){
 3         var oCanvas = document.querySelector( "#canvas" ),
 4             oGc = oCanvas.getContext( '2d' );
 5
 6         oGc.fillStyle = 'rgba( 255, 0, 0, 0.3 )';
 7         oGc.rect( 50, 50, 500, 300 );
 8         // oGc.stroke();
 9         oGc.fill();
10     }
11 </script>
12 </head>
13 <body>
14 <canvas id="canvas" width="600" height="400"></canvas>
15 </body>
清空矩形API:cxt.clearRect( x, y, width, height ); 参数跟strokeRect,fillRect意思一样
 1 <script>
 2     window.onload = function(){
 3         var oCanvas = document.querySelector( "#canvas" ),
 4             oGc = oCanvas.getContext( '2d' );
 5
 6         oGc.fillStyle = 'rgba( 255, 0, 0, 0.3 )';
 7         oGc.fillRect( 50, 50, 500, 300 );
 8
 9         oGc.clearRect( 100, 100, 200, 200 );
10     }
11 </script>
12 </head>
13 <body>
14 <canvas id="canvas" width="600" height="400"></canvas>
15 </body>

用fillRect和clearRect画一个加号,当然你可以用moveTo和lineTo,不过代码应该比这种方法多了不少.
 1 <script>
 2     window.onload = function(){
 3         var oCanvas = document.querySelector( "#canvas" ),
 4             oGc = oCanvas.getContext( '2d' );
 5
 6         oGc.fillStyle = 'rgba( 255, 0, 0, 0.3 )';
 7         oGc.fillRect( 100, 100, 200, 200 );
 8         oGc.clearRect( 100, 100, 50, 50 );
 9         oGc.clearRect( 250, 100, 50, 50 );
10         oGc.clearRect( 250, 250, 50, 50 );
11         oGc.clearRect( 100, 250, 50, 50 );
12     }
13 </script>
14 </head>
15 <body>
16 <canvas id="canvas" width="400" height="400"></canvas>
17 </body>

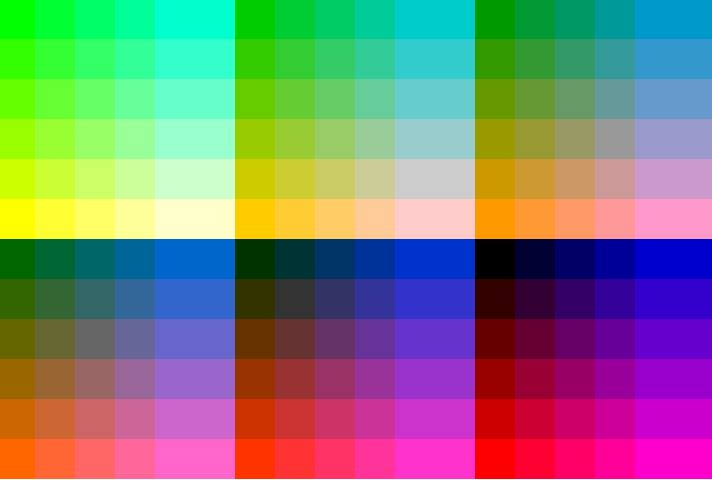
绘制一个调色板:
 1 <style>
 2     body {
 3         background:#000;
 4     }
 5     #canvas {
 6         background:white;
 7     }
 8 </style>
 9 <script>
10     window.onload = function(){
11         var oCanvas = document.querySelector( "#canvas" ),
12             oGc = oCanvas.getContext( '2d' ),
13             aColor = [ '00', '33', '66', '99', 'cc', 'ff' ],
14             aMiddle = [ 'ff', 'cc', '99', '66', '33', '00' ], count = 0;
15         for( var i = 0; i < 12; i++ ){
16             for( var j = 0; j < 18; j++ ){
17                 count++;
18                 if ( i < 6 && count < 6 && j < 6 )
19                     oGc.fillStyle = `#${aColor[i]}${aMiddle[0]}${aColor[j]}`;
20                 else if( i < 6 && count < 12 && j < 12 )
21                     oGc.fillStyle = `#${aColor[i]}${aMiddle[1]}${aColor[j-6]}`;
22                 else if ( i < 6 && count < 18 && j < 18 )
23                     oGc.fillStyle = `#${aColor[i]}${aMiddle[2]}${aColor[j-12]}`;
24                 else if ( count < 6 && j < 6 )
25                     oGc.fillStyle = `#${aColor[i-6]}${aMiddle[3]}${aColor[j]}`;
26                 else if ( count < 12 && j < 12 )
27                     oGc.fillStyle = `#${aColor[i-6]}${aMiddle[4]}${aColor[j-6]}`;
28                 else if ( count < 18 && j < 18 )
29                     oGc.fillStyle = `#${aColor[i-6]}${aMiddle[5]}${aColor[j-12]}`;
30                 oGc.fillRect( j * 40, i * 40, 40, 40 );
31             }
32             count = 0;
33         }
34     }
35 </script>
36 </head>
37 <body>
38 <canvas id="canvas" width="720" height="720"></canvas>
39 </body>
javascript原生实现调色板:
1 var aColor = [ '00', '33', '66', '99', 'cc', 'ff' ], 2 aMiddle = [ 'ff', 'cc', '99', '66', '33','00' ]; 3 4 document.write( "<table>" ); 5 for( var i = 0; i < 12; i++ ){ 6 document.write( "<tr>" ); 7 for( var j = 0 ; j < 18; j++ ) { 8 if ( i < 6 && j < 6 ) //前6行,左6列 9 document.write( "<td style='background-color:#" + aColor[i]+ aMiddle[0] + aColor[j] + "'> </td>" ); 10 else if ( i < 6 && j < 12 ){ //前6行 中间6列 11 document.write( "<td style='background-color:#" + aColor[i]+ aMiddle[1] + aColor[j-6] + "'> </td>" ); 12 }else if ( i < 6 && j < 18 ){ //前6行, 后面6列 13 document.write( "<td style='background-color:#" + aColor[i]+ aMiddle[2] + aColor[j-12] + "'> </td>" ); 14 }else if ( i < 12 && j < 6 ){ //后6行, 左6列 15 document.write( "<td style='background-color:#" + aColor[i-6]+ aMiddle[3] + aColor[j] + "'> </td>" ); 16 }else if ( i < 12 && j < 12 ){ //后6行, 中6列 17 document.write( "<td style='background-color:#" + aColor[i-6]+ aMiddle[4] + aColor[j-6] + "'> </td>" ); 18 }else if ( i < 12 && j < 18 ){ //后6行, 后6列 19 document.write( "<td style='background-color:#" + aColor[i-6]+ aMiddle[5] + aColor[j-12] + "'> </td>" ); 20 } 21 } 22 document.write( "</tr>" ); 23 } 24 document.write( "</table>" );

 浙公网安备 33010602011771号