1、管道的高级操作
将爬取到的数据值分别存储到本地磁盘、redis数据库、mysql数据。
需求:将爬取到的数据值分别存储到本地磁盘、redis数据库、mysql数据。
  1.需要在管道文件中编写对应平台的管道类
  2.在配置文件中对自定义的管道类进行生效操作
qiubai.py
import scrapy
from qiubaipro.items import QiubaiproItem

class QiubaiSpider(scrapy.Spider):
    name = 'qiubai'
    #allowed_domains = ['www.qiushibaike.com/text']
    start_urls = ['https://www.qiushibaike.com/text/']

    def parse(self, response):
        # 建议大家使用xpath进行解析(框架集成了xpath解析的接口)
        div_list = response.xpath("//div[@id='content-left']/div")
        # 存储到的解析到的页面数据
        data_list = []
        for div in div_list:
            author = div.xpath('./div/a[2]/h2/text()').extract_first()
            #content = div.xpath(".//div[@class='content']/span/text()")
            content = div.xpath(".//div[@class='content']/span/text()").extract_first()
            # 1.将解析到数据值(author和content)储存到items对象
            item = QiubaiproItem()
            item['author'] = author
            item['content'] = content
            # 2.将item对象提交给管道
            yield item
pipelines.py
import redis
import pymysql
import json
class QiubaiproPipeline(object):
    conn = None
    def open_spider(self,spider):
        print('写入到redis服务器')
        print('开始爬虫')
        # redis服务器port
        self.conn = redis.Redis(host='127.0.0.1',port=6379)
    # 该方法可以接受爬虫文件中提交过来的item对象,并且对item对象的页面数据进行持久化处理
    # 参数:item表示的就是接受到的item对象
    def process_item(self, item, spider):
        # 1.链接数据库
        dict = {'author':item['author'],
                'content':item['content']}
     dict = json.doums(dict)
        self.conn.lpush('data',dict)

        return item
    # 该方法只会在爬虫结束的时候被调用一次
    def close_spider(self,spider):
        print('爬虫结束')

# 实现将数据值存到本地磁盘中
class QiubaiByFiles(object):
    # 该方法可以接受爬虫文件中提交过来的item对象,并且对item对象的页面数据进行持久化处理
    # 参数:item表示的就是接受到的item对象
    def open_spider(self,spider):
        print('写入到本地磁盘中')
        print('开始爬虫')
        self.fp = open('./qiubai_pipe.txt', 'w', encoding='utf-8')

    # 该方法可以接受爬虫文件中提交过来的item对象,并且对item对象的页面数据进行持久化处理
    # 参数:item表示的就是接受到的item对象
    def process_item(self, item, spider):
        author = item['author']
        content  = item['content']

        # 持久化存储io操作
        self.fp.write(author+':'+content+'\n\n\n')
        return item
    # 该方法只会在爬虫结束的时候被调用一次
    def close_spider(self,spider):
        print('爬虫结束')
        self.fp.close()

# 实现将数据值存储到mysql数据库中
class QiubaiByMysql(object):
    conn = None  # mysql的连接对象声明
    cursor = None  # mysql游标对象声明
    def open_spider(self,spider):
        print('写入到mysql数据库中')
        print('开始爬虫')

        # 链接数据库
        # host 本机的ip地址
        # 在命令行输入 ipconfig查看
        self.conn = pymysql.Connect(host='127.0.0.1',port=3306,user='root',password='123',db='qiubai',charset='utf8')

    # 该方法可以接受爬虫文件中提交过来的item对象,并且对item对象的页面数据进行持久化处理
    # 参数:item表示的就是接受到的item对象
    def process_item(self, item, spider):
        # 1.链接数据库
        # 执行sql语句
        # 插入数据
        sql = 'insert into qiubai(author,content) values("%s","%s")'%(item['author'], item['content'])
        # 获取游标
        self.cursor = self.conn.cursor()
        try:
            self.cursor.execute(sql)
            self.conn.commit()
        except Exception as e:
            print(e)
            self.conn.rollback()

        # 提交事务
        return item
    # 该方法只会在爬虫结束的时候被调用一次
    def close_spider(self,spider):
        print('爬虫结束')
        self.cursor.close()
        self.conn.close()
在settings配置
#  数字表示优先级,数字越大优先级越高
ITEM_PIPELINES = {
   'qiubaipro.pipelines.QiubaiproPipeline': 300,
   'qiubaipro.pipelines.QiubaiByFiles':400,
   'qiubaipro.pipelines.QiubaiByMysql':500,
}
打开终端,先进入文件目录
先打开redis,mysql服务器再执行如下命令:
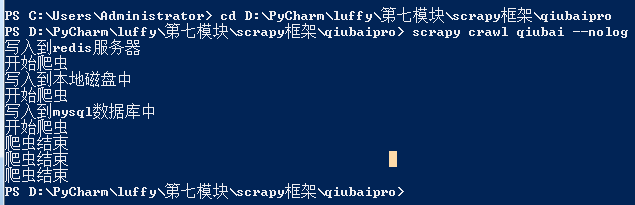
存本地:

存redis:

存mysql
测试成功
多个url数据爬取
***问题:针对多个url进行数据的爬取
    解决方案:请求的手动发送
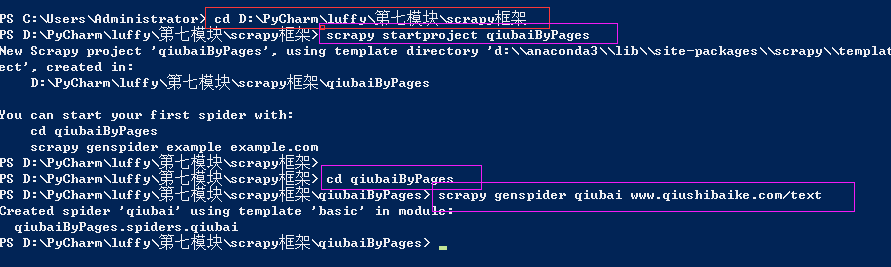
1、新建一个工程
cd 到需要保存工程的目录
scrapy startproject qiubaiByPages
cd qiubaiByPages
爬虫文件的名称,起始url
scrapy genspider qiubai www.qiushibaike.com/text
把实现的步骤在理清一次
1、qiubai.py
解析网页信息
 def parse(self, response):
        # 在原页面点击copy xpath
        div_list = response.xpath('//*[@id="content-left"]/div')

        for div in div_list:
            # 在当前 div下 直系的div=====》./div
            author = response.xpath('./div[@class="author clearfix"]/a[2]/h2/text()').extract_first()
            # 在当前div下 的a 在 a下的div===>.//div
            content = response.xpath('.//div[@class="content"]/span/text()').extract_first()
 qiubai.py全文代码
2、创建一个items对象,将解析到数据值存储到items对象中
# 创建一个items对象,将解析到数据值存储到items对象中
            # 在items.py文件中author = scrapy.Field()
            #                content = scrapy.Field()

            item = QiubaibypagesItem()
            item['author'] = author
            item['content'] = content
3、将item提交管道---然后在管道文件中进行编写
 # 将item提交管道---然后在管道文件中进行编写
            yield item
4、pipelines.py
class QiubaibypagesPipeline(object):
    fp = None
    def open_spider(self, spider):
        print('开始爬虫')
        self.fp = open('./qiubai.txt', 'w', encoding='utf-8')
    def process_item(self, item, spider):
        self.fp.write(item['author'] + ":" + item['content'])
        return item

    def close_spider(self, spider):
        self.fp.close()
        print('爬虫结束')
5、在settings.py配置
USER_AGENT = 'Mozilla/5.0 (Macintosh; Intel Mac OS X 10_12_0) AppleWebKit/537.36 (KHTML, like Gecko) Chrome/68.0.3440.106 Safari/537.36'

# Obey robots.txt rules
ROBOTSTXT_OBEY = False
ITEM_PIPELINES = {
   'qiubaiByPages.pipelines.QiubaibypagesPipeline': 300,
}
6、执行文件

先前测试不成功原因:class= 属性没有加 " "

测试成功:

其中,mypjt.pipelines.MypjtPipeline命名规范为项目名.piplines配置文件名.piplines文件里的类名。300代表优先级,范围为0~1000,数字越小,越先执行。

可以同时定义多个处理数据的类,使用数字来确定优先级。
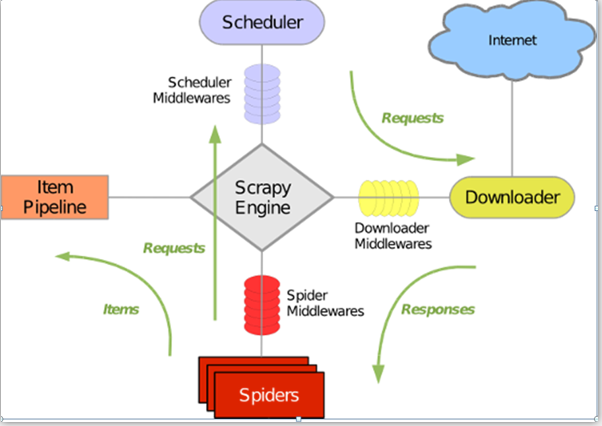
Scrapy5大核心组件:
•    引擎(Scrapy)
用来处理整个系统的数据流处理, 触发事务(框架核心)

•    调度器(Scheduler)
用来接受引擎发过来的请求, 压入队列中, 并在引擎再次请求的时候返回. 可以想像成一个URL(抓取网页的网址或者说是链接)的优先队列,
由它来决定下一个要抓取的网址是什么, 同时去除重复的网址

•    下载器(Downloader)
用于下载网页内容,并将网页内容返回给蜘蛛(Scrapy下载器是建立在twisted这个高效的异步模型上的)

•    爬虫(Spiders)

爬虫是主要干活的, 用于从特定的网页中提取自己需要的信息, 即所谓的实体(Item)。用户也可以从中提取出链接,让Scrapy继续抓取下一个页面

•    项目管道(Pipeline)

负责处理爬虫从网页中抽取的实体,主要的功能是持久化实体、验证实体的有效性、清除不需要的信息。当页面被爬虫解析后,将被发送到项目管道,并经过几个特定的次序处理数据。
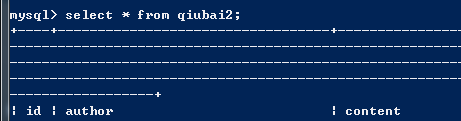
create table qiubai2(
    id int primary key auto_increment,
    author varchar(20),
    content varchar(255));
悟已往之不谏,知来者之可追。
