Django之模板语言
目录
一、说明
在Python代码中使用Django模板的最基本方式如下:
1、可以用原始的模板代码字符串创建一个 Template 对象, Django同样支持用指定模板文件路径的方式来创建 Template 对象;
2、调用模板对象的render方法,并且传入一套变量context。它将返回一个基于模板的展现字符串,模板中的变量和标签会被context值替换。
二、使用
1、简单使用

from django.shortcuts import render,HttpResponse
from django.template import Context,Template


# 直接传入键值对
raw_tem = '''<h1>My name is {{ name }}.I am {{ age }} years old.</h1>'''
t = Template(raw_tem)
c = Context({"name":"ABC","age":18})
print(t.render(c))

# 把字典整体作为值传入,用"."访问键值
raw_tem = '''<h1>My name is {{ person.name }}.I am {{ person.age }} years old.</h1>'''
t = Template(raw_tem)
p = {"name":"张无忌","age":18}
c = Context({"person":p})
print(t.render(c)) #My name is 张无忌.I am 18 years old

# 对象的属性,用"."访问属性
d = datetime.date(1993, 5, 2)
t = Template('The month is {{ date.month }} and the year is {{ date.year }}.')
c = Context({'date': d})
print(t.render(c)) # The month is 5 and the year is 1993.
# 使用对象的方法,upper/isdigit等,不带(),因此只能调用不需参数的方法
>>> from django.template import Template, Context
>>> t = Template('{{ var }} -- {{ var.upper }} -- {{ var.isdigit }}')
>>> t.render(Context({'var': 'hello'}))
u'hello -- HELLO -- False'
>>> t.render(Context({'var': '123'}))
u'123 -- 123 -- True'
2、模板标签(template tag)
- for标签
- if标签
- 其他标签
- 过滤器

语法
{% for athlete in athlete_list %}
<li>{{ athlete.name }}</li>
{% endfor %}


方法:
forloop.counter 总是一个表示当前循环的执行次数的整数计数器,从1开始。
forloop.counter0 类似于 forloop.counter ,但是它是从0计数的。
forloop.revcounter 是表示循环中剩余项的整型变量。
forloop.revcounter0 类似于 forloop.revcounter ,但它以0做为结束索引。
forloop.first 是一个布尔值,如果该迭代是第一次执行,那么它被置为True。
forloop.last 是一个布尔值;在最后一次执行循环时被置为True。
forloop.parentloop 是一个指向当前循环的上一级循环的 forloop 对象的引用(在嵌套循环的情况下)。
详见http://docs.30c.org/djangobook2/chapter04/#id12

使用1 <ul> {% for athlete in athlete_list %} <li>{{ athlete.name }}</li> {% endfor %} </ul> 使用2 reversed {% for athlete in athlete_list reversed %} # reversed ... {% endfor %} 使用3 empty {% if athlete_list %} # 先查看列表是否为空 {% for athlete in athlete_list %} <p>{{ athlete.name }}</p> {% endfor %} {% else %} <p>There are no athletes. Only computer programmers.</p> {% endif %} 等价于 {% for athlete in athlete_list %} <p>{{ athlete.name }}</p> {% empty %} <p>There are no athletes. Only computer programmers.</p> {% endfor %} 使用4 {% for item in target_list %} {% if forloop.counter < 5 %} {# 显示4个 #} <div>{{ forloop.counter }} {{ item }}</div> {% else %} {% if forloop.counter == target_list|length %} {# 如果循环完毕,显示总个数 #} {# {% if forloop.last %} {# 如果是最后一次执行 #} #} <div>...共{{ forloop.counter }}个</div> {% endif %} {% endif %} {% empty %} {# 如果target_list为空,则显示“-” #} <div>-</div> {% endfor %}

特性:
1、{% if %} 标签接受and,or 或者not关键字来对多个变量做判断 ,或者对变量取反( not )
2、不支持用圆括号来组合比较操作


{% if 条件 %}
  ... # if逻辑
{% else %}
    {% if 条件 %}
        ... # if逻辑
    {% else %}
        ... # if逻辑
    {% endif %}
{% endif %}


{% if today_is_weekend %}
    <p>welecome to the weekend!</p>
{% else %}
    <p>it is weekday.</p>
{% endif %}

- 其他标签
{% ifequal %}{% else %}{% endifequal %}
{% ifequal 1 1 %}
    <div>abc</div>
{% else %}
    <div>123</div>
{% endifequal %}

extends标签
block标签
{% extends 'xxx.html' %}  # 继承base模版
{% block xxx %}
{% endblock %}


include 模板标签
{% include xxx.html %}  # 引用子模块xxx.html

{% for family in sample.family.all %}
    {% if family.image %}
        <img src="/media/{{ family.image }}" alt="家系图" style="width: 90%;">
        {{ "<!--" }}
    {%endif%}
{% endfor %}
{{ "-->" }}

==================urls.py========================
from django.urls import path
from app01 import views

urlpatterns = [
    path("test.html",views.test),
]

==================views.py========================
def test(request):
    current_section = "【test】"
    title = "for include_tag section"
    return render(request,"test.html",{
        "current_section":current_section,
        "title":title
    })


==================test.html========================
<!DOCTYPE html>
<html lang="en">
<head>
    <meta charset="UTF-8">
    <title>Title</title>
</head>
<body>
    {% include "includes/nav.html" %}
    <h1>{{ title }}</h1>
</body>
</html>

==================includes/nav.html========================
<div id="nav">
    You are in: {{ current_section }}
</div>


==================结果========================
You are in: 【test】
for include_tag section

###################urls.py#####################
from django.urls import path
from app01 import views

urlpatterns = [
    path("mypage.html",views.mypage),
]

###################views.py#####################
def mypage(request):
    return render(request,"mypage.html")

###################bases/base_test.html#####################
<!DOCTYPE html>
<html lang="en">
<head>
    <meta charset="UTF-8">
    <title>Title</title>
</head>
<body>
    <h1>这个base页面</h1>
    {% block test_for_block %}{% endblock %}

</body>
</html>


###################mypage.html#####################
{% extends "bases/base_test.html" %}

{% block test_for_block %}
    <h3>这个mypage</h3>
{% endblock %}


###################结果#####################

这个base页面

这个mypage

#settings.py
STATIC_URL = '/static/'


# html
{% load static %}
<!DOCTYPE html>
<html lang="en">
<head>
    <meta charset="UTF-8">
    <title>Title</title>
    <link rel="stylesheet" href="{% static 'yg/plugins/bootstrap-3.3.7-dist/css/bootstrap-theme.css' %}" >
</head>

###################mypage.html##################
{% extends "bases/base_test.html" %}

{% block test_for_block %}
    <h3>这个mypage</h3>
    {% autoescape on %}
        {{ name }}  // 以字符串形式显示把整个变量显示出来
        {{ age }}  // 以字符串形式显示把整个变量显示出来
    {% endautoescape %}
    {% autoescape off %}
        {{ name }}  // 把变量作为html语言,这里直接alert了
        {{ age }}  // 把变量作为html语言,直接以h1标签显示出来
    {% endautoescape %}
    {{ name|safe }}    // 把变量作为html语言,这里直接alert了,等同于上面的off
    {{ age|safe }}  // 把变量作为html语言,直接以h1标签显示出来,等同于上面的off

{% endblock %}


###################views.py##################
def mypage(request):
    name = "<script>alert('tom')</script>"
    age = "<h1>12<h1>"
    return render(request,"mypage.html",{"name":name,"age":age})
3、过滤器
- 系统自带过滤器
- 自定义过滤器
(1)系统自带过滤器

{{ name|lower }} 显示的内容是变量 {{ name }} 被过滤器 lower 处理后的结果,它功能是转换文本为小写。
{{ my_list|first|upper }} 查找列表的第一个元素并将其转化为大写
{{ bio|truncatewords:"30" }} 这个将显示变量 bio 的前30个词。有些过滤器有参数。 过滤器的参数跟随冒号之后并且总是以双引号包含。
addslashes : 添加反斜杠到任何反斜杠、单引号或者双引号前面。 这在处理包含JavaScript的文本时是非常有用的。
{{ pub_date|date:"Y-m-d H:i:s" }} date : 按指定的格式字符串参数格式化 date 或者 datetime 对象.Y年/m月/d日/H时/i分/s秒/F月(英文)/j日/Y年
    "Y-m-d H:i:s" :2017-10-11 22:51:12
    "F j, Y":October 11, 2017

{{ my_list|length }} 返回变量的长度
(2)自定义过滤器
(1)在app01中新建templatetags文件夹,新建空文件__init__.py(貌似没这个也可以);
(2)在文件夹templatetags文件夹中,新建py文件(名字自定义,比如my_extras),里面定义一些自定义的过滤器函数;
(3)在html文件中引入my_extras,使用该过滤器;
使用过滤器的注意事项,只能有最多两个参数:
(a){{ data|mylower }},data为第一个参数,对应mylower(value);
(b){{ data|cut:" " }},data是第一个参数,“ ”是第二个参数,对应cut(value, arg)。

# -*- coding:utf-8 -*-

from django import template

register = template.Library()  # 必须这么定义

@register.filter(name='cut')
def cut(value, arg):
    "Removes all values of arg from the given string"
    return value.replace(arg, '')

@register.filter(name='mylower')
def mylower(value): # Only one argument.
    "Converts a string into all lowercase"
    return value.lower()

from django.shortcuts import render

def mypage(request):
    name = "<script>alert('tom')</script>"
    age = "<h1>12<h1>"
    data = "A B C"
    return render(request,"mypage.html",{"name":name,"age":age,"data":data})

{% extends "bases/base_test.html" %}
{% load my_extras %}  # 引入my_extras

{% block test_for_block %}
    <div>{{ data }}</div>  # 原数据
    <div>{{ data|cut:" " }}</div>  # 去除空格
    <div>{{ data|mylower }}</div>  # 小写
    <div>{{ data|mylower|cut:" " }}</div>  # 小写,去除空格

{% endblock %}

这个base页面

A B C
ABC
a b c
abc
三、simple_tag
简单标签的快捷方式
许多模板标签接收单一的字符串参数或者一个模板变量引用,然后独立地根据输入变量和一些其它外部信息进行处理并返回一个字符串。
Django提供了一个帮助函数simple_tag。这个函数是django.template.Library的一个方法,它接受一个只有一个参数的函数作参数,把它包装在render函数和之前提及过的其他的必要单位中,然后通过模板系统注册标签。
# 使用,多个参数

{% my_simple_tag 1 2 3 %}

{% my_simple_tag 'id_username' 'hide'%}
示例1

from django import template
from django.utils.safestring import mark_safe

register = template.Library()

@register.simple_tag
def test_stag(arg):
    my_tags = "<h1>这是标题</h1>" \
              "<a>这个是a标签</a>"
    # return my_tags  # 字符串所有内容均显示出来
    return mark_safe(my_tags)  # 作为html语言显示出来

def mypage(request):
    return render(request,"mypage.html")

{% extends "bases/base_test.html" %}  # 上一实验的东西,继承base
{% load my_extras %}

{% block test_for_block %}
    {% test_stag 'arg' %}
    // {% test_stag %}  # 无参数

{% endblock %}

这个base页面

这是标题

这个是a标签
示例2
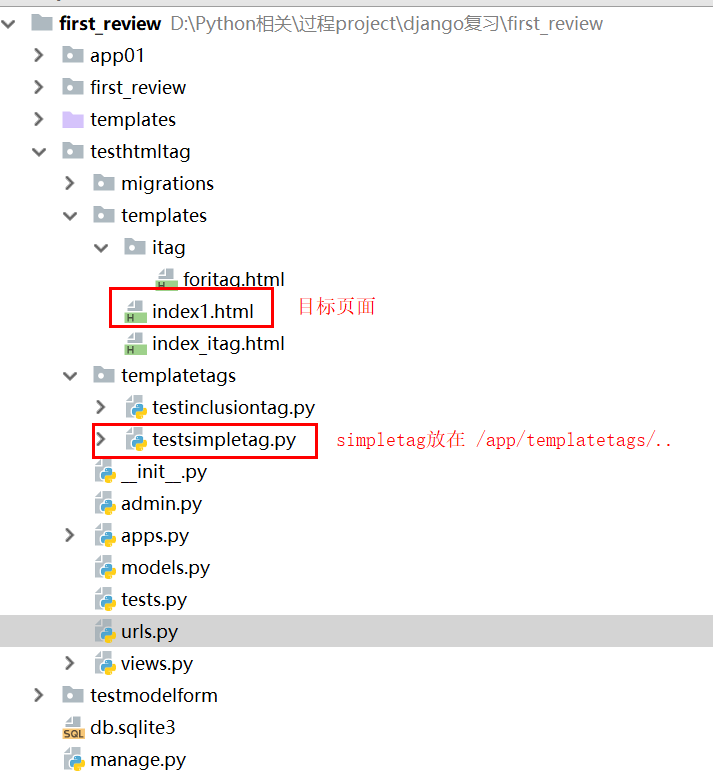

"""first_review URL Configuration

The `urlpatterns` list routes URLs to views. For more information please see:
    https://docs.djangoproject.com/en/2.0/topics/http/urls/
Examples:
Function views
    1. Add an import:  from my_app import views
    2. Add a URL to urlpatterns:  path('', views.home, name='home')
Class-based views
    1. Add an import:  from other_app.views import Home
    2. Add a URL to urlpatterns:  path('', Home.as_view(), name='home')
Including another URLconf
    1. Import the include() function: from django.urls import include, path
    2. Add a URL to urlpatterns:  path('blog/', include('blog.urls'))
"""
from django.contrib import admin
from django.urls import path,re_path,include

urlpatterns = [
    path('admin/', admin.site.urls),
    re_path("testhtmltag/",include("testhtmltag.urls")),
]

"""first_review URL Configuration

The `urlpatterns` list routes URLs to views. For more information please see:
    https://docs.djangoproject.com/en/2.0/topics/http/urls/
Examples:
Function views
    1. Add an import:  from my_app import views
    2. Add a URL to urlpatterns:  path('', views.home, name='home')
Class-based views
    1. Add an import:  from other_app.views import Home
    2. Add a URL to urlpatterns:  path('', Home.as_view(), name='home')
Including another URLconf
    1. Import the include() function: from django.urls import include, path
    2. Add a URL to urlpatterns:  path('blog/', include('blog.urls'))
"""
from django.contrib import admin
from django.urls import path,re_path,include
from testhtmltag import views

urlpatterns = [
    re_path("index/",views.Index.as_view()),
]

from django.shortcuts import render,HttpResponse
from django.views import View

class Index(View):
    def get(self,request):
        # 模拟数据库
        data = [
            {"name": "tom", "age": 12, "gender": "M"},
            {"name": "david", "age": 19, "gender": "M"},
            {"name": "lily", "age": 21, "gender": "f"},
            {"name": "amy", "age": 22, "gender": "f"},
            {"name": "lucy", "age": 18, "gender": "f"},
        ]
        context = {"data":data}
        return render(request,"index1.html",context)

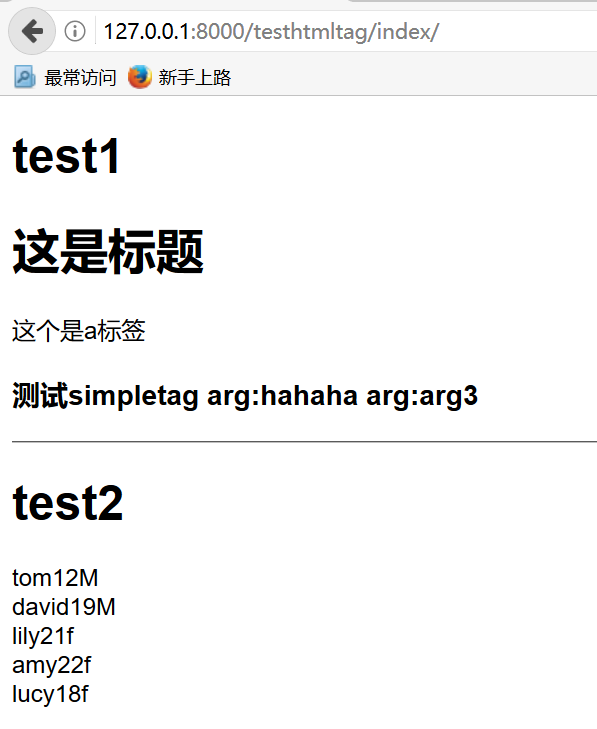
# -*- coding:utf-8 -*-
from django import template
from django.utils.safestring import mark_safe


register = template.Library()


@register.simple_tag
def test_stag(*args):
    my_tags = """<h1>这是标题</h1>
<a>这个是a标签</a>
<h3>{}</h3>""".format(" arg:".join(args))
    # return my_tags  # 字符串所有内容均显示出来
    return mark_safe(my_tags)  # 作为html语言显示出来


@register.simple_tag
def test_stag2(*args):
    context = ""
    for item in args[0]:
        s = "<div>"
        s += "<span>{}</span>".format(item["name"])
        s += "<span>{}</span>".format(item["age"])
        s += "<span>{}</span>".format(item["gender"])
        s += "</div>"
        context += s
    return mark_safe(context)  # 作为html语言显示出来

{% load testsimpletag %}
<!DOCTYPE html>
<html lang="en">
<head>
    <meta charset="UTF-8">
    <title>Title</title>
</head>
<body>
    <h1>test1</h1>
    {% test_stag '测试simpletag' 'hahaha' 'arg3' %}

    <hr>
    <h1>test2</h1>
    {% test_stag2 data %}

</body>
</html>
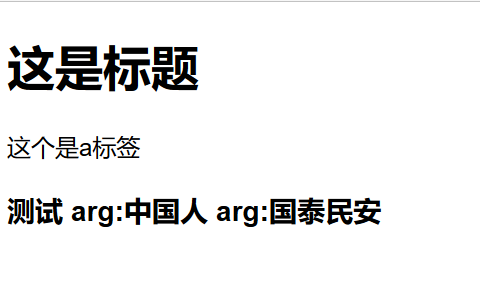
示例3 使用format_html,对mark_safe进行进一步操作

# -*- coding:utf-8 -*-
from django import template
from django.utils.html import format_html

register = template.Library()

@register.simple_tag
def test_stag(*args):
    my_tags = """<h1>这是标题</h1>
<a>这个是a标签</a>
<h3>{}</h3>""".format(" arg:".join(args))
    # return my_tags  # 字符串所有内容均显示出来
    return format_html(my_tags)  # 作为html语言显示出来

{% load testsimpletag %}
<!DOCTYPE html>
<html lang="en">
<head>
    <meta charset="UTF-8">
    <title>Title</title>
</head>
<body>

    {% test_stag '测试' '中国人' '国泰民安' %}
</body>
</html>
四、inclusion_tag
1、用法
1、类似simpletag,在html页面load xxx 和 使用xxx里面的函数,传入参数
其中xxx.py需放在templatetags文件夹中
{% load xxx %}

{% func arg %}
2、 在xxx.py,定义func
from django.template import Library
register = Library()
def yield_form(form):
    for i in range(100):
        yield i

@register.inclusion_tag("模版页面.html")
def add_or_edit(form):
    '''
    :param form: form是原始页面传过来的参数
    :return:
    '''
    form = yield_form(form)  # 对于for循环出来的结果,可通过yield,避免二次循环(本py及模版html均循环)
    '''
    当然,也可以不借助其他函数,在这里直接得出数据
    '''
    return {"form":form}  # 把form数据传入模版html
3、在模版html里,使用传过来的form
<div>
    {% for item in form %}
        .....
    {% endfor %}

</div>
2、实例
示例1

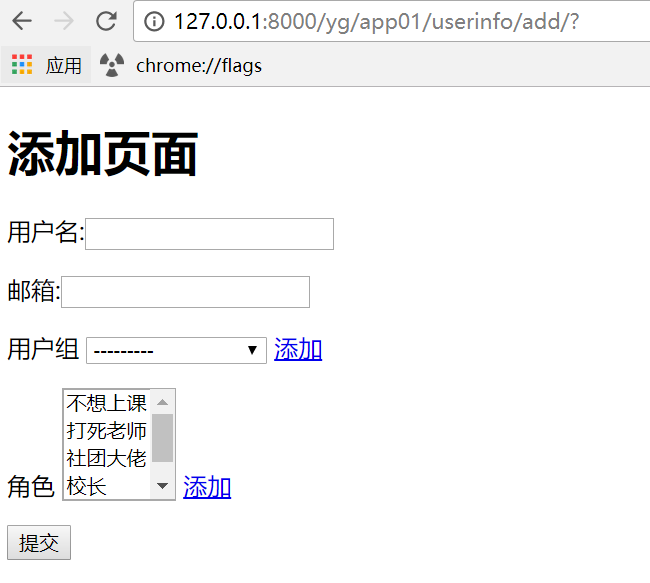
{% load yg_form %}
<!DOCTYPE html>
<html lang="en">
<head>
    <meta charset="UTF-8">
    <title>Title</title>
</head>
<body>
    <h1>添加页面</h1>
    {% add_or_edit form %}

</body>
</html>

# -*- coding:utf-8 -*-
from django.template import Library
from django.urls import reverse
from django.forms.models import ModelChoiceField
from newadmin.service import v1

register = Library()

def yield_form(form):
    for item in form:
        row = {"is_popup": False, "item": None, "popup_url": None}
        if isinstance(item.field, ModelChoiceField) and item.field.queryset.model in v1.site._registry:
            target_app_label = item.field.queryset.model._meta.app_label
            target_model_name = item.field.queryset.model._meta.model_name
            url_name = "{0}:{1}_{2}_add".format(v1.site.namespace, target_app_label, target_model_name)
            target_url = "{0}?popup={1}".format(reverse(url_name),item.auto_id)
            row["is_popup"] = True
            row["item"] = item
            row["popup_url"] = target_url
        else:
            row["item"] = item

        yield row

@register.inclusion_tag("yg/md_add_edit_form.html")
def add_or_edit(form):
    form = yield_form(form)
    return {"form":form}

    <form method="POST" novalidate>
        {% csrf_token %}
        {% for col in form %}
            {% if col.is_popup %}
                <p>
                    {{ col.item.field.label }}
                    {{ col.item }}
                    <a onclick="popupOpen('{{ col.popup_url }}')" href="#">添加</a>
                    <span>{{ col.item.errors.0 }}</span>
                </p>
            {% else %}
                <p>{{ col.item.field.label }}:{{ col.item }}<span>{{ col.item.errors.0 }}</span></p>
            {% endif %}
        {% endfor %}
        <input type="submit">
    </form>

<script>
    function popupCallBack(data_dict){
        var tag = document.createElement("option");
        tag.innerHTML = data_dict.text;
        tag.setAttribute("value",data_dict.pk);
        tag.setAttribute("selected","selected");
        document.getElementById(data_dict.popid).appendChild(tag);
    }
    function popupOpen(url){
        window.open(url,url,"status=1,height:500,width:600,toolbar=0, resizeable=0");
    }
</script>
示例2
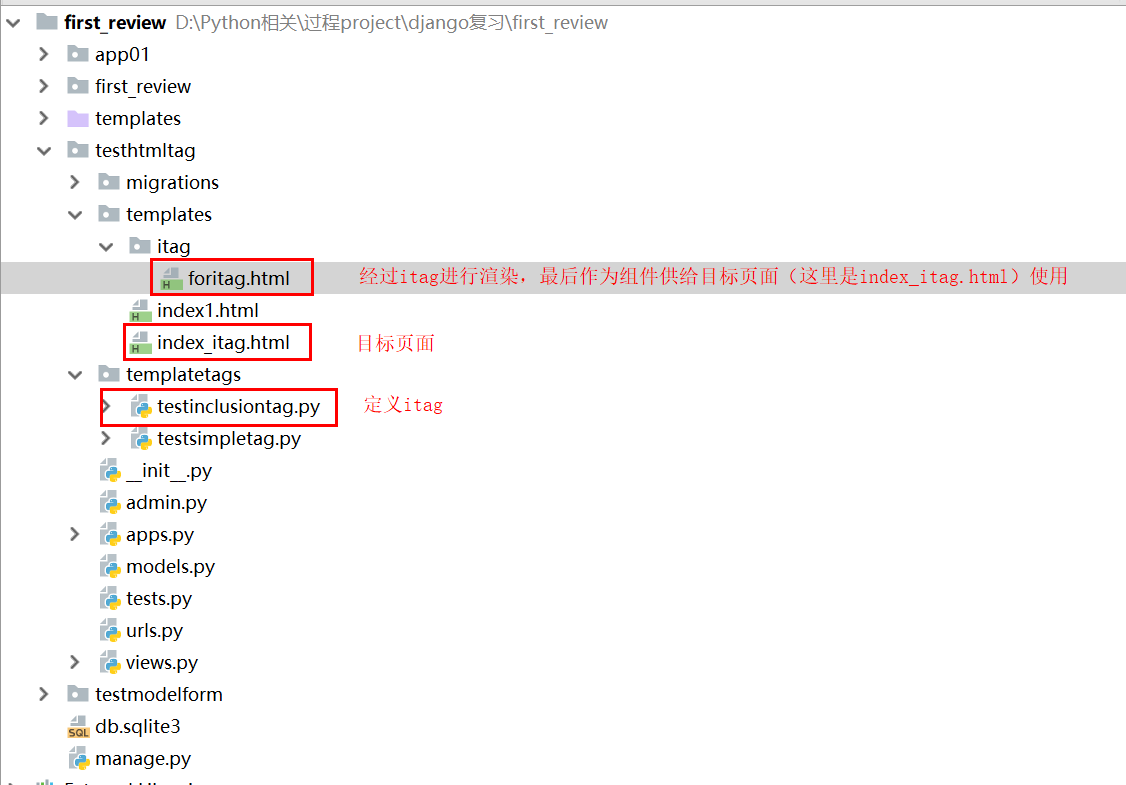

"""first_review URL Configuration

The `urlpatterns` list routes URLs to views. For more information please see:
    https://docs.djangoproject.com/en/2.0/topics/http/urls/
Examples:
Function views
    1. Add an import:  from my_app import views
    2. Add a URL to urlpatterns:  path('', views.home, name='home')
Class-based views
    1. Add an import:  from other_app.views import Home
    2. Add a URL to urlpatterns:  path('', Home.as_view(), name='home')
Including another URLconf
    1. Import the include() function: from django.urls import include, path
    2. Add a URL to urlpatterns:  path('blog/', include('blog.urls'))
"""
from django.contrib import admin
from django.urls import path,re_path,include

urlpatterns = [
    path('admin/', admin.site.urls),
    re_path("testhtmltag/",include("testhtmltag.urls")),
]

"""first_review URL Configuration

The `urlpatterns` list routes URLs to views. For more information please see:
    https://docs.djangoproject.com/en/2.0/topics/http/urls/
Examples:
Function views
    1. Add an import:  from my_app import views
    2. Add a URL to urlpatterns:  path('', views.home, name='home')
Class-based views
    1. Add an import:  from other_app.views import Home
    2. Add a URL to urlpatterns:  path('', Home.as_view(), name='home')
Including another URLconf
    1. Import the include() function: from django.urls import include, path
    2. Add a URL to urlpatterns:  path('blog/', include('blog.urls'))
"""
from django.contrib import admin
from django.urls import path,re_path,include
from testhtmltag import views

urlpatterns = [
    re_path("index/",views.Index.as_view()),
    re_path("index_itag/",views.Itag.as_view()),
]

from django.shortcuts import render,HttpResponse
from django.views import View


class Itag(View):
    def get(self,request):
        # 模拟数据库
        data = [
            {"name": "tom", "age": 12, "gender": "M"},
            {"name": "david", "age": 19, "gender": "M"},
            {"name": "lily", "age": 21, "gender": "f"},
            {"name": "amy", "age": 22, "gender": "f"},
            {"name": "lucy", "age": 18, "gender": "f"},
        ]
        context = {
            "data":data
        }
        return render(request,"index_itag.html",context)

# -*- coding:utf-8 -*-
from django.template import Library

register = Library()

def yield_data(data):
    for item in data:
        # 简单处理
        item["email"] = "{}{}@qq.com".format(item["name"],"123")
        item["name"] = f"{item['name']}_ooxx经过一定逻辑处理后的name"
        yield item

@register.inclusion_tag("itag/foritag.html")
def testitag(data):  # data是从index_itag.html传过来的
    data = yield_data(data)
    return {"mydata":data}  # 此处的mydata,是供foritag.html使用

<table border="1px solid black">
    <thead>
        <tr>
            <th>name</th>
            <th>age</th>
            <th>gender</th>
            <th>email</th>
        </tr>
    </thead>
    <tbody>
        {% for item in mydata %}
            <tr>
                <td>{{ item.name }}</td>
                <td>{{ item.age }}</td>
                <td>{{ item.gender }}</td>
                <td>{{ item.email }}</td>
            </tr>
        {% endfor %}
    </tbody>
</table>

{% load testinclusiontag %}
<!DOCTYPE html>
<html lang="en">
<head>
    <meta charset="UTF-8">
    <title>Title</title>
</head>
<body>
    <h3>普通页面</h3>
    <table border="1px solid black">
        <thead>
            <tr>
                <th>name</th>
                <th>age</th>
                <th>gender</th>
            </tr>
        </thead>
        {% for item in data %}
            <tr>
                <td>{{ item.name }}</td>
                <td>{{ item.age }}</td>
                <td>{{ item.gender }}</td>
            </tr>
        {% endfor %}
    </table>


    <hr>
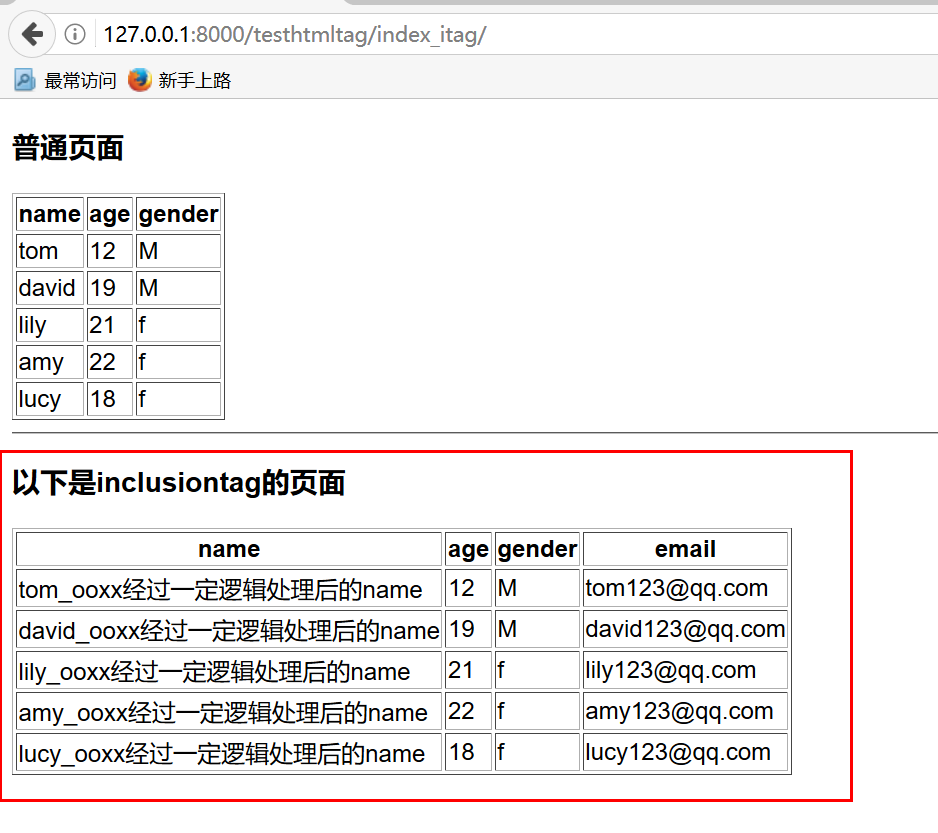
    <h3>以下是inclusiontag的页面</h3>
    {% testitag data %}

</body>
</html>
自定义模板标签
暂缺


