[BOT] 一种android中实现“圆角矩形”的方法
内容简介
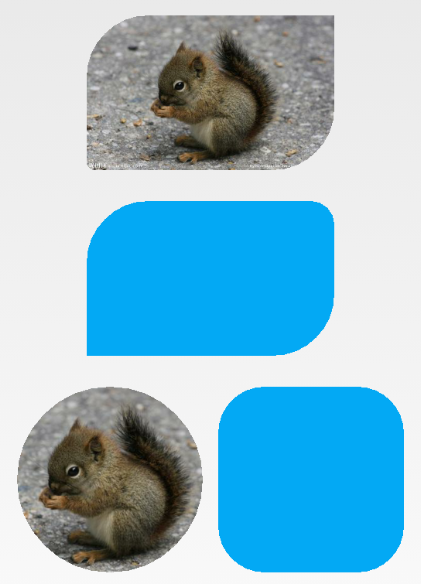
文章介绍ImageView(方法也可以应用到其它View)圆角矩形(包括圆形)的一种实现方式,四个角可以分别指定为圆角。思路是利用“Xfermode + Path”来进行Bitmap的裁剪。
背景
圆角矩形实现的方法应该很多,网上一大堆。很怀疑为啥安卓的控件不内置这样的属性(我不知道有)?
之前用到的网络图片加载库(UniversalImageLoader等)都自带“圆形图片”这样的功能。这次需要的效果是圆角矩形,而且只有图片上面左、右两个角是圆角。然后藐似没发现有这种功能,刚好就自己实践下了。
一个需要强调的事实就是,像ImageView这样的控件,它可以是wrap_content这样的,最终大小不定,由对应的Drawable或Bitmap资源决定其大小。另一种情况下ImageView的大小是固定的,此时图片的实际填充效果(可视范围)受到scaleType的影响,不一定和View大小一致,不过往往会保持图片宽高比例,使得最终ImageView的宽高和显示的图片是一致的。
在画布上进行裁剪时,必须明确要操作的相关Bitmap的尺寸。由于上面的原因,根据实际ImageView大小的确定方式不同,要么是取ImageView的大小来作为整个“圆角矩形”的范围,要么是以实际展示的Bitmap的大小为准。
下面采取自定义ImageView子类的形式提供案例来说明“Xfermode + Path”实现圆角矩形的思路。而且会以ImageView固定大小(图片填充,scaleType=fitXY)的形式,也就是说要显示的图片是完全填充ImageView的,它们一样大小。如果以Bitmap为准,那么就得自己去设法得到原本ImageView的“设置下”显示的图片的范围,然后对应的去裁剪。这里为突出重点,就不考虑那么多了(-)。
clipPath()版本
方法android.graphics.Canvas#clipPath(android.graphics.Path)用来沿着Path指定的路线从目前的canvas裁剪出新的区域的canvas,就是改变了画布的可绘制区域。理解上,就像你拿着剪刀沿着圆环路径裁剪画纸就可以裁剪出一个圆型画纸一样。
Canvas类的一些API是直接绘制内容的操作,另一些是针对canvas(画布)本身做设置的。clip**系列方法就是对画布进行裁剪,之后的绘制(“可以简单地”认为之前通过canvas的绘制已经固定在画布对应存储图像的bitmap上了)都在裁剪后的区域中进行。
使用clipPath()实现圆角矩形的完整代码如下:
public class RoundCornerImageView1 extends ImageView {
    private float[] radiusArray = { 0f, 0f, 0f, 0f, 0f, 0f, 0f, 0f };

    public RoundCornerImageView1(Context context) {
        super(context);
    }

    public RoundCornerImageView1(Context context, AttributeSet attrs) {
        super(context, attrs);
    }

    /**
     * 设置四个角的圆角半径
     */
    public void setRadius(float leftTop, float rightTop, float rightBottom, float leftBottom) {
        radiusArray[0] = leftTop;
        radiusArray[1] = leftTop;
        radiusArray[2] = rightTop;
        radiusArray[3] = rightTop;
        radiusArray[4] = rightBottom;
        radiusArray[5] = rightBottom;
        radiusArray[6] = leftBottom;
        radiusArray[7] = leftBottom;

        invalidate();
    }

    protected void onDraw(Canvas canvas) {
        Path path = new Path();
        path.addRoundRect(new RectF(0, 0, getWidth(), getHeight()), radiusArray, Path.Direction.CW);
        canvas.clipPath(path);

        super.onDraw(canvas);
    }
}
注意需要先在canvas上执行clipPath(),之后再继续绘制原本的图片,这样就保证了绘制的内容范围限制在裁剪后的“圆角矩形画布”中。
上面方法addRoundRect()的原型如下:
/**
 * Add a closed round-rectangle contour to the path. Each corner receives
 * two radius values [X, Y]. The corners are ordered top-left, top-right,
 * bottom-right, bottom-left
 *
 * @param rect The bounds of a round-rectangle to add to the path
 * @param radii Array of 8 values, 4 pairs of [X,Y] radii
 * @param dir  The direction to wind the round-rectangle's contour
 */
public void addRoundRect(RectF rect, float[] radii, Direction dir);
它就是用来描述一个圆角矩形的路径。可以看到四个角都可以指定,而且还可以是不同的x,y半径。但是这里只允许圆角是圆。
下图是一些效果图:

clipPath()缺陷
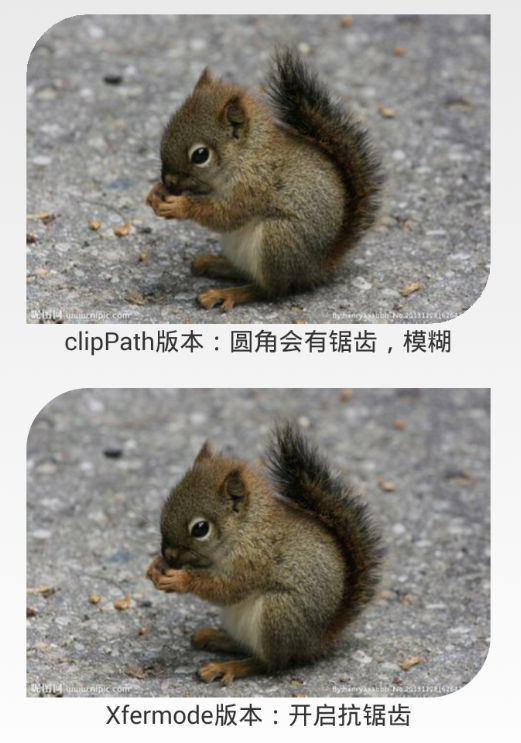
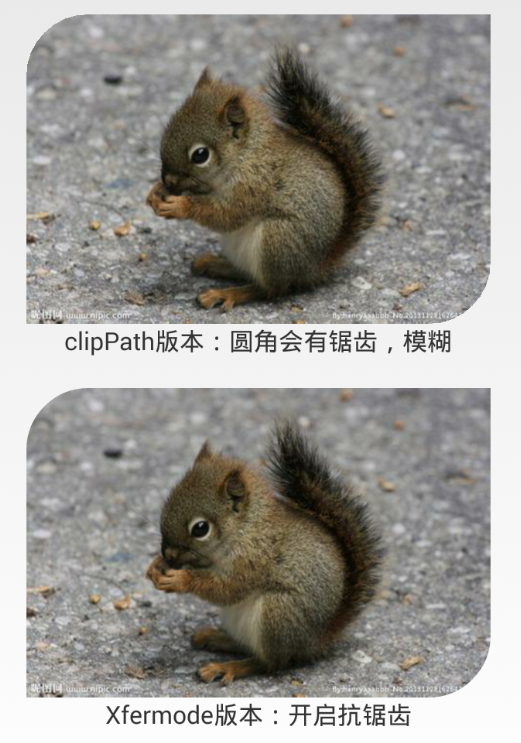
最初的版本就是这样ok了,完成任务。后来测试说是图片圆角处模糊,
这里先给一个对比图,感受下:

我以为是网络加载的图片的Bitmap.Config引起的,改后无果。关键字“clipPath 锯齿”搜了下发现clipPath这种方式无法抗锯齿。
后面看到StackOverflow上歪果仁的一个回答,说Xfermode可以实现。
在sdk目录下有对应的一个关于Xfermode的使用演示:sdk\samples\android-19\ApiDemos\src\com\example\android\apis\graphics\Xfermodes.java。
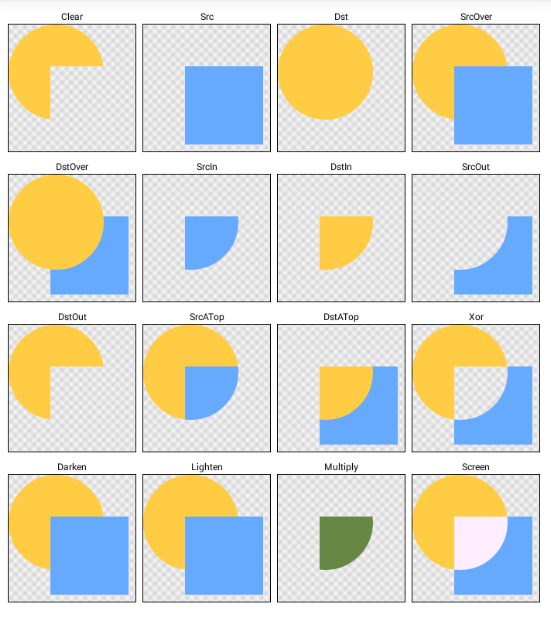
如果使用了模拟器,可以在ApiDemos > Graphics > Xfermodes中看到下面的效果:

后面会附上Xfermode.java的核心代码,这里说明下。矩形和圆分别是两个独立的Bitmap,上图演示了选取Xfermode的子类PorterDuffXfermode作为“Xfermode("transfer-modes" in the drawing pipeline)”时其不同混合模式得到的效果。
把圆作为一个画框看待,那么第2行第2个效果图:SrcIn,画了一个矩形,矩形只有落在圆中的部分才最终可见。
同样的思路,可以先做一个圆角矩形的画框——方式类似上面的clipPath()也是使用Path实现。然后让原本的图片画在这个画框上,效果就是圆角矩形的图片了。
强调下,接下来的所有努力都是为了“抗锯齿”!应用Xfermode会使用Paint,就可以开启抗锯齿(通过Paint.ANTI_ALIAS_FLAG标志或setAntiAlias方法)。
接下来就是用上面的示例来完成抗锯齿的圆角矩形。
Xfermode版本
要弄清楚apiDemo中的圆和矩形混合效果的实现,先来看下它的核心代码:
class SampleView extends View {
  private Bitmap mSrcB; // 源位图,矩形
  private Bitmap mDstB; // 目标位图,圆

  protected void onDraw(Canvas canvas) {
    ...
    // draw the src/dst example into our offscreen bitmap
    int sc = canvas.saveLayer(x, y, x + W, y + H, null,
                             Canvas.MATRIX_SAVE_FLAG |
                             Canvas.CLIP_SAVE_FLAG |
                             Canvas.HAS_ALPHA_LAYER_SAVE_FLAG |
                             Canvas.FULL_COLOR_LAYER_SAVE_FLAG |
                             Canvas.CLIP_TO_LAYER_SAVE_FLAG);
     canvas.translate(x, y);
     canvas.drawBitmap(mDstB, 0, 0, paint);
     paint.setXfermode(sModes[i]);
     canvas.drawBitmap(mSrcB, 0, 0, paint);
     paint.setXfermode(null);
     canvas.restoreToCount(sc);
     ...
  }
}
成员变量:
- mSrcB: 源位图,矩形
- mDstB: 目标位图,圆
可以看到,先绘制矩形,然后setXfermode(),然后绘制圆。
上面的代码有一个“模板”:匹配的saveLayer()和restoreToCount()调用。
canvas拥有layer的概念,canvas默认拥有一个初始的layer。可以通过方法int saveLayer (RectF bounds, Paint paint, int saveFlags)产生新的layer。新layer相当于一个区域为传递的bounds的“新画布”,它关联一个bitmap(an offscreen bitmap,它是完全透明的),之后的绘制操作都在此bitmap上执行。每个layer可以看做一个独立的画布,所有layer形成一个栈,栈底是初始的layer。每次在栈顶产生的新layer,任何时候都在栈顶的layer上执行绘图,调用restoreToCount()后栈顶layer出栈,其对应的bitmap的内容合并(进行像素的argb混合)到之前layer中。很显然,最后也只应该剩下最初的layer,这样保证所绘制内容都最终输出到canvas的目标bitmap中,形成最终的内容(可以假想“画布生成的内容就是bitmap”——带颜色的像素区域)。
这里不严谨的认为:每个layer是一个canvas(画布),画布关联一个Bitmap存储最终绘制的内容。实际上不像现实中的画布或画纸,Canvas更像一个“绘图工具集”,包含直尺,圆规等绘图工具。skia文档中对SkCanvas的解释是“drawing context”——绘画环境。它提供的都是有关绘制的API,而绘制的内容会输出到Canvas的“绘制目标”——画纸,可以是Bitmap(像素集合),或者Hardware-layer(具备硬件加速的Bitmap)和DisplayList(存储绘制指令的序列而非最终的像素集合),从存储绘制结果的角度看本质是一样的。
上面的代码中,onDraw()方法在新的layer中使用Xfermode绘图模式来画圆和矩形。原因是drawBitmap()会把参数bitmap绘制到layer对应的bitmap中(也许用词上是胡说八道,但这样可以理解吧?),Xfermode模式下后续drawBitmap()方法会以当前layer的“整个区域的内容”作为混合操作的参考bitmap,所以为了不让之前layer已有内容对混合产生影响,就使用一个全新的layer——也就是全新的bitmap来进行混合绘制,最终再合并回去。
下面把各个方法的API介绍简单罗列下,重点是Xfermode类和PorterDuffXfermode类。
方法saveLayer()
原型如下:
/**
 * This behaves the same as save(), but in addition it allocates an
 * offscreen bitmap. All drawing calls are directed there, and only when
 * the balancing call to restore() is made is that offscreen transfered to
 * the canvas (or the previous layer). Subsequent calls to translate,
 * scale, rotate, skew, concat or clipRect, clipPath all operate on this
 * copy. When the balancing call to restore() is made, this copy is
 * deleted and the previous matrix/clip state is restored.
 *
 * @param bounds May be null. The maximum size the offscreen bitmap
 *               needs to be (in local coordinates)
 * @param paint  This is copied, and is applied to the offscreen when
 *               restore() is called.
 * @param saveFlags  see _SAVE_FLAG constants
 * @return       value to pass to restoreToCount() to balance this save()
 */
public int saveLayer(RectF bounds, Paint paint, int saveFlags)
在API文档中还有下面的说明:
public int saveLayer (RectF bounds, Paint paint, int saveFlags);
This behaves the same as save(), but in addition it allocates and redirects drawing to an offscreen bitmap.
Note: this method is very expensive, incurring more than double rendering cost for contained content. Avoid using this method, especially if the bounds provided are large, or if the CLIP_TO_LAYER_SAVE_FLAG is omitted from the saveFlags parameter. It is recommended to use a hardware layer on a View to apply an xfermode, color filter, or alpha, as it will perform much better than this method.
All drawing calls are directed to a newly allocated offscreen bitmap. Only when the balancing call to restore() is made, is that offscreen buffer drawn back to the current target of the Canvas (either the screen, it's target Bitmap, or the previous layer).
Attributes of the Paint - alpha, Xfermode, and ColorFilter are applied when the offscreen bitmap is drawn back when restore() is called.
上面说到在使用Xfermode时,可以开启硬件加速(hardware layer)来直接绘制,此时不需要产生新的layer,会具有更好的性能,后面会给出这种实现。
方法restoreToCount()
原型如下:
/**
 * Efficient way to pop any calls to save() that happened after the save
 * count reached saveCount. It is an error for saveCount to be less than 1.
 *
 * Example:
 *    int count = canvas.save();
 *    ... // more calls potentially to save()
 *    canvas.restoreToCount(count);
 *    // now the canvas is back in the same state it was before the initial
 *    // call to save().
 *
 * @param saveCount The save level to restore to.
 */
public native void restoreToCount(int saveCount);
根据约定,在调用saveLayer()后,执行restoreToCount()将新layer中的内容合并回之前layer。
PorterDuffXfermode
方法android.graphics.Paint#setXfermode用来为paint设置Xfermode。之后使用此paint绘制的图像就会应用具体Xfermode子类所表示的“模式”。
类Xfermode的说明:
Xfermode is the base class for objects that are called to implement custom "transfer-modes" in the drawing pipeline. The static function Create(Modes) can be called to return an instance of any of the predefined subclasses as specified in the Modes enum. When an Xfermode is assigned to an Paint, then objects drawn with that paint have the xfermode applied.
Xfermode表示要在“绘制管线中使用的颜色传递模式”。概括来说,每一次绘图操作(drawXxx)底层都执行一次绘制管线,通常要经过:路径生成(Path Generation)、光栅化(Rasterization)、着色(Shading)和传递(Transfer)四个阶段。管线操作的输入就是draw**的输入,包括方法对应绘制图形图像的参数信息,以及canvas layer关联的目标bitmap (下面用Dst Image表示)。
在Transfer阶段,会根据之前阶段产生的“source image”和Dst Image生成一个intermediate image(中间图片)。过程是把每个(x,y)处的source image和Dst Image的像素颜色值使用指定的传递模式(Xfermode,如果未指定,默认是PorterDuffXferMode(SRC_OVER))对应的函数,得到结果color,然后传递给中间图片作为其(x,y)的color,最后中间图片和Dst Image再进行混合(使用Mask),结果就是修改后的Dst Image。
Xfermode是一个基类,它的子类表示实际的颜色传递模式。子类PorterDuffXfermode表示:Porter/Duff 颜色混合算法,这里有篇文章Porter/Duff描述了它。在ApiDemo中给出了Porter/Duff模式支持的16种不同混合效果。
代码实现
上面介绍了ApiDemo中核心代码片段的含义,接下来就继续沿用其saveLayer()、ResetoreToCount()以及Xfermode()这几个步骤来实现圆角矩形。
得到Dst Image
本身要绘制的图像就是Dst Image,在ImageView的onDraw方法中,super.onDraw(canvas)会将需要绘制的内容绘制到传递的canvas中,这里为了得到对应的bitmap,可以产生一个新的Canvas对象然后把它作为ImageView.onDraw的输出目标:
// 得到原始的图片
final int w = getWidth();
final int h = getHeight();
Bitmap bitmapOriginal = Bitmap.createBitmap(w, h, Bitmap.Config.ARGB_8888);
Canvas c = new Canvas(bitmapOriginal);
super.onDraw(c);
上面的w、h是原始图片的宽、高,根据文章开始的假定,就是ImageView的宽高。bitmapOriginal作为super.onDraw的绘制结果。这样就得到了“Xfermode中的Dst Bitmap”。
得到Src Bitmap - 圆角矩形
为了四个角可配,继续使用Path来得到圆角矩形,重要的是为Paint设置ANTI_ALIAS_FLAG标志开启抗锯齿:
// 四个角的x,y半径
private float[] radiusArray = { 0f, 0f, 0f, 0f, 0f, 0f, 0f, 0f };
private Paint bitmapPaint = new Paint(Paint.ANTI_ALIAS_FLAG);

private Bitmap makeRoundRectFrame(int w, int h) {
    Bitmap bm = Bitmap.createBitmap(w, h, Bitmap.Config.ARGB_8888);
    Canvas c = new Canvas(bm);
    Path path = new Path();
    path.addRoundRect(new RectF(0, 0, w, h), radiusArray, Path.Direction.CW);
    Paint bitmapPaint = new Paint(Paint.ANTI_ALIAS_FLAG);
    bitmapPaint.setColor(Color.GREEN); // 颜色随意,不要有透明度。
    c.drawPath(path, bitmapPaint);
    return bm;
}
在新layer中绘制
if (bitmapFrame == null) {
    bitmapFrame = makeRoundRectFrame(w, h);
}

int sc = canvas.saveLayer(0, 0, w, h, null, Canvas.ALL_SAVE_FLAG);

canvas.drawBitmap(bitmapFrame, 0, 0, bitmapPaint);
// 利用Xfermode取交集(利用bitmapFrame作为画框来裁剪bitmapOriginal)
bitmapPaint.setXfermode(new PorterDuffXfermode(PorterDuff.Mode.SRC_IN));
canvas.drawBitmap(bitmapOriginal, 0, 0, bitmapPaint);

bitmapPaint.setXfermode(null);
canvas.restoreToCount(sc);
上面的saveLayer()接收的saveFlags是和canvas已设置的状态相关的,canvas需要恢复哪些方面的属性,就需要标记对应SAVE_FLAG来保存相应的状态。
因为上面对Paint开启了抗锯齿,最终得到的圆角矩形就不像clipPath那种会在圆角处产生模糊。

Hardware Layer
根据saveLayer方法的文档介绍,可以去掉saveLayer()/restoreToCount()的调用,只需要在onDraw()中开启硬件加速就可以实现相同的目标了,性能会更好:
setLayerType(LAYER_TYPE_HARDWARE, bitmapPaint);

// 利用Xfermode取交集(利用bitmapFrame作为画框来裁剪bitmapOriginal)
canvas.drawBitmap(bitmapFrame, 0, 0, bitmapPaint);
bitmapPaint.setXfermode(new PorterDuffXfermode(PorterDuff.Mode.SRC_IN));
canvas.drawBitmap(bitmapOriginal, 0, 0, bitmapPaint);
bitmapPaint.setXfermode(null);
结论
上面分别给出了clipPath和Xfermode方式实现圆角矩形的方式,根据场景不同——在什么地方来实现需要的圆角矩形——其它等像基于shader的方式也许是更好的选择。
强调下,上面代码限制ImageView和它展示的内容必须是同样大小的,否则就以实际显示图片的Rect作为“圆角矩形画框”的Rect。
Android有关2D和3D的很多操作,像上面的clipPath和Xfermode,底层都是native方式执行的,framework层几乎只是很薄的C++包装。而且是比较专业的知识了,到底要了解多少,就看自己的app的需求,以及兴趣了。
Canvas Api的底层实现是Skia,之后引入了opengl es的实现(HWUI),后者支持硬件加速。
(本文使用Atom编写)


