
Struts 学习之03Controller(控制器 中)
本篇接Struts 学习之03Controller(控制器 上)
本打算是写在一起,但很郁闷的是 写了N多的时候,我手痒, 看到电脑插座似呼有些松动,去动了下,结果,瞬间黑屏,电脑重启动,要崩溃了,只好再重新写,激情当然也就减少一大半料~
好了牢骚也不多发了,还是接着Struts 学习之03Controller(控制器 上) 开始创建项目
Step1:我们还是创建一个StrutsProject 并在Struts-config.xml视图中添加一个action form and jsp!具体可参见Struts 学习之01,操作后的struts-cpnfig.xml文件代码如下:
 <struts-config> <data-sources /> <form-beans > <form-bean name="loginForm" type="fengyan.struts.form.LoginForm" /> </form-beans> <global-exceptions /> <global-forwards /> <action-mappings > <action attribute="loginForm" input="/login.jsp" name="loginForm" path="/login" scope="request" type="fengyan.struts.action.LoginAction"> <forward name="ok" path="/ok.jsp" redirect="true" /> <forward name="error" path="/error.jsp" /> </action> </action-mappings> <message-resources parameter="fengyan.struts.ApplicationResources" /></struts-config>
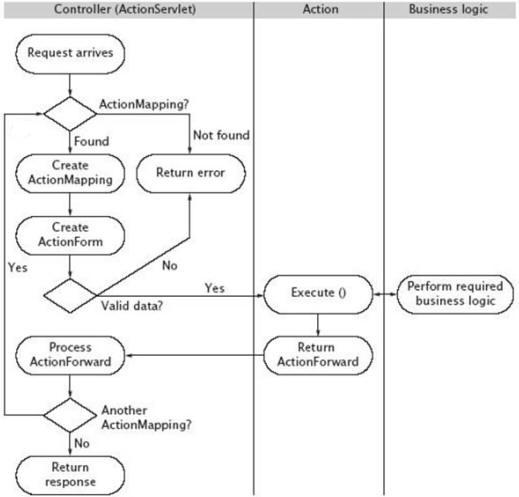
我们现在看上图,其实中间少了一个process方法,其实这里面的过程到了ActionServlet对象后会调用一个RequestProcessor对象,这个可以在struts源代码中可以看到!打开\struts-1.2.9-src\src\share\org\apache\struts\action下的ActionServlet.java (没有的朋友可以到Apache官方网站上去下载struts是开源,)以下为部分源码:


我在上面已经做了详细注释,如果对servlet熟习的话,我们知道http请求大多是get/post,同样ActionServlet是从servlet继承来的,通过上面部分源码我们发现,无论是doPost/doGet都是调用的ActionServlet中的process方法,process方法主要的作用就是得到一个相应的ReuestProcessor类或者子类的对象,然后调用这个对象的process方法来处理用户的需求,这样我们将 注意力放在ReuestProcessor上
ReuestProcessor主要执行以下操作:
1.processMultipart(request):对用户的请求进行预处理,如果HttpServletRequest是POST方式,且请求为multipart/form-data,Struts框架将请求对象包装成处理multipart请求专用的请求对象,否则,只是简单的返回原有的请求对象。一般来说除非需要处理文件上传,否则不用关心multipart功能的具体细节。进行包装处理的类是MultipartRequestWrapper类它以用户的请求为包装对象!
2.processPath(request,response):该方法用来从请求URL中获取路径部分,获取到的信息在稍后的步骤中用于选择合适的Struts Action调用,与action标签的path属性相对应!
也就是我们struts-config.xml文件中 <action path="/login">它对应于loginForm,
3.processLocale(request,response):处理一些国际化的事物
4.processContent(request,response):设置响应体的编码方式 response.setContentType(contentType);
5.processNoCache(request,response)根据noCache属性的设置调用processNoCache()方法,如果noCache设置为true,则添加合适的响应对象中,使得页面保留浏览器的Cache中。这些响应头包含Pragma,CacheControl和Expries!也就是缓冲区了!
6.processPreprocess(request,response):该方法只是简单的返回一个true值,它是以下方式调用的:
if(!processPreprocess(request,response))return;因此我们可以在processPreprocess方法中进行一点的预处理,如果用户的请求不符号要求的话,我们就让它返回一个false值,这样的话action就不会调用
这里我们在action包下建立一个MyRequestProcessor类,让其继承org.apache.struts.action.RequestProcessor如下图
之后我们让该类重写父类方法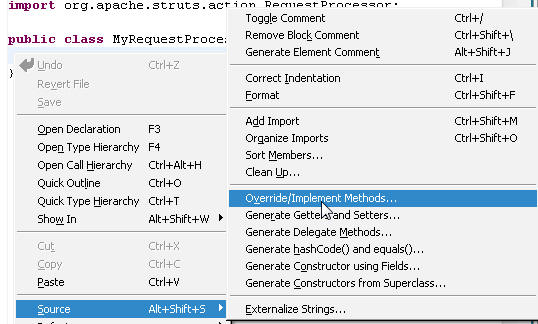

然后我们在processPreprocess方法中简单的修改一下,MyRequestProcessor完整代码如下:
package fengyan.struts.action;import javax.servlet.http.HttpServletRequest;import javax.servlet.http.HttpServletResponse;import org.apache.struts.action.RequestProcessor; public class MyRequestProcessor extends RequestProcessor {
 @Override
 protected boolean processPreprocess(HttpServletRequest arg0, HttpServletResponse arg1) { //我们简单的让其输出一句话,实际中当然可以根据业务需要来进行处理! System.out.println("楚旋-博客园:http://eflylab.cnblogs.com"); return super.processPreprocess(arg0, arg1); //我们可以return false 这样struts-config.xml中的action就不会被调用了
 }
} }<controller processorClass="fengyan.struts.action.MyRequestProcessor"></controller>
这样我们通过修改,就使其不经过原始的processor了,我们可以先运行,效果如下:
我们可以看到在控制台输出了"楚旋-博客园:http://eflylab.cnblogs.com"表明请求经过了我们的MyRequesProcesor
7. 好了,经过上面processPreprocess预处理之后是processMapping(request,response):它是利用前面所获取的path值,在struts-config.xml中寻找对应的action.即根据path在action-mappings标签中寻找其对应的action,如果找不到则返回一个error
8.processRoles(request,response):通过其名,知道是与角色有关,它是action访问权限的问题!不过可忽略,一般没啥用处!有可能我会在下一篇文章中写出!
9.processActionForm(request,response,mapping):
第一步,查看是否存在着为这个ActionMapping配置的ActionForm,具体查看流程如下:
a:该Action元素的attribute是否为null,如果为null,则返回null;
b:如果attribute不为null,则取得它的name属性,然后根据name的值在<form-beans>中寻找相应的ActionForm,也是通过name属性来配对的,如果找不到的话,则产生错误日志,并且返回null.
第二步:如果存在这样的ActionForm,我们就根据上面的attribute的值,在作用域查看是否存在着这样的ActionForm的实例,如果存在则重复用之,并把它作为返回值,否则的话,就重新创建这个ActionForm的一个实例,并且返回它,最后这个实例将会保存在相应的作用域中
10.processPopulate(request,response,form,mapping)如果存在为ActionMapping配置的ActionForm,则封装请求对象中的数据到ActionForm中,在进行封装之前,先调用ActionForm的reset方法进行属性值的默认化。在Struts 学习之02(验证)中已经用过!
11.processValidate(request,response,form,mapping):如果ActionForm被设置好,并且Action元素的属性validate被设置为true,则进一步调用validate()方法进行规则校验。如果validate方法验证失败,就会保存一个ActionErrors对象到请求区域中,请求就会自动重写向到action映射的input属性所指定的页面中。如果校验通过或在action映射中没有配置ActionForm,则继续处理请求!在Struts 学习之02(验证)中已经用过!
12.processForward(reuest,response,mapping) & processInclude(request,response,mapping):根据action映射是否配置了forward属性或include属性来决定下一步操作。如果配置了任意一个,则相应地调用RequestDispathcher对象的forward方法或include方法,调用后,对客户请求的处理结束。否则,继续处理请求!
13.processActionCreate(request,response,mapping):创建或获取一个Action对象实例处理请求。processActionCreate方法会在缓存中查找是否存在已经创建好的Action实例,如果存在,则重复用之,否则,重新创建并将其存于缓存中。如果该方法返回null,则请求处理结束(注:根据action映射的type属性来寻找对应的Action类)。
14.processActionPerform(request,response,action,form,mapping):调用action实例的execute()方法。也就是为什么我们正常创建一个action时 都会重写它的execute方法!
15.processForwordConfig(request,response,forword):传入action的execute()方法返回的ActionForword对象实例,方法通过检查ActionForword对象实例,决定用redirect或forword方式进行重定向。究竟采用redirect还是forword取决于forword元素的redirect属性值!在前面我们也使用过了!
好了,控制器中篇就先写到这~余下的我会在下一篇中继续!


