[python] 安装numpy+scipy+matlotlib+scikit-learn及问题解决
这篇文章主要讲述Python如何安装Numpy、Scipy、Matlotlib、Scikit-learn等库的过程及遇到的问题解决方法。最近安装这个真是一把泪啊,各种不兼容问题和报错,希望文章对你有所帮助吧!你可能遇到的问题包括:
ImportError: No module named sklearn 未安装sklearn包
ImportError: DLL load failed: 找不到指定的模块
ImportError: DLL load failed: The specified module could not be found
Microsoft Visual C++ 9.0 is required Unable to find vcvarsall.bat
Numpy Install RuntimeError: Broken toolchain: cannot link a simple C program
ImportError: numpy.core.multiarray failed to import
ImportError: cannot import name __check_build
ImportError: No module named matplotlib.pyplot
一. 安装过程
最早我是使用"pip install scikit-learn"命令安装的Scikit-Learn程序,并没有注意需要安装Numpy、Scipy、Matlotlib,然后在报错"No module named Numpy"后,我接着使用PIP或者下载exe程序安装相应的包,同时也不理解安装顺序和版本的重要性。其中最终都会报错" ImportError: DLL load failed: 找不到指定的模块",此时我的解决方法是:
错误:sklearn ImportError: DLL load failed: 找不到指定的模块
重点:安装python第三方库时总会出现各种兼容问题,应该是版本问题,版本需要一致。
第一步:卸载原始版本,包括Numpy、Scipy、Matlotlib、Scikit-Learn
pip uninstall scikit-learn
pip uninstall numpy
pip uninstall scipy
pip uninstall matplotlib
第二步:不使用"pip install package"或"easy_install package"安装,或者去百度\CSDN下载exe文件,而是去到官网下载相应版本。
http://www.lfd.uci.edu/~gohlke/pythonlibs/#scipy
http://www.lfd.uci.edu/~gohlke/pythonlibs/#numpy
http://www.lfd.uci.edu/~gohlke/pythonlibs/#matplotlib
http://www.lfd.uci.edu/~gohlke/pythonlibs/#scikit-learn
安装过程中最重要的地方就是版本需要兼容。其中操作系统为64位,Python为2.7.8 64位,下载的四个whl文件如下,其中cp27表示CPython 2.7版本,cp34表示CPython 3.4,win_arm64指的是64位版本。
numpy-1.10.2-cp27-none-win_amd64.whl
scipy-0.16.1-cp27-none-win_amd64.whl
matplotlib-1.5.0-cp27-none-win_amd64.whl
scikit_learn-0.17-cp27-none-win_amd64.whl
PS:不推荐使用"pip install numpy"安装或下载如"numpy-MKL-1.8.0.win-amd64-py2.7.exe"类似文件,地址如:
http://sourceforge.net/projects/numpy/files/NumPy
http://sourceforge.net/projects/scipy/files/Scipy
第三步:去到Python安装Scripts目录下,再使用pip install xxx.whl安装,先装Numpy\Scipy\Matlotlib包,再安装Scikit-Learn。
其中我的python安装路径"G:\software\Program software\Python\python insert\Scripts",同时四个whl文件安装核心代码:
pip install G:\numpy+scipy+matplotlib\numpy-1.10.2-cp27-none-win_amd64.whl
pip install G:\numpy+scipy+matplotlib\scikit_learn-0.17-cp27-none-win_amd64.whl
C:\>G:

G:\>cd G:\software\Program software\Python\python insert\Scripts

G:\software\Program software\Python\python insert\Scripts>pip install G:\numpy+s
cipy+matplotlib\numpy-1.10.2-cp27-none-win_amd64.whl
Processing g:\numpy+scipy+matplotlib\numpy-1.10.2-cp27-none-win_amd64.whl
Installing collected packages: numpy
Successfully installed numpy-1.10.2

G:\software\Program software\Python\python insert\Scripts>pip install G:\numpy+s
cipy+matplotlib\matplotlib-1.5.0-cp27-none-win_amd64.whl
Installing collected packages: matplotlib
Successfully installed matplotlib-1.5.0

G:\software\Program software\Python\python insert\Scripts>pip install G:\numpy+s
cipy+matplotlib\scipy-0.16.1-cp27-none-win_amd64.whl
Processing g:\numpy+scipy+matplotlib\scipy-0.16.1-cp27-none-win_amd64.whl
Installing collected packages: scipy
Successfully installed scipy-0.16.1

G:\software\Program software\Python\python insert\Scripts>pip install G:\numpy+s
cipy+matplotlib\scikit_learn-0.17-cp27-none-win_amd64.whl
Processing g:\numpy+scipy+matplotlib\scikit_learn-0.17-cp27-none-win_amd64.whl
Installing collected packages: scikit-learn
Successfully installed scikit-learn-0.17
第四步:此时配置完成,关键是Python64位版本兼容问题和Scripts目录。最后用北邮论坛一个神人的回复结束这个安装过程:“傻孩子,用套件啊,给你介绍一个Anaconda或winpython。只能帮你到这里了! ”
二. 测试运行环境
搞了这么半天,为什么要装这些呢?给几个用例验证它的正确安装和强大吧!
Scikit-Learn是基于python的机器学习模块,基于BSD开源许可。Scikit-learn的基本功能主要被分为六个部分,分类,回归,聚类,数据降维,模型选择,数据预处理,具体可以参考官方网站上的文档。
NumPy(Numeric Python)系统是Python的一种开源的数值计算扩展,一个用python实现的科学计算包。它提供了许多高级的数值编程工具,如:矩阵数据类型、矢量处理,以及精密的运算库。专为进行严格的数字处理而产生。
内容包括:1、一个强大的N维数组对象Array;2、比较成熟的(广播)函数库;3、用于整合C/C++和Fortran代码的工具包;4、实用的线性代数、傅里叶变换和随机数生成函数。numpy和稀疏矩阵运算包scipy配合使用更加方便。
SciPy (pronounced "Sigh Pie") 是一个开源的数学、科学和工程计算包。它是一款方便、易于使用、专为科学和工程设计的Python工具包,包括统计、优化、整合、线性代数模块、傅里叶变换、信号和图像处理、常微分方程求解器等等。
Matplotlib是一个Python的图形框架,类似于MATLAB和R语言。它是python最著名的绘图库,它提供了一整套和matlab相似的命令API,十分适合交互式地进行制图。而且也可以方便地将它作为绘图控件,嵌入GUI应用程序中。
第一个代码:斜线坐标,测试matplotlib
import matplotlib
import numpy
import scipy
import matplotlib.pyplot as plt

plt.plot([1,2,3])
plt.ylabel('some numbers')
plt.show()
运行结果:

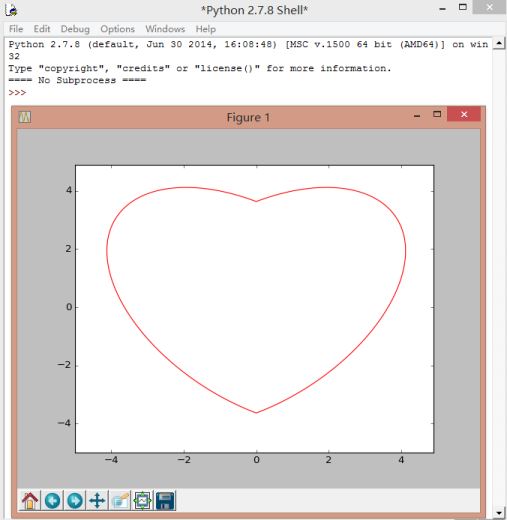
第二个代码:桃心程序,测试numpy和matplotlib
代码参考:Windows 下 Python easy_install 的安装 - KingsLanding
import numpy as np
import matplotlib.pyplot as plt

X = np.arange(-5.0, 5.0, 0.1)
Y = np.arange(-5.0, 5.0, 0.1)

x, y = np.meshgrid(X, Y)
f = 17 * x ** 2 - 16 * np.abs(x) * y + 17 * y ** 2 - 225

fig = plt.figure()
cs = plt.contour(x, y, f, 0, colors = 'r')
plt.show()
运行结果:

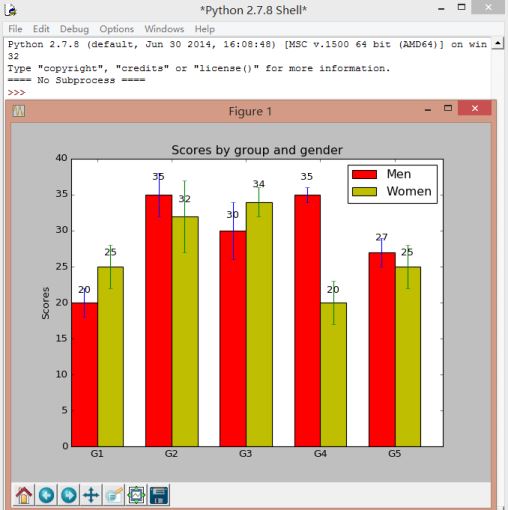
第三个程序:显示Matplotlib强大绘图交互功能
代码参考:Python-Matplotlib安装及简单使用 - bery
import numpy as np
import matplotlib.pyplot as plt

N = 5
menMeans = (20, 35, 30, 35, 27)
menStd =   (2, 3, 4, 1, 2)

ind = np.arange(N)  # the x locations for the groups
width = 0.35        # the width of the bars

fig, ax = plt.subplots()
rects1 = ax.bar(ind, menMeans, width, color='r', yerr=menStd)

womenMeans = (25, 32, 34, 20, 25)
womenStd =   (3, 5, 2, 3, 3)
rects2 = ax.bar(ind+width, womenMeans, width, color='y', yerr=womenStd)

# add some
ax.set_ylabel('Scores')
ax.set_title('Scores by group and gender')
ax.set_xticks(ind+width)
ax.set_xticklabels( ('G1', 'G2', 'G3', 'G4', 'G5') )

ax.legend( (rects1[0], rects2[0]), ('Men', 'Women') )

def autolabel(rects):
    # attach some text labels
    for rect in rects:
        height = rect.get_height()
        ax.text(rect.get_x()+rect.get_width()/2., 1.05*height, '%d'%int(height),
                ha='center', va='bottom')

autolabel(rects1)
autolabel(rects2)

plt.show()
运行结果:

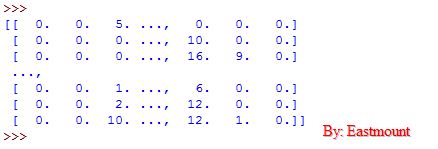
第四个代码:矩阵数据集,测试sklearn
from sklearn import datasets
iris = datasets.load_iris()
digits = datasets.load_digits()
print digits.data
运行结果:

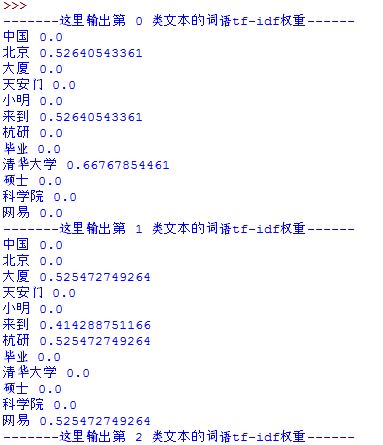
第五个代码:计算TF-IDF词语权重,测试scikit-learn数据分析
参考代码:http://blog.csdn.net/liuxuejiang158blog/article/details/31360765
# coding:utf-8
__author__ = "liuxuejiang"
import jieba
import jieba.posseg as pseg
import os
import sys
from sklearn import feature_extraction
from sklearn.feature_extraction.text import TfidfTransformer
from sklearn.feature_extraction.text import CountVectorizer

if __name__ == "__main__":
    corpus=["我 来到 北京 清华大学",     #第一类文本切词后的结果 词之间以空格隔开
        "他 来到 了 网易 杭研 大厦",     #第二类文本的切词结果
        "小明 硕士 毕业 与 中国 科学院",  #第三类文本的切词结果
        "我 爱 北京 天安门"]            #第四类文本的切词结果

    #该类会将文本中的词语转换为词频矩阵,矩阵元素a[i][j] 表示j词在i类文本下的词频
    vectorizer=CountVectorizer()

    #该类会统计每个词语的tf-idf权值
    transformer=TfidfTransformer()

    #第一个fit_transform是计算tf-idf,第二个fit_transform是将文本转为词频矩阵
    tfidf=transformer.fit_transform(vectorizer.fit_transform(corpus))

    #获取词袋模型中的所有词语
    word=vectorizer.get_feature_names()

    #将tf-idf矩阵抽取出来,元素a[i][j]表示j词在i类文本中的tf-idf权重
    weight=tfidf.toarray()

    #打印每类文本的tf-idf词语权重,第一个for遍历所有文本,第二个for便利某一类文本下的词语权重
    for i in range(len(weight)):
        print u"-------这里输出第",i,u"类文本的词语tf-idf权重------"
        for j in range(len(word)):
            print word[j],weight[i][j]
运行结果:
三. 其他错误解决方法
这里虽然讲解几个安装时遇到的其他错误及解决方法,但作者更推荐上面的安装步骤。
在这之前,我反复的安装、卸载、升级包,其中遇到了各种错误,改了又改,百度了又谷歌。常见PIP用法如下:
* pip install numpy             --安装包numpy
* pip uninstall numpy           --卸载包numpy
* pip show --files PackageName  --查看已安装包
* pip list outdated             --查看待更新包信息
* pip install --upgrade numpy   --升级包
* pip install -U PackageName    --升级包
* pip search PackageName        --搜索包
* pip help                      --显示帮助信息
ImportError: numpy.core.multiarray failed to import
python安装numpy时出现的错误,这个通过stackoverflow和百度也是需要python版本与numpy版本一致,解决的方法包括"pip install -U numpy"升级或下载指定版本"pip install numpy==1.8"。但这显然还涉及到更多的包,没有前面的卸载下载安装统一版本的whl靠谱。
Microsoft Visual C++ 9.0 is required(unable to find vcvarsall.bat)
因为Numpy内部矩阵运算是用C语言实现的,所以需要安装编译工具,这和电脑安装的VC++或VS2012有关,解决方法:如果已安装Visual Studio则添加环境变量VS90COMNTOOLS即可,不同的VS版本对应不同的环境变量值:
Visual Studio 2010 (VS10)设置 VS90COMNTOOLS=%VS100COMNTOOLS%
Visual Studio 2012 (VS11)设置 VS90COMNTOOLS=%VS110COMNTOOLS%
Visual Studio 2013 (VS12)设置 VS90COMNTOOLS=%VS120COMNTOOLS%
但是这并没有解决,另一种方法是下载Micorsoft Visual C++ Compiler for Python 2.7的包。
下载地址:http://www.microsoft.com/en-us/download/details.aspx?id=44266
参考文章:http://www.oschina.net/question/2294527_244245
PS:这些问题基本解决方法使用pip升级、版本一致、重新下载相关版本exe文件再安装。
总之,最后希望文章对你有所帮助!尤其是学习Python安装那几个包的同学~写文不易,且看且珍惜!
(By:Eastmount 2015-12-17 早上8点半 http://www.cnblogs.com/eastmount/ )
参考文章:
[Python] Windows7 x64安装numpy和scipy - delbert
[Python] matplotlib在windows下安装 - sina
Windows系统下Python与NumPy安装方法 - bubuko
scikit learn 安装及注意事项 - wbgxx333
Python包numpy、Matplotlib、SciPy在64位Windows上的安装
windows下安装scikit learn以及python的各种包
python 机器学习的开发环境搭建(numpy,scipy,matplotlib)


