(翻译)LearnVSXNow! #16- 创建简单的编辑器-2
(LearnVSXNow又开始继续翻译了,为了提高翻译速度,不再对每句话进行翻译,并且会用自己的理解来代替不好翻译的句子。理解不一定正确,见谅。)
前面那篇文章介绍了Visual Studio的自定义编辑器的基本概念,并用一个例子来说明如何创建自定义编辑器,今天我们继续这个例子。
1. 注册Editor
Editor需要注册到Visual Studio中才能使用。通常会注册下面三个东西:
Editor Factory:告诉Visual Studio我们的package可以提供哪些Editor Factory。
Editor支持的文件扩展名:告诉Visual Studio哪种扩展名的文件会关联到我们的Editor。
Editor的逻辑视图(Logic View):下面的段落中会提到什么是Logic View
// --- Other attributes have been omitted[ProvideEditorFactory(typeof(BlogItemEditorFactory), 200, TrustLevel = __VSEDITORTRUSTLEVEL.ETL_AlwaysTrusted)]
[ProvideEditorExtension(typeof(BlogItemEditorFactory), HowToPackage.BlogFileExtension,
32,
ProjectGuid = "{FAE04EC0-301F-11D3-BF4B-00C04F79EFBC}", TemplateDir = @"..\..\BlogItemEditor\Templates",NameResourceID = 200)]
[ProvideEditorLogicalView(typeof(BlogItemEditorFactory), GuidList.GuidBlogItemEditorLogicalView)]
public sealed class HowToPackage : Package
{public const string BlogFileExtension = ".blit";
protected override void Initialize()
{ base.Initialize(); // --- Other initialization code // --- Register the blog item editor RegisterEditorFactory(new BlogItemEditorFactory()); // --- Other initialization code}
}
ProvideEditorFactory表示我们的Package会提供什么Editor Factory。参数200是资源的ID,表示EditorFactory的名字(在VSPackage.resx文件中定义)。TrustLevel 用来设置Editor的信任级别。不懂什么叫“信任级别”没关系,我也不懂,但不影响使用,至少目前是这样。
ProvideLogicalView 表示我们的的Editor Factory可以提供一个逻辑视图。第二个参数是逻辑视图的guid。暂时弄不清楚这个逻辑视图是干嘛的也没关系,至少这篇文章的例子不太需要它。
在上面的代码里最长的是ProvideEditorExtension ,我用到了6个参数:
第一个参数用来指定Editor Factory。
第二个参数指定对应文件的扩展名,在这个例子里是“.blit”。
第三个参数设置Editor的优先级。
ProjectGuid属性指定一个项目类型的GUID,比如我们这个例子里指定了C#项目的GUID,这样在C#项目里“添加新项”时,可以在“添加新项”对话框里看到.blit文件。
TemplateDir属性指定添加新项对话框从哪个文件夹里寻找模版。它是一个相对路径,相对于当前Package编译出来的dll所在的目录。
NameResourceID属性设置在添加新项对话框里,我们的文件类型显示的名字,它是一个在VSPackage.resx中定义的资源ID。
在目录TemplateDir里需要放一些文件,用来说明该目录下的模版的名称、描述等信息。在这里我使用".vsdir"这种格式的文件:
BlogItem.blit|{0380775d-5735-43ed-8c23-c1fda451e1c8}|#200|32|#202|{0380775d-5735-43ed-8c23-c1fda451e1c8}|400|0|#203请注意,不管在你的浏览器上看到上面这段代码显示为几行,它实际上应该是一行才对。这行文本由“|”号隔开了下面几个内容:
— BlogItem.blit: 模版文件的文件名,该文件也存放在TemplateDir文件夹下面。
— GUID: 我们的Package的GUID。
— #200: 模版的名称,是一个定义在VSPackage.resx中的资源ID。应该是和上面提到的NameResourceID同一个东西。
— 32: 模版显示在添加新项对话框中的顺序。
— #202: 模版的描述,是一个定义在VSPackage.resx中的资源ID。
— GUID: 定义资源的dll的GUID。在这里我们用Package的GUID。
— 400: 在添加新项对话框中,模版的图标的资源ID.
— 0: 貌似是一些标记,我也弄不清楚。
— #203: 在添加新项对话框中的默认文件名资源ID。
需要说明一下,ProvideEditorExtension 后面的三个参数以及这个vsdir文件可以不设置,它和Editor没什么关系,是属于Project的ItemTemplate的相关内容,但既然作者写了它们,那我也就照着把它们翻译过来了。
仅仅在Package上面加上这几个Attribute是不够的,我们还必须在Package初始化的时候,创建我们的Editor Factory的实例:
protected override void Initialize()
{ base.Initialize(); // --- Other initialization code // --- Register the blog item editor RegisterEditorFactory(new BlogItemEditorFactory()); // --- Other initialization code}
2 Editor Factory
在第15章中可以看到,BlogItemEditorFactory 继承自SimpleEditorFactory<> 泛型类,并指定了Guid:
[Guid(GuidList.GuidBlogEditorFactoryString)]
public sealed class BlogItemEditorFactory:
SimpleEditorFactory<BlogItemEditorPane>
{ // --- That is the full code of this class! Nothing is omitted.}
基类SimpleEditorFactory的代码如下:
public class SimpleEditorFactory<TEditorPane> :
IVsEditorFactory,
IDisposable
where TEditorPane: WindowPane, IOleCommandTarget, IVsPersistDocData, IPersistFileFormat, new(){ private ServiceProvider _ServiceProvider; public SimpleEditorFactory() { ... } // --- IDisposable pattern implementationpublic void Dispose() { ... }
private void Dispose(bool disposing) { ... }
// --- IVsEditorFactory implementationpublic virtual int SetSite(IOleServiceProvider serviceProvide) { ... }
public virtual int MapLogicalView(ref Guid logicalView, out string physicalView)
{ ... }public virtual int Close() { ... }
[EnvironmentPermission(SecurityAction.Demand, Unrestricted = true)]public virtual int CreateEditorInstance(
uint grfCreateDoc, string pszMkDocument, string pszPhysicalView,IVsHierarchy pvHier,
uint itemid,IntPtr punkDocDataExisting,
out IntPtr ppunkDocView, out IntPtr ppunkDocData,out string pbstrEditorCaption,
out Guid pguidCmdUI,out int pgrfCDW)
{ ... } // --- Helper methods public object GetService(Type serviceType) { ... }
}
SimpleEditorFactory泛型类接受一个类型参数TEditorPane,这个类型参数继承自WindowPane,而且要实现IOleCommandTarget, IVsPersistDocData和IPersistFileFormat接口。SimpleEditorFactory类还实现了IVsEditorFactory和IDisposable接口。为了方便子类override,我把这个基类里和IVsEditorFactory相关的所有方法都弄成了虚方法。
Visual Studio会调用SetSite方法把Service Provider传递进来:
public virtual int SetSite(IOleServiceProvider serviceProvider)
{ _ServiceProvider = new ServiceProvider(serviceProvider); return VSConstants.S_OK;}
Service Provider传递进来之后,我们就可以利用下面的GetService方法它来访问VS中的服务了:
public object GetService(Type serviceType)
{ return _ServiceProvider.GetService(serviceType);}
不过BlogItemEditor这个例子并没有用到GetService这个方法。
Dispose方法负责销毁不再用到的资源:
public void Dispose()
{ Dispose(true);}
private void Dispose(bool disposing)
{ if (disposing) { // --- Here we dispose all managed and unmanaged resourcesif (_ServiceProvider != null)
{_ServiceProvider.Dispose();
_ServiceProvider = null;}
}
}
除了Dispose之外,我们还需要实现IVsEditorFactory的方法Close方法,在EditorFactory关闭时执行一些清理工作,不过也没什么好清理的:
public virtual int Close()
{ return VSConstants.S_OK;}
下面来说一下Editor的Logic View和Physical View。一个Editor有可能有多个视图,在CreateEditorInstance方法里有一个参数,叫做pszPhysicalView,如果我们的Editor有多个视图的话,我们就应该在根据pszPhysicalView参数的不同,来创建不同的Editor Instance。MapLogicalView 方法的功能就是根据传进来的Logic View的GUID,返回代表Physical View的字符串,这个字符串会被VS当成参数传递到CreateEditorInstance方法中。如果你的Editor有多个逻辑视图,那就可以在MapLogicalView 方法中根据不同的Logic View来返回不同的Physical View,然后在CreateEditorInstance方法中,根据不同的Physical View来创建不同的Editor Instance。由于我到目前还没用到过多视图的Editor,所以对原文作者的这段话理解上有些困难,所以这段英文就不翻译了,原文内容如下:
Now we arrived to the part of the IVsEditorFactory that does the real work. Before going on, I have to explain ideas not treated yet: the concept of logical view and physical view. When interacting with an editor (or better to imagine a designer) we use concrete instance of a view called physical view. If our designer supports more than one view, those can be grouped into logical categories. For example, our designer could have a view to see the information as text or as code; it may provide a different view while we are debugging. When creating a physical view, the shell offers the possibility to map it to a logical view and retrieve a name for the physical view that can be used as a parameter when creating the physical view instance. This is the role of the MapLogicalView method.
幸亏这个BlogItemEditor例子只有一个视图,所以暂时不理解也无所谓。SimpleEditorFactory的MapLogicalView 方法如下:
public virtual int MapLogicalView(ref Guid logicalView, out string physicalView)
{ physicalView = null; if (VSConstants.LOGVIEWID_Primary == logicalView) { // --- Primary view uses null as physicalView return VSConstants.S_OK;}
else { // --- You must return E_NOTIMPL for any unrecognized logicalView values return VSConstants.E_NOTIMPL;}
}
如果参数logicView等于VSConstants.LOGVIEWID_Primary,那就返回VSConstants.S_OK,表示能够识别这个logicView,并且对应的physicalView设置为null,否则返回E_NOTIMPL,表示我们不支持这个logicView。上面这段代码只适用于单视图的Editor,如果Editor有多个视图,那这段代码就得做些调整了。
physicalView的值会作为参数传递给CreateEditorInstance 方法,该方法的定义如下:
public virtual int CreateEditorInstance(
uint grfCreateDoc, string pszMkDocument, string pszPhysicalView,IVsHierarchy pvHier,
uint itemid,IntPtr punkDocDataExisting,
out IntPtr ppunkDocView, out IntPtr ppunkDocData,out string pbstrEditorCaption,
out Guid pguidCmdUI,out int pgrfCDW)
{ ... }各参数的含义如下:
| 参数 | 说明 |
| grfCreateDoc |
这个参数表示VS在什么情况下调用的这个方法。VSConstants类中以CEF_打头的字段表示了这个参数值的可能范围。只有CEF_OPENFILE and CEF_SILENT这两个值是合法的。 |
| pszMkDocument | 表示正在打开的文件的全路径 |
| pszPhysicalView |
physical view的名字,它的值是由MapLogicalView 决定的。在我们的例子里,它的值为null。 |
| pvHier |
IVsHierarchy 对象。例如,它表示我们要打开的文件在solution explorer中对应的节点。 |
| itemid |
IVsHierarchy 对象在solution explorer中的id |
| punkDocDataExisting | 判断DocData是否已经存在。在多视图的Editor中,多个Editor的实例会处理同一个document data。 |
| ppunkDocView | 返回创建的document view的指针。 |
| ppunkDocData | 返回创建的document data的指针。 |
| pbstrEditorCaption | 返回创建的document window的标题 |
| pguidCmdUI |
返回创建的Editor对应的Command group的GUID。 |
| pgrfCWD |
Flags for CreateDocumentWindow. 不太清楚具体含义,反正这个例子没用到它。 |
CreateEditorInstance 方法的实现如下(我省略掉了参数):
public virtual int CreateEditorInstance
(
// ... // --- See arguments in the code above)
{ // --- Initialize to nullppunkDocView = IntPtr.Zero;
ppunkDocData = IntPtr.Zero;
pguidCmdUI = GetType().GUID;
pgrfCDW = 0;
pbstrEditorCaption = null; // --- Validate inputs if ((grfCreateDoc & (VSConstants.CEF_OPENFILE | VSConstants.CEF_SILENT)) == 0) { return VSConstants.E_INVALIDARG;}
if (punkDocDataExisting != IntPtr.Zero) { return VSConstants.VS_E_INCOMPATIBLEDOCDATA;}
// --- Create the Document (editor) TEditorPane newEditor = new TEditorPane();ppunkDocView = Marshal.GetIUnknownForObject(newEditor);
ppunkDocData = Marshal.GetIUnknownForObject(newEditor);
pbstrEditorCaption = ""; return VSConstants.S_OK;}
在这个方法的一开始,所有的参数都被初始化成空或者0,除了pguidCmdUI。它的值是SimpleEditorFactory 的子类的GUID,在我们的例子里是BlogItemEditorFactory的GUID。
然后我们检查grfCreateDoc 参数是不是有效,如果是无效的值,我们就返回E_INVALIDARG。
同时我们也不接受document data已存在的情况,如果document data不为空,我们就返回VS_E_INCOMPATIBLEDOCDATA。
最后我们创建了一个TEditorPane类型的实例,由于TEditorPane类型即实现了WindowPane,又实现了IVsPersistDocData,所以它既是document view,又是document data,然后我们用Marshal.GetIUnknownForObject 方法取出它的IUnknow接口,并赋值给参数ppunkDocView和ppunkDocData。
3 BlogItemEditorData
在继续之前,来看一下BlogItemEditor要编辑的数据是什么样子的:
public sealed class BlogItemEditorData : IXmlPersistable
{private string _Title;
private string _Categories;
private string _Body;
public const string BlogItemNamespace =
"http://www.codeplex.com/LearnVSXNow/BlogItemv1.0";public const string BlogItemLiteral = "BlogItem";
// --- Other contant values used for XMLpersistenceprivate readonly XName BlogItemXName = XName.Get(BlogItemLiteral,
BlogItemNamespace);
// --- Other readonly fields representing XML elements of the .blit file public BlogItemEditorData() {}
public BlogItemEditorData(string title, string categories, string body)
{_Title = title;
_Categories = categories;
_Body = body;
}
// --- Read-write properties omitted
读写文件的代码如下:
public void SaveTo(string fileName)
{ // --- Create the root document element XElement root = new XElement(BlogItemXName); XDocument objectDoc = new XDocument(root); // --- Save document data to XElement and then tofileSaveTo(root);
objectDoc.Save(fileName);
}
public void ReadFrom(string fileName)
{ string fileContent = File.ReadAllText(fileName);XDocument objectDoc = XDocument.Parse(fileContent,
LoadOptions.PreserveWhitespace);
// --- Check the document elementXElement root = objectDoc.Element(BlogItemXName);
if (root == null)
throw new InvalidOperationException(
"Root '" + BlogItemLiteral + "' element cannot be found.");
// --- Read the documentReadFrom(root);
}
多亏有System.XML.Linq 命名空间下的新的xml类型XElement,这样代码比用以前的XmlDocument简洁多了:
public void SaveTo(XElement targetElement)
{ // --- Create title targetElement.Add(new XElement(TitleXName, _Title)); // --- Create category hierarchy XElement categories = new XElement(CategoriesXName);targetElement.Add(categories);
string[] categoryList = _Categories.Split(';');
foreach (string category in categoryList)
{ string trimmed = category.Trim(); if (trimmed.Length > 0) { categories.Add(new XElement(CategoryXName, trimmed));}
}
// --- Create the bodytargetElement.Add(new XElement(BodyXName, new XCData(_Body)));
}
同样的,ReadFrom(XElement)方法也很简单,我就不贴它的代码了。
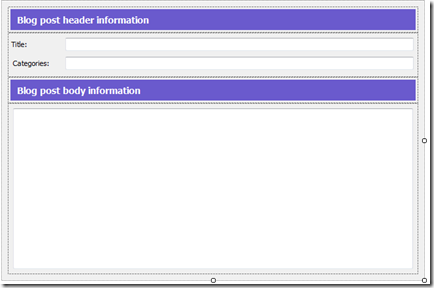
4 Editor界面:BlogItemEditorControl
Editor的界面是一个UserControl,叫做BlogItemEditorControl,它的样子如下图:
BlogItemEditorControl 实现了ICommonCommandSupport:
public partial class BlogItemEditorControl :
UserControl, ICommonCommandSupport { ... }不要去google这个ICommonCommandSupport接口,它不是Microsoft的,是我们自己定义的。它包含若干个以Supports开头的bool类型的属性,以及对应的以Do开头的方法,表示是否支持xxx命令,以及在支持的情况下,执行xxx命令。例如我不打算支持SelectAll, Redo和Undo命令:
// --- ICommonCommandSupport implementationbool ICommonCommandSupport.SupportsSelectAll{ get { return false; } }bool ICommonCommandSupport.SupportsRedo{ get { return false; } }bool ICommonCommandSupport.SupportsUndo{ get { return false; } }当控件有选中的文本时,支持Copy和Cut命令:
// --- ICommonCommandSupport implementationbool ICommonCommandSupport.SupportsCopy{ get { return ActiveControlHasSelection; }}
// ...private bool ActiveControlHasSelection
{get
{ TextBox active = ActiveControl as TextBox;return active == null ? false : active.SelectionLength > 0;
}
}
当剪贴板上有文本数据时,支持Paste命令:
// --- ICommonCommandSupport implementationbool ICommonCommandSupport.SupportsPaste{ get { return ActiveCanPasteFromClipboard; }}
// ...private bool ActiveCanPasteFromClipboard
{get
{ TextBox active = ActiveControl as TextBox;return (active != null && Clipboard.ContainsText());
}
}
下面是执行Copy、Cut、Paste命令的代码:
// --- ICommonCommandSupport implementationvoid ICommonCommandSupport.DoCopy(){ TextBox active = ActiveControl as TextBox;if (active != null) active.Copy();
}
void ICommonCommandSupport.DoCut(){ TextBox active = ActiveControl as TextBox;if (active != null) active.Cut();
}
void ICommonCommandSupport.DoPaste(){ TextBox active = ActiveControl as TextBox;if (active != null) active.Paste();
}
BlogItemEditorControl中还定义了在BlogItemEditorData和界面控件之间同步的方法:
public partial class BlogItemEditorControl :
UserControl,
ICommonCommandSupport
{ public BlogItemEditorControl() {InitializeComponent();
}
public void RefreshView(BlogItemEditorData data)
{ TitleEdit.Text = data.Title ?? string.Empty;CategoriesEdit.Text = data.Categories ?? String.Empty;
BodyEdit.Text = data.Body ?? String.Empty;
}
public void RefreshData(BlogItemEditorData data)
{data.Title = TitleEdit.Text;
data.Categories = CategoriesEdit.Text;
data.Body = BodyEdit.Text;
}
BlogItemEditorControl还剩下一个重要的工作要做:在文本框里改变blog的标题或内容之后,要告诉VS,这个blog数据“dirty”了,这样vs才会在Editor窗口上显示一个“*”的标记。
其实告诉vs我们的数据dirty了并不是这个BlogItemEditorControl要负责的事情,但是它需要公开一个事件,并且当blog内容发生改变的时候,触发这个事件。这样使用到这个控件的地方就可以通过这个事件来通知vs了。
事件定义如下:
public event EventHandler ContentChanged;
private void RaiseContentChanged(object sender, EventArgs e)
{if (ContentChanged != null) ContentChanged.Invoke(sender, e);
}
private void ControlContentChanged(object sender, EventArgs e)
{RaiseContentChanged(sender, e);
}
ControlContentChanged方法关联到了所有文本框的TextChanged事件,当文本框的内容发生改变时,就会触发这个方法,并进一步触发公开的ContentChanged事件。
5 BlogItemEditorPane
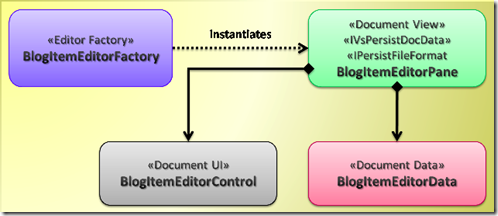
回顾一下上一章中的一张图:
从上图可以看出,BlogItemEditorPane 既是document data,又是document view。虽然我们分别用BlogItemEditorData和BlogItemEditorControl 类来表示blog的数据和Editor的界面,但BlogItemEditorPane才是能被vs接受的document data和document view,因为它实现了IVsPersistDocData和WindowPane。
我抽取了一些通用的方法,做了一个基类SimpleEditorPane,并使BlogItemEditorPane继承它,这样BlogItemEditorPane的代码就非常简洁。它的全部代码如下:
public sealed class BlogItemEditorPane:
SimpleEditorPane<BlogItemEditorFactory, BlogItemEditorControl>
{private readonly BlogItemEditorData _EditorData = new BlogItemEditorData();
public BlogItemEditorPane() {UIControl.ContentChanged += DataChangedInView;
}
protected override string GetFileExtension()
{return HowToPackage.BlogFileExtension; // --- “.blit”
}
protected override Guid GetCommandSetGuid()
{ return GuidList.GuidBlogEditorCmdSet;}
protected override void LoadFile(string fileName)
{_EditorData.ReadFrom(fileName);
UIControl.RefreshView(_EditorData);
}
protected override void SaveFile(string fileName)
{UIControl.RefreshData(_EditorData);
_EditorData.SaveTo(fileName);
}
void DataChangedInView(object sender, EventArgs e)
{OnContentChanged();
}
}
GetFileExtension返回我们的Editor支持的文件扩展名".blit".
GetCommandSetGuid返回Editor支持的Command group的GUID。
LoadFile从文件中加载BlogItemEditorData的实例,并显示在BlogItemEditorControl上。
SaveFile从BlogItemEditorControl上取出BlogItemEditorData实例,并保存到文件中。
下一篇文章我们继续完成这个的编辑器的例子。
作者这个“简单的编辑器”例子搞的有点复杂了,他抽象出了一个开发自定义编辑器的类库,虽然使用这个类库可以更简单的创建编辑器,但对于我们刚刚开始学习如何创建编辑器的同学们来说,容易被他的类库影响注意力,还不如不要这个类库,直接拿最直接的代码作文示例。 建议把源代码下载下来,结合源代码来理解这个编辑器的系列。
源码下载:
https://files.cnblogs.com/default/LearnVSXNow-8528.zip
原文链接:
http://dotneteers.net/blogs/divedeeper/archive/2008/03/14/LearnVSXNowPart16.aspx
出处:http://www.cnblogs.com/default
本文版权归作者所有,欢迎转载,但未经作者同意必须保留此段声明,且在文章页面明显位置给出原文链接,否则保留追究法律责任的权利。


 浙公网安备 33010602011771号