ASP.NET Core Web API下事件驱动型架构的实现(三):基于RabbitMQ的事件总线
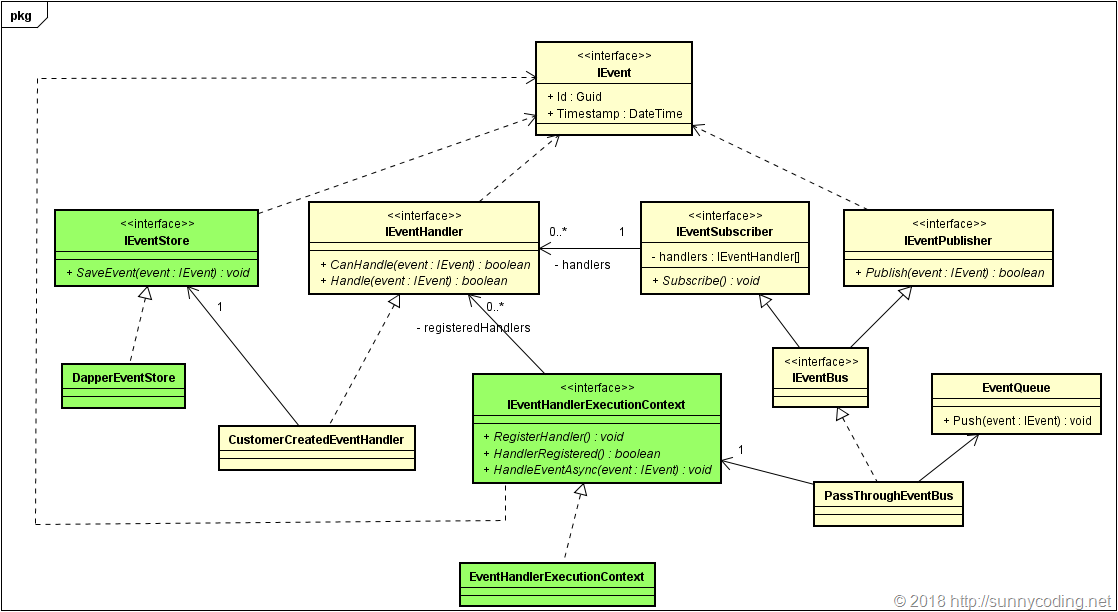
在上文中,我们讨论了事件处理器中对象生命周期的问题,在进入新的讨论之前,首先让我们总结一下,我们已经实现了哪些内容。下面的类图描述了我们已经实现的组件及其之间的关系,貌似系统已经变得越来越复杂了。
其中绿色的部分就是上文中新实现的部分,包括一个简单的Event Store,一个事件处理器执行上下文的接口,以及一个基于ASP.NET Core依赖注入框架的执行上下文的实现。接下来,我们打算淘汰PassThroughEventBus,然后基于RabbitMQ实现一套新的事件总线。
事件总线的重构
根据前面的结论,事件总线的执行需要依赖于事件处理器执行上下文,也就是上面类图中PassThroughEventBus对于IEventHandlerExecutionContext的引用。更具体些,是在事件总线订阅某种类型的事件时,需要将事件处理器注册到IEventHandlerExecutionContext中。那么在实现RabbitMQ时,也会有着类似的设计需求,即RabbitMQEventBus也需要依赖IEventHandlerExecutionContext接口,以保证事件处理器生命周期的合理性。
为此,我们新建一个基类:BaseEventBus,并将这部分公共的代码提取出来,需要注意以下几点:
- 通过BaseEventBus的构造函数传入IEventHandlerExecutionContext实例,也就限定了所有子类的实现中,必须在构造函数中传入IEventHandlerExecutionContext实例,这对于框架的设计非常有利:在实现新的事件总线时,框架的使用者无需查看API文档,即可知道事件总线与IEventHandlerExecutionContext之间的关系,这符合SOLID原则中的Open/Closed Principle
- BaseEventBus的实现应该放在EdaSample.Common程序集中,更确切地说,它应该放在EdaSample.Common.Events命名空间下,因为它是属于框架级别的组件,并且不会依赖任何基础结构层的组件
BaseEventBus的代码如下:
1 2 3 4 5 6 7 8 9 10 11 12 13 14 15 16 17 | public abstract class BaseEventBus : IEventBus{ protected readonly IEventHandlerExecutionContext eventHandlerExecutionContext; protected BaseEventBus(IEventHandlerExecutionContext eventHandlerExecutionContext) { this.eventHandlerExecutionContext = eventHandlerExecutionContext; } public abstract Task PublishAsync<TEvent>(TEvent @event, CancellationToken cancellationToken = default) where TEvent : IEvent; public abstract void Subscribe<TEvent, TEventHandler>() where TEvent : IEvent where TEventHandler : IEventHandler<TEvent>; // Disposable接口实现代码省略} |
在上面的代码中,PublishAsync和Subscribe方法是抽象方法,以便子类根据不同的需要来实现。
接下来就是调整PassThroughEventBus,使其继承于BaseEventBus:
1 2 3 4 5 6 7 8 9 10 11 12 13 14 15 16 17 18 19 20 21 22 23 24 25 26 27 28 29 30 31 32 33 | public sealed class PassThroughEventBus : BaseEventBus{ private readonly EventQueue eventQueue = new EventQueue(); private readonly ILogger logger; public PassThroughEventBus(IEventHandlerExecutionContext context, ILogger<PassThroughEventBus> logger) : base(context) { this.logger = logger; logger.LogInformation($"PassThroughEventBus构造函数调用完成。Hash Code:{this.GetHashCode()}."); eventQueue.EventPushed += EventQueue_EventPushed; } private async void EventQueue_EventPushed(object sender, EventProcessedEventArgs e) => await this.eventHandlerExecutionContext.HandleEventAsync(e.Event); public override Task PublishAsync<TEvent>(TEvent @event, CancellationToken cancellationToken = default) { return Task.Factory.StartNew(() => eventQueue.Push(@event)); } public override void Subscribe<TEvent, TEventHandler>() { if (!this.eventHandlerExecutionContext.HandlerRegistered<TEvent, TEventHandler>()) { this.eventHandlerExecutionContext.RegisterHandler<TEvent, TEventHandler>(); } } // Disposable接口实现代码省略} |
代码都很简单,也就不多做说明了,接下来,我们开始实现RabbitMQEventBus。
RabbitMQEventBus的实现
首先需要新建一个.NET Standard 2.0的项目,使用.NET Standard 2.0的项目模板所创建的项目,可以同时被.NET Framework 4.6.1或者.NET Core 2.0的应用程序所引用。创建新的类库项目的目的,是因为RabbitMQEventBus的实现需要依赖RabbitMQ C#开发库这个外部引用。因此,为了保证框架核心的纯净和稳定,需要在新的类库项目中实现RabbitMQEventBus。
Note:对于RabbitMQ及其C#库的介绍,本文就不再涉及了,网上有很多资料和文档,博客园有很多朋友在这方面都有使用经验分享,RabbitMQ官方文档也写得非常详细,当然是英文版的,如果英语比较好的话,建议参考官方文档。
以下就是在EdaSample案例中,RabbitMQEventBus的实现,我们先读一读代码,再对这部分代码做些分析。
1 2 3 4 5 6 7 8 9 10 11 12 13 14 15 16 17 18 19 20 21 22 23 24 25 26 27 28 29 30 31 32 33 34 35 36 37 38 39 40 41 42 43 44 45 46 47 48 49 50 51 52 53 54 55 56 57 58 59 60 61 62 63 64 65 66 67 68 69 70 71 72 73 74 75 76 77 78 79 80 81 82 83 84 85 86 87 88 89 90 91 92 93 94 95 96 97 98 99 100 101 102 103 | public class RabbitMQEventBus : BaseEventBus{ private readonly IConnectionFactory connectionFactory; private readonly IConnection connection; private readonly IModel channel; private readonly string exchangeName; private readonly string exchangeType; private readonly string queueName; private readonly bool autoAck; private readonly ILogger logger; private bool disposed; public RabbitMQEventBus(IConnectionFactory connectionFactory, ILogger<RabbitMQEventBus> logger, IEventHandlerExecutionContext context, string exchangeName, string exchangeType = ExchangeType.Fanout, string queueName = null, bool autoAck = false) : base(context) { this.connectionFactory = connectionFactory; this.logger = logger; this.connection = this.connectionFactory.CreateConnection(); this.channel = this.connection.CreateModel(); this.exchangeType = exchangeType; this.exchangeName = exchangeName; this.autoAck = autoAck; this.channel.ExchangeDeclare(this.exchangeName, this.exchangeType); this.queueName = this.InitializeEventConsumer(queueName); logger.LogInformation($"RabbitMQEventBus构造函数调用完成。Hash Code:{this.GetHashCode()}."); } public override Task PublishAsync<TEvent>(TEvent @event, CancellationToken cancellationToken = default(CancellationToken)) { var json = JsonConvert.SerializeObject(@event, new JsonSerializerSettings { TypeNameHandling = TypeNameHandling.All }); var eventBody = Encoding.UTF8.GetBytes(json); channel.BasicPublish(this.exchangeName, @event.GetType().FullName, null, eventBody); return Task.CompletedTask; } public override void Subscribe<TEvent, TEventHandler>() { if (!this.eventHandlerExecutionContext.HandlerRegistered<TEvent, TEventHandler>()) { this.eventHandlerExecutionContext.RegisterHandler<TEvent, TEventHandler>(); this.channel.QueueBind(this.queueName, this.exchangeName, typeof(TEvent).FullName); } } protected override void Dispose(bool disposing) { if (!disposed) { if (disposing) { this.channel.Dispose(); this.connection.Dispose(); logger.LogInformation($"RabbitMQEventBus已经被Dispose。Hash Code:{this.GetHashCode()}."); } disposed = true; base.Dispose(disposing); } } private string InitializeEventConsumer(string queue) { var localQueueName = queue; if (string.IsNullOrEmpty(localQueueName)) { localQueueName = this.channel.QueueDeclare().QueueName; } else { this.channel.QueueDeclare(localQueueName, true, false, false, null); } var consumer = new EventingBasicConsumer(this.channel); consumer.Received += async (model, eventArgument) => { var eventBody = eventArgument.Body; var json = Encoding.UTF8.GetString(eventBody); var @event = (IEvent)JsonConvert.DeserializeObject(json, new JsonSerializerSettings { TypeNameHandling = TypeNameHandling.All }); await this.eventHandlerExecutionContext.HandleEventAsync(@event); if (!autoAck) { channel.BasicAck(eventArgument.DeliveryTag, false); } }; this.channel.BasicConsume(localQueueName, autoAck: this.autoAck, consumer: consumer); return localQueueName; }} |
阅读上面的代码,需要注意以下几点:
- 正如上面所述,构造函数需要接受IEventHandlerExecutionContext对象,并通过构造函数的base调用,将该对象传递给基类
- 构造函数中,queueName参数是可选参数,也就是说:
- 如果通过RabbitMQEventBus发送事件消息,则无需指定queueName参数,仅需指定exchangeName即可,因为在RabbitMQ中,消息的发布方无需知道消息是发送到哪个队列中
- 如果通过RabbitMQEventBus接收事件消息,那么也分两种情况:
- 如果两个进程在使用RabbitMQEventBus时,同时指定了queueName参数,并且queueName的值相同,那么这两个进程将会轮流处理路由至queueName队列的消息
- 如果两个进程在使用RabbitMQEventBus时,同时指定了queueName参数,但queueName的值不相同,或者都没有指定queueName参数,那么这两个进程将会同时处理路由至queueName队列的消息
- 有关Exchange和Queue的概念,请参考RabbitMQ的官方文档
- 在Subscribe方法中,除了将事件处理器注册到事件处理器执行上下文之外,还通过QueueBind方法,将指定的队列绑定到Exchange上
- 事件数据都通过Newtonsoft.Json进行序列化和反序列化,使用TypeNameHandling.All这一设定,使得序列化的JSON字符串中带有类型名称信息。在此处这样做既是合理的,又是必须的,因为如果没有带上类型名称的信息,JsonConvert.DeserializeObject反序列化时,将无法判定得到的对象是否可以转换为IEvent对象,这样就会出现异常。但如果是实现一个更为通用的消息系统,应用程序派发出去的事件消息可能还会被由Python或者Java所实现的应用程序所使用,那么对于这些应用,它们并不知道Newtonsoft.Json是什么,也无法通过Newtonsoft.Json加入的类型名称来获知事件消息的初衷(Intent),Newtonsoft.Json所带的类型信息又会显得冗余。因此,简单地使用Newtonsoft.Json作为事件消息的序列化、反序列化工具,其实是欠妥的。更好的做法是,实现自定义的消息序列化、反序列化器,在进行序列化的时候,将.NET相关的诸如类型信息等,作为Metadata(元数据)附着在序列化的内容上。理论上说,在序列化的数据中加上一些元数据信息是合理的,只不过我们对这些元数据做一些标注,表明它是由.NET框架产生的,第三方系统如果不关心这些信息,可以对元数据不做任何处理
- 在Dispose方法中,注意将RabbitMQ所使用的资源dispose掉
使用RabbitMQEventBus
在Customer服务中,使用RabbitMQEventBus就非常简单了,只需要引用RabbitMQEventBus的程序集,然后在Startup.cs文件的ConfigureServices方法中,替换PassThroughEventBus的使用即可:
1 2 3 4 5 6 7 8 9 10 11 12 13 14 15 16 17 18 19 20 21 22 23 24 | public void ConfigureServices(IServiceCollection services){ this.logger.LogInformation("正在对服务进行配置..."); services.AddMvc(); services.AddTransient<IEventStore>(serviceProvider => new DapperEventStore(Configuration["mssql:connectionString"], serviceProvider.GetRequiredService<ILogger<DapperEventStore>>())); var eventHandlerExecutionContext = new EventHandlerExecutionContext(services, sc => sc.BuildServiceProvider()); services.AddSingleton<IEventHandlerExecutionContext>(eventHandlerExecutionContext); // services.AddSingleton<IEventBus, PassThroughEventBus>(); var connectionFactory = new ConnectionFactory { HostName = "localhost" }; services.AddSingleton<IEventBus>(sp => new RabbitMQEventBus(connectionFactory, sp.GetRequiredService<ILogger<RabbitMQEventBus>>(), sp.GetRequiredService<IEventHandlerExecutionContext>(), RMQ_EXCHANGE, queueName: RMQ_QUEUE)); this.logger.LogInformation("服务配置完成,已注册到IoC容器!");} |
Note:一种更好的做法是通过配置文件来配置IoC容器,在曾经的Microsoft Patterns and Practices Enterprise Library Unity Container中,使用配置文件是很方便的。这样只需要Customer服务能够通过配置文件来配置IoC容器,同时只需要让Customer服务依赖(注意,不是程序集引用)于不同的事件总线的实现即可,无需对Customer服务重新编译。
下面来验证一下效果。首先确保RabbitMQ已经配置并启动妥当,我是安装在本地机器上,使用默认安装。首先启动ASP.NET Core Web API,然后通过Powershell发起两次创建Customer的请求:
查看一下数据库是否更新正常:
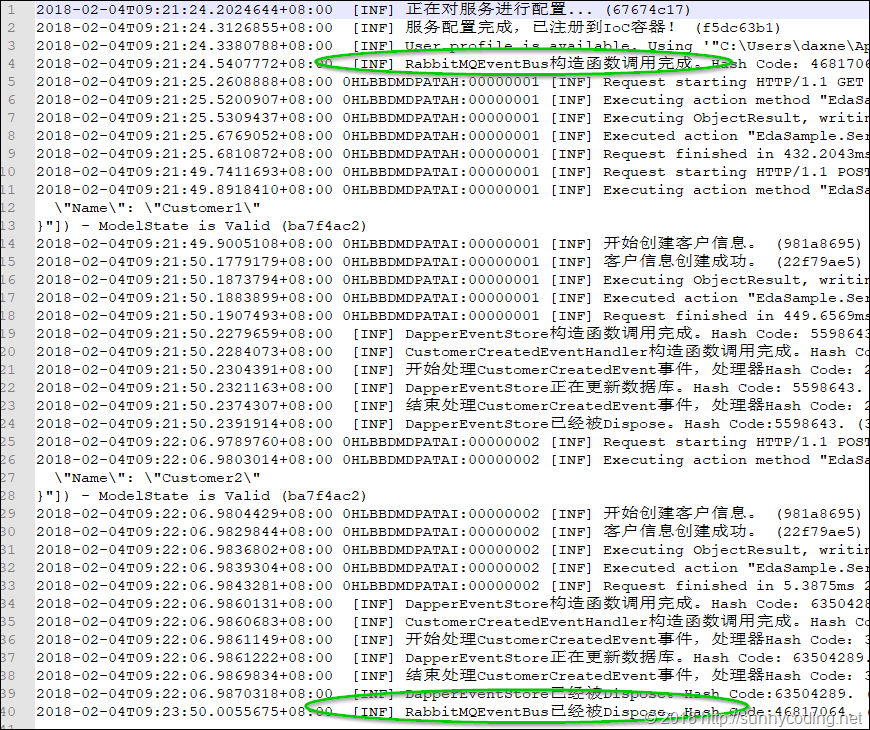
并检查一下日志信息:
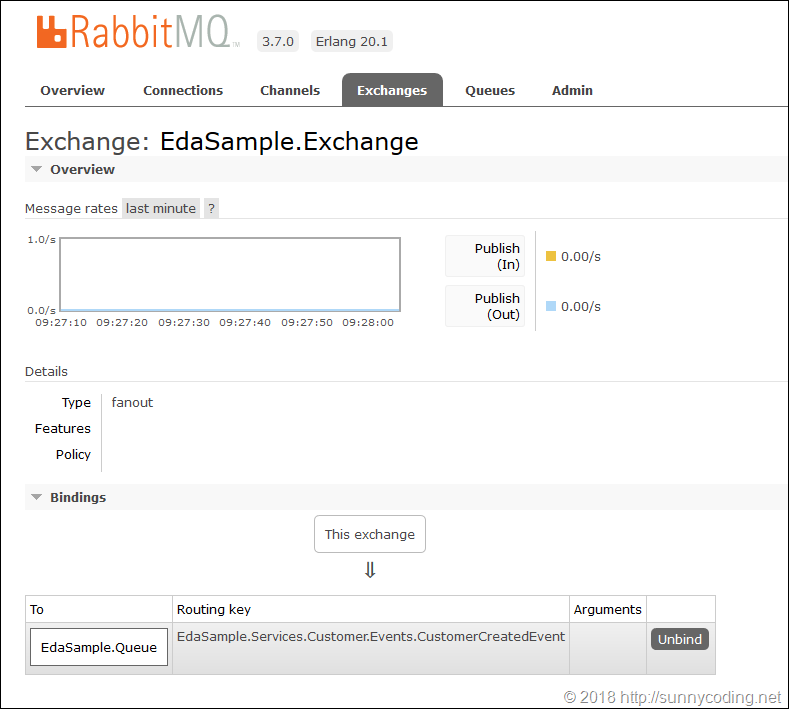
RabbitMQ中Exchange的信息:
总结
本文提供了一种RabbitMQEventBus的实现,目前来说是够用的,而且这种实现是可以使用在实际项目当中的。在实际使用中,或许也会碰到一些与RabbitMQ本身有关的问题,这就需要具体问题具体分析了。此外,本文没有涉及事件消息丢失、重发然后保证最终一致性的问题,这些内容会在后面讨论。从下文开始,我们着手逐步实现CQRS架构的领域事件和事件存储部分。
源代码的使用
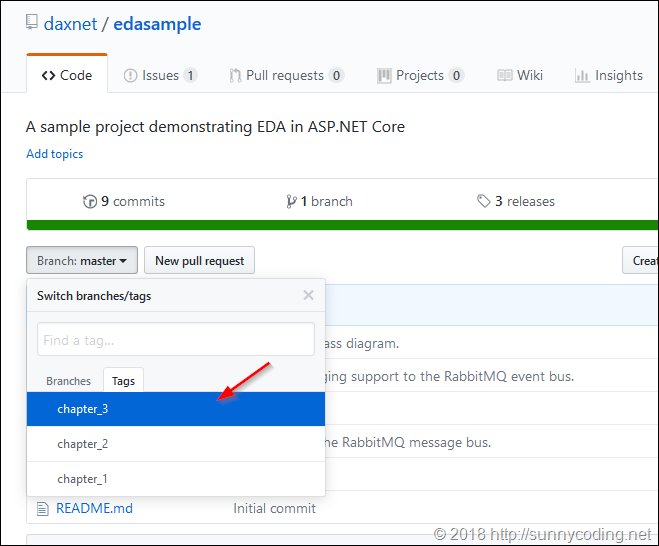
本系列文章的源代码在https://github.com/daxnet/edasample这个Github Repo里,通过不同的release tag来区分针对不同章节的源代码。本文的源代码请参考chapter_3这个tag,如下:
欢迎访问我的博客新站:http://sunnycoding.net。




【推荐】国内首个AI IDE,深度理解中文开发场景,立即下载体验Trae
【推荐】编程新体验,更懂你的AI,立即体验豆包MarsCode编程助手
【推荐】轻量又高性能的 SSH 工具 IShell:AI 加持,快人一步