在Silverlight 2 (Beta2) 中使用webclient上传图片
在之前的一篇文章中,谈到了使用文件对话框选取并预览本地文件。当时就有一个想法,将这个
DEMO扩展成为支持图片上传。所以今天本文会以上个DEMO中的部分代码为原型,在其基础上稍加
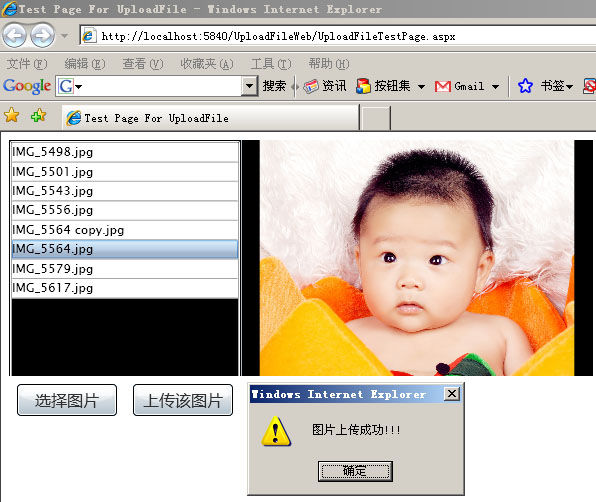
变动,使其支持图片上传功能。如下图所示:

首先,我们需要建立一个silverlight application ,名称为:UploadFileWeb
然后在该WEB项目中新建一个Generic Handler,名称为:Handler.ashx
下面就是它的代码:
因为要加入上传图片按钮,所以将page.xaml内容修改如下:
而相应的page.xmal.cs代码也做了修改(相关内容见注释):
好了,今天的内容就到这里了。
源码下载链接,请点击这里:)
TAG: silverlight, upload image, 上传, daizhj,代震军
DEMO扩展成为支持图片上传。所以今天本文会以上个DEMO中的部分代码为原型,在其基础上稍加
变动,使其支持图片上传功能。如下图所示:

首先,我们需要建立一个silverlight application ,名称为:UploadFileWeb
然后在该WEB项目中新建一个Generic Handler,名称为:Handler.ashx
下面就是它的代码:
using System;
using System.Web;
using System.IO;
public class Handler : System.Web.IHttpHandler {
public void ProcessRequest (HttpContext context)
{ //获取上传的数据流
Stream sr = context.Request.InputStream;
try
{
//生成随机的文件名(本DEMO中的上传图片名称也可用参数方法传递过来)
string chars = "abcdefghijklmnopqrstuvwxyzABCDEFGHIJKLMNOPQRSTUVWXYZ";
Random rnd = new Random();
string filename = "";
for (int i = 1; i <= 32; i++)
{
filename += chars.Substring(rnd.Next(chars.Length), 1);
}
byte[] buffer = new byte[4096];
int bytesRead = 0;
//将当前数据流写入服务器端文件夹ClientBin下
using (FileStream fs = File.Create(context.Server.MapPath("ClientBin/" + filename + ".jpg"), 4096))
{
while ((bytesRead = sr.Read(buffer, 0, buffer.Length)) > 0)
{
//向文件中写信息
fs.Write(buffer, 0, bytesRead);
}
}
context.Response.ContentType = "text/plain";
context.Response.Write("上传成功");
}
catch (Exception e)
{
context.Response.ContentType = "text/plain";
context.Response.Write("上传失败, 错误信息:" + e.Message);
}
finally
{
sr.Dispose();
}
}
public bool IsReusable {
get {
return false;
}
}
}
因为要加入上传图片按钮,所以将page.xaml内容修改如下:
<Grid x:Name="LayoutRoot" Background="Black" ShowGridLines="False" Margin="8">
<Grid.ColumnDefinitions>
<ColumnDefinition Width="196" />
<ColumnDefinition Width="*" />
</Grid.ColumnDefinitions>
<Grid.RowDefinitions>
<RowDefinition Height="*" />
<RowDefinition Height="48" />
</Grid.RowDefinitions>
<ListBox x:Name="myList" HorizontalAlignment="Stretch" VerticalAlignment="Stretch"
ItemsSource="{Binding}"
Grid.Row="0"
Grid.Column="0"
Grid.RowSpan="2"
SelectionChanged="OnSelectionChanged" >
<ListBox.ItemTemplate>
<DataTemplate>
<TextBlock Text="{Binding Name}" />
</DataTemplate>
</ListBox.ItemTemplate>
</ListBox>
<my:GridSplitter Width="1" HorizontalAlignment="Left" VerticalAlignment="Stretch" Grid.Column="1"></my:GridSplitter>
<Image x:Name="myImage" Grid.Column="1" />
<StackPanel Grid.Row="1" Background="white" Grid.ColumnSpan="2" Orientation="Horizontal" HorizontalAlignment="Stretch">
<Button Grid.Row="1"
Grid.Column="0"
Content="选择图片"
Margin="8" Click="OnClick" FontSize="16" Width="100"/>
<Button Grid.Row="1"
Grid.Column="2"
Content="上传该图片"
Margin="8" Click="OnUpLoadClick" FontSize="16" Width="100"/>
</StackPanel>
</Grid>
而相应的page.xmal.cs代码也做了修改(相关内容见注释):
public partial class Page : UserControl
{
public Page()
{
InitializeComponent();
}
void OnClick(object sender, EventArgs args)
{
OpenFileDialog openFileDialog = new OpenFileDialog()
{
Filter = "Jpeg Files (*.jpg)|*.jpg|All Files(*.*)|*.*",
Multiselect = true
};
if (openFileDialog.ShowDialog() == true)//.DialogResult.OK)
{
myList.DataContext = openFileDialog.SelectedFiles;
}
}
void OnUpLoadClick(object sender, EventArgs args)
{
if (fi != null)
{
WebClient webclient = new WebClient();
webclient.OpenWriteCompleted += new OpenWriteCompletedEventHandler(webclient_OpenWriteCompleted);
webclient.OpenWriteAsync(new Uri("http://localhost:5840/UploadFileWeb/Handler.ashx", UriKind.Absolute), "POST", fi.OpenRead());
}
else
{
HtmlPage.Window.Alert("请选取相应图片!!!");
}
}
void webclient_OpenWriteCompleted(object sender, OpenWriteCompletedEventArgs e)
{
//将图片数据流发送到服务器上
Stream inputStream = e.UserState as Stream;
Stream outputStream = e.Result;
byte[] buffer = new byte[4096];
int bytesRead = 0;
while ((bytesRead = inputStream.Read(buffer, 0, buffer.Length)) > 0)
{
outputStream.Write(buffer, 0, bytesRead);
}
outputStream.Close();
inputStream.Close(); HtmlPage.Window.Alert("图片上传成功!!!");
}
FileDialogFileInfo fi ;//获取选定图片信息
private void OnSelectionChanged(object sender, SelectionChangedEventArgs e)
{
if ((e.AddedItems != null) && (e.AddedItems.Count > 0))
{
fi = e.AddedItems[0] as FileDialogFileInfo;
if (fi != null)
{
using (Stream stream = fi.OpenRead())
{
BitmapImage image = new BitmapImage();
image.SetSource(stream);
myImage.Source = image;
myImage.Visibility = Visibility.Visible;
stream.Close();
}
}
}
}
}
{
public Page()
{
InitializeComponent();
}
void OnClick(object sender, EventArgs args)
{
OpenFileDialog openFileDialog = new OpenFileDialog()
{
Filter = "Jpeg Files (*.jpg)|*.jpg|All Files(*.*)|*.*",
Multiselect = true
};
if (openFileDialog.ShowDialog() == true)//.DialogResult.OK)
{
myList.DataContext = openFileDialog.SelectedFiles;
}
}
void OnUpLoadClick(object sender, EventArgs args)
{
if (fi != null)
{
WebClient webclient = new WebClient();
webclient.OpenWriteCompleted += new OpenWriteCompletedEventHandler(webclient_OpenWriteCompleted);
webclient.OpenWriteAsync(new Uri("http://localhost:5840/UploadFileWeb/Handler.ashx", UriKind.Absolute), "POST", fi.OpenRead());
}
else
{
HtmlPage.Window.Alert("请选取相应图片!!!");
}
}
void webclient_OpenWriteCompleted(object sender, OpenWriteCompletedEventArgs e)
{
//将图片数据流发送到服务器上
Stream inputStream = e.UserState as Stream;
Stream outputStream = e.Result;
byte[] buffer = new byte[4096];
int bytesRead = 0;
while ((bytesRead = inputStream.Read(buffer, 0, buffer.Length)) > 0)
{
outputStream.Write(buffer, 0, bytesRead);
}
outputStream.Close();
inputStream.Close(); HtmlPage.Window.Alert("图片上传成功!!!");
}
FileDialogFileInfo fi ;//获取选定图片信息
private void OnSelectionChanged(object sender, SelectionChangedEventArgs e)
{
if ((e.AddedItems != null) && (e.AddedItems.Count > 0))
{
fi = e.AddedItems[0] as FileDialogFileInfo;
if (fi != null)
{
using (Stream stream = fi.OpenRead())
{
BitmapImage image = new BitmapImage();
image.SetSource(stream);
myImage.Source = image;
myImage.Visibility = Visibility.Visible;
stream.Close();
}
}
}
}
}
好了,今天的内容就到这里了。
源码下载链接,请点击这里:)
TAG: silverlight, upload image, 上传, daizhj,代震军


