如何在各类控件中输入/输出数据(学习笔记)
一、知识点描述
1、相关控件
①下拉框(ComboBox)
显示一个可编辑的文本框,其中包含一个允许值下拉列表。
②日历框(DateTimePick)
允许用户选择日期和时间,并以指定的格式显示该日期和时间。
③文本框(TextBox)
允许用户输入文本,并提供多行编辑和密码字符掩码功能。
④图片框(PictureBox)
指定支持事务处理初始化,允许用户加载图片。
⑤单选框(RadioButton)
当与其他单选按钮成对出现时,允许用户从一组选项中选择单个选项。
二、思维导图

三、示例代码
using System;
using System.Collections.Generic;
using System.ComponentModel;
using System.Data;
using System.Drawing;
using System.Linq;
using System.Text;
using System.Windows.Forms;
using System.Data.SqlClient;
using System.IO;
using System.Drawing.Imaging;
namespace 护士工作站
{
public partial class 信息管理 : Form
{
private string PhotoFileName;
public 信息管理()
{
InitializeComponent();
this.工号.Text = 登录.txt;
}
//button1_Click事件下的代码为载入代码
private void button1_Click(object sender, EventArgs e)
{
SqlConnection sqlConnection = new SqlConnection();
sqlConnection.ConnectionString =
"Server=(local);Database=EduBase1;Integrated Security=sspi";
SqlCommand sqlCommand = new SqlCommand();
SqlCommand sqlCommand2 = new SqlCommand();
sqlCommand.Connection = sqlConnection;
sqlCommand2.Connection = sqlConnection;
sqlCommand.CommandText = "SELECT * FROM tb_Room;";
sqlCommand2.CommandText = "SELECT * FROM tb_Nurse WHERE No=@No;";
sqlCommand2.Parameters.AddWithValue("@No", this.工号.Text.Trim());
SqlDataAdapter sqlDataAdapter = new SqlDataAdapter();
sqlDataAdapter.SelectCommand = sqlCommand;
DataTable roomTable = new DataTable();
sqlConnection.Open();
sqlDataAdapter.Fill(roomTable);
this.所属科室.DataSource = roomTable;
this.所属科室.DisplayMember = "Name";
this.所属科室.ValueMember = "No";
SqlDataReader sqlDataReader = sqlCommand2.ExecuteReader();
byte[] photoBytes = null;
if (sqlDataReader.Read())
{
this.工号.Text = sqlDataReader["No"].ToString();
this.姓名.Text = sqlDataReader["Name"].ToString();
this.rdb_Male.Checked = (bool)sqlDataReader["Gender"];
this.rdb_Female.Checked = !(bool)sqlDataReader["Gender"];
this.职称.Text = sqlDataReader["Title"].ToString();
this.所属科室.SelectedValue =(int) sqlDataReader["RoomNo"];
photoBytes =
(sqlDataReader["Photo"] == DBNull.Value ? null : (byte[])sqlDataReader["Photo"]);
}
sqlDataReader.Close();
if (photoBytes != null)
{
MemoryStream memoryStream = new MemoryStream(photoBytes);
this.照片.Image = Image.FromStream(memoryStream);
}
}
//button3_Click事件下的代码为打开照片代码
private void button3_Click(object sender, EventArgs e)
{
OpenFileDialog openPhotoDialog = new OpenFileDialog()
{
Title = "打开照片文件(位图格式)"
,
Filter = "BMP Files (*.bmp)|*.bmp"
,
InitialDirectory = @"C:\"
};
if (openPhotoDialog.ShowDialog() == DialogResult.OK)
{
this.PhotoFileName = openPhotoDialog.FileName;
this.照片.Image = Image.FromFile(this.PhotoFileName);
}
}
//button2_Click事件下的代码为载入代码
private void button2_Click(object sender, EventArgs e)
{
MemoryStream memoryStream = new MemoryStream();
this.照片.Image.Save(memoryStream, ImageFormat.Bmp);
byte[] photoBytes = new byte[memoryStream.Length];
memoryStream.Seek(0, SeekOrigin.Begin);
memoryStream.Read(photoBytes, 0, photoBytes.Length);
SqlConnection sqlConnection = new SqlConnection();
sqlConnection.ConnectionString =
"Server=(local);Database=EduBase1;Integrated Security=sspi";
SqlCommand sqlCommand = new SqlCommand();
sqlCommand.Connection = sqlConnection;
sqlCommand.CommandText =
"UPDATE tb_Nurse"
+ " SET Name=@Name,Gender=@Gender,Title=@Title,RoomNo=@RoomNo,Photo=@Photo"
+ " WHERE No=@No;";
sqlCommand.Parameters.AddWithValue("@Name", this.姓名.Text.Trim());
sqlCommand.Parameters.AddWithValue("@Gender", this.rdb_Male.Checked);
sqlCommand.Parameters.AddWithValue("@Title", this.职称.Text.Trim());
sqlCommand.Parameters.AddWithValue("@RoomNo", (int)this.所属科室.SelectedValue);
sqlCommand.Parameters.AddWithValue("@Photo", photoBytes);
sqlCommand.Parameters.AddWithValue("@No", this.工号.Text.Trim());
sqlConnection.Open();
int rowAffected = sqlCommand.ExecuteNonQuery();
sqlConnection.Close();
MessageBox.Show("更新" + rowAffected.ToString() + "行。");
}
}
}
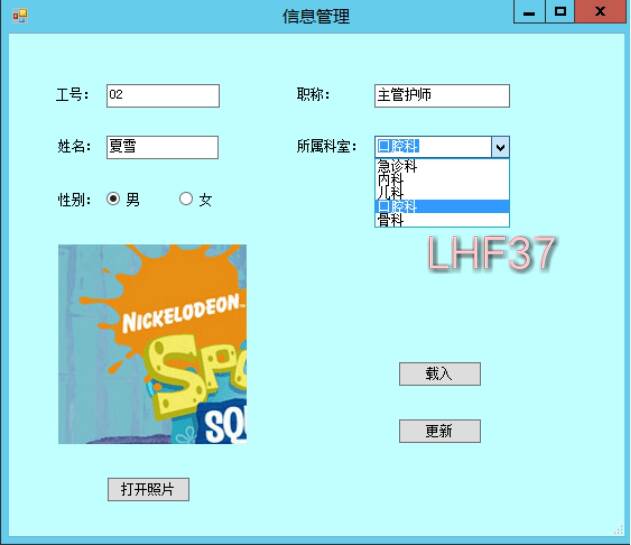
四、效果截图
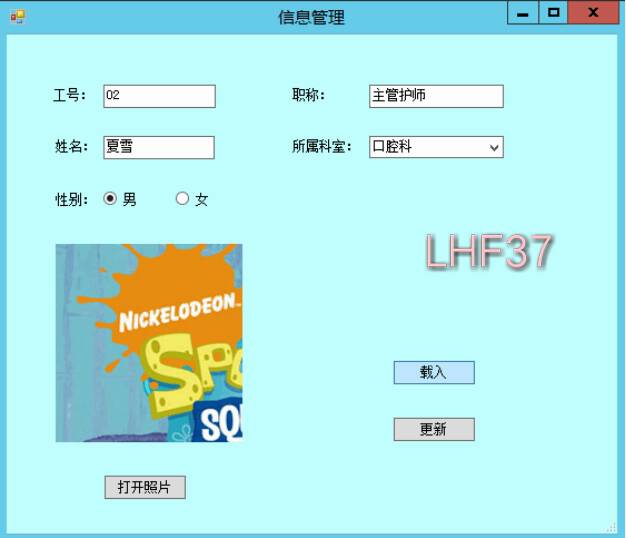
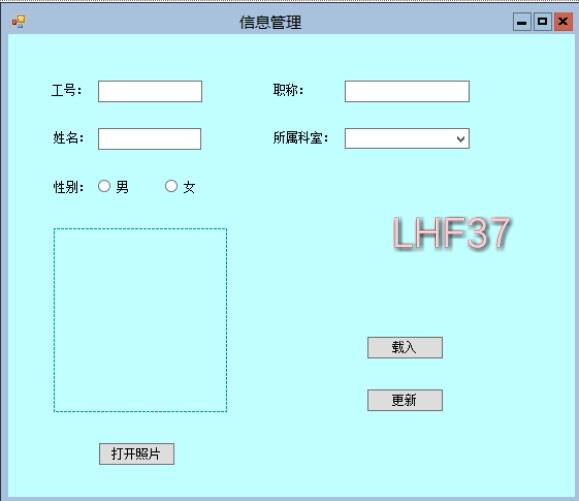
1、首先进入信息管理页面
2、载入该护士的个人信息
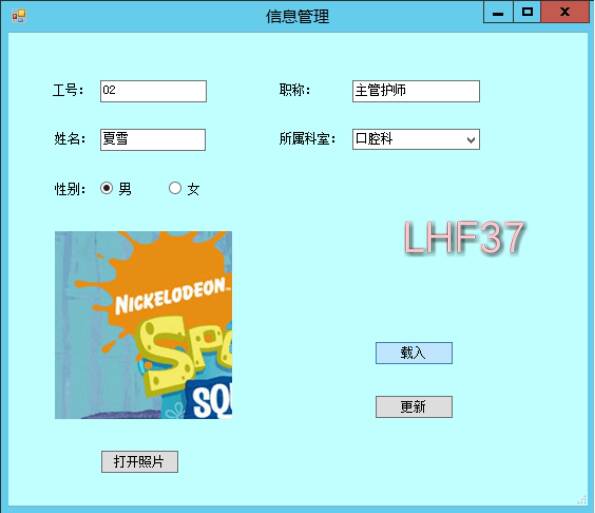
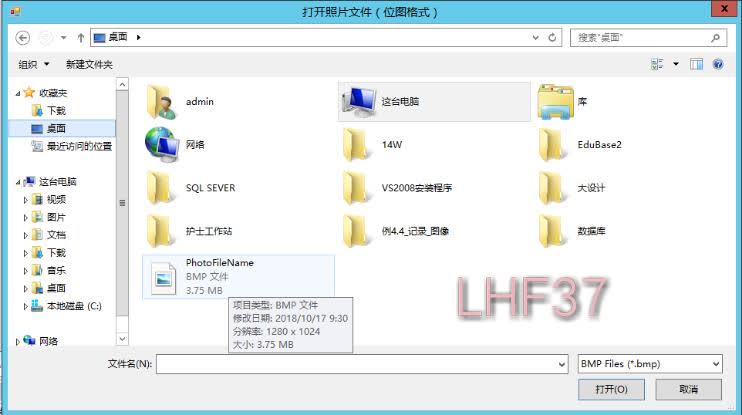
3、在打开照片中选择自己需要载入的图片
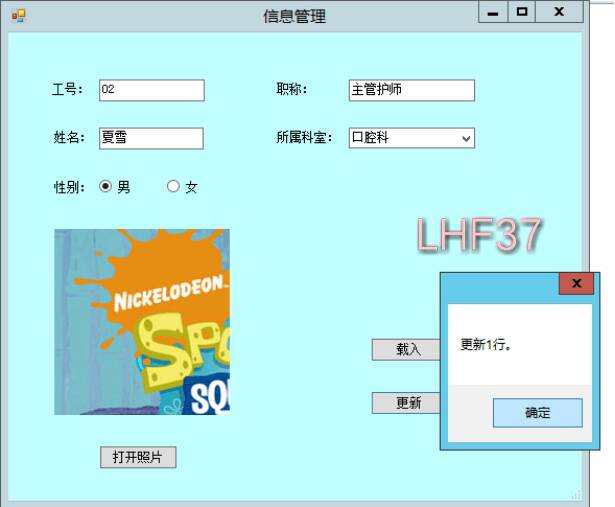
4、若要更新个人信息可直接在页面上更改内容
5、点击更新可提示更新的行数
6、这时再点击载入就是你更新的内容