
SQLite数据库

1.ios中数据的存储方式
(1)Plist(NSArray\NSDictionary)
(2)Preference(偏好设置\NSUserDefaults)
(3)NSCoding(NSKeyedArchiver\NSkeyedUnarchiver)
(4)SQLite
(5)Core Data:core Data是对SQLite的封装,因为iOS中使用的SQLite是纯C语言的。
(1)什么是SQLite?
答:SQLite是一款轻型的嵌入式数据库,安卓和ios开发使用的都是SQLite数据库
(2)特点(优点)
答:1)它占用资源非常的低,在嵌入式设备中,可能只需要几百K的内存就够了
2)它的处理速度比Mysql、PostgreSQL这两款著名的数据库都还快
(3)什么是数据库
答:数据库(Database)是按照数据结构来组织、存储和管理数据的仓库
(4)数据库的分类
答:可以分为2大种类
关系型数据库(主流)和对象型数据库(直接把内存中的对象塞入到数据库,对比关系型数据库而言性能不能很好,效率不高)
(5)常用关系型数据库有哪些?
答:PC端:Oracle、MySQL、SQL Server、Access、DB2、Sybase
嵌入式\移动客户端:SQLite
(6)数据库是如何存储数据的?
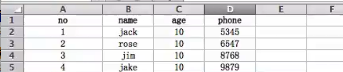
答:数据库的存储结构和excel很像,以表(table)为单位 。表由多个字段(列、属性、column)组成,表里面的每一行数据称为记录
(7)数据库存储数据的步骤?
1)新建一张表(table)
2)添加多个字段(column,列,属性)
3)添加多行记录(row,record,每行存放多个字段对应的值)
代码实现
iOS中原生的SQLite API在使用上相当不友好,在使用时,非常不便。于是,就出现了一系列将SQLite API进行封装的库,例如FMDB、PlausibleDatabase、sqlitepersistentobjects等,FMDB (https://github.com/ccgus/fmdb) 是一款简洁、易用的封装库,这一篇文章简单介绍下FMDB的使用。
在FMDB下载文件后,工程中必须导入如下文件,并使用 libsqlite3.dylib 依赖包。
FMDB同时兼容ARC和非ARC工程,会自动根据工程配置来调整相关的内存管理代码。
FMDB常用类:
FMDatabase : 一个单一的SQLite数据库,用于执行SQL语句。
FMResultSet :执行查询一个FMDatabase结果集,这个和android的Cursor类似。
FMDatabaseQueue :在多个线程来执行查询和更新时会使用这个类。
FMDB有支持和不支持ARC版本的。如果不支持ARC,改成MRC或者让Xcode自适应不检查加-fno-objc-arc。导入几个系统框架
在主页面中委托添加(修改)页面添加(修改)支出
在主页面的m文件中:
  1 #import "RootViewController.h"
  2 #import "RecordModel.h"
  3 #import "AddViewController.h"
  4 #import "DBManager.h"
  5 @interface RootViewController ()<UITableViewDataSource,UITableViewDelegate,UISearchDisplayDelegate>
  6 {
  7     NSMutableArray *dataAry;
  8     UITableView *tv;
  9     UITableViewCell *cell;
 10     DBManager *db;
 11     NSInteger deleteId;
 12
 13     UISearchBar *search;
 14     UISearchDisplayController *usdc;
 15 }
 16 @property  RecordModel *record;
 17 @end
 18
 19 @implementation RootViewController
 20
 21 - (void)viewDidLoad {
 22     [super viewDidLoad];
 23     // Do any additional setup after loading the view.
 24     dataAry=[[NSMutableArray alloc] init];
 25     db=[DBManager shareManager];
 26     dataAry =(NSMutableArray *)[db getAllRecord];
 27     tv=[[UITableView alloc] initWithFrame:CGRectMake(0, 64, 375, 600) style:UITableViewStylePlain];
 28     tv.delegate=self;
 29     tv.dataSource=self;
 30     [self.view addSubview:tv];
 31
 32     UIBarButtonItem *btnAdd=[[UIBarButtonItem alloc] initWithBarButtonSystemItem:UIBarButtonSystemItemAdd target:self action:@selector(btn_Add:)];
 33     self.navigationItem.rightBarButtonItem=btnAdd;
 34     self.navigationItem.title=@"千锋支出";
 35
 36     search=[[UISearchBar alloc] initWithFrame:CGRectMake(0, 80, 375, 30)];
 37     [self.view addSubview:search];
 38     usdc=[[UISearchDisplayController alloc] initWithSearchBar:search contentsController:self];
 39     usdc.delegate=self;
 40     usdc.searchResultsDataSource=self;
 41     usdc.searchResultsDelegate=self;
 42
 43     [[NSNotificationCenter defaultCenter] addObserver:self selector:@selector(insert_Record:) name:@"insert" object:nil];
 44 }
 45 -(BOOL)searchDisplayController:(UISearchDisplayController *)controller shouldReloadTableForSearchString:(NSString *)searchString{
 46     dataAry=(NSMutableArray *)[db getRecordByItem:searchString];
 47     [tv reloadData];
 48     return YES;
 49 }
 50
 51 -(void)insert_Record:(NSNotification *)sender{
 52
 53      dataAry =(NSMutableArray *)[db getAllRecord];
 54     [tv reloadData];
 55 }
 56 -(void)btn_Add:(UIBarButtonItem *)sender{
 57     AddViewController *add=[[AddViewController alloc] init];
 58     [self.navigationController pushViewController:add animated:NO];
 59 }
 60 -(NSInteger)tableView:(UITableView *)tableView numberOfRowsInSection:(NSInteger)section{
 61     return dataAry.count;
 62 }
 63 -(UITableViewCell *)tableView:(UITableView *)tableView cellForRowAtIndexPath:(NSIndexPath *)indexPath{
 64     NSString *identifier=@"manageFinance";
 65     cell=[tableView dequeueReusableCellWithIdentifier:identifier];
 66     if (!cell) {
 67         cell=[[UITableViewCell alloc] initWithStyle:UITableViewCellStyleSubtitle reuseIdentifier:identifier];
 68     }
 69     RecordModel *r=dataAry[indexPath.row];
 70
 71     NSString *str=[NSString stringWithFormat:@"%d %@   %@   %@   %@",r.Id,r.item,r.time,r.money,r.note];
 72     cell.textLabel.text=str;
 73     cell.accessoryType=UITableViewCellAccessoryDetailButton;
 74     UILongPressGestureRecognizer *longPress=[[UILongPressGestureRecognizer alloc] initWithTarget:self action:@selector(longPress_View:)];
 75     [cell addGestureRecognizer:longPress];
 76     return cell;
 77 }
 78
 79 -(void)longPress_View:(UILongPressGestureRecognizer *)sender{
 80     if (sender.state==UIGestureRecognizerStateBegan) {
 81 #pragma mark - 获取删除的Id
 82         cell=(UITableViewCell *)sender.view;
 83         NSInteger i=[tv indexPathForCell:cell].row;     //通过表格中寻找对应的的索引
 84         RecordModel *record=dataAry[i];    //i,不是要删除数据的主键
 85         deleteId=record.Id;
 86
 87         UIAlertView *alert=[[UIAlertView alloc] initWithTitle:@"提示" message:@"到底删不删" delegate:self cancelButtonTitle:@"取消" otherButtonTitles:@"确定", nil];
 88         [alert show];
 89     }
 90 }
 91 -(void)alertView:(UIAlertView *)alertView clickedButtonAtIndex:(NSInteger)buttonIndex{
 92     if (buttonIndex==1) {
 93         [db deleteRecordById:(int)deleteId];
 94         dataAry=(NSMutableArray *)[db getAllRecord];
 95         [tv reloadData];
 96     }
 97 }
 98 -(void)tableView:(UITableView *)tableView accessoryButtonTappedForRowWithIndexPath:(NSIndexPath *)indexPath{
 99     AddViewController *add=[[AddViewController alloc] init];
100     RecordModel *r=dataAry[indexPath.row];
101     add.rec=r;
102     add.flag=10;
103     [self.navigationController pushViewController:add animated:NO];
104 }
在添加(或修改)页面的m文件中:
 1 - (void)viewDidLoad {
 2     [super viewDidLoad];
 3     // Do any additional setup after loading the view from its nib.
 4
 5     if (self.flag==10) {
 6         txtItem.text=rec.item;
 7         txtMoney.text=rec.money;
 8         txtNote.text=rec.note;
 9         txtTime.text=rec.time;
10 }
11 }
12 - (void)didReceiveMemoryWarning {
13     [super didReceiveMemoryWarning];
14     // Dispose of any resources that can be recreated.
15 }
16
17 /*
18 #pragma mark - Navigation
19 // In a storyboard-based application, you will often want to do a little preparation before navigation
20 - (void)prepareForSegue:(UIStoryboardSegue *)segue sender:(id)sender {
21     // Get the new view controller using [segue destinationViewController].
22     // Pass the selected object to the new view controller.
23 }
24 */
25 - (IBAction)btn_Insert:(id)sender {
26     RecordModel *record=[[RecordModel alloc] init];
27     record.item=txtItem.text;
28     record.money=txtMoney.text;
29     record.time=txtTime.text;
30     record.note=txtNote.text;
31     DBManager *db=[DBManager shareManager];
32
33     if (self.flag==10) {
34         [db updateRecord:record WithId:record.Id];
35     }else{
36     [db insertRecord:record];
37     }
38     [[NSNotificationCenter defaultCenter] postNotificationName:@"insert" object:nil];
39     [self.navigationController popToRootViewControllerAnimated:NO];
40
41 }
42 - (IBAction)btn_Cancel:(UIButton *)sender {
43     [self.navigationController popToRootViewControllerAnimated:NO];
44 }
45 @end
实现效果:
