lab5:分析system_call中断处理过程
李俊锋 + 原创作品转载请注明出处 + 《Linux内核分析》MOOC课程http://mooc.study.163.com/course/USTC-1000029000
一.实验原理
1.应用程序、封装例程、系统调用处理程序及系统调用服务例程之间的关系
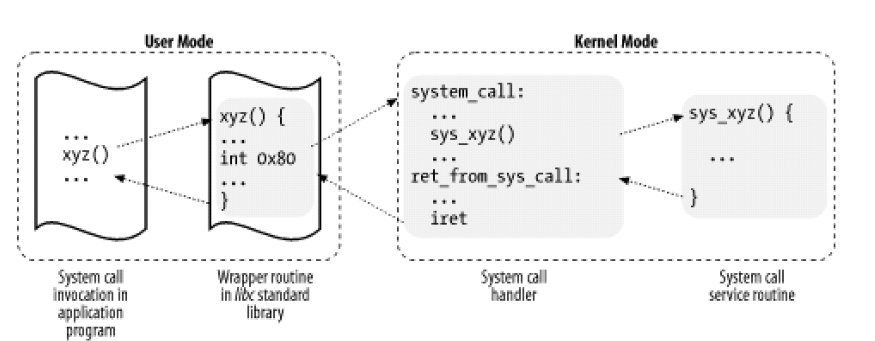
2.在Linux中是通过执行int $0x80来执行系统调用的,这条汇编指令产生向量为128的编程异常
3.system_call是linux中所有系统调用的入口点,每个系统调用至少有一个参数,即由eax传递的系统调用号
4.系统调用初始化函数trap_init()完成系统调用的初始化。
二.实验步骤
1.将getuid和getuidasm两条命令添加置系统中,在test.c中添加如下代码:
 1 int main()
 2 {
 3     PrintMenuOS();
 4     SetPrompt("MenuOS>>");
 5     MenuConfig("version","XXX V1.0(Menu program v1.0 inside)",NULL);
 6     MenuConfig("quit","Quit from XXX",Quit);
 7     MenuConfig("getuid","getuid",Getuid);
 8     MenuConfig("getuidasm","getuidasm",GetuidAsm);
 9     ExecuteMenu();
10 }
2.将Getuid和GetuidAsm的代码加入到test.c中,代码如下图所示:
 1 int Getuid(int argc, char *argv[])
 2 {
 3         int uid;
 4     uid =getuid();
 5
 6     printf("uid is %d\n",uid);
 7     return 0;
 8 }
 9 int GetuidAsm(int argc, char *argv[])
10 {
11         int uid;
12     //uid =getuid();
13     asm volatile(
14             "mov $0x18,%%eax\n\t"
15             "int $0x80\n\t"
16             "mov %%eax,%0\n\t"
17             :"=m"(uid)
18         );
19     printf("uid is %d\n",uid);
20     return 0;
21 }
3.重新编译,如下图所示:

4.重新运行,如下图所示:
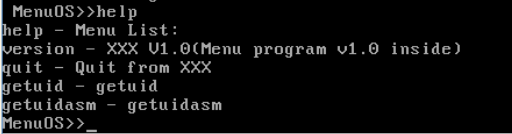
5.查看支持的命令,可见我们的两条命令已经添加置系统中,如下图所示:
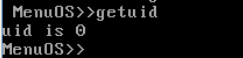
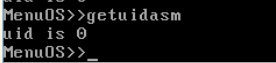
6.输入getuid命令,结果如下图所示:
7.输入getuidasm命令,结果如下图所示:
8.使用gdb工具对系统进行调试,在函数sys_getuid16出下断点,如下图所示:

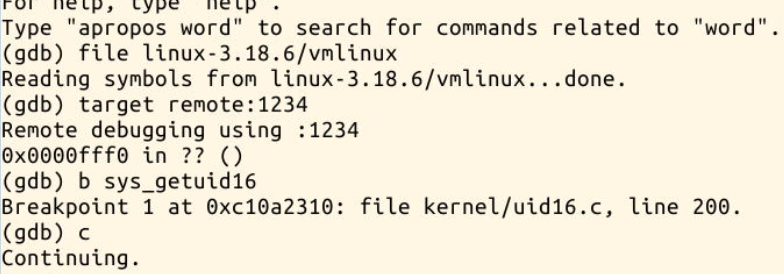
9.可知sys_getuid16对getuid系统调用起着关键作用,打开kernel/uid16.c 我们可以看到该函数,如下图所示:
1 SYSCALL_DEFINE0(getuid16)
2 {
3     return high2lowuid(from_kuid_munged(current_user_ns(), current_uid()));
4 }
三.实验总结
system_call的处理过程:
1.在系统调用的过程触发int 0x80中断。
2.之后执行system_call,在system_call中完成中段函数的调用。
3.system_call完整的代码如下所示:


ENTRY(system_call)
    RING0_INT_FRAME            # can't unwind into user space anyway
    ASM_CLAC
    pushl_cfi %eax            # save orig_eax
    SAVE_ALL
    GET_THREAD_INFO(%ebp)
                    # system call tracing in operation / emulation
    testl $_TIF_WORK_SYSCALL_ENTRY,TI_flags(%ebp)
    jnz syscall_trace_entry
    cmpl $(NR_syscalls), %eax
    jae syscall_badsys
syscall_call:
    call *sys_call_table(,%eax,4)
syscall_after_call:
    movl %eax,PT_EAX(%esp)        # store the return value
syscall_exit:
    LOCKDEP_SYS_EXIT
    DISABLE_INTERRUPTS(CLBR_ANY)    # make sure we don't miss an interrupt
                    # setting need_resched or sigpending
                    # between sampling and the iret
    TRACE_IRQS_OFF
    movl TI_flags(%ebp), %ecx
    testl $_TIF_ALLWORK_MASK, %ecx    # current->work
    jne syscall_exit_work

restore_all:
    TRACE_IRQS_IRET
restore_all_notrace:
#ifdef CONFIG_X86_ESPFIX32
    movl PT_EFLAGS(%esp), %eax    # mix EFLAGS, SS and CS
    # Warning: PT_OLDSS(%esp) contains the wrong/random values if we
    # are returning to the kernel.
    # See comments in process.c:copy_thread() for details.
    movb PT_OLDSS(%esp), %ah
    movb PT_CS(%esp), %al
    andl $(X86_EFLAGS_VM | (SEGMENT_TI_MASK << 8) | SEGMENT_RPL_MASK), %eax
    cmpl $((SEGMENT_LDT << 8) | USER_RPL), %eax
    CFI_REMEMBER_STATE
    je ldt_ss            # returning to user-space with LDT SS
#endif
restore_nocheck:
    RESTORE_REGS 4            # skip orig_eax/error_code
irq_return:
    INTERRUPT_RETURN
.section .fixup,"ax"
ENTRY(iret_exc)
    pushl $0            # no error code
    pushl $do_iret_error
    jmp error_code
.previous
    _ASM_EXTABLE(irq_return,iret_exc)

#ifdef CONFIG_X86_ESPFIX32
    CFI_RESTORE_STATE
ldt_ss:
#ifdef CONFIG_PARAVIRT
    /*
     * The kernel can't run on a non-flat stack if paravirt mode
     * is active.  Rather than try to fixup the high bits of
     * ESP, bypass this code entirely.  This may break DOSemu
     * and/or Wine support in a paravirt VM, although the option
     * is still available to implement the setting of the high
     * 16-bits in the INTERRUPT_RETURN paravirt-op.
     */
    cmpl $0, pv_info+PARAVIRT_enabled
    jne restore_nocheck
#endif

/*
 * Setup and switch to ESPFIX stack
 *
 * We're returning to userspace with a 16 bit stack. The CPU will not
 * restore the high word of ESP for us on executing iret... This is an
 * "official" bug of all the x86-compatible CPUs, which we can work
 * around to make dosemu and wine happy. We do this by preloading the
 * high word of ESP with the high word of the userspace ESP while
 * compensating for the offset by changing to the ESPFIX segment with
 * a base address that matches for the difference.
 */
#define GDT_ESPFIX_SS PER_CPU_VAR(gdt_page) + (GDT_ENTRY_ESPFIX_SS * 8)
    mov %esp, %edx            /* load kernel esp */
    mov PT_OLDESP(%esp), %eax    /* load userspace esp */
    mov %dx, %ax            /* eax: new kernel esp */
    sub %eax, %edx            /* offset (low word is 0) */
    shr $16, %edx
    mov %dl, GDT_ESPFIX_SS + 4 /* bits 16..23 */
    mov %dh, GDT_ESPFIX_SS + 7 /* bits 24..31 */
    pushl_cfi $__ESPFIX_SS
    pushl_cfi %eax            /* new kernel esp */
    /* Disable interrupts, but do not irqtrace this section: we
     * will soon execute iret and the tracer was already set to
     * the irqstate after the iret */
    DISABLE_INTERRUPTS(CLBR_EAX)
    lss (%esp), %esp        /* switch to espfix segment */
    CFI_ADJUST_CFA_OFFSET -8
    jmp restore_nocheck
#endif
    CFI_ENDPROC
ENDPROC(system_call)

entry_call
4.system_call精简代码如下所示:
 1 ENTRY(system_call)
 2     SAVE_ALL    #保存现场
 3 syscall_call:
 4     call *sys_call_table(,%eax,4)  #中断向量表,查阅中断向量表,调用系统调用
 5 syscall_after_call:
 6     movl %eax,PT_EAX(%esp)        # 存储返回值
 7 syscall_exit:
 8     LOCKDEP_SYS_EXIT
 9     DISABLE_INTERRUPTS(CLBR_ANY)    # 确保不会错过中断
10 restore_all:
11     TRACE_IRQS_IRET
12 irq_return:
13     INTERRUPT_RETURN
14 ENDPROC(system_call)
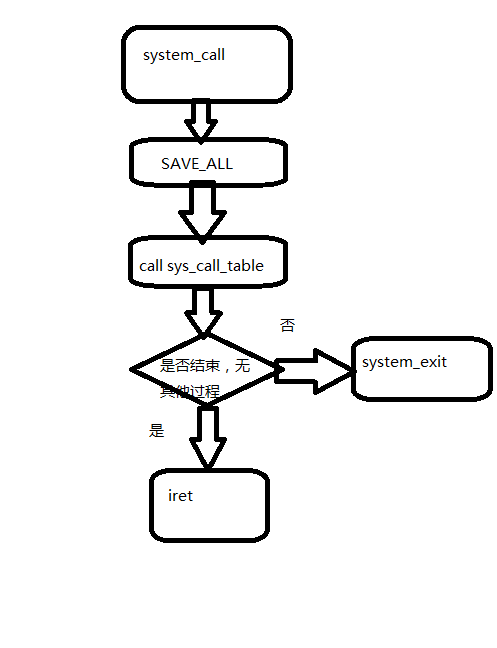
5.system_call流程图如下所示:
个人总结:本次实验的难度明显比之前的实验要难,而且做实验时,由于实验楼环境比较卡,因此配置实验环境可花了不少时间,希望下次实验不要遇到这么多麻烦(*^__^*)
posted on 2016-03-27 21:43 crowpurple 阅读(326) 评论(0) 编辑 收藏 举报

