Storyboard多View的切换 [xcode 4.4.1]
概述
Storyboard,我直接翻译为故事画板,是Xcode4.2新增的又一个特性,它将原有工程中的所有xib文件集成在一起,用拖曳的方式建立ViewController相关之间的跳转关系,使得整个程序的UI跳转逻辑清楚明了。Storyboard可以帮助你解决写很多重复的跳转方法的麻烦,节省很多时间,以便你能够完全的专注于核心功能的实现上。
简单地说,Storyboard引入了2个概念:
- scene:一个场景,由一个viewController和相关的xib表示。
- segue:在这是用于连接scenes,其有多种类型,包括:Push,Modal,Popover and more。当然segue也负责传递数据和返回数据。
整个程序的界面转换就是在各个scene之间切换。界面跳转关系,比如按哪个键跳到哪个界面,是由segue来描述。segue也可以带数据,以便做数据传递。
学习目标
- 使用NIB文件View跳转
- Storyboard 内View连接关系
- 使用编程方式跳转View
使用NIB文件View跳转
在开始讲Storyboard之前,我们来使用以前NIB方式来建立一个程序,从最基础的方式来感受一下,XIB与Stroyboard之间的区别,明白之间的机制。
1. 创建一个空的项目,使用Empty Application 模板创建项目。如下图所示:

这个模板创建出来的项目只包含一个Appdelegate.h与Appdelegate.m文件。
2. 我们创建一个View,做为第一个View,或者称为Root View。

3. 打开RootViewController.xib,添加Label与Button两个控件,如下图:

4. 修改AppDelegate.h 文件
2 #import "RootViewController.h"
3
4 @interface AppDelegate : UIResponder <UIApplicationDelegate>
5
6 @property (strong, nonatomic) UIWindow *window;
7
8 // 视图
9 @property (strong,nonatomic) RootViewController *viewController;
10
11 @end
5. 修改AppDelegate.m 文件
2 {
3 self.window = [[UIWindow alloc] initWithFrame:[[UIScreen mainScreen] bounds]];
4 // Override point for customization after application launch.
5 self.window.backgroundColor = [UIColor whiteColor];
6
7 // 实例化视图
8 self.viewController = [[RootViewController alloc] initWithNibName:@"RootViewController" bundle:nil];
9
10 // 添加把视图添加到Window中
11 self.window.rootViewController = self.viewController;
12
13 [self.window makeKeyAndVisible];
14 return YES;
15 }
6. 到这一步,运行后,就可以显示出视图了,我们要做的是视图跳转,所以需要添加一个跳转后视图,假设我们的新视图名为: TwoViewController,并且在新的视图中,添加一个Label。
7.给RootViewController 的Button按钮添加一个事件
2 #import "TwoViewController.h"
3
4 @interface RootViewController : UIViewController
5 - (IBAction)btnClick:(id)sender;
6
7 @end
2
3 // 实例化视图
4 TwoViewController *controller = [[TwoViewController alloc] initWithNibName:@"TwoViewController" bundle:nil];
5
6 // 跳转视图
7 [self presentModalViewController:controller animated:YES];
8 }
8. 完成,是不是很简单,大家可以试一下,在这段,就不提供源代码下载了。
Storyboard 内View连接关系
在Storyboard中,segue有几种不同的类型,在iphone和ipad的开发中,segue的类型是不同的。
1. 在iphone中,有:push,modal,和custom三种不同的类型,这些类型的区别在与新页面出现的方式。
2. 而在ipad中,有:push,modal,popover,replace和custom五种不同的类型。
详细说明如下:
1) modal
最常用的场景,新的场景完全盖住了旧的场景。用户无法再与上一个场景交互,除非他们先关闭这个场景。是在viewController中的标准切换的方式,包括淡出什么的,可以选切换动画。
2) push
Push类型一般是需要头一个界面是个Navigation Controller的。注:是在navigation View Controller中下一级时使用的那种从右侧划入的方式。
3) popover(iPad only)
就是采用浮动窗的形式把新页面展示出来,只有ipad下才有用。
4) replace (iPad only)
替换当前scene,只有ipad下才有用。
5) custom
自定义跳转方式,需要自定义继承于UIStoryboardSegue的子类。
接下来,我们用几个例子,来说明model,push,custom的区别。
1. 创建一个空项目, 使用Empty Application 模板创建项目,其实可以使用其他模板,在此是为了进一步了解机制,选择最原始的方式来进行。
2. 创建一个MainStoryboard.storyboard文件,如下图所示:

3. 打开MainStoryboard.storyboard 拖一个View Controller,如下图所示:

注:
(1.)Initial Scene:初始化Storyboard时显示此视图。 这个选择框,如果只有一个视图,将自动选择。
(2.)Identifier: 识别码,在编程中跳转时需要,在此我们先设置成:First
4. 设置项目使用主Storyboard,如图所示:

5. 修改AppDelegate.m
2 {
3 /* 删除以下的代码,使用Storyboard后,不需要这此代码,只需要 return YES;就可以了
4 self.window = [[UIWindow alloc] initWithFrame:[[UIScreen mainScreen] bounds]];
5 // Override point for customization after application launch.
6 self.window.backgroundColor = [UIColor whiteColor];
7 [self.window makeKeyAndVisible];
8 */
9 return YES;
10 }
6. 到此,运行就可以看到效果,没有骗你,是不是很简单。
7. 我们要看是视图跳转,所以还需要添加一个视图,最终效果如下:

操作也很简单,选中第一个视图中的按钮,右键拉出一条线到第二个视图上,放开就可以看:

一定要选择model,其它两种,我们后面有例子。

Modal Style:
*Cover Vertical: 滑入效果。从下面滑入当前场景,这是默认效果同Default。
*Filp Hovizontal: 翻转效果。
*Cross Dissolve: 淡出效果。
*Partial Curl: 翻页效果。
8. 在第二个视图,添加按钮事件,返回第一个视图

代码如下:
 SecondViewController.h
2
3 @interface SecondViewController : UIViewController
4 - (IBAction)btnBackHome:(id)sender;
5
6 @end
 SecondViewController.m
2 [self dismissModalViewControllerAnimated:YES];
3 }
9. 到此,我们就完成页面跳转的效果,是不是很简单?接下来,我们演示push的连接方式,从步骤7开始,重新做。
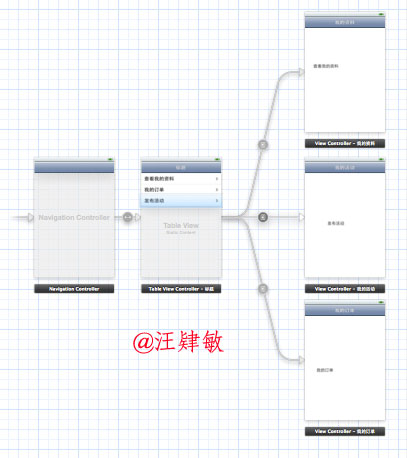
拖一个Navigation Controller到Storyboard中,并设置Table View为静态Cell,如下所示:

然后,添加对应三个ViewController, “我的资料”、“我的订单”和“发布活动”
每个表格里,选择连接到相应的View Controller,连接方式是Push,最终结果如下:

10. 到此,我们又完成Push页面跳转的效果,是不是很简单?接下来,我们演示Custom的连接方式,从步骤7开始,重新做。
先添加一个控制类,如下:

重写perform方法,详细如下:
 CustomModal
2
3 -(void)perform
4 {
5 // 原视图
6 UIViewController *source = self.sourceViewController;
7
8 // 下个视图
9 UIViewController *next = self.destinationViewController;
10
11 // 跳转动作
12 [source presentModalViewController:next animated:YES];
13 }
14 @end
接下来回到Storyboard做些简单的设置,如下图所示:

我没有骗人吧,真得很强大,很简单。
使用编程方式跳转View
1. Modal 方式跳转
2 UIStoryboard *board = [UIStoryboard storyboardWithName:@"MainStoryboard" bundle:nil];
3
4 // 获取故事板中某个View
5 UIViewController *next = [board instantiateViewControllerWithIdentifier:@"Second"];
6
7 // 跳转
8 [self presentModalViewController:next animated:YES];
2. 以Modal 方式跳转的返回方法
3. 根据Segue Identifier 跳转
2 [self performSegueWithIdentifier:@"GotoSecond" sender:self];
4. Push 方式跳转
5. 弹出一个ViewController 相当于返回上一个界面


 浙公网安备 33010602011771号