iOS自定义Tabbar
因为公司需求,苹果的原生tabBar已经不能满足本人类的需求,我在网上查了下,觉得还是自己写一个tabBar比较好。
虽然是自定义tabBar,还是在原生基础上写
基本思路就是:隐藏系统原生tabBar,自己写一个tabView(一个自定义View)放在底部当成tabBar,在点击View上面的button的时候调用原生方法,实现控制器切换
可以实现的功能:
1 可以自己随意的隐藏显示tabBar,实现一些关于tabBar的动画,所有的一切只需要设置tabView就可以了
2 可以自定义tabBar的样式,在tabBar上添加背景图,添加气泡等等完全无压力
在网上找了一个别人写好的tabBar,然后自己修改了一下,立即就可以实现需求,非常方便
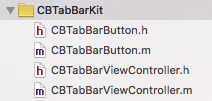
CBTabBar
只有两个类

CBTabBarViewController的.h代码
#import <UIKit/UIKit.h>

/*
 *可以实现隐藏tabBar功能
 */


@interface CBTabBarViewController : UITabBarController
-(void)hidCBTabbar:(BOOL)ishid;
@property (nonatomic, strong) NSArray           * imageNameArray;
@property (nonatomic, strong) NSArray           * imageName_sel_Array;
-(instancetype)initWithImageArray:(NSArray *)array andImageSelArray:(NSArray *)selArray;
-(void)setSelectedButton:(NSUInteger)selectedIndex;
@end
CBTabBarViewController的.m代码
#import "CBTabBarViewController.h"
#import "CBTabBarButton.h"
@interface CBTabBarViewController (){
    UIView * myView;
    NSMutableArray * _buttonArray;
}
@property (nonatomic, weak) UIButton *selectedBtn;
@end

@implementation CBTabBarViewController

-(instancetype)initWithImageArray:(NSArray *)array andImageSelArray:(NSArray *)selArray{
    self = [super init];
    if (self) {


        self.imageNameArray = array;
        self.imageName_sel_Array = selArray;
        [self loadSubView];//添加自定义tabBar
    }
    return self;
}

- (void)viewDidLoad {
    [super viewDidLoad];

    self.imageNameArray = [NSArray array];
    self.imageName_sel_Array = [NSArray array];
    _buttonArray = [[NSMutableArray alloc] init];
}

-(void)loadSubView{


    //删除现有的tabBar
    CGRect rect = self.tabBar.frame;
    [self.tabBar removeFromSuperview];  //移除TabBarController自带的下部的条


    //添加自己的视图
    /*
     *tabBar的底部View
     *背景图,button都会添加到这个myVIew上面
     *可以自己添加其他View
     */
    myView = [[UIView alloc] init];
    myView.frame = rect;
//    myView.backgroundColor = [UIColor redColor];
    [self.view addSubview:myView];


    //给tabBar添加自定义背景图
    UIImageView * imageView = [[UIImageView alloc] init];
    imageView.image = [UIImage imageNamed:@"tabBarBGImg"];
    imageView.frame = CGRectMake(0, 0, myView.frame.size.width, myView.frame.size.height);
    [myView addSubview:imageView];


    if (self.imageName_sel_Array.count < 1 || self.imageNameArray.count < 1) {
        return;
    }
    [_buttonArray removeAllObjects];
    for (int i = 0; i < 5; i++) {

        CGFloat x = i * myView.frame.size.width / 5;

        UIView * view = [[UIView alloc] initWithFrame:CGRectMake(x, 2, myView.frame.size.width / 5, myView.frame.size.height)];
        [myView addSubview:view];
        if (i == 2) {
            view.frame = CGRectMake(x, 0, myView.frame.size.width / 5, myView.frame.size.height);
        }


        //tabber 上面的button
        CBTabBarButton *btn = [[CBTabBarButton alloc] init];

        NSString *imageName = [self.imageNameArray objectAtIndex:i];
        NSString *imageNameSel = [self.imageName_sel_Array objectAtIndex:i];

        [btn setImage:[UIImage imageNamed:imageName] forState:UIControlStateNormal];
        [btn setImage:[UIImage imageNamed:imageNameSel] forState:UIControlStateSelected];

        btn.tag = i;//设置按钮的标记, 方便来索引当前的按钮,并跳转到相应的视图
        [btn addTarget:self action:@selector(clickBtn:) forControlEvents:UIControlEventTouchUpInside];

        btn.center = CGPointMake(view.frame.size.width / 2, view.frame.size.height / 2);
        btn.bounds = CGRectMake(0, 0, 40, 40);

        [view addSubview:btn];
        [_buttonArray addObject:btn];


        //设置刚进入时,第一个按钮为选中状态
        if (0 == i) {
            btn.selected = YES;
            self.selectedBtn = btn;  //设置该按钮为选中的按钮
        }
    }
}


//通过点击tabBar上面的button来跳转控制器
- (void)clickBtn:(UIButton *)button {
    //1.先将之前选中的按钮设置为未选中
    self.selectedBtn.selected = NO;
    //2.再将当前按钮设置为选中
    button.selected = YES;
    //3.最后把当前按钮赋值为之前选中的按钮
    self.selectedBtn = button;
    //4.跳转到相应的视图控制器. (通过selectIndex参数来设置选中了那个控制器)
    self.selectedIndex = button.tag;
}

//调用此方法来跳转控制器
-(void)setSelectedButton:(NSUInteger)selectedIndex{
    //1.先将之前选中的按钮设置为未选中
    self.selectedBtn.selected = NO;
    //2.从buttonarray中找到当前button
    UIButton * button = [_buttonArray objectAtIndex:selectedIndex];
    //3.最后把当前按钮赋值为之前选中的按钮
    button.selected = YES;
    //4.跳转到相应的视图控制器. (通过selectIndex参数来设置选中了那个控制器)
    self.selectedIndex = selectedIndex;
}

//通过设置View的透明度来隐藏tabBar
-(void)hidCBTabbar:(BOOL)ishid{
    if (ishid) {
        myView.alpha = 0;
    }else{
        myView.alpha = 1;
    }
}
CBTabBarButton.m代码
-(void)setHighlighted:(BOOL)highlighted{
    //只需要取消高亮,这里什么都不用写
}
调用tabBar的代码
#import "ViewController.h"

#import "CBTabBarViewController.h"
#import "TestViewController.h"
@interface ViewController ()

@end

@implementation ViewController

- (void)viewDidLoad {
    [super viewDidLoad];


    UIViewController *firstViewController = [[TestViewController alloc] init];
    firstViewController.view.backgroundColor = [UIColor redColor];
    UIViewController *firstNavigationController = [[UINavigationController alloc]
                                                   initWithRootViewController:firstViewController];

    UIViewController *secondViewController = [[TestViewController alloc] init];
    secondViewController.view.backgroundColor = [UIColor yellowColor];
    UIViewController *secondNavigationController = [[UINavigationController alloc]
                                                    initWithRootViewController:secondViewController];

    UIViewController *thirdViewController = [[TestViewController alloc] init];
    thirdViewController.view.backgroundColor = [UIColor greenColor];
    UIViewController *thirdNavigationController = [[UINavigationController alloc]
                                                   initWithRootViewController:thirdViewController];

    UIViewController *fourthViewController = [[TestViewController alloc] init];
    fourthViewController.view.backgroundColor = [UIColor orangeColor];
    UIViewController *fourthNavigationController = [[UINavigationController alloc]
                                                    initWithRootViewController:fourthViewController];

    UIViewController *fifthViewController = [[TestViewController alloc] init];
    fifthViewController.view.backgroundColor = [UIColor blueColor];
    UIViewController *fifthNavigationController = [[UINavigationController alloc]
                                                   initWithRootViewController:fifthViewController];


    NSArray * imageArray = [NSArray arrayWithObjects:@"sq_03",@"sq_05",@"zcfTabIcon",@"sousuo",@"wode",nil];
    NSArray * selImageArray = [NSArray arrayWithObjects:@"sq_18",@"sq_19",@"sq_16",@"sousuo_sel",@"wode_sel",nil];

    CBTabBarViewController * tabVC = [[CBTabBarViewController alloc] initWithImageArray:imageArray andImageSelArray:selImageArray];
    tabVC.viewControllers = @[firstNavigationController,secondNavigationController,thirdNavigationController,fourthNavigationController,fifthNavigationController];
    [tabVC setSelectedButton:0];


    UIWindow * window = [[[UIApplication sharedApplication] delegate] window];
    window.rootViewController = tabVC;


}
很简单的tabBar,其中的loadSubView方法可能有隐患,以后再处理
这样靠设置frame写出来的tabBar没有横屏效果,想要实现横屏效果需要自己再写约束代码


