使用 ExtJS 实现 ASP.NET MVC 2 客户端验证
在 ASP.NET MVC 2 中, 客户端表单验证信息不再是直接调用微软自己提供的方法, 而是将客户端表单验证的元数据放到了一个变量 (window.mvcClientValidationMetadata) 之中, 为实现第三方的客户端验证提供了可能, 由于工作中大量的使用到了 ExtJS ,于是抽时间用 ExtJS 实现了 ASP.NET MVC 2 客户端验证机制,主要有如下特点:
- 只依赖 Ext core 即可使用,不需要完整版本的 ExtJS, 当然,如果有完整版 ExtJS 的话, 还可以调用 Ext.form.VTypes 的表单验证方法;
- 使用方法完全遵循 ASP.NET MVC 2 提供的客户端验证机制,实现了默认的 required 、regularExpression 、 number 、range 、stringLength 客户端验证函数;
- 可以根据 ASP.NET MVC 2 提供的验证扩展机制进行相应的扩展。
使用方法如下:
1、在要进行验证的 Model 上添加验证标记, 代码如下:
1 2 3 4 5 6 7 8 9 10 11 12 13 14 15 16 17 18 19 20 21 22 23 24 25 26 27 28 29 30 31 32 33 34 | public class RegisterModel { [Required(ErrorMessage = "用户名必须填写!")] [DisplayName("用户名:")] public string UserName { get; set; } [Required(ErrorMessage = "密码必须填写!")] [DisplayName("密码:")] [DataType(DataType.Password)] public string Password { get; set; } [Required(ErrorMessage = "邮箱必须填写")] [RegularExpression("", ErrorMessage = "邮件格式不正确!")] [DisplayName("邮箱:")] public string Email { get; set; } [Range(0, 100, ErrorMessage = "年龄必须在1~100之间!")] [DisplayName("年龄:")] [DefaultValue(20)] public int Age { get; set; }} |
2、在 View 中添加下面的代码,除了要使用 ExtJS 的脚本之外, 与普通的 View 没有什么区别, 代码如下:
1 2 3 4 5 6 7 8 9 10 11 | ;<h2>ExtJS 实现 ASP.NET MVC 2 客户端验证</h2><% Html.EnableClientValidation(); %>;<%= Html.ValidationSummary(true, "输入信息不完整,无法完成注册。") %><% using (Html.BeginForm()) { %><%= Html.EditorForModel() %><input value="注册" type="submit"><input value="取消" type="reset"><% } %>; |
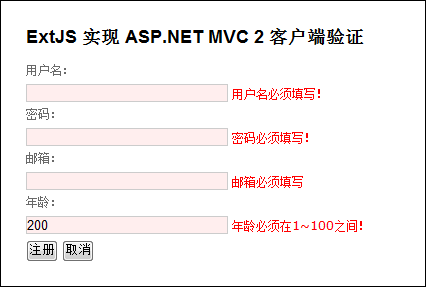
运行效果如下图所示:

如果要做扩展自定义验证的话,需要做完成下面两部分:
1、参考 msdn 文档,添加服务端验证扩展, 代码如下:
1 2 3 4 5 6 7 8 9 10 11 12 13 14 15 16 17 18 19 20 21 22 23 24 25 26 27 28 | [AttributeUsage(AttributeTargets.Property, AllowMultiple = false)]public class CustomAttribute : ValidationAttribute { public override bool IsValid(object value) { var val = value as string; if (string.IsNullOrEmpty(val)) { return false; } return val.Equals("Hello,world!", StringComparison.OrdinalIgnoreCase); }}public class CustomValidator : DataAnnotationsModelValidator<customattribute> { public CustomValidator(ModelMetadata metadata, ControllerContext context, CustomAttribute attribute) : base(metadata, context, attribute) { } public override IEnumerable<modelclientvalidationrule> GetClientValidationRules() { return new[] { new ModelClientValidationRule { ErrorMessage = "输入: Hello,world!", ValidationType = "custom" } }; }}</modelclientvalidationrule></customattribute> |
2、添加对应的客户端验证实现,代码如下:
1 2 3 4 5 | Ext.apply(Ext.ux.mvc.VTypes, { custom: function(val, param) { return val.toLowerCase() == 'hello,world!'; }}); |
4、在 App_Start 注册该扩展,代码如下:
1 | DataAnnotationsModelValidatorProvider.RegisterAdapter(typeof(CustomAttribute), typeof(CustomValidator)); |
5、添加扩展之后的运行效果如下图:

如果你工作中也用到了 ExtJS 和 ASP.NET MVC 2 的话,可以下载这个文件来尝试一下。
张志敏所有文章遵循创作共用版权协议,要求署名、非商业 、保持一致。在满足创作共用版权协议的基础上可以转载,但请以超链接形式注明出处。
本博客已经迁移到 GitHub , 围观地址: https://beginor.github.io/


【推荐】编程新体验,更懂你的AI,立即体验豆包MarsCode编程助手
【推荐】凌霞软件回馈社区,博客园 & 1Panel & Halo 联合会员上线
【推荐】抖音旗下AI助手豆包,你的智能百科全书,全免费不限次数
【推荐】博客园社区专享云产品让利特惠,阿里云新客6.5折上折
【推荐】轻量又高性能的 SSH 工具 IShell:AI 加持,快人一步