深入理解 RecyclerView 系列之一:ItemDecoration
2016-05-18 19:23 安卓MAN 阅读(5285) 评论(0) 编辑 收藏 举报RecyclerView 已经推出了一年多了,日常开发中也已经彻底从 ListView 迁移到了 RecyclerView,但前两天有人在一个安卓群里面问了个关于最顶上的 item view 加蒙层的问题,被人用 ItemDecoration 完美解决。此时我发现自己对 RecyclerView 的使用一直太过基本,更深入更强大的功能完全没有涉及,像 ItemDecoration, ItemAnimator, SmoothScroller, OnItemTouchListener, LayoutManager 之类,以及 RecyclerView 重用 view 的原理。网上也有很多对 RecyclerView 使用的讲解博客,要么讲的内容非常少,要么提到了高级功能,但是并没讲代码为什么这样写,每个方法和参数的含义是什么,像张鸿洋的博客,也讲了 ItemDecoration 的使用,但是看了仍然云里雾里,只能把他的代码拿来用,并不能根据自己的需求编写自己的 ItemDecoration。
在这个系列中,我将对上述各个部分进行深入研究,目标就是看了这一系列的文章之后,开发者可以清楚快捷的根据自己的需求,编写自己需要的各个高级模块。本系列第一篇就聚焦在:RecyclerView.ItemDecoration。本文涉及到的完整代码可以在 Github 获取。
TL; DR
- getItemOffsets 中为 outRect 设置的4个方向的值,将被计算进所有 decoration 的尺寸中,而这个尺寸,被计入了 RecyclerView 每个 item view 的 padding 中
- 在 onDraw 为 divider 设置绘制范围,并绘制到 canvas 上,而这个绘制范围可以超出在 getItemOffsets 中设置的范围,但由于 decoration 是绘制在 child view 的底下,所以并不可见,但是会存在 overdraw
- decoration 的 onDraw,child view 的 onDraw,decoration 的 onDrawOver,这三者是依次发生的
- onDrawOver 是绘制在最上层的,所以它的绘制位置并不受限制
RecyclerView.ItemDecoration
这个类包含三个方法 1:
onDraw(Canvas c, RecyclerView parent, State state)onDrawOver(Canvas c, RecyclerView parent, State state)getItemOffsets(Rect outRect, View view, RecyclerView parent, State state)
getItemOffsets
官方样例的 DividerItemDecoration 里面是这样实现的:
[代码]java代码:
|
1
2
3
4
5
|
if (mOrientation == VERTICAL_LIST) { outRect.set(0, 0, 0, mDivider.getIntrinsicHeight());} else { outRect.set(0, 0, mDivider.getIntrinsicWidth(), 0);} |
这个outRect设置的四个值是什么意思呢?先来看看它是在哪里调用的,它在RecyclerView中唯一被调用的地方就是 getItemDecorInsetsForChild(View child) 函数。
[代码]java代码:
|
01
02
03
04
05
06
07
08
09
10
11
12
13
14
15
16
17
18
19
20
|
Rect getItemDecorInsetsForChild(View child) { final LayoutParams lp = (LayoutParams) child.getLayoutParams(); if (!lp.mInsetsDirty) { return lp.mDecorInsets; } final Rect insets = lp.mDecorInsets; insets.set(0, 0, 0, 0); final int decorCount = mItemDecorations.size(); for (int i = 0; i < decorCount; i++) { mTempRect.set(0, 0, 0, 0); mItemDecorations.get(i).getItemOffsets(mTempRect, child, this, mState); insets.left += mTempRect.left; insets.top += mTempRect.top; insets.right += mTempRect.right; insets.bottom += mTempRect.bottom; } lp.mInsetsDirty = false; return insets;} |
可以看到,getItemOffsets 函数中设置的值被加到了 insets 变量中,并被该函数返回,那么 insets 又是啥呢?
insets 是啥?
根据Inset Drawable文档,它的使用场景是:当一个view需要的背景小于它的边界时。例如按钮图标较小,但是我们希望按钮有较大的点击热区,一种做法是使用ImageButton,设置background="@null",把图标资源设置给src属性,这样ImageButton可以大于图标,而不会导致图标也跟着拉伸到ImageButton那么大。那么使用Inset drawable也能达到这样的目的。但是相比之下有什么优势呢?src属性也能设置selector drawable,所以点击态也不是问题。也许唯一的优势就是更“优雅”吧 :)
回到正题,getItemDecorInsetsForChild 函数中会重置 insets 的值,并重新计算,计算方式就是把所有 ItemDecoration 的 getItemOffsets 中设置的值累加起来 2,而这个 insets 实际上是 RecyclerView 的 child 的 LayoutParams 中的一个属性,它会在 getTopDecorationHeight,getBottomDecorationHeight 等函数中被返回,那么这个 insets 的意义就很明显了,它记录的是所有 ItemDecoration 所需要的 3尺寸的总和。
而在 RecyclerView 的 measureChild(View child, int widthUsed, int heightUsed) 函数中,调用了 getItemDecorInsetsForChild,并把它算在了 child view 的 padding 中。
[代码]java代码:
|
01
02
03
04
05
06
07
08
09
10
11
12
13
14
15
16
|
public void measureChild(View child, int widthUsed, int heightUsed) { final LayoutParams lp = (LayoutParams) child.getLayoutParams(); final Rect insets = mRecyclerView.getItemDecorInsetsForChild(child); widthUsed += insets.left + insets.right; heightUsed += insets.top + insets.bottom; final int widthSpec = getChildMeasureSpec(getWidth(), getWidthMode(), getPaddingLeft() + getPaddingRight() + widthUsed, lp.width, canScrollHorizontally()); final int heightSpec = getChildMeasureSpec(getHeight(), getHeightMode(), getPaddingTop() + getPaddingBottom() + heightUsed, lp.height, canScrollVertically()); if (shouldMeasureChild(child, widthSpec, heightSpec, lp)) { child.measure(widthSpec, heightSpec); }} |
上面这段代码中调用 getChildMeasureSpec 函数的第三个参数就是 child view 的 padding,而这个参数就把 insets 的值算进去了。那么现在就可以确认了,getItemOffsets 中为 outRect 设置的4个方向的值,将被计算进所有 decoration 的尺寸中,而这个尺寸,被计入了 RecyclerView 每个 item view 的 padding 中。
PoC
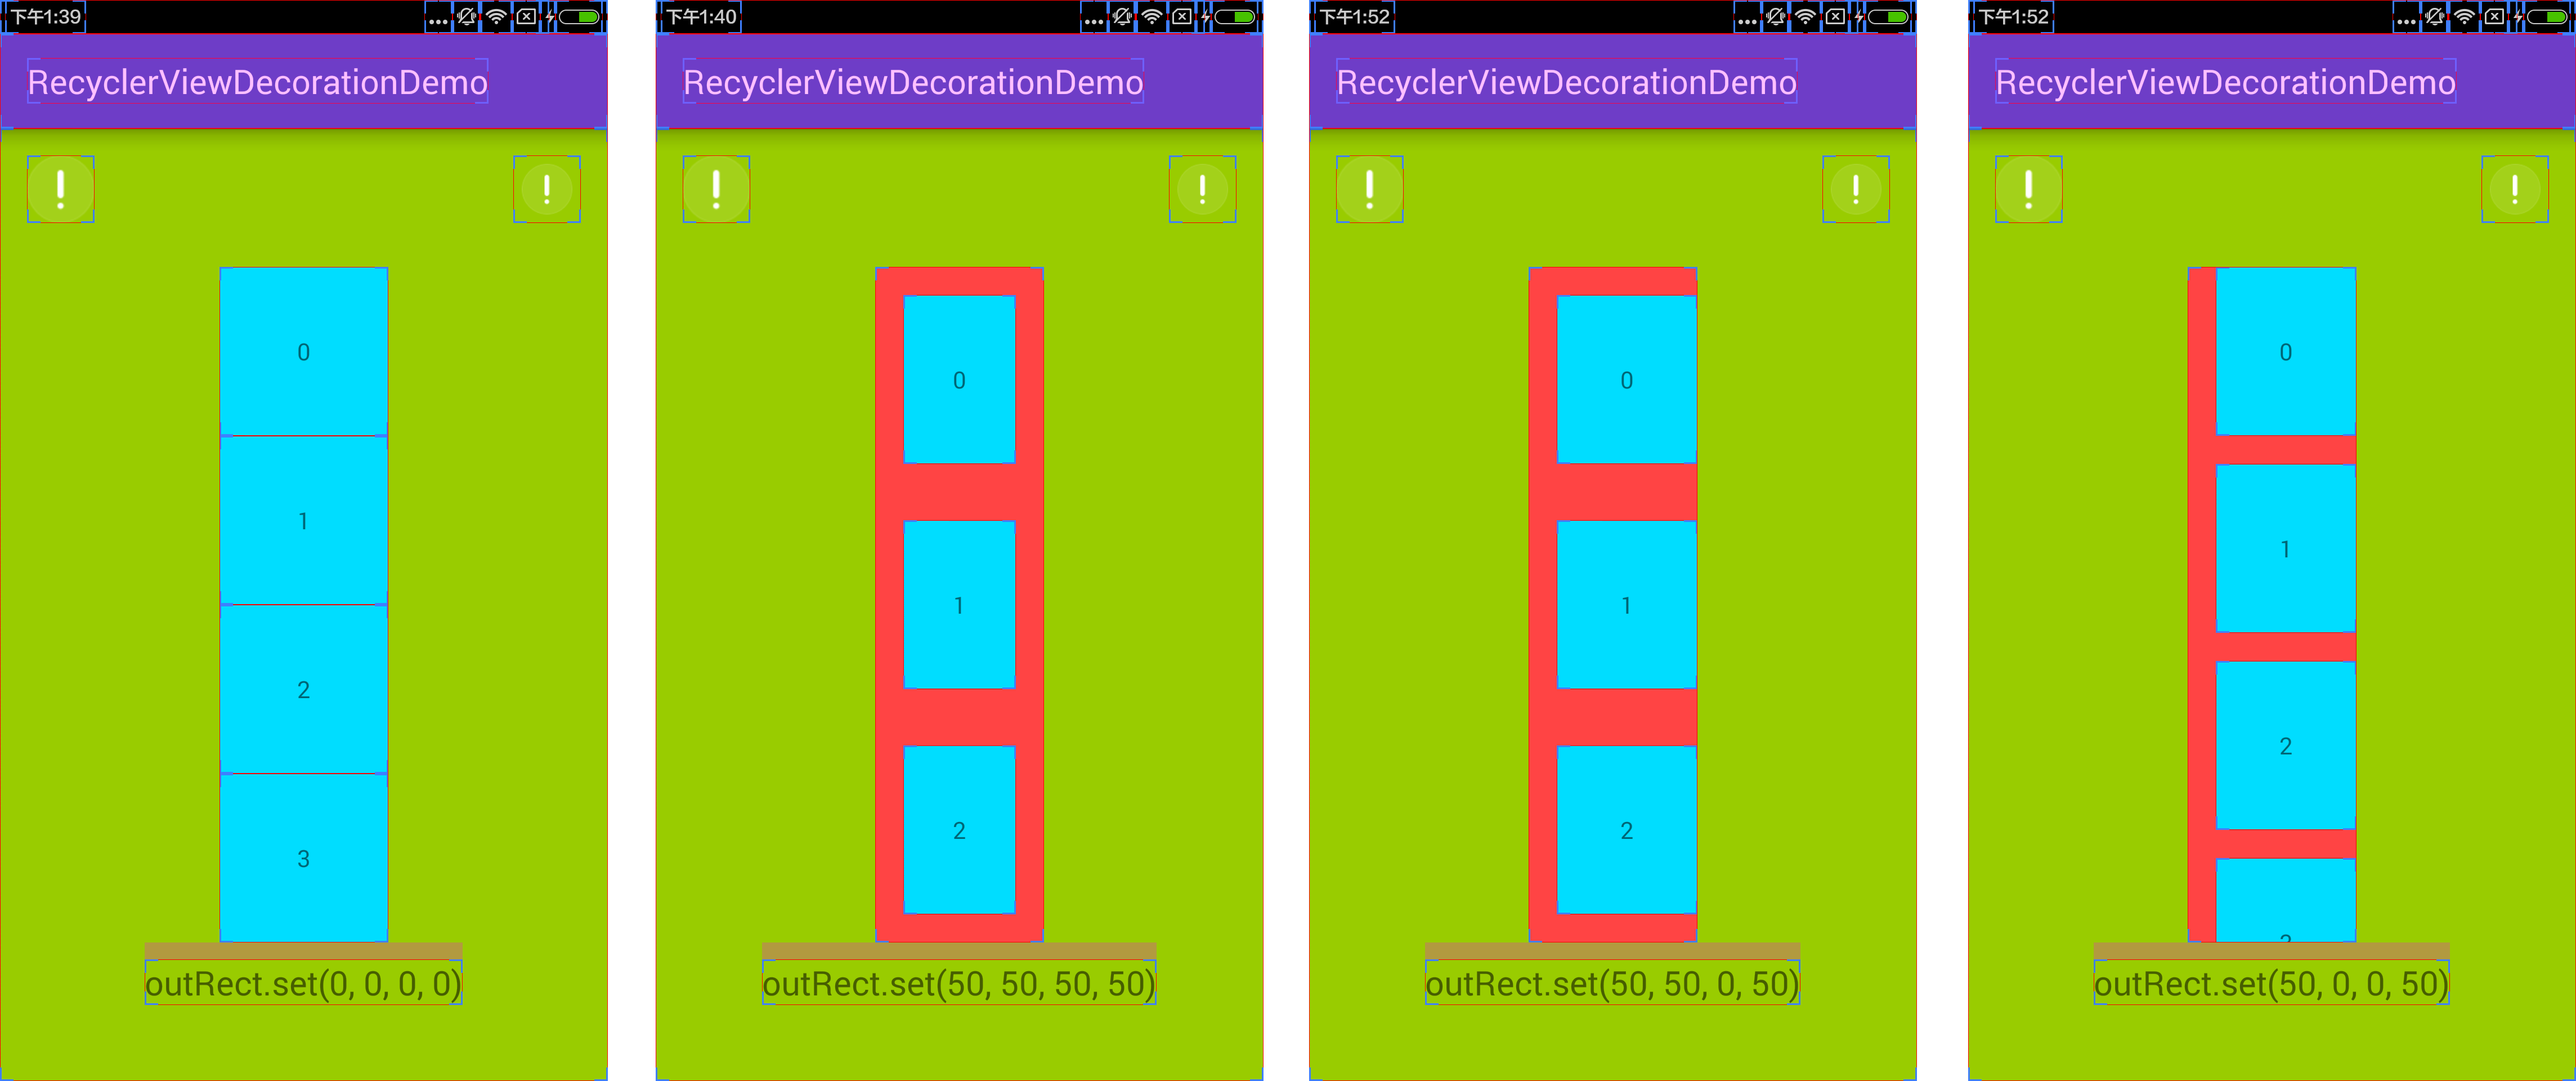
这一步测试主要是对 getItemOffsets 函数传入的 outRect 参数各个值的设置,以证实上述分析的结论。

可以看到,当 left, top, right, bottom 全部设置为50时,RecyclerView 的每个 item view 各个方向的 padding 都增加了,对比各种情况,确实 getItemOffsets 中为 outRect 设置的值都将被计入 RecyclerView 每个 item view 的 padding 中。
onDraw
先来看看官方样例的 DividerItemDecoration 实现:
[代码]java代码:
|
01
02
03
04
05
06
07
08
09
10
11
12
13
14
15
|
public void drawVertical(Canvas c, RecyclerView parent) { final int left = parent.getPaddingLeft(); final int right = parent.getWidth() - parent.getPaddingRight(); final int childCount = parent.getChildCount(); for (int i = 0; i < childCount; i++) { final View child = parent.getChildAt(i); final RecyclerView.LayoutParams params = (RecyclerView.LayoutParams) child .getLayoutParams(); final int top = child.getBottom() + params.bottomMargin + Math.round(ViewCompat.getTranslationY(child)); final int bottom = top + mDivider.getIntrinsicHeight(); mDivider.setBounds(left, top, right, bottom); mDivider.draw(c); }} |
drawVertical 是为纵向的 RecyclerView 绘制 divider,遍历每个 child view 4 ,把 divider 绘制到 canvas 上,而 mDivider.setBounds 则设置了 divider 的绘制范围。其中,left 设置为 parent.getPaddingLeft(),也就是左边是 parent 也就是 RecyclerView 的左边界加上 paddingLeft 之后的位置,而 right 则设置为了 RecyclerView 的右边界减去 paddingRight 之后的位置,那这里左右边界就是 RecyclerView 的内容区域 5了。top 设置为了 child 的 bottom 加上 marginBottom 再加上 translationY,这其实就是 child view 的下边界 6,bottom 就是 divider 绘制的下边界了,它就是简单地 top 加上 divider 的高度。
PoC
这一步测试主要是对 onDraw 函数中对 divider 的绘制边界的设置。

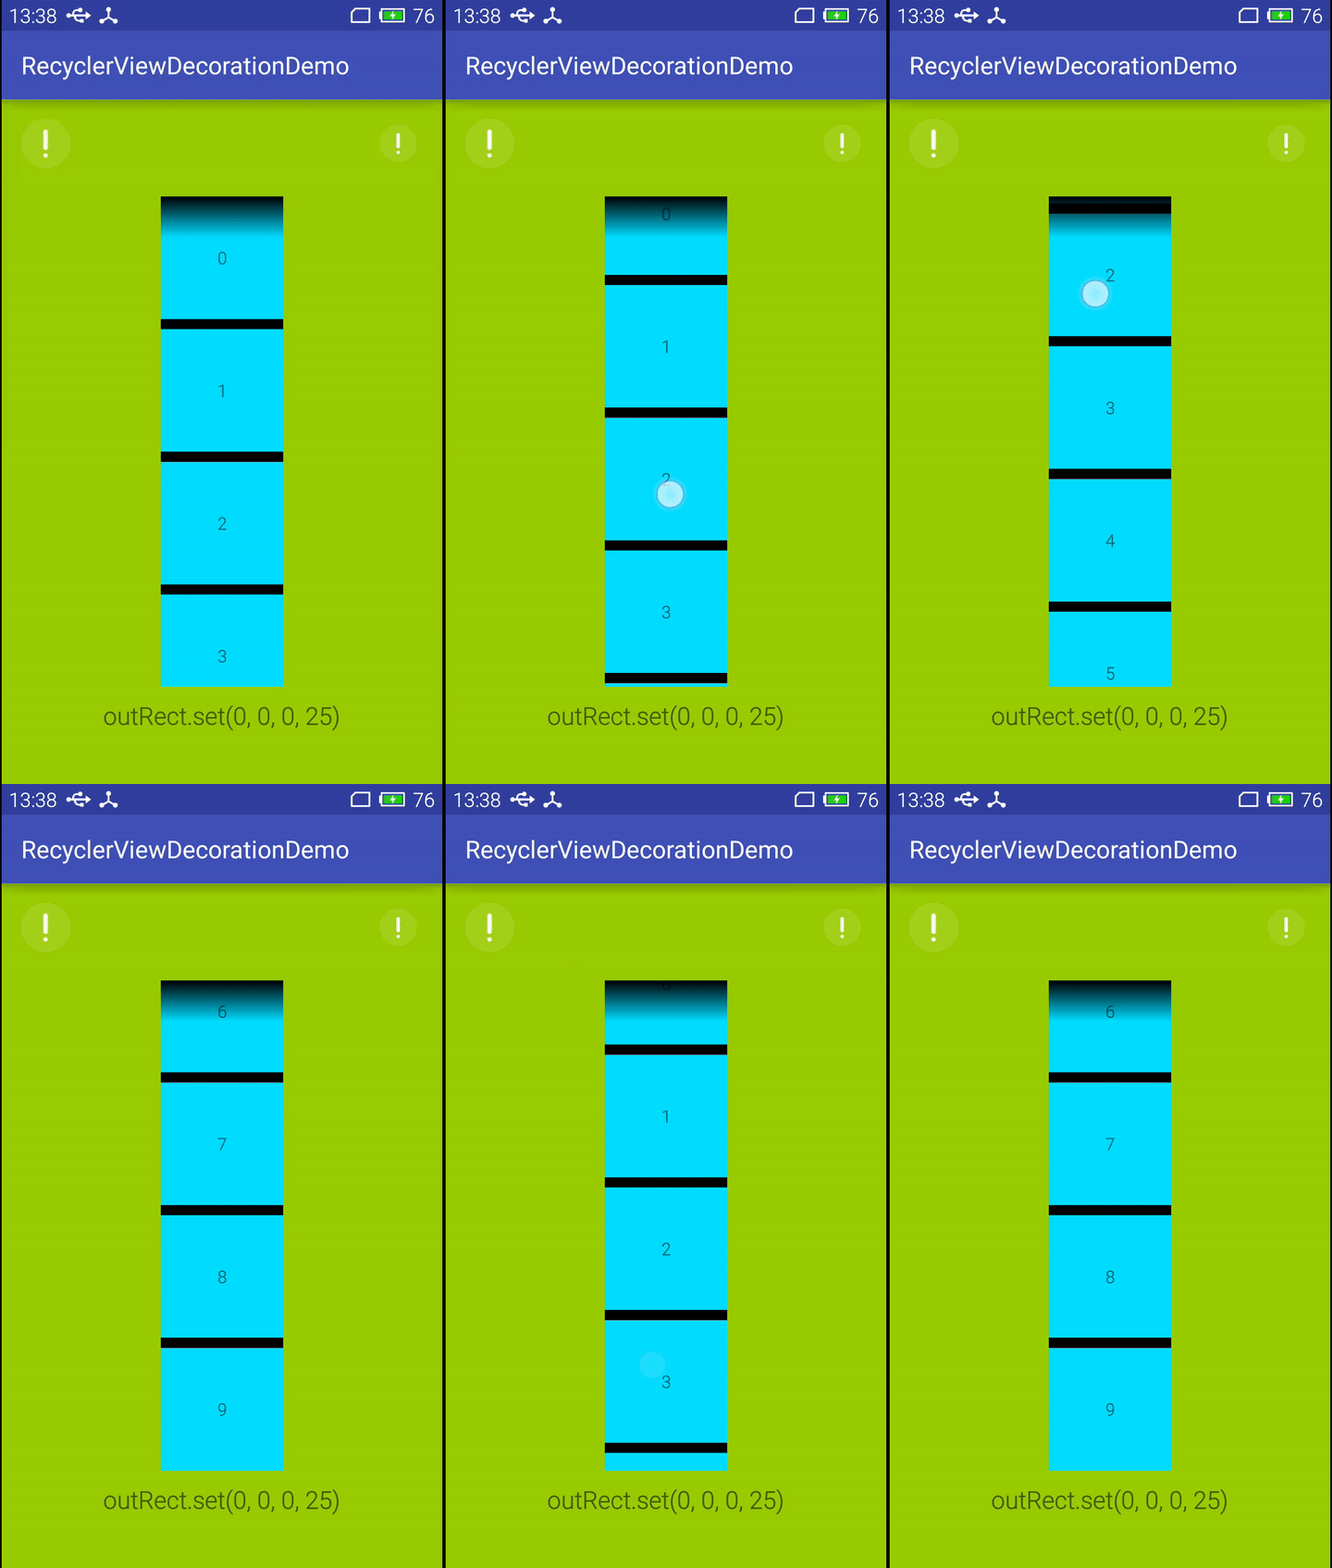
可以看到,当我们把 left, right, top 7 设置得和官方样例一样,bottom 设置为 top + 25,注意,这里 getItemOffsets 对 outSets 的设置只有 bottom = 50,也就是 decoration 高度为50,我们可以看到,decoration 的上半部分就绘制为黑色了,下半部分没有绘制。而如果设置top = child.getBottom() + params.bottomMargin - 25,bottom = top + 50,就会发现 child view 的底部出现了 overdraw。所以这里我们可以得出结论:在 onDraw 为 divider 设置绘制范围,并绘制到 canvas 上,而这个绘制范围可以超出在 getItemOffsets 中设置的范围,但由于 decoration 是绘制在 child view 的底下,所以并不可见,但是会存在 overdraw。
onDrawOver
有一点需要注意:decoration 的 onDraw,child view 的 onDraw,decoration 的 onDrawOver,这三者是依次发生的。而由于 onDrawOver 是绘制在最上层的,所以它的绘制位置并不受限制(当然,decoration 的 onDraw 绘制范围也不受限制,只不过不可见),所以利用 onDrawOver 可以做很多事情,例如为 RecyclerView 整体顶部绘制一个蒙层,或者为特定的 item view 绘制蒙层。这里就不单独进行测试了,请见下一节的整体效果。
All in together
实现的效果:除了最后一个 item view,底部都有一个高度为25的黑色 divider,为整个 RecyclerView 的顶部绘制了一个渐变的蒙层。效果图如下:

小结
- getItemOffsets 中为 outRect 设置的4个方向的值,将被计算进所有 decoration 的尺寸中,而这个尺寸,被计入了 RecyclerView 每个 item view 的 padding 中
- 在 onDraw 为 divider 设置绘制范围,并绘制到 canvas 上,而这个绘制范围可以超出在 getItemOffsets 中设置的范围,但由于 decoration 是绘制在 child view 的底下,所以并不可见,但是会存在 overdraw
- decoration 的 onDraw,child view 的 onDraw,decoration 的 onDrawOver,这三者是依次发生的
- onDrawOver 是绘制在最上层的,所以它的绘制位置并不受限制
脚注
-
不算被 Deprecated 的方法
-
把 left, top, right, bottom 4个属性分别累加
-
也就是在 getItemOffsets 函数中为 outRect 参数设置的4个属性值
-
child view,并不是 adapter 的每一个 item,只有可见的 item 才会绘制,才是 RecyclerView 的 child view
-
可以类比 CSS 的盒子模型,一个 view 包括 content, padding, margin 三个部分,content 和 padding 加起来就是 view 的尺寸,而 margin 不会增加 view 的尺寸,但是会影响和其他 view 的位置间距,但是安卓的 view 没有 margin 的合并
-
bottom 就是 content 的下边界加上 paddingBottom,而为了不“吃掉” child view 的底部边距,所以就加上 marginBottom,而 view 还能设置 translation 属性,用于 layout 完成之后的再次偏移,同理,为了不“吃掉”这个偏移,所以也要加上 translationY
-
这里由于并没有对 child view 设置 translation,为了代码简短,就没有减去 translationY,实际上是需要的
继续深入理解:深入理解 RecyclerView 系列之二:ItemAnimator


