Cocos2d-x里面如何实现MVC(二)
上一篇博文中,我提到了《如何在cocos2d-x里面实现mvc(一)》,但是,都是一些纯理论的东西,我们需要看一些代码才能理解地更清楚。这篇博文是基于上一篇来写的,所以我建议你先阅读完上一篇。
模型类
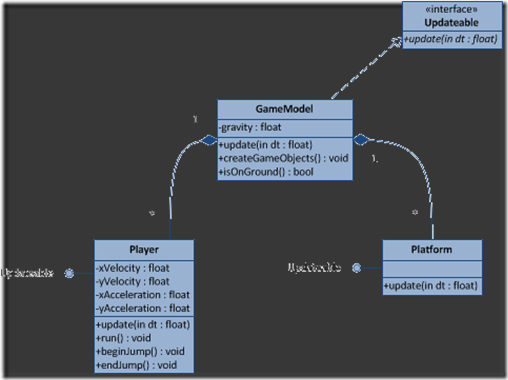
就像之前所讨论的,GameModel类存储了游戏世界里面的一些属性,比如当前的重力。但是,它同时也负责创建和联接游戏里面的对象,比如Player和Platforms。它们之间的关系如下图所示:(译者:这里采用了针对接口编程的方法,所有的游戏对象都实例updateable接口,这样就可以在game loop里面更新自己了。同时GameModel类提供了一个工厂方法createGameObjects,用来创建游戏里面的对象。)
你可能已经注意到了,所有的model类都实现了updateable protocol,并实现了update方法。这样它们就可以在game loop里面更新自己的状态了。比如,在Player类里面,我们需要根据当前x轴和y轴的速度来更新player的位置信息。在我的游戏里面,我把它委托给Physics组件,它是我实现的一个简单的物理引擎。但是,假如你的游戏很简单的话,你可以不用分开你的物理代码,然后可以直接在update方法里面来做碰撞检测等物理操作。
// Player.h

#include "cocos2d.h"
using namespace cocos2d;

class Player : public Updateable{
public:
	void update(ccTime dt){
		_physics->updateModel(this, dt);
		// detect collisions with game objects, etc.
	}
}
GameModel实现的update方法,不仅仅用来更新自己的状态,同时,它还调用player的update方法和所有platform的update方法。这个update方法,之后会被game loop所调用。
// GameModel.h

#include "cocos2d.h"
using namespace cocos2d;

class GameModel : public Updateable{
public:
	virtual void update(ccTime dt){
		// modify game model properties here
		// update player
		this->player->update(dt);
		// update platforms
		for(int i=0; i<_platforms.size(); i++){
			_platforms.at(i)->update(dt);
		}
		// ...
	}
}
视图和控制器类
对于我的游戏里面的每一个场景,都关联了一个Controller类,它负责处理用户交互、创建视图和管理场景的跳转。控制器会schedule一个游戏主循环,在这个loop里面,所有的model和view的update方法都会被调用。
// GameplayController.h

#include "cocos2d.h"
using namespace cocos2d;

class GameplayController : public GameplayViewDelegate{
public:
	virtual bool init() {
		GameplayView *view = new GameplayView();
		view->initWithDelegate(this);
		// retain view in controller
		this->view = view;
		// release view
		view->release();
		// init model
		GameModel *model = GameModel::sharedModel();
		model->createGameObjects();
		model->getPlayer()->run();
		this->scheduleUpdate();

		return true;
	}

	void update(ccTime dt) {
		GameModel *model = GameModel::shareMode();
		if(model->getIsGameover()) {
			CCDirector::sharedDirector()->replaceScene(GameOverController::node());
			// process model
			model->update(dt);
			// update view
			this->view->update(dt);
		}
	}
}
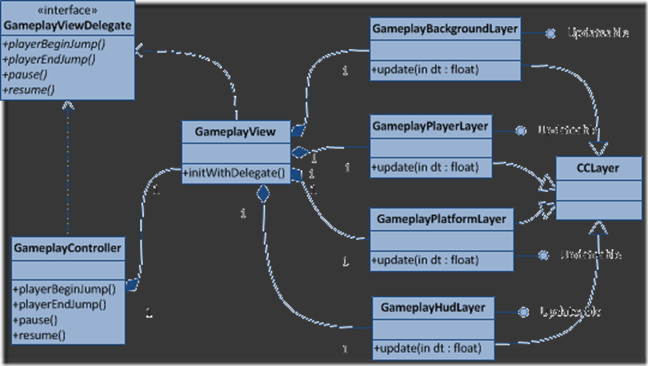
View主要负责根据model的状态来渲染游戏画面。但是,同时,因为cococs2d的实现方式,我们还需要把touch事件传递给controller类。你应该注意到了,view不并直接依赖controller。view类调用controller的方法是通过GameViewDelegate协议来实现的。这也是为什么我们要在init方法里面传递一个delegate的原因。
// GameplayView.h

#include "cocos2d.h"
using namespace cocos2d;

class GameplayView {
public:
	void initWithDelegate(CCObject *theDelegate) {
		this->delegate = theDelegate;

		// initialize layers
		_backgroundLayer = GameplayBackgroundLayer::node();
		this->delegate->addChild(_backgroundLayer);

		_platformLayer = GameplayPlatformLayer::node();
		this->delegate->addChild(_platformLayer);

		_playerLayer = GameplayPlayerLayer::node();
		_playerLayer.delegate = theDelegate;
		this->delegate->addChild(_playerLayer);

		_hudLayer = GameplayHudLayer::node();
		_hudLayer.delegate = theDelegate;
		this->delegate->addChild(_hudLayer);
	}
}
更新:我忘了告诉大家layer本身是怎么实现的了。其实很简单,就是创建一些sprite、action和animation等。
// GameplayPlayerLayer.h

#include "cocos2d.h"
using namespace cocos2d;

class GameplayPlayerLayer : public CCLayer, public Updateable{
public:
	virtual bool init() {
		this->setIsTouchEnabled(true);
		this->setIsAccelerometerEnabled(true);
		// ResourceManager is the self-declared class
		ResourceManager *resources = ResourceManager::sharedResourceManager();
		CCSpriteFrameCache::sharedSpriteFrameCache()->addSpriteFramesWithFile(PLAYER_SPRITE_SHEET_PLIST);
		CCSpriteBatchNode *spriteSheet = resources->playerSpriteSheet;
		this->addChild(spriteSheet);
	 	// ...
		// initialize sprites
		// initialize animations
	}
	// ...
}
层里面的精灵都会在layer的update方法里面被更新,如下所示:
void update(ccTime dt)
{
	// update player sprite based on model
	GameModel *model = GameModel::sharedModel();

	_playerSprite->setPosition(ccp((model->getPlayer()->getPosition().x - model->getViewPort()->getRect()->getOrigin().x)*PRM_RATIO, model->getPlayer()->getPosition().h - model->getViewPort()->getRect()->getOrigin().y)*PRM_RATIO);
}
注意,在渲染player的位置的时候,我们使用了PPM_RATIO,用来把米转换成point。(为什么是point而不是pixel,因为cocos2d使用的是point而不是pixel,不明白的可以看看源代码和官方文档)
touch事件被传递给了controller类,如下所示:
class GameplayPlayerLayer : public CCLayer, public Updateable{
	// ...
	virtual void ccTouchesBegan(CCset *pTouches, CCEvent *pEvent){
		this.delegate->playerBeginJump();
	}
}
然后下图就是view和controller交互的完整的UML图:
处理模型事件
上一篇博文中,我留下了一个问题,就是怎么处理model和controller之间的交互。其它很简单,就是使用观察者模式,controller只要订阅model的事件,然后定义相应的处理方法即可。当model更新的时候,会触发事件,然后所以侦听了该事件的controller都能被通知到。下面给出实现:(译者:很多童靯不知道对象之间该怎么交互,其实使用Notification可以大大地解耦对象的交互,使代码更容易维护。)
class Player : public Updateable{
public:
	void beginJump(){
		// 在Object-c中有NSNotificationCenter类,在C++中要自行实现该类
		NotificationCenter::shareCenter()->postNotificationName(EVENT_PLAYER_BEGIN_JUMP, NULL);
	}
}
controller订阅事件,当事件发生的时候会得到通知,同时相应的事件处理函数将会被调用。
class GameplayController : public GameplayViewDelegate{
public:
	virtual bool init() {
		NotificationCenter::shareCenter()->addObserver(this, callfunc_selector(GameplayController::onPlayerBeginJumpNotification), EVENT_PLAYER_BEGIN_JUMP, NULL);

	//...
	}

	void onPlayerBeginJumpNotification(){
		SimpleAudioEngine::sharedEngine()->playEffect(PLAYER_JUMP_SOUND);
	}
}
就这么多!
乍一看,可能会觉得有点复杂。而且,要创建这么多类,而只是为了实现一个简单的功能,确实有点划不来。而且,你还记得吗?如果在系统里面添加太多的类,其实是一种反模式(anti-pattern),叫做Fear of Adding Classes。但是,从长远的角度来看,从可维护性的角度来看,加这么多类是值得的。后面的教程我将向大家展示出来。如果大家对于如何在cocos2d里面使用mvc有更好的看法,欢迎补充。
参考来源:http://www.cnblogs.com/andyque/archive/2012/03/11/2390082.html
posted on 2012-05-15 10:30 anndaming 阅读(1993) 评论(1) 编辑 收藏 举报


