

OVN实战---《The OVN Gateway Router》翻译
Overview
在本文中我将在前文的基础上添加一个OVN gateway router。gateway router将使得lab network能访问我们的overlay network
The lab
为了能演示gateway router,我们需要给我们的ubuntu hosts再添加一个物理网络。因此,各个节点的eth1都将加入10.127.0.128/25这个网络。最终的拓扑结构如下所示:

Introducing the OVN L3 Gateway
OVN Gateway通常作为overlay network和physical network之间的onramp/offramp存在。它有两种工作方式:在二层将一个OVN logical switch接入一个VLAN,在三层则为OVN router和physical network提供连接。在本文中,我们专注于创建一个三层的gateway,作为physical network和logical network的分界点。
和distributed logical router(DLR)不同,一个OVN gateway router是存在于单个节点中的(chassis),因此它可以提供一些不能分布的服务(例如NAT,负载均衡等等)。在撰写本文的时候,对于gateway router存在一个限制,即它只能通过logical switch和其他路由器相连,而DLRs却能通过peer link之间相连。对于移除这项限制的工作仍在进行中。
需要注意的是,环境中存在多个gateway router也是允许的。这意味着可能存在多条链路(ECMP)能够进入逻辑空间。但是值得注意的是,OVN现在不支持gateway routers之间的egress routers。当然,这也将在以后的开发中得到解决。
Make ubuntu1 an OVN Host
首先,我们将把OVN gateway router存放在ubuntu1中,而不是其他用于存放虚拟机的节点。接着,像OVN Central进行注册
ovs-vsctl set open . external-ids:ovn-remote=tcp:127.0.0.1:6642
ovs-vsctl set open . external-ids:ovn-encap-type=geneve
ovs-vsctl set open . external-ids:ovn-encap-ip=10.127.0.2
确认连通性:
root@ubuntu1:~# netstat -antp | grep 127.0.0.1
tcp        0      0 127.0.0.1:6642          127.0.0.1:55566         ESTABLISHED 4999/ovsdb-server
tcp        0      0 127.0.0.1:55566         127.0.0.1:6642          ESTABLISHED 15212/ovn-controlle
同样,如果OVN没有自动创建integration bridge就创建一个
ovs-vsctl add-br br-int -- set Bridge br-int fail-mode=secure
OVN Logical Design
在我们进行具体配置之前,我们先来审查以下我们计划的设计方案。我们要创建的OVN logical network如下所示:
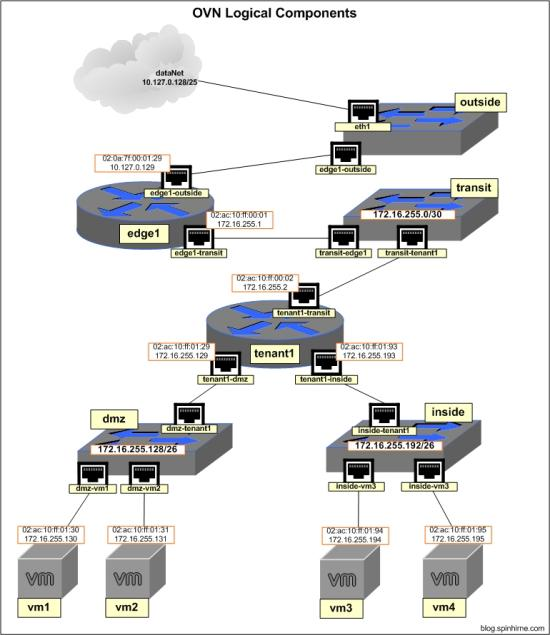
可以看到,我们添加了以下这些新的组件:
- OVN gateway router(edge1)
- 用于连接edge1和tenant1 routers的logical switch(transit)
- 用于连接edge1和lab network的logical switch(outside)
Adding the L3 Gateway
如上文所述,gateway router位于一个特定的chassis(如本例中的ubuntu1)中。为了完成绑定,我们需要确定ubuntu1的chassis id。通过在ubuntu1中使用命令ovn-sbctl,我们可以看到类似如下的输出内容:
ovn-sbctl show
Chassis "833ae1bd-ced3-494a-a95b-f2dc54172b71"
        hostname: "ubuntu1"
        Encap geneve
                ip: "10.127.0.2"
                options: {csum="true"}
Chassis "239f2c28-90ff-468f-a701-655585c630bf"
        hostname: "ubuntu3"
        Encap geneve
                ip: "10.127.0.3"
                options: {csum="true"}
        Port_Binding "dmz-vm2"
        Port_Binding "inside-vm4"
Chassis "517d558e-158a-4cb2-8870-283e9d39685e"
        hostname: "ubuntu2"
        Encap geneve
                ip: "10.127.0.129"
                options: {csum="true"}
        Port_Binding "inside-vm3"
        Port_Binding "dmz-vm1"
拷贝ubuntu1的chassis UUID,下面将会用到。
创建一个新的logical router,用上文中的UUID取代下面操作中的{chassis_id}。在ubuntu1上执行如下操作:
# create router edge1
ovn-nbctl create Logical_Router name=edge1 options:chassis={chassis_uid}

# create a new logical switch for connecting the edge1 and tenant1 routers
ovn-nbctl ls-add transit

# edge1 to the transit switch
ovn-nbctl lrp-add edge1 edge1-transit 02:ac:10:ff:00:01 172.16.255.1/30
ovn-nbctl lsp-add transit transit-edge1
ovn-nbctl lsp-set-type transit-edge1 router
ovn-nbctl lsp-set-addresses transit-edge1 02:ac:10:ff:00:01
ovn-nbctl lsp-set-options transit-edge1 router-port=edge1-transit

# tenant1 to the transit switch
ovn-nbctl lrp-add tenant1 tenant1-transit 02:ac:10:ff:00:02 172.16.255.2/30
ovn-nbctl lsp-add transit transit-tenant1
ovn-nbctl lsp-set-type transit-tenant1 router
ovn-nbctl lsp-set-address transit-tenant1 02:ac:10:ff:00:02
ovn-nbctl lsp-set-options transit-tenant1 router-port=tenant1-transit

# add static routes
ovn-nbctl lr-route-add edge1 "172.16.255.128/25" 172.16.255.2
ovn-nbctl lr-route-add tenant1 "0.0.0.0/0" 172.16.255.1

ovn-sbctl show
注意ubuntu1中的port bindings。现在我们可以通过从ubuntu2中的vm1 ping edge1来测试连通性了
root@ubuntu2:~# ip netns exec vm1 ping 172.16.255.1
PING 172.16.255.1 (172.16.255.1) 56(84) bytes of data.
64 bytes from 172.16.255.1: icmp_seq=1 ttl=253 time=1.07 ms
64 bytes from 172.16.255.1: icmp_seq=2 ttl=253 time=1.13 ms
64 bytes from 172.16.255.1: icmp_seq=3 ttl=253 time=1.00 ms
Connecting to the "data" Network
我们接下去将使用ubuntu1的eth1作为edge1 router和"data" network的连接点。为了完成这个任务,我们需要设置OVN使其通过一个专用的OVS bridge来使用eth1。这种类型的连接在OVN中被称为"localnet"。
# create new port on router 'edge1'
ovn-nbctl lrp-add edge1 edge1-outside 02:0a:7f:00:01:29 10.127.0.129/25

# create new logical switch and connect it to edge1
ovn-nbctl ls-add outside
ovn-nbctl lsp-add outside outside-edge1
ovn-nbctl lsp-set-type outside-edge1 router
ovn-nbctl lsp-set-addresses outside-edge1 02:0a:7f:00:01:29
ovn-nbctl lsp-set-options outside-edge1 router-port=edge1-outside

# create a bridge for eth1
ovs-vsctl add-br br-eth1

# create bridge mapping for eth1, map network name "dataNet" to br-eth1
ovs-vsctl set Open_vSwitch . external-ids:ovn-bridge-mappings=dataNet:br-eth1

# create localnet port on 'outside'. set the network name to "dataNet"
ovn-nbctl lsp-add outside outside-localnet
ovn-nbctl lsp-set-addresses outside-localnet unknown
ovn-nbctl lsp-set-type outside-localnet localnet
ovn-nbctl lsp-set-options outside-localnet network_name=dataNet

# connect eth1 to br-eth1
ovs-vsctl add-port br-eth1 eth1
从vm1测试到edge1-outside的连通性
root@ubuntu2:~# ip netns exec vm1 ping 10.127.0.129
PING 10.127.0.129 (10.127.0.129) 56(84) bytes of data.
64 bytes from 10.127.0.129: icmp_seq=1 ttl=253 time=1.74 ms
64 bytes from 10.127.0.129: icmp_seq=2 ttl=253 time=0.781 ms
64 bytes from 10.127.0.129: icmp_seq=3 ttl=253 time=0.582 ms
Giving the Ubuntu Hosts Access to the "data" Network
现在是时候让各个Ubuntu主机出现在data network里了。对于ubuntu2/ubuntu3,我们只要简单地在它们的物理网卡上设置IP地址即可(在本文中为eth1)。对于ubuntu1,我们需要在br-eth1上设置IP
ubuntu1
ip addr add 10.127.0.130/24 dev br-eth1
ip link set br-eth1 up
ubuntu2
ip addr add 10.127.0.131/24 dev eth1
ip link set eth1 up
ubuntu3
ip addr add 10.127.0.132/24 dev eth1
ip link set eth1 up
从ubuntu1测试到edge1的连通性
root@ubuntu1:~# ping 10.127.0.129
PING 10.127.0.129 (10.127.0.129) 56(84) bytes of data.
64 bytes from 10.127.0.129: icmp_seq=1 ttl=254 time=0.563 ms
64 bytes from 10.127.0.129: icmp_seq=2 ttl=254 time=0.290 ms
64 bytes from 10.127.0.129: icmp_seq=3 ttl=254 time=0.333 ms
Configuring NAT
让我们看看从vm1 ping ubuntu1的结果是怎样的
root@ubuntu2:~# ip netns exec vm1 ping 10.127.0.130
PING 10.127.0.130 (10.127.0.130) 56(84) bytes of data.
^C
--- 10.127.0.130 ping statistics ---
3 packets transmitted, 0 received, 100% packet loss, time 2016ms
未出所料,根本ping不通。这是为什么呢?让我们来看看在ubuntu1执行tcpdump的输出结果:
root@ubuntu1:~# tcpdump -i br-eth1
tcpdump: verbose output suppressed, use -v or -vv for full protocol decode
listening on br-eth1, link-type EN10MB (Ethernet), capture size 262144 bytes
14:41:53.057993 IP 172.16.255.130 > 10.127.0.130: ICMP echo request, id 19359, seq 1, length 64
14:41:54.065696 IP 172.16.255.130 > 10.127.0.130: ICMP echo request, id 19359, seq 2, length 64
14:41:55.073667 IP 172.16.255.130 > 10.127.0.130: ICMP echo request, id 19359, seq 3, length 64
我们可以看到请求进来,但是我们的应答却从另一个网卡返回了,因此并没有出现在tcpdump的输出中。出现这个问题的原因是,ubuntu1中并没有到172.16.255.130的路由,因此应答只能从默认的网关返回。因此为了能够正常工作,我们需要使用以下两个方法中的一种:
- 在ubuntu主机中添加静态路由
- 在OVN gateway router添加NAT
为了减少管理静态路由带来的麻烦,我们将使用第二种方法
在OVN中可以配置以下三种NAT:
- DNAT --- 用于将外部可见的IP转换为内部IP
- SNAT --- 用于将一个或多个内部IP转换为外部可见的IP
- SNAT-DNAT --- 用于创建“静态的NAT”,用于将外部IP和内部IP进行一对一映射
因为我们并不需要外部网络能够访问我们内部的虚拟机,因此我们只要能够让内部虚拟机做outbound NAT就可以了。为了能够创建NAT规则,我们需要直接对OVN northbound database进行操作。操作的语法看起来可能有点奇怪,不过我会在下文具体解释。接下来在ubuntu1执行如下操作:
# create snat rule which will nat to the edge1-outside interface
ovn-nbctl -- --id=@nat create nat type="snat" logical_ip=172.16.255.128/25 \
external_ip=10.127.0.129 -- add logical_router edge1 nat @nat
简单地说,上述命令就是在northbound database中的"nat"表中添加了一条记录,将UUID存储在ovsdb变量"@nat"中,然后再将存储在@nat中的UUID添加到northbound database的"logical_router"表的"edge1"记录的"nat"域中。如果你想了解有关northbound database的细节,那么一定要仔细阅读ovn-nb的man page。同时,ovn-nbctl的man page描述了上述命令的语法
接着我们从vm1进行连通性测试:
root@ubuntu2:~# ip netns exec vm1 ping 10.127.0.130
PING 10.127.0.130 (10.127.0.130) 56(84) bytes of data.
64 bytes from 10.127.0.130: icmp_seq=40 ttl=62 time=2.39 ms
64 bytes from 10.127.0.130: icmp_seq=41 ttl=62 time=1.61 ms
64 bytes from 10.127.0.130: icmp_seq=42 ttl=62 time=1.28 ms
如上所示,我们现在在内部的虚拟机中也能ping通外部网络了
Final Words
Overlay network 如果不能和外部世界相连接的话是没有任何意义的。OVN为这种连接提供了一种方法。
在下一篇文章中,我们将探索OVN另一个重要的特性:the OVN load balancer

