WCF后传系列(6):消息如何传递之绑定Part 1
概述
每个服务终结点都包含一个地址Address、一个绑定Binding 和一个契约Contract。契约指定可用的操作,绑定指定如何与服务进行通信,而地址指定查找服务的位置,在WCF专题系列前5篇中,深入了解了WCF中寻址的细节;从本文开始,将深入了解经典“ABC”中的B,即绑定Binding,了解它的原理,如何使用绑定通信以及在元数据中如何公开
什么是绑定
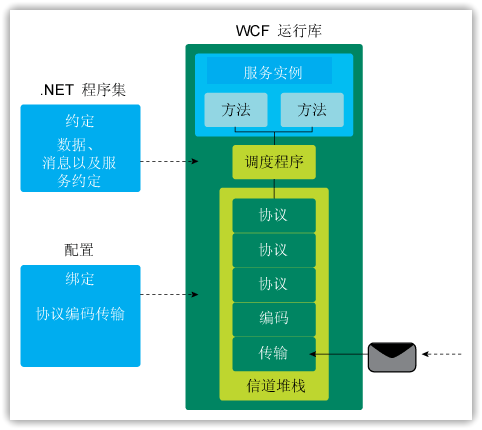
从本质上说,WCF是一个通信服务框架,它允许我们使用不同的传输协议(如Http、Https、TCP、P2P、IPC和MSMQ等),使用不同的消息编码形式(文本、二进制和MTOM),跟不同的WS-*系列规范(如WS-Security、WS-Atomic Transaction等)交互。所有这些细节都是由通道堆栈来处理的,看一下Aaron Skonnard给出的这幅图:

图1
最底层传输组件读入消息,消息编码器将传入字节读取为逻辑消息对象,之后消息通过通道堆栈中的各个消息,它们执行各自的处理。如果对这三者之间之间进行组合,至少可以得到上千种不同的通信方式,但是这些传输、编码以及协议之间有些是互斥的,有些相互约束,也就是说,对于开发人员来说,每构建一个服务,都要需要考虑这三者之间是否可以共存,是否是高效的通信方式,显然这个工作是非常复杂的,要求开发者必须了解所有的传输、编码以及协议等。
为了简化这三者之间的管理,WCF中引入了绑定的概念(Binding),每个绑定中都封装了传输协议、消息编码和多种协议的集合,这样在构建服务时,我们就可以直接选择一个适用的绑定,通过调整它们的属性来适应需求,如果系统内置的绑定通过调整属性仍然不能达到我们的要求,这时才会考虑自定义绑定。这样,通过绑定,就把应用程序编程模型与通道模型(后面会有专门的文章写到)关联了起来,对于开发者来说,就无需再考虑复杂的底层通道模型,直接使用应用程序编程模型。
绑定元素
在WCF中,绑定由绑定元素组成,每个绑定元素用来描述终结点与客户端通信方式中的某个方面,绑定元素继承于BindingElement,其中最重要的绑定元素有如下三种:
1.编码绑定元素(Encoding Binding Element):如采用文本、二进制还是MTOM的方式;
2.传输绑定元素(Transport Binding Element):使用Http、TCP或者MSMQ进行传输;
3.协议绑定元素(Protocol Binding Element):指定可靠性、安全性、事务等。
每个绑定必须要有一个编码绑定元素和一个传输绑定元素,以及包括任意数目的其他协议绑定元素。
通道模型中使用绑定
在WCF中,提供了两个层面的模型,一是针对开发人员的应用程序编程模型;二是用于通信的通道模型(后面会专门讲到)。在通道模型编程中,服务端侦听并接收消息的第一步就是创建绑定,如下面的代码:
// 创建自定义绑定
BindingElement[] bindingElements = new BindingElement[2];
bindingElements[0] = new TextMessageEncodingBindingElement();
bindingElements[1] = new HttpTransportBindingElement();

CustomBinding binding = new CustomBinding(bindingElements);
这里创建了一个自定义绑定,并在其中加入了两个必须的绑定元素,消息编码采用文本的方式,而传输绑定元素采用了内置的HttpTransportBindingElement。接下来就可以使用自定义的绑定来创建通道侦听器,并进行消息的侦听,如下代码所示:
/// <summary>
/// Author:TerryLee
/// Url:http://www.cnblogs.com/terrylee
/// </summary>
/// <param name="args"></param>
static void Main(string[] args)
{
    // 创建自定义绑定
    BindingElement[] bindingElements = new BindingElement[2];
    bindingElements[0] = new TextMessageEncodingBindingElement();
    bindingElements[1] = new HttpTransportBindingElement();

    CustomBinding binding = new CustomBinding(bindingElements);

    // 使用自定义绑定创建通道侦听器
    IChannelListener<IReplyChannel> listener =
          binding.BuildChannelListener<IReplyChannel>(
             new Uri("http://localhost:8080/ChannelApp"),
             new BindingParameterCollection());

    // 监听消息
    listener.Open();
    Console.WriteLine("Listening for incoming channel connections");

    IReplyChannel channel = listener.AcceptChannel();
    Console.WriteLine("Channel accepted. Listening for messages");
    channel.Open();

    while (true)
    {
        RequestContext request = channel.ReceiveRequest();
        // 读取请求的消息
        Message message = request.RequestMessage;
        Console.WriteLine("Message Received");
        Console.WriteLine("Message Action: {0}", message.Headers.Action);
        string body = message.GetBody<string>();
        Console.WriteLine("Message Content: {0}", body);

        // 发送响应消息
        Message replymessage = Message.CreateMessage(
            binding.MessageVersion,
            "http://www.cnblogs.com/terrylee",
             body);
        request.Reply(replymessage);

        // 释放对象
        message.Close();
        request.Close();
        channel.Close();
        listener.Close();
    }
}
其中的代码我们就不再解释,到关于WCF中通道编程模型一文中,还会进行详细的讲解。
自定义系统绑定
在WCF中,已经内置了大量的绑定供我们使用,但是如果这些绑定不能满足实际的开发需求,我们可以通过几种办法来对系统内置绑定进行自定义,一是通过配置文件进行绑定的配置,如下代码所示,配置BasicHttpBinding的消息编码为MTOM,而安全性为消息级别:
<services>
  <service name="TerryLee.WCFAddressing.Service.CalculatorService"
           behaviorConfiguration="calculatorBehavior">
    <host>
      <baseAddresses>
        <add baseAddress="http://localhost:8887/Calculator"/>
      </baseAddresses>
    </host>
    <endpoint address=""
              binding ="basicHttpBinding"
              contract="TerryLee.WCFAddressing.Contract.ICalculator"
              name="defaultBinding"
              bindingConfiguration="myBindingConfiguration">
    </endpoint>
  </service>
</services>
<bindings>
  <basicHttpBinding>
    <binding name="myBindingConfiguration"
             messageEncoding="Mtom">
      <security mode="Message"></security>
    </binding>
  </basicHttpBinding>
</bindings>
二是可以通过编码的方式,如下代码所示:
BasicHttpBinding binding = new BasicHttpBinding();
binding.Security.Message.ClientCredentialType =
    BasicHttpMessageCredentialType.Certificate;

binding.Security.Mode = BasicHttpSecurityMode.Message;
binding.MessageEncoding = WSMessageEncoding.Mtom;
考虑到程序部署之后的修改,还是推荐使用配置的方式。同时,我们完全可以利用系统内置绑定创建一个自定义的绑定,或者我们在自定义绑定过程中,可以直接通过已有的系统内置绑定来创建一个绑定元素集合,如下代码所示:
BasicHttpBinding binding = new BasicHttpBinding();
binding.Security.Message.ClientCredentialType =
    BasicHttpMessageCredentialType.Certificate;

binding.Security.Mode = BasicHttpSecurityMode.Message;
binding.MessageEncoding = WSMessageEncoding.Mtom;

CustomBinding mybinding = new CustomBinding(binding);
BindingElementCollection myElements =
    binding.CreateBindingElements();
在下篇文章中,我将会介绍如何完全重新进行自定义绑定。
元数据中公开绑定
在WCF中,通信的双方应该就通信的细节达成一致,既然绑定中封装了所有通信的细节,而服务端唯一公开这些细节的方式就是元数据,所以绑定的相关信息应该通过公开WSDL和 WS-Policy 形式的元数据,这样服务就可以和客户端共享绑定配置,以BasicHttpBinding为例,它所使用的传输是Http,而消息编码采用文本的方式,如有下面这样一端配置:
<services>
  <service name="TerryLee.WCFAddressing.Service.CalculatorService"
           behaviorConfiguration="calculatorBehavior">
    <host>
      <baseAddresses>
        <add baseAddress="http://localhost:8887/Calculator"/>
      </baseAddresses>
    </host>
    <endpoint address="http://localhost:8887/CalculatorService"
              binding ="basicHttpBinding"
              contract="TerryLee.WCFAddressing.Contract.ICalculator"
              name="defaultBinding"
              bindingConfiguration="myBindingConfiguration">
    </endpoint>
  </service>
</services>
<bindings>
  <basicHttpBinding>
    <binding name="myBindingConfiguration"
             messageEncoding="Mtom">
    </binding>
  </basicHttpBinding>
</bindings>
通过绑定配置,设置BasicHttpBinding的消息编码为MTOM,在元数据中,可以看到采用Http进行传输:
<wsdl:binding name="defaultBinding" type="tns:ICalculator">
  <wsp:PolicyReference URI="#defaultBinding_policy" />
  <soap:binding transport="http://schemas.xmlsoap.org/soap/http" />
  <wsdl:operation name="Add">
    <soap:operation soapAction="http://tempuri.org/ICalculator/Add"
                    style="document" />
    <wsdl:input>
      <soap:body use="literal" />
    </wsdl:input>
    <wsdl:output>
      <soap:body use="literal" />
    </wsdl:output>
  </wsdl:operation>
</wsdl:binding>
对于消息编码MTOM,放在Policy的配置中,如下代码所示:
<wsp:Policy wsu:Id="defaultBinding_policy">
  <wsp:ExactlyOne>
    <wsp:All>
      <wsoma:OptimizedMimeSerialization
        xmlns:wsoma="http://schemas.xmlsoap.org/ws/2004/09/policy/optimizedmimeserialization" />
    </wsp:All>
  </wsp:ExactlyOne>
</wsp:Policy>
总结
本文详细介绍了WCF中的绑定,以及如何使用绑定进行通信,自定义系统绑定以及在元数据中公开绑定。
Worktile,新一代简单好用、体验极致的团队协同、项目管理工具,让你和你的团队随时随地一起工作。完全免费,现在就去了解一下吧。
https://worktile.com

 每个服务终结点都包含一个地址Address、一个绑定Binding 和一个契约Contract。契约指定可用的操作,绑定指定如何与服务进行通信,而地址指定查找服务的位置,在WCF专题系列前5篇中,深入了解了WCF中寻址的细节;从本文开始,将深入了解经典“ABC”中的B,即绑定Binding,了解它的原理,如何使用绑定通信以及在元数据中如何公开。

 浙公网安备 33010602011771号