程序下载地址: https://files.cnblogs.com/TerryFeng/WF2.rar
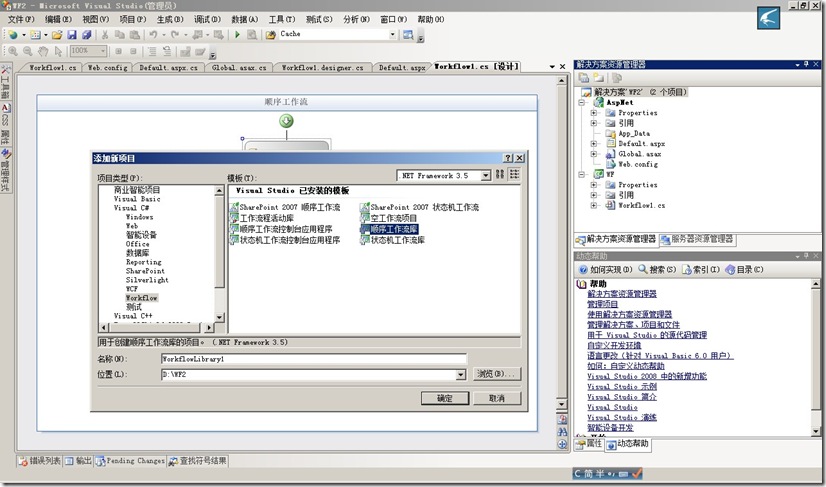
建立一个空的解决方案,向其中加入一个顺序工作流类库和一个Asp.Net Web 应用程序项目,结果如下图
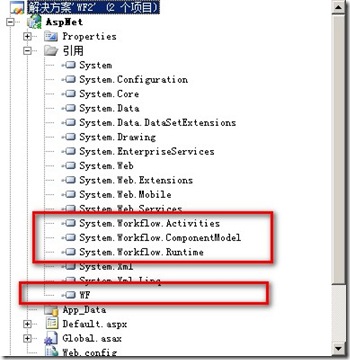
向asp.Net 程序中,添加引用,“WF”是工作流项目,如图
向Web.Config 中加入WF的注册(细节下载代码看一下)。
                    <section name="roleService" type="System.Web.Configuration.ScriptingRoleServiceSection, System.Web.Extensions, Version=3.5.0.0, Culture=neutral, PublicKeyToken=31BF3856AD364E35" requirePermission="false" allowDefinition="MachineToApplication" />
                </sectionGroup>
            </sectionGroup>
        </sectionGroup>

        <!--WF注册服务-->
        <section name="WorkflowRuntime" type="System.Workflow.Runtime.Configuration.WorkflowRuntimeSection, System.Workflow.Runtime, Version=3.0.0.0, Culture=neutral, PublicKeyToken=31bf3856ad364e35"/>
        <!--技术WF注册服务-->

    </configSections>

    <!--WF注册服务-->

    <WorkflowRuntime Name="WorkflowServiceContainer">
        <Services>
            <add type="System.Workflow.Runtime.Hosting.ManualWorkflowSchedulerService, System.Workflow.Runtime, Version=3.0.00000.0, Culture=neutral, PublicKeyToken=31bf3856ad364e35"/>
            <add type="System.Workflow.Activities.ExternalDataExchangeService, System.Workflow.Activities, Version=3.0.00000.0, Culture=neutral, PublicKeyToken=31bf3856ad364e35"/>

        </Services>
    </WorkflowRuntime>
    <!--结束注册服务-->


    <appSettings/>
    <connectionStrings/>
添加一个全局Global.asax 文件,添加如下代码
protected void Application_Start(object sender, EventArgs e)
       {

           WorkflowRuntime workflowRuntime = new WorkflowRuntime("WorkflowRuntime");
           workflowRuntime.StartRuntime();
           Application["WorkflowRuntime"] = workflowRuntime;


       }

       protected void Session_Start(object sender, EventArgs e)
       {
           WorkflowRuntime workflowRuntime = Application["WorkflowRuntime"] as WorkflowRuntime;
           workflowRuntime.StopRuntime();

       }
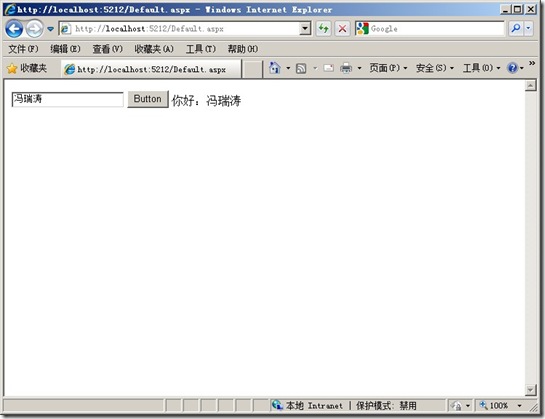
向Default.aspx中添加3个控件,Textbox,button,label ,双击Button为其添加单击事件,并在default.aspx.cs 中添加如下代码
using System;
using System.Collections.Generic;
using System.Linq;
using System.Web;
using System.Web.UI;
using System.Web.UI.WebControls;

using System.Workflow.Runtime;
using System.Workflow.Runtime.Hosting;
using System.Workflow.ComponentModel;
using System.Workflow.Activities;
namespace AspNet
{
    public partial class _Default : System.Web.UI.Page
    {
        string Result = string.Empty;
        protected void Page_Load(object sender, EventArgs e)
        {

        }

        protected void Button1_Click(object sender, EventArgs e)
        {
            StartWorkflow();
            Label1.Text = Result;
        }

        private void StartWorkflow()
        {
            WorkflowRuntime workflowRuntime = Application["WorkflowRuntime"] as WorkflowRuntime;


            ManualWorkflowSchedulerService scheduler = workflowRuntime.GetService(typeof(ManualWorkflowSchedulerService)) as ManualWorkflowSchedulerService;

            workflowRuntime.WorkflowCompleted += new EventHandler<WorkflowCompletedEventArgs>(workflowRuntime_WorkflowCompleted);

            Dictionary<String, Object> wfPara = new Dictionary<string, object>();

            wfPara.Add("Name", TextBox1.Text);

            WorkflowInstance workflowInstance = workflowRuntime.CreateWorkflow(typeof(WF.Workflow1), wfPara);

            workflowInstance.Start();

            scheduler.RunWorkflow(workflowInstance.InstanceId);
        }

        void workflowRuntime_WorkflowCompleted(object sender, WorkflowCompletedEventArgs e)
        {
            if (e.OutputParameters.ContainsKey("Result"))
            {
                Result = (string)e.OutputParameters["Result"];
            }

        }

    }
}
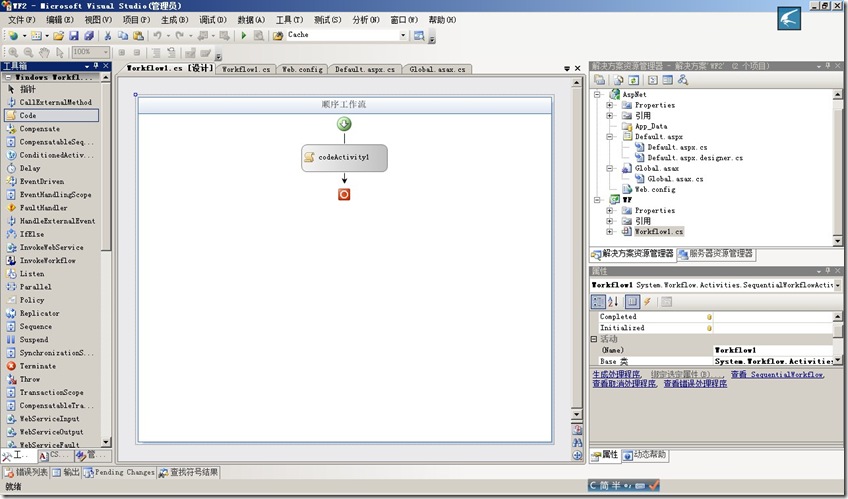
好了,下面,在WF项目中的Workflow1,拖入一个Code控件,如下图
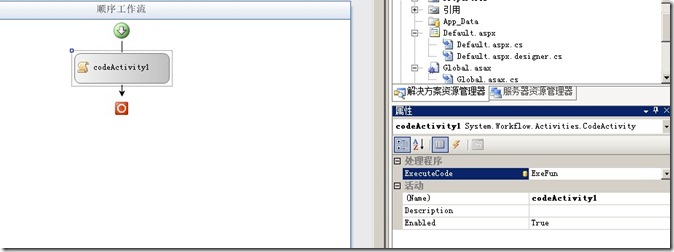
为CodeActivety1.添加事件代码,方法名字可以自己取,也可以用默认的,我这里用了一个Exefun的方法名,
代码如下
namespace WF
{
    public sealed partial class Workflow1 : SequentialWorkflowActivity
    {

        public string Name { get; set; }

        public string Result { get; set; }


        public Workflow1()
        {
            InitializeComponent();
        }

        private void ExeFun(object sender, EventArgs e)
        {
            Result = "你好:" + Name;
        }
    }

}
冯瑞涛




【推荐】国内首个AI IDE,深度理解中文开发场景,立即下载体验Trae
【推荐】编程新体验,更懂你的AI,立即体验豆包MarsCode编程助手
【推荐】抖音旗下AI助手豆包,你的智能百科全书,全免费不限次数
【推荐】轻量又高性能的 SSH 工具 IShell:AI 加持,快人一步
· 如何编写易于单元测试的代码
· 10年+ .NET Coder 心语,封装的思维:从隐藏、稳定开始理解其本质意义
· .NET Core 中如何实现缓存的预热?
· 从 HTTP 原因短语缺失研究 HTTP/2 和 HTTP/3 的设计差异
· AI与.NET技术实操系列:向量存储与相似性搜索在 .NET 中的实现
· 周边上新:园子的第一款马克杯温暖上架
· Open-Sora 2.0 重磅开源!
· 分享 3 个 .NET 开源的文件压缩处理库,助力快速实现文件压缩解压功能!
· Ollama——大语言模型本地部署的极速利器
· DeepSeek如何颠覆传统软件测试?测试工程师会被淘汰吗?