折腾了这么久,hbase终于装好了
-------------------------
上篇:
在安装之前,查了一下资料,关于hbase与hadoop兼容性的。
最开始看hadoop的时候,在好像慕课网上看的,hadoop全家桶之间的兼容性问题(以前被java web的各种jar包坑坏了的Java菜鸟,心理有点小阴影),还有特意出的cdh版本(Cloudera 公司出的,每个hadoop的cdh版本,都有对应的其他组件的cdh版本)
然后,感觉就坏了,我装的hadoop 3.0.1是最新出的,hbase的最新版本肯定对应不上啊。
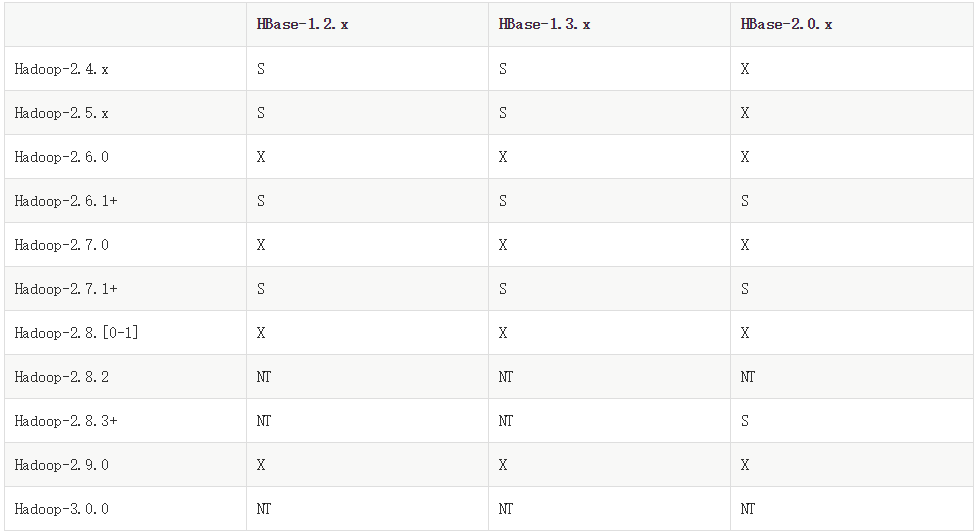
然后我就发现了下面这张,hbase 兼容hadoop的版本图:

"S" = supported

"X" = not supported

"NT" = Not tested
果然,hadoop3没有对应的hbase版本
下载最新的hbase2.0.2,查看lib目录发现hadoop 的版本是: 2.7.4

犹豫再三
突然想起,公司大神搭的新平台就是hadoop3,里面也有用到hbase,看下版本,得到如下答案:
hbase-1.2.6
what fuck? 看不懂,不过不影响,模仿一下。/偷笑/偷笑
然后就去官网: 下载地址 下个了1.2.6。
安装步骤如下:
1、上传安装包到服务器、解压,重命名:
tar -zxvf hbase-1.2.6-bin.tar.gz
mv hbase-1.2.6-bin.tar.gz hbase1.2.6
2、配置hbase环境变量
vi .baserc

#添加如下内容
#hbase
HBASE_HOME=/opt/hadoop/hbase1.2.6
export PATH=$HBASE_HOME/bin:$PATH
#使配置文件生效
source .baserc
3、修改 /conf/hbase-env.sh
找到如下两行,关闭注释,修改如下:
export JAVA_HOME=/opt/hadoop/jdk1.8  #配置jdk路径

#使用hbase自带的zookeeper
export HBASE_MANAGES_ZK=true
4、修改/conf/hbase-site.xml
添加如下内容:
 23 <configuration>
 24         <property>
 25         <name>hbase.rootdir</name> <!-- hbase存放数据目录 -->
 26         <value>hdfs://venn05:8020/hbase/hbase_db</value>
 27
 28           <!-- 端口要和Hadoop的fs.defaultFS端口一致-->
 29       </property>
 30       <property>
 31         <name>hbase.cluster.distributed</name> <!-- 是否分布式部署 -->
 32         <value>true</value>
 33       </property>
 34       <property>
 35         <name>hbase.zookeeper.quorum</name> <!-- zookooper 服务启动的节点,只能为奇数个 -->
 36         <value>venn05,venn06,venn07</value>
 37       </property>
 38
 39        <property><!--zookooper配置、日志等的存储位置,必须为以存在 -->
 40           <name>hbase.zookeeper.property.dataDir</name>
 41           <value>/opt/hadoop/hbase1.2.6/hbase/zookeeper</value>
 42        </property>
 43             <property><!--hbase web 端口 -->
 44             <name>hbase.master.info.port</name>
 45            <value>16010</value>
 46         </property>
 47 </configuration>
注:zookeeper有这样一个特性:集群中只要有过半的机器是正常工作的,那么整个集群对外就是可用的。
也就是说如果有2个zookeeper,那么只要有1个死了zookeeper就不能用了,因为1没有过半,
所以2个zookeeper的死亡容忍度为0;同理,要是有3个zookeeper,一个死了,还剩下2个正常的,
过半了,所以3个zookeeper的容忍度为1;
同理你多列举几个:2->0;3->1;4->1;5->2;6->2会发现一个规律,2n和2n-1的容忍度是一样的,
都是n-1,所以为了更加高效,何必增加那一个不必要的zookeeper
5、配置slaver
修改 regionservers 文件,删除localhost,添加region server 的ip
[hadoop@venn05 conf]$ more regionservers
venn06
venn07
venn08
5、发送.baserc 和hbase到其他节点
scp .bashrc venn06:/opt/hadoop/
scp .bashrc venn07:/opt/hadoop/
scp .bashrc venn08:/opt/hadoop/
scp -r hbase1.2.6 venn06:/opt/hadoop/
scp -r hbase1.2.6 venn07:/opt/hadoop/
scp -r hbase1.2.6 venn08:/opt/hadoop/
配置完成,启动看下效果
hbase 启动命令:
start-all.sh #启动hadoop
start-hbase.sh #会自动启动其他节点
查看主节点进程:
[hadoop@venn05 conf]$ jps
3072 NodeManager
5009 Jps
2180 NameNode
2533 SecondaryNameNode
3703 HMaster
4043 Main
2765 ResourceManager
3566 HQuorumPeer
查看其他节点进程:
[hadoop@venn06 ~]$ jps
2225 HQuorumPeer
2386 HRegionServer
2039 NodeManager
1913 DataNode
3262 Jps
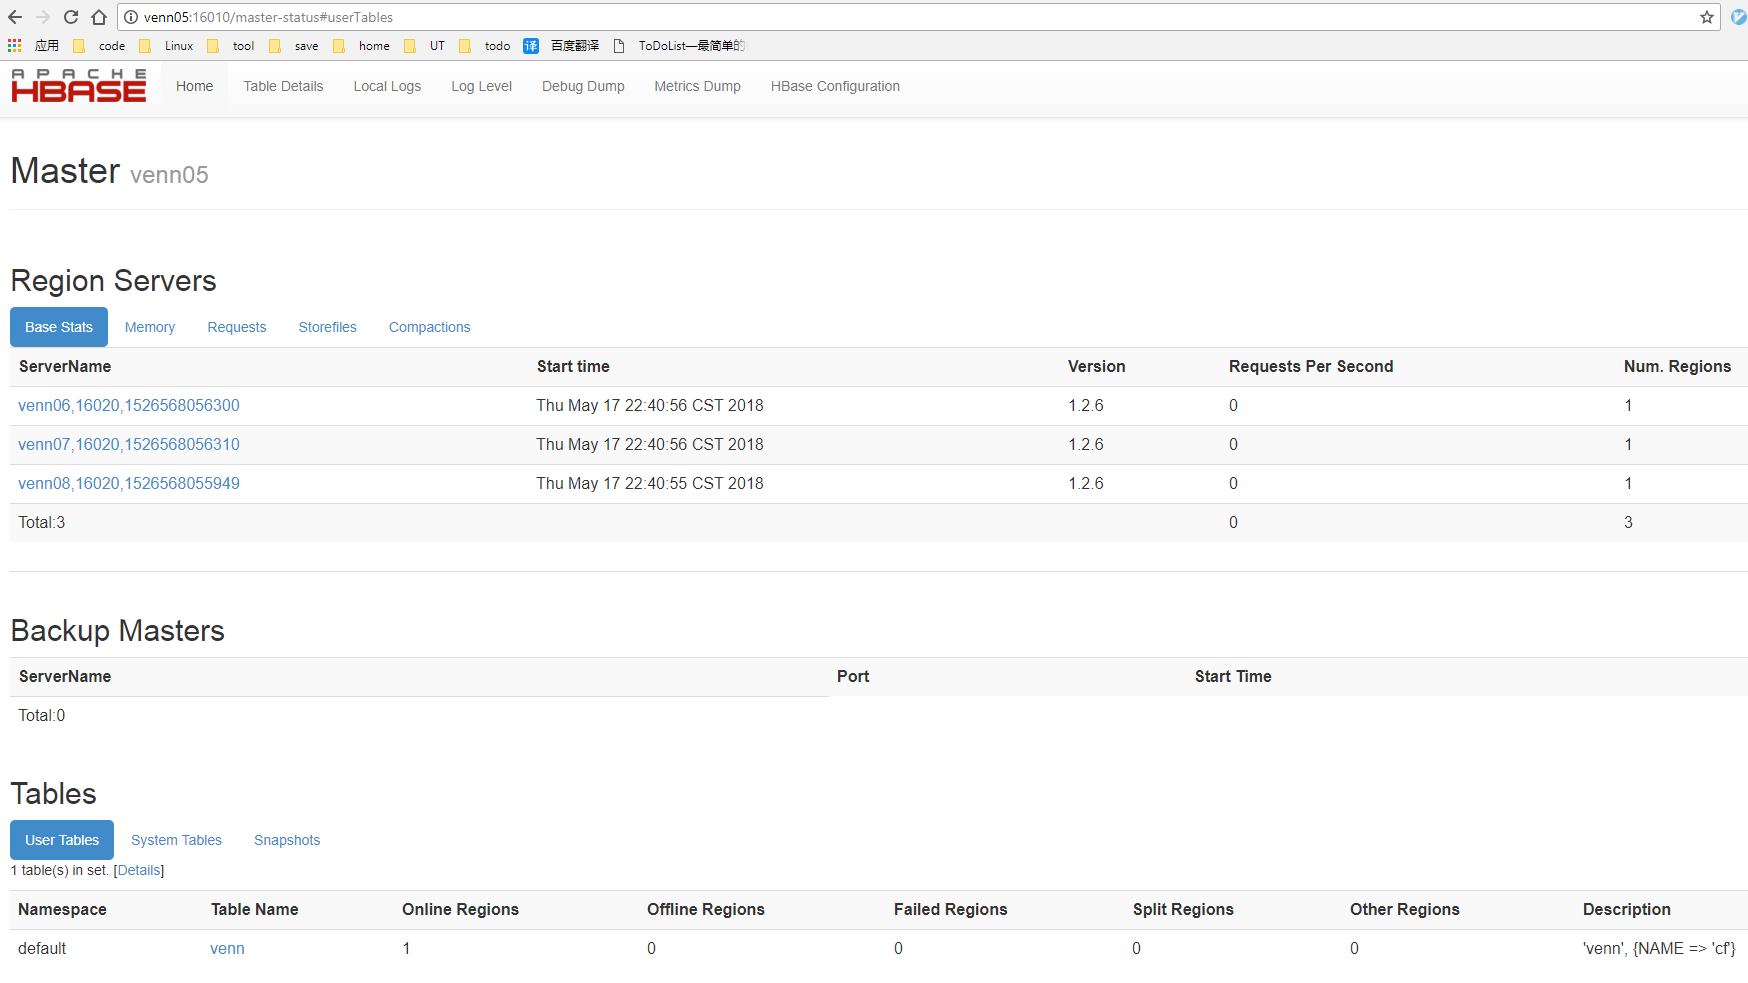
查看web界面:
地址:http://venn05:16010 如下:

启动成功,尝试一下:
启动hbase 客户端:
[hadoop@venn05 ~]$ hbase shell #启动hbase客户端
SLF4J: Class path contains multiple SLF4J bindings.
SLF4J: Found binding in [jar:file:/opt/hadoop/hbase1.2.6/lib/slf4j-log4j12-1.7.5.jar!/org/slf4j/impl/StaticLoggerBinder.class]
SLF4J: Found binding in [jar:file:/opt/hadoop/hadoop3/share/hadoop/common/lib/slf4j-log4j12-1.7.25.jar!/org/slf4j/impl/StaticLoggerBinder.class]
SLF4J: Found binding in [jar:file:/opt/hadoop/hive2.3.3/lib/log4j-slf4j-impl-2.6.2.jar!/org/slf4j/impl/StaticLoggerBinder.class]
SLF4J: See http://www.slf4j.org/codes.html#multiple_bindings for an explanation.
SLF4J: Actual binding is of type [org.slf4j.impl.Log4jLoggerFactory]
HBase Shell; enter 'help<RETURN>' for list of supported commands.
Type "exit<RETURN>" to leave the HBase Shell
Version 1.2.6, rUnknown, Mon May 29 02:25:32 CDT 2017
hbase(main):001:0> create 'test','cf' #创建一个test表,一个cf 列簇
0 row(s) in 2.4480 seconds
=> Hbase::Table - test
hbase(main):002:0> list #查看hbase 所有表
TABLE
test
venn
2 row(s) in 0.0280 seconds
=> ["test", "venn"]
hbase(main):003:0> put 'test','1000000000','cf:name','venn' #put一条记录到表test,rowkey 为 1000000000,放到 name列上
0 row(s) in 0.1650 seconds
hbase(main):004:0> put 'test','1000000000','cf:sex','male' #put一条记录到表test,rowkey 为 1000000000,放到 sex列上
0 row(s) in 0.0410 seconds
hbase(main):005:0> put 'test','1000000000','cf:age','26' #put一条记录到表test,rowkey 为 1000000000,放到 age列上
0 row(s) in 0.0170 seconds
hbase(main):006:0> count 'test' #查看表test 有多少条数据
1 row(s) in 0.1220 seconds
=> 1
hbase(main):007:0> get 'test','cf'
COLUMN CELL
0 row(s) in 0.0240 seconds
hbase(main):008:0> get 'test','1000000000' #获取数据
COLUMN CELL
cf:age timestamp=1526571007485, value=26
cf:name timestamp=1526571006326, value=venn
cf:sex timestamp=1526571006411, value=male
3 row(s) in 0.0250 seconds
hbase(main):009:0> disable 'test' #禁用表 test
0 row(s) in 2.2670 seconds
hbase(main):010:0> drop 'test' #删除表
0 row(s) in 1.2490 seconds
hbase(main):011:0> list
TABLE
venn
1 row(s) in 0.0100 seconds
=> ["venn"]
搞定,收工


【推荐】国内首个AI IDE,深度理解中文开发场景,立即下载体验Trae
【推荐】编程新体验,更懂你的AI,立即体验豆包MarsCode编程助手
【推荐】抖音旗下AI助手豆包,你的智能百科全书,全免费不限次数
【推荐】轻量又高性能的 SSH 工具 IShell:AI 加持,快人一步
· 如何编写易于单元测试的代码
· 10年+ .NET Coder 心语,封装的思维:从隐藏、稳定开始理解其本质意义
· .NET Core 中如何实现缓存的预热?
· 从 HTTP 原因短语缺失研究 HTTP/2 和 HTTP/3 的设计差异
· AI与.NET技术实操系列:向量存储与相似性搜索在 .NET 中的实现
· 周边上新:园子的第一款马克杯温暖上架
· Open-Sora 2.0 重磅开源!
· 分享 3 个 .NET 开源的文件压缩处理库,助力快速实现文件压缩解压功能!
· Ollama——大语言模型本地部署的极速利器
· DeepSeek如何颠覆传统软件测试?测试工程师会被淘汰吗?
2017-05-17 oracle 查看数据库版本