只不过它内部不会存储用户需要扫描的分辨率等信息,不过这种方法在与方便快捷,直接安装WIA控件到
Windows,直接在C#代码中编写就可以直接调用,不用自己编辑控件的属性等,很方便易用。
另外一种方式就是传统的TWIAN,因为很多扫描仪厂家都墨守陈规的遵循了TWAIN的潜规则,所以这种方法
也是得到了很多编程爱好者的欢迎,这个接口可以直接调用扫描仪厂家已经编写好的扫描窗口,可以实现在驱
动层获取到图片信息,而且这种方法的好处就是可以批量扫描,添加Kodak扫描控件后,也可以实现批量扫描
的功能,而且还提供图片编辑等功能。
WIA方法所需要的系统组件:
将wiaaut.dll复制到系统目录下的 WINDOWS\system32目录中,并且在CMD中运行安装:
C:\\windows\\system32\\RegSvr32 WIAAut.dll
将WIA安装成功后就可以直接使用。
Kodak方法所需要的系统组件:
imgadmin.ocx imgcmn.dll imgedit.ocx imgscan.ocx xiffr3_0.dll
imgshl.dll imgthumb.ocx imm32.dll jpeg1x32.dll tifflt.dll
jpeg2x32.dll oieng400.dll oiprt400.dll oislb400.dll oiui400.dll
oissq400.dll oitwa400.dll Run Kodak.bat
真正要用到的空间只有两个。不过,在扫描过程中,为了保证图片的编辑以及其他的操作不受影响,建议全部
安装,运行Run Kodak.bat注册所有的组件。
在Kodak的扫描组件中,我们需要的是imgscan.ocx、imgadmin.ocx、imgedit.ocx三个为主要的控件,其中
imgscan.ocx为Kodak的主要扫描组件。
所有的扫描组件都安装完毕之后,接下来就是在C#中添加扫描组件的调用,操作、获取扫描仪中的数据
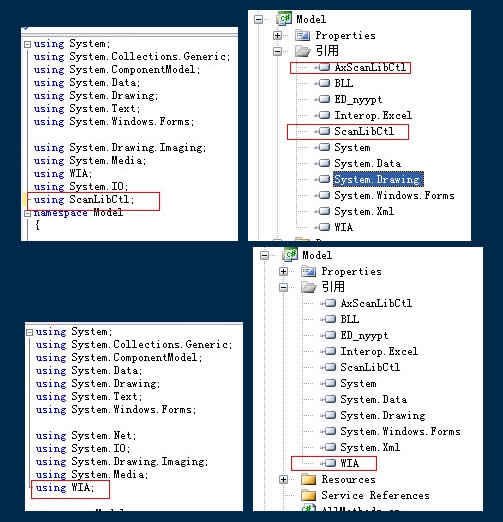
。在项目工程中,添加WIA引用以及Kodak组件的应用,Kodak属于工具类,所以在工具箱中还需要添加Kodak组
件工具。
添加完毕之后,实现通过WIA操作扫描仪的代码如下,在button下,可直接获取到扫描仪数据:
使用WIA扫描,还需要引用命名空间
using WIA;
下面是使用WIA扫描的代码:
try
{
DeviceManager manager = new DeviceManagerClass();
Device device = null;
foreach (DeviceInfo info in manager.DeviceInfos)
{
if (info.Type != WiaDeviceType.ScannerDeviceType)
continue;
device = info.Connect();
break;
}
Item item = device.Items[1];
CommonDialogClass cdc = new WIA.CommonDialogClass();
imageFile = cdc.ShowAcquireImage(WIA.WiaDeviceType.ScannerDeviceType,
WIA.WiaImageIntent.TextIntent,
WIA.WiaImageBias.MaximizeQuality, "{00000000-
0000-0000-0000-000000000000}", true, true, false);
//imageFile = cdc.ShowAcquireImage(WIA.WiaDeviceType.ScannerDeviceType,
WIA.WiaImageIntent.TextIntent,
// WIA.WiaImageBias.MaximizeQuality, "{B96B3CB0-
0728-11D3-9D7B-0000F81EF32E}", true, true, false);
if (imageFile != null)
{
var buffer = imageFile.FileData.get_BinaryData() as byte[];
using (MemoryStream ms = new MemoryStream())
{
ms.Write(buffer, 0, buffer.Length);
try
{
SealPicture.Image = Image.FromStream(ms);
}
catch { }
}
}
//ImageBuild();
}
catch
{
MessageBox.Show("请检查扫描仪是否连接正确!", "提示...", MessageBoxButtons.OK,
MessageBoxIcon.Stop);
}
使用Kodak扫描,需要拖放Kodak扫描控件到窗口程序中
添加Kodak的命名空间:
using ScanLibCtl;
下面是在button时间中的代码:
SealPicture.Image = null;
string paths = @"Temp/temp.jpg";
try
{
File.Delete(paths);
}
catch { }
int ll_rtn = axImgScan.OpenScanner(); //打开扫描仪
if (ll_rtn == 0)
{
if (axImgScan.ScannerAvailable() == true)//判断扫描仪是否可用
{
axImgScan.MultiPage = true;//是否多页
axImgScan.PageCount = axImgScan.PageCount + 1;
axImgScan.Image = paths;
axImgScan.FileType = FileTypeConstants.JPG_File;//设置文件类型
axImgScan.CompressionType = CompressionTypeConstants.JPEG;
axImgScan.ScanTo = ScanToConstants.FileOnly;
axImgScan.SetPageTypeCompressionOpts(CompPreferenceConstants.GoodDisplay,
ImageTypeConstants.ColorPal4Bit, CompTypeConstants.JPEGCompression,
CompInfoConstants.JPEGHighHigh);//.G31DFaxRBO);
axImgScan.StopScanBox = false;
axImgScan.ShowSetupBeforeScan = true;//是否在扫描前显示设置界面
axImgScan.Show();
ll_rtn = axImgScan.StartScan();//开始扫描
//以文件流的形式读取图片文件并释放,以便下一次扫面前删除文件
try
{
FileStream Files = new FileStream(paths, FileMode.Open);
Image Picture = Image.FromStream(Files);
SealPicture.Image = Picture;
Files.Close();
}
catch { }
if (ll_rtn == 9254 || ll_rtn == 0) { }
else
{
MessageBox.Show("扫描仪没有正确连接或扫描控件已破坏,请检查!", "系统提
示...", MessageBoxButtons.OK, MessageBoxIcon.Stop);
}
axImgScan.CloseScanner(); //关闭扫描仪
}
else
{
MessageBox.Show("扫描仪没有正确连接,请重新设置!", "系统提示...",
MessageBoxButtons.OK, MessageBoxIcon.Exclamation);
}
}
else if (ll_rtn == 9219)
{
MessageBox.Show("系统没有安装扫描仪或扫描仪没有正确连接!", "系统提示...",
MessageBoxButtons.OK, MessageBoxIcon.Exclamation);
}
完成这些代码的编写,也就可以完成了通过调用WIA与Kodak两个扫描组件对扫描议的调用,获取扫描仪中
的图片数据。
以上使用到的WIA组件以及Kodak组件的下载地址:
WIA组件:http://img.namipan.com/downfile/1b8e49e6a1e9694614559bcb6b1784bb48d99fae66ab0700/WIA组
件.rar
Kodak组件:
http://img.namipan.com/downfile/7476c7fcd7087b114474eec37a4cf5ef64d9f487980d0b00/Kodak组件.rar
下面是项目代码中的截图:


 浙公网安备 33010602011771号