UIButton的titleEdgeInsets属性和imageEdgeInsets属性实现图片文字按要求排列
button可以设置 titleEdgeInsets属性和 imageEdgeInsets属性来调整其image和label相对位置,具体参考http://stackoverflow.com/questions/4564621/aligning-text-and-image-on-uibutton-with-imageedgeinsets-and-titleedgeinsets/5358259#5358259的第二个答案,关键是这个:

这里说说我自己的理解,理解有误的地方,大家可以讨论
前提:这是在button的frame足够显示image和label内容的情况下,如果frame不够,图片或者文字会被压缩(demo的button是xib上画的,所以大小刚刚好
2016.4.1更新:在xib或者storyboard上画的button,如果勾选了autolayout而不设置任何约束的话,系统会自动给button加上约束,
而且加上的约束是根据其在xib上的frame加的,这个约束会导致你重新设置title或者image button的大小也不会变;
所以建议还是提前设置好约束,对于button或者label来说,因为有intrinsicSize的存在,所以可以不设置宽高,只设置相对于其他空间的位置)
前置知识点:titleEdgeInsets是title相对于其上下左右的inset,跟tableView的contentInset是类似的,
如果只有title,那它上下左右都是相对于button的,image也是一样;
如果同时有image和label,那这时候image的上左下是相对于button,右边是相对于label的;title的上右下是相对于button,左边是相对于image的。
我写了个demo来说明怎么设置这两个属性以达到自己想要的效果:https://github.com/Phelthas/Demo_ButtonImageTitleEdgeInsets
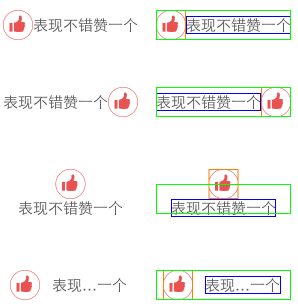
看效果图来说明一下:

其中,右边的是给对应的左边的button及button.imageView, button.titleLabel加上边框的效果
默认情况下,button的image和label是紧贴着居中的,
那如果想要image在右边,label在左边应该怎么办呢?
答案就是:
self.oneButton.imageEdgeInsets = UIEdgeInsetsMake(0, labelWidth, 0, -labelWidth);
self.oneButton.titleEdgeInsets = UIEdgeInsetsMake(0, -imageWith, 0, imageWith);
来解释一下为什么:
其实就是这一句:This property is used only for positioning the image during layout
其实titleEdgeInsets属性和 imageEdgeInsets属性只是在画这个button出来的时候用来调整image和label位置的属性,并不影响button本身的大小(这个看第三排的图比较明显),
它们只是image和button相较于原来位置的偏移量,那什么是原来的位置呢?就是 这个没有设置edgeInset时候的位置了。
 这个没有设置edgeInset时候的位置了。
如要要image在右边,label在左边,那image的左边相对于button的左边右移了labelWidth的距离,image的右边相对于label的左边右移了labelWidth的距离
所以,self.oneButton.imageEdgeInsets = UIEdgeInsetsMake(0, labelWidth, 0, -labelWidth);为什么是负值呢?因为这是contentInset,是偏移量,不是距离
同样的,label的右边相对于button的右边左移了imageWith的距离,label的左边相对于image的右边左移了imageWith的距离
所以self.oneButton.titleEdgeInsets = UIEdgeInsetsMake(0, -imageWith, 0, imageWith);
这样就完成image在右边,label在左边的效果了。
第三排,image在上,label在下
同样的第三排调整前的还是第一排的样子,
跟第一排比起来,image的中心位置向右移动了 CGFloat imageOffsetX = (imageWith + labelWidth) / 2 - imageWith / 2;
上向上移动了 CGFloat imageOffsetY = imageHeight / 2;
所以self.twoButton.imageEdgeInsets = UIEdgeInsetsMake(-imageOffsetY, imageOffsetX, imageOffsetY, -imageOffsetX);
label的中心位置像左移动了CGFloat labelOffsetX = (imageWith + labelWidth / 2) - (imageWith + labelWidth) / 2;
向下移动了CGFloat labelOffsetY = labelHeight / 2;
所以self.twoButton.titleEdgeInsets = UIEdgeInsetsMake(labelOffsetY, -labelOffsetX, -labelOffsetY, labelOffsetX);
然后就大功告成了,现在已经完美实现一个button内image在上,label在下,且居中了
2016.4.1更新
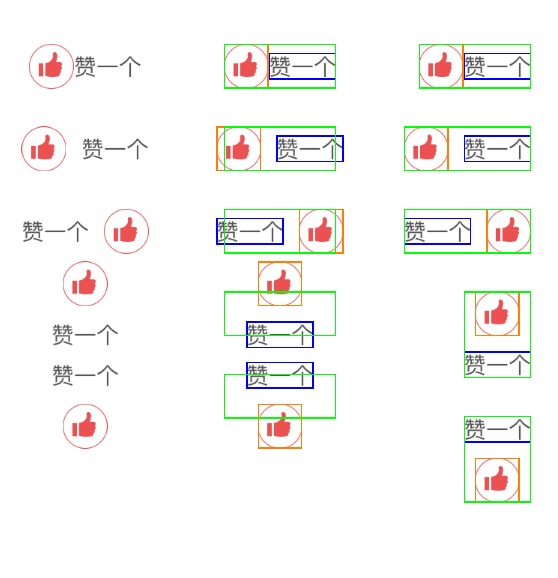
根据stackoverflow 上的解释,加入contentInset的考虑,可以很好的解决intrinsicSize的问题,效果如图:

其中约束是:
左边一列左对齐,上下间隔25
中间一列居中对齐,上下间隔25
右边一列右对齐,上下间隔25
全部不设置宽高,用button的intrinsicSize来确定大小
左边一列和中间一列是只设置了titleEdgeInsets属性和imageEdgeInsets的效果;
右边一列是追加了contentInset的效果;
button的可主控范围是绿色框框内的部分,在模拟器上可以试试,点击不在绿色框框内的部分button是不会有响应的。
为什么呢?还是文章最上面的那句,titleEdgeInsets属性和imageEdgeInsets只是用来设置title和image的位置,但是系统不会用它们来计算button的intrinsicSize;
button是用contentInset来计算其intrinsicSize的大小的!!!
所以右边一列是更好的,可以比完美的配合autoLayout;
另:这个用button自身属性来实现图片文字自由排列的方法已经封装成一个分类,而且已经支持cocoaPods了
只需要一行代码,就可以实现右边一列的效果:
[self.twoButton_line setImagePosition:LXMImagePositionTop spacing:10];
欢迎使用~~


