
FutureTask源码解析
两种构造方式:
1. public FutureTask(Callable<V> callable) {
        if (callable == null)
            throw new NullPointerException();
        this.callable = callable;
        this.state = NEW;       // ensure visibility of callable
    }

// 可以传runnable,但是因为是void run(),所以想要有结果返回需要特殊处理,即传个准备接收结果的东西进来
2. public FutureTask(Runnable runnable, V result) {
        this.callable = Executors.callable(runnable, result);
        this.state = NEW;       // ensure visibility of callable
    }
一、一个FutureTask为什么三种构造能放到一个线程中执行?
//FutureTask实现了RunnableFuture接口 public class FutureTask<V> implements RunnableFuture<V>
我们看下RunnableFuture接口,继承了Runnbale和Future接口,所以可以放在线程中执行。
//RunnableFuture接口继承了Runnable和Future接口。
public interface RunnableFuture<V> extends Runnable, Future<V> {
    /**
     * Sets this Future to the result of its computation
     * unless it has been cancelled.
     */
    void run();
}
二、在一个线程中如何调用Callable方法?
一个小例子:RealData1实现了Callable接口,同时模拟了一个费时操作。


class RealData1 implements Callable<String>{
    private String para;

    RealData1(String para) {
        this.para = para;
    }

    @Override
    public String call() throws Exception {
        StringBuilder sb = new StringBuilder();
        for (int i = 0; i < 10; i++) {
            sb.append(para);
        }
        try {
            // 这里使用sleep,模拟很慢的构造RealData过程
            Thread.sleep(4000);
        } catch (InterruptedException e) {
            e.printStackTrace();
        }
        return sb.toString();
    }
}
Main方法:
import java.time.LocalTime;
import java.util.concurrent.*;

public class FutureMainJDK {
    public static void main(String[] args){
        // future本身是一个runnable
        FutureTask<String> future = new FutureTask<>(new RealData1("a"));
        new Thread(future).start();

        System.out.println("请求完成");
        try {
            // 这里代表其他任意操作
            System.out.println(LocalTime.now());
            Thread.sleep(2000);
            System.out.println(LocalTime.now());
        } catch (InterruptedException e) {
            e.printStackTrace();
        }
        try {
            System.out.println("数据=" + future.get());
            System.out.println(LocalTime.now());
        } catch (InterruptedException | ExecutionException e) {
            e.printStackTrace();
        }
    }
}
我们知道,起一个线程,它执行的是起线程的对象的run方法,那我们来看一下FutureTask的run方法。
public void run() {
        if (state != NEW ||
            !UNSAFE.compareAndSwapObject(this, runnerOffset,
                                         null, Thread.currentThread()))
            return;
        try {
            Callable<V> c = callable;
            if (c != null && state == NEW) {
                V result;
                boolean ran;
                try {
                    //注意这里,实现Callable接口,有这个call方法。
                    result = c.call();
                    ran = true;
                } catch (Throwable ex) {
                    result = null;
                    ran = false;
                    setException(ex);
                }
                if (ran)
                    set(result);
            }
        } finally {
            // runner must be non-null until state is settled to
            // prevent concurrent calls to run()
            runner = null;
            // state must be re-read after nulling runner to prevent
            // leaked interrupts
            int s = state;
            if (s >= INTERRUPTING)
                handlePossibleCancellationInterrupt(s);
        }
    }
好,果然,可以看到FutureTask的run方法里调用了call(),也就是说线程通过FutureTask的run方法,来调用Callable的call方法,call方法真正的实现在实现Callable接口的类中。
三、如何拿到FutureTask返回的结果呢?
get方法:
public V get() throws InterruptedException, ExecutionException {
        int s = state;
        if (s <= COMPLETING) //通过状态位判断完成否
            s = awaitDone(false, 0L);
        return report(s);
}
awaitDone
 private int awaitDone(boolean timed, long nanos)
        throws InterruptedException {
        //可以看到是可以设置等待的超时时间的,咱们现在没设
        final long deadline = timed ? System.nanoTime() + nanos : 0L;
        WaitNode q = null;
        boolean queued = false;
        for (;;) {
            if (Thread.interrupted()) {
                //如果当前线程被中断,则把包含本线程的等待节点移除
                removeWaiter(q);
                throw new InterruptedException();
            }

            //不断的来获取当前的状态位state大小,只有大于COMPLIING时才返回
            //注意一下,这里状态位的设置是在run方法里调用的set方法设置的,下面贴出来
            int s = state;
            if (s > COMPLETING) {
                if (q != null)
                    q.thread = null;
                return s;
            }
            else if (s == COMPLETING) // cannot time out yet
                Thread.yield();
            else if (q == null)
                q = new WaitNode();
            else if (!queued)
                queued = UNSAFE.compareAndSwapObject(this, waitersOffset,
                                                     q.next = waiters, q);
            else if (timed) {
                nanos = deadline - System.nanoTime();
                if (nanos <= 0L) {
                    removeWaiter(q);
                    return state;
                }
                LockSupport.parkNanos(this, nanos);
            }
            else
                //不断的循环相当于做了一个自旋锁,会park当前线程
                LockSupport.park(this);
        }
    }
run方法里调用的set方法,分为三个步骤:
① 先将状态位设为COMPLETING,把call方法的结果放到outcome里
②将state状态位设为NORMAL
③finishCompletion,完成通知,实际上就是unpark,下面会细说这里。
 protected void set(V v) {
     if (UNSAFE.compareAndSwapInt(this, stateOffset, NEW, COMPLETING)) {
           outcome = v;
           UNSAFE.putOrderedInt(this, stateOffset, NORMAL); // final state
           finishCompletion();
     }
}
好,做完上面这些分析,我们已经能够理解FutureTask怎么跑起来和怎么拿到任务,注意一下get方法会阻塞调用线程,没拿到结果之前,他就一直Park着,那么接下来的问题就是:
四、什么时候unpark了阻塞线程?
看看上面的set方法,调用了finishCompletion(),这其实就是那个unpark。
private void finishCompletion() {
        // assert state > COMPLETING;
        // 通知所有的WaitNode,可以unpark了
        for (WaitNode q; (q = waiters) != null;) {
            if (UNSAFE.compareAndSwapObject(this, waitersOffset, q, null)) {
                for (;;) {
                    Thread t = q.thread;
                    if (t != null) {
                        q.thread = null;
                        //注意这里,unpark了
                        LockSupport.unpark(t);
                    }
                    WaitNode next = q.next;
                    if (next == null)
                        break;
                    q.next = null; // unlink to help gc
                    q = next;
                }
                break;
            }
        }

        done();

        callable = null;        // to reduce footprint
    }
cancel方法也会调用这个finishCompletion。
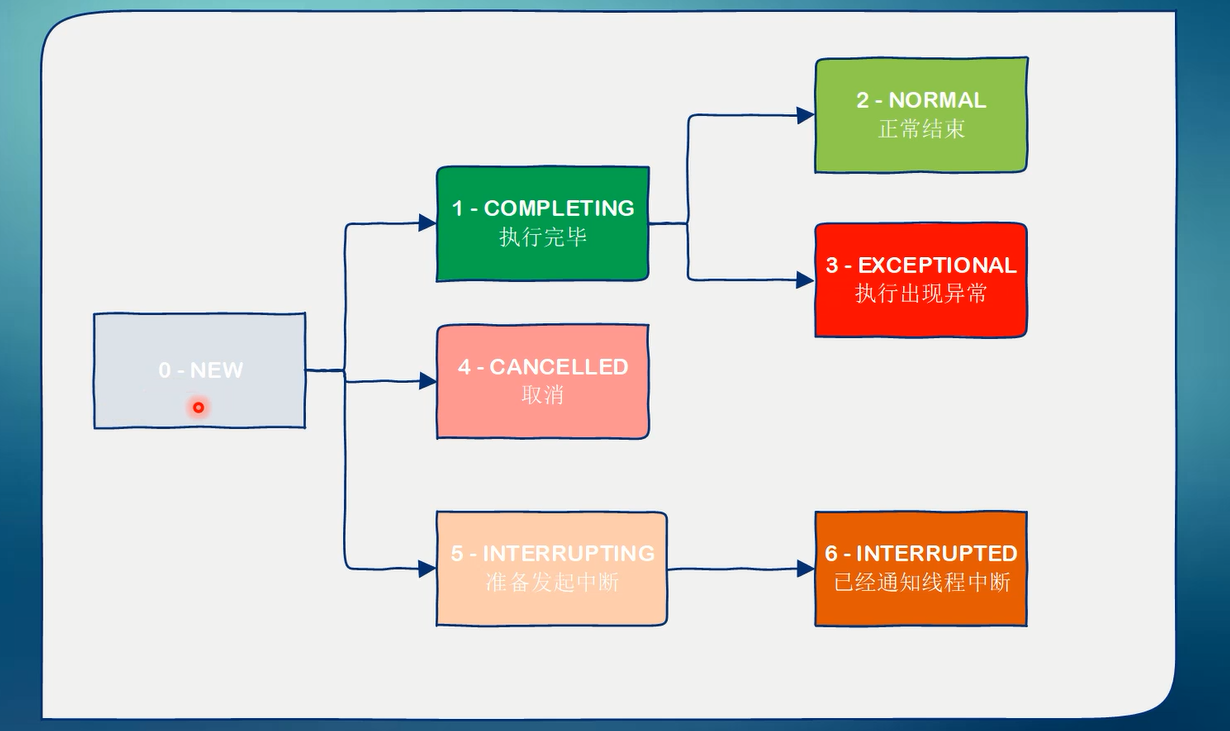
最后上个状态变化图

 浙公网安备 33010602011771号