eclipse的ssh框架详解
1、创建项目
2、导包
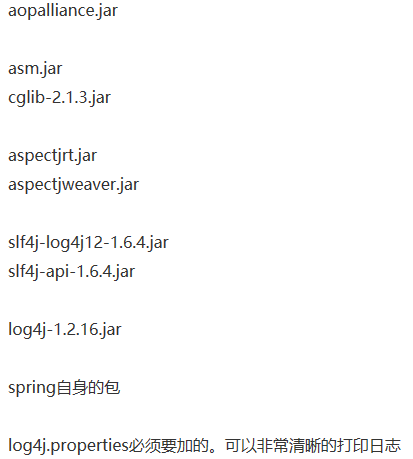
1.1:导入Struts2可能用到的包:
先从网站下载
再这里找出 ,打开它把WEB-INF/lib/下的所有包导入项目

1.2:导入spring可能用到的包:
先从网站下载
再打开把
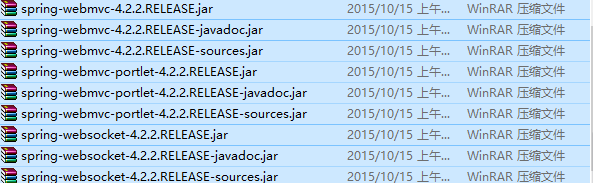 和所有以"javadoc.jar"、"sources.jar"结尾的jar包如
 都不用管,其余的都导入项目中
要想Struts2与spring整合,还得导入 这两个jar包
这两个jar包可以自己在百度搜索找到或者从的 中WEB-INF/lib/下找
1.3:导入hibernate可能用到的包:
先从网站下载
把required目录下的包都导入项目中

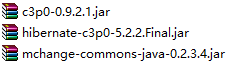
还有一个数据库池的包,如果是c3p0,那么可以在的\lib\optional\c3p0找,
如果是dbcp,那么你可以上网下载或在Struts2的包下也有(自己找)

最后别忘了导入你对应你数据库的包哟
2、写web.xml配置文件加入Struts2(过滤器)和spring(监听器)
这份要看你的版本(一般是从空白项目中把头部信息拷贝过来的)
<web-app xmlns:xsi="http://www.w3.org/2001/XMLSchema-instance"
xmlns="http://xmlns.jcp.org/xml/ns/javaee"
xsi:schemaLocation="http://xmlns.jcp.org/xml/ns/javaee http://xmlns.jcp.org/xml/ns/javaee/web-app_3_1.xsd"
id="WebApp_ID" version="3.1">
<!-- struts过滤器的开始 -->
<filter>
<filter-name>struts2</filter-name>
<filter-class>org.apache.struts2.dispatcher.ng.filter.StrutsPrepareAndExecuteFilter</filter-class>
</filter>
<filter-mapping>
<filter-name>struts2</filter-name>
<url-pattern>/*</url-pattern>
</filter-mapping>
<!-- spring的监听器配置开始 -->
<context-param>
<param-name>contextConfigLocation</param-name>
<param-value>classpath:applicationContext.xml</param-value>
</context-param>
<listener>
<listener-class>org.springframework.web.context.ContextLoaderListener</listener-class>
</listener>
3、写struts.xml配置文件
头部信息
<!DOCTYPE struts PUBLIC
"-//Apache Software Foundation//DTD Struts Configuration 2.3//EN"
"http://struts.apache.org/dtds/struts-2.3.dtd">
有些老版本若想spring的配置文件和Struts2的配置文件整合要加上一句
<constant name="struts.objectFactory" value="spring" />
然后写action类一般都要继承 ActionSupport 如下:


接着写action的配置信息
4、写appliCation.xml配置文件
写从找一份appliCation.xml模板文件,也就是写下面这堆东西
<beans xmlns="http://www.springframework.org/schema/beans"
xmlns:xsi="http://www.w3.org/2001/XMLSchema-instance"
xmlns:p="http://www.springframework.org/schema/p"
xmlns:aop="http://www.springframework.org/schema/aop"
xmlns:context="http://www.springframework.org/schema/context"
xmlns:jee="http://www.springframework.org/schema/jee"
xmlns:tx="http://www.springframework.org/schema/tx"
xsi:schemaLocation="
http://www.springframework.org/schema/aop http://www.springframework.org/schema/aop/spring-aop-4.2.xsd
http://www.springframework.org/schema/beans http://www.springframework.org/schema/beans/spring-beans-4.2.xsd
http://www.springframework.org/schema/context http://www.springframework.org/schema/context/spring-context-4.2.xsd
http://www.springframework.org/schema/jee http://www.springframework.org/schema/jee/spring-jee-4.2.xsd
http://www.springframework.org/schema/tx http://www.springframework.org/schema/tx/spring-tx-4.2.xsd">
接着写你的<bean>如下

接着写数据库池dbcp或者c3p0与sessionFactory(一般都用c3p0而不用dbcp)
要看源码的朋友可以去看以下的类文件路径
sessionFactory的类文件路径spring-orm-4.2.2.RELEASE.jar/org.springframework.orm.hibernate5.LocalSessionFactoryBean.class
c3p0的类文件路径hibernate-release-5.2.2.Final\lib\optional\c3p0\c3p0-0.9.2.1.jarcom.mchange.v2.c3p0.ComboPooledDataSource.class
dbcp的类文件路径F:\二学期的\ssh\s2sh的库\dbcp\commons-dbcp-1.4.jar\org.apache.commons.dbcp.BasicDataSource.class
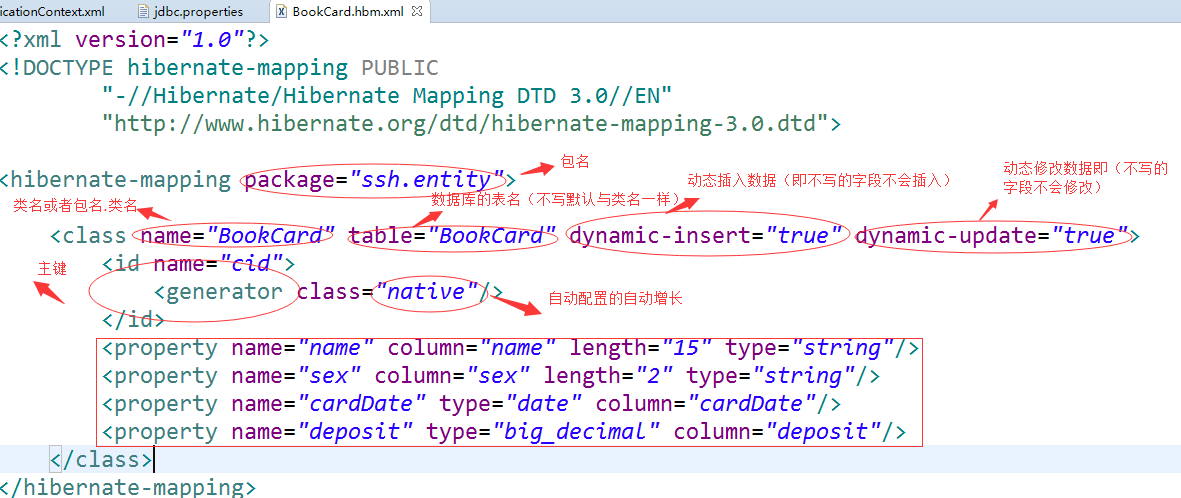
接着下面是一份关于数据库信息的配置文件:(之所以要这样写是为了以后方面维护的时候误删了重要的东西,所有要区分开)
注意:要想能读取这份配置文件,那么必须在applicationContext.xml里面加一句话


下面这是c3p0的配置文件

下面这是dbcp的配置文件(一般不用它,所有就不多说了)

下面这是sessionFactory的配置文件
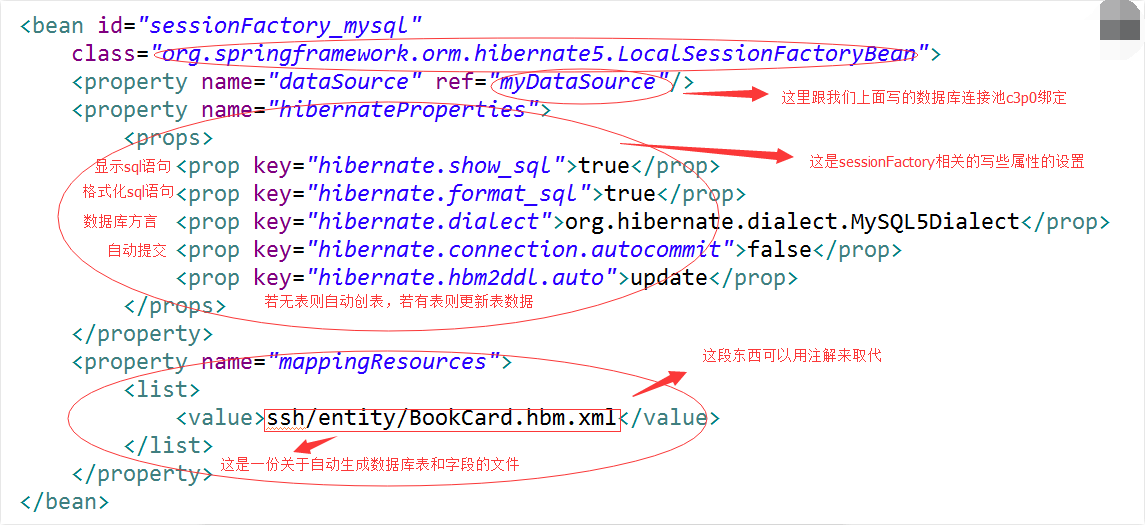
下面也给大家看看这份配置文件吧
sessionFactory都做完之后,我们就那些要用到它的类注入了:比如说daoImpl包下的类,serviceImpl包下的类等等都有可以用到它
当然还可以加个事务管理器(要加相关的一些jar包)
首先实例化一个事务管理器

然后建立一个通知
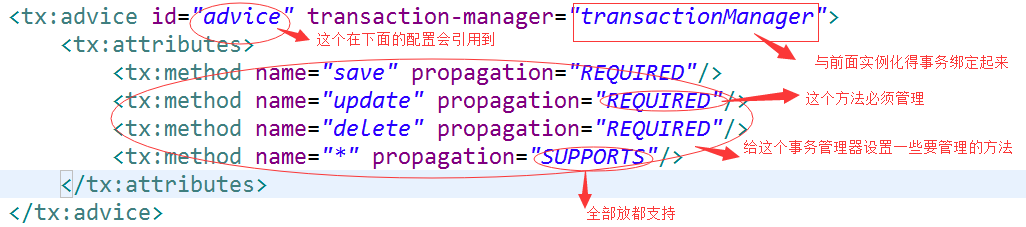
最后给它配一个切面表达式

做完这些,一个ssh框架就基本完成了,不过为了规范,还要把对应的包建好,有助于你写代码。如:
 这是最基本的包(小项目可以用这样分)
 大点项目一般就分得更细了,有助于我们阅读
