(文/馒头)
本篇文章针对Controls控件里封装的自定义WEB控件一一说明。
1.LRepeater:基于Repeater的扩展控件
前台使用如下:
除了Repeater自身的属性外,扩展了以下功能:
(1) VirtualPage,虚拟分页,
当一次性从数据库读取所有的记录,然后让LRepeater自己分页,那么需要将VirtualPage设置为"false";
如果数据库里已做分页处理,那么VirtualPage则必须为"true";
如果需要显示所有的数据,不管有无分页,则直接将VirtualPage设置为"true"。
(2)SORT,排序字段
Sort表示默认的排序方式,这个需要配合OnSortEvent一起使用,当多个字段排序时,采用Name_Age_Height 的方式,用下划线将多个字段连接起来。
(3)OrderBy,排序方向
OrderBy="1"表示倒序,DESC方向;OrderBy="0"表示顺序,即ASC方向。
(4)OnSortEvent,排序事件
后台代码如下:
{
ListBind();
}
ListBind():
PageModel pmodel = new PageModel
{
TableName = "UserList",
ReturnFields = "*",
Where = strwhere,
PageSize = this.AspNetPager1.PageSize,
PageIndex = this.AspNetPager1.CurrentPageIndex,
Orderfld = this.repeaterlist.SORT,
OrderType = this.repeaterlist.OrderBy
};
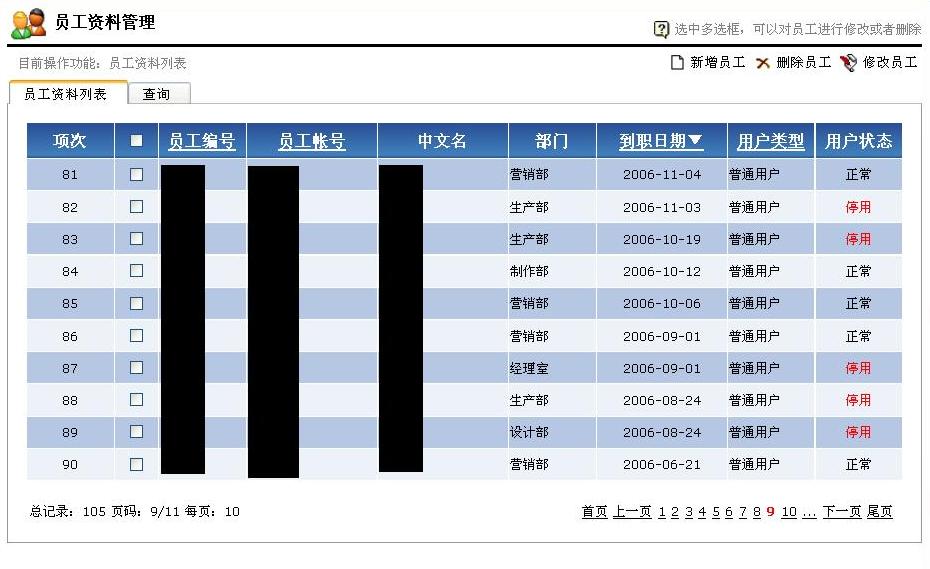
前台,采用LReapeater里面的<asp:linkbutton />控件进行触发OnSort事件,一般情况下,LReapeater需要与AspNetPage配合使用。
相信大家都明白repeater做数据控件的优点和缺点,本人比较赞同采用repeater,因为可以很好管理显示的格式。
示例图片(LReapeater + AspNetPage):

2.AspNetPage:分页控件
本分页控件的源码直接复制网上的AspNetPage代码,为了使用方便,没有单独使用,而是和其他控件封装到一起。
前台代码如下:
后台代码如下:
{
ListBind();
}
private void ListBind()
{
PageModel pmodel = new PageModel
{
TableName = "inventorylist",
ReturnFields = "*",
PageSize = this.AspNetPager1.PageSize,
PageIndex = this.AspNetPager1.CurrentPageIndex,
Orderfld = "PartNo",
OrderType = 0
};
pmodel.Where = "Where [Type] = '" + type + "'";
this.repeaterlist.CurrentPageIndex = this.AspNetPager1.CurrentPageIndex - 1;
this.repeaterlist.DataSource = new DataMapper("base").GetPagedDataTable(pmodel).DefaultView;
this.repeaterlist.DataBind();
this.AspNetPager1.RecordCount = pmodel.RecordCount;
}
3.HeadMenuControl:页面顶部信息菜单控件
本控件是采用博客园里一同学的开源控件,在它的技术上进行了封装,扩展了两个功能,
(1)Tab标签:
Tab的数据与WebTabControl配合使用,当Tab页切换时,按钮也会更这切换,这样在多个Tab页时,按钮不会相互冲突。
(2)OnCommand事件:
HeadMenuButtonItem按钮可以触发Command事件,使此控件成为真正的WebForm控件,只有ButtonUrlType= "Command"时,才会触发Command事件。
ButtonUrlType目前有四种方式:Command,URL,Javascript,VBScript。
ButtonPopedom为功能按钮,这个与权限系统进行天衣无缝的配合。只有拥有此权限的身份访问页面时,才会显示操作按钮。
其他的比较简单,一看就知道了。
前台代码如下:
ButtonList-Capacity="4" OnCommand="HeadMenuWebControls1_Command" HeadOPTxt="库存报表" HeadTitleTxt="库存报表" HeadHelpTxt="库存报表">
<kilo:HeadMenuButtonItem ButtonPopedom="Print" Tab="0" ButtonIcon="xls.gif" ButtonUrlType="Command" CommandName="excel" ButtonName="导出当前库存" ButtonVisible="true" />
<kilo:HeadMenuButtonItem ButtonPopedom="Print" Tab="1" ButtonIcon="xls.gif" ButtonUrlType="Command" CommandName="detail" ButtonName="导出当前明细" ButtonVisible="true" />
</kilo:HeadMenuWebControls>
后台代码如下:
{
switch(e.CommandName)
{
case "detail":
iPage.DataTable2Excel(this.LoadDataTable2(), "当前明细");
break;
case "excel":
iPage.DataTable2Excel(this.LoadDataTable(), "当前库存");
break;
}
}
示例图片:
4.WebTabControl,Tab切换页控件:
此控件源码同上,在其基础上增加了控件HeadMenuWebControls里的按钮关联显示功能,使操作更加具有人性化。使用也非常简单,不再多说。
示例图片:
整体效果:
点此返回:基于ORM的快速开发框架
网名:@"老舟"
兴趣:@"影音,阅读"
动态:@"系统架构设计,Android通信模块开发"
网址:@"http://kilonet.cnblogs.com"
签名:@"--------------------------------------------------
Stay Hungry , Stay Foolish
求 知 若 渴,处 事 若 愚
--------------------------------------------------"
]; // Never Release


