[Silverligt技巧][转]如何让TextBlock文本竖排
Silverlight提供的TextBlock 用于基本的文本显示. 通常状态下,TextBlock文本都是横排状态.但是,有的时候,我们需要文本竖排以满足我们的需求. 下面介绍一下两种方法:
方法一: 使用TextWrapping = Wrap
TextBlock的TextWrapping属性用于获取或设置TextBlock对文本的换行方式,它有两个枚举值:NoWrap和Wrap.Wrap表示允许TextBlock当文本的长度超过TextBlock的ActualWith时,文本自动换行.这个属性给我们一点启示:我们可以设置TextWrapping = Wrap,并设定TextBlock的With来实现我们的效果.
例如:
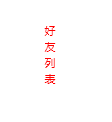
<TextBlock TextAlignment="Center" TextWrapping="Wrap" Text="好友列表" Width="12" Foreground="Red"/>
效果:

但是,这个方法有一个缺点,就是你需要设置好TextBlock.的with属性和文本字体大小的比例. 例如,我们将依旧设置成width = 12, FontSize =20,即:
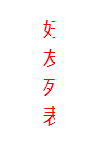
<TextBlock TextAlignment="Center" TextWrapping="Wrap" Text="好友列表" Width="12" Foreground="Red" FontSize="20" />
得到的效果:

很明显文字有被遮挡,因此,如果再给字体添加一个粗体的属性,那遮挡效果更明显.于是,寻求另一中方法.
方法二:自定义一个继承与Control的类,命名为VerticalTextBlock.
该类公布一个TextProperty属性,并自定义控件模板,在模板中添加一个TextBlock,TextBlock的Text内容由一系列带有换行符的字符组成.该类也重写模板应用方法.代码如下:
 VerticalTextBlock
{
public VerticalTextBlock()
{
IsTabStop = false;
var templateXaml =
@"<ControlTemplate " +
#if SILVERLIGHT
"xmlns='http://schemas.microsoft.com/client/2007' " +
#else
"xmlns='http://schemas.microsoft.com/winfx/2006/xaml/presentation' " +
#endif
"xmlns:x='http://schemas.microsoft.com/winfx/2006/xaml'>" +
"<Grid Background=\"{TemplateBinding Background}\">" +
"<TextBlock x:Name=\"TextBlock\" TextAlignment=\"Center\"/>" +
"</Grid>" +
"</ControlTemplate>";
#if SILVERLIGHT
Template = (ControlTemplate)XamlReader.Load(templateXaml);
#else
using(var stream = new MemoryStream(Encoding.UTF8.GetBytes(templateXaml)))
{
Template = (ControlTemplate)XamlReader.Load(stream);
}
#endif
}
public override void OnApplyTemplate()
{
base.OnApplyTemplate();
_textBlock = GetTemplateChild("TextBlock") as TextBlock;
CreateVerticalText(_text);
}
private string _text { get; set; }
private TextBlock _textBlock { get; set; }
public string Text
{
get { return (string)GetValue(TextProperty); }
set { SetValue(TextProperty, value); }
}
public static readonly DependencyProperty TextProperty = DependencyProperty.Register(
"Text", typeof(string), typeof(VerticalTextBlock), new PropertyMetadata(OnTextChanged));
private static void OnTextChanged(DependencyObject o, DependencyPropertyChangedEventArgs e)
{
((VerticalTextBlock)o).OnTextChanged((string)(e.NewValue));
}
private void OnTextChanged(string newValue)
{
CreateVerticalText(newValue);
}
private void CreateVerticalText(string text)
{
_text = text;
if (null != _textBlock)
{
bool first = true;
foreach (var c in _text)
{
if (!first)
{
_textBlock.Inlines.Add(new LineBreak());
}
_textBlock.Inlines.Add(new Run { Text = c.ToString() });
first = false;
}
}
}
}
如何应用?
很简单,添加控件所在的命名空间,然后再xaml里像添加控件一样加载即可.
<mcl:VerticalTextBlock Text="功能列表" FontWeight="bold" Foreground="Red" FontSize="20"/>
效果:

第二种方法比较好,就像正常使用TextBlock控件一样使用,不需要考虑到字体大小和控件大小间的关系.
2011-07-10补充:
利用Behavior实现文本竖排
http://www.cnblogs.com/HalfwayMonk/archive/2011/06/26/2090902.html


