COLLADA DOM Tutorial
引言
COLLADA是一个开放的标准,最初用于3D软件数据交换,由SCEA发起,现在则被许多著名厂家支持如Autodesk、XSI等。COLLADA不仅仅可以用于建模工具之间交换数据之用,也可以作为场景描述语言用于小规模的实时渲染。因为COLLADA DOM拥有丰富的内容用于表现场景中的各种元素,从多边形几何体到摄像机无所不包。我们可以通过COLLADA DOM库来进行场景文件的读取与处理操作。
提示
COLLADA DOM的编程方式类似COM
苏醒
从这里下载COLLADA DOM
http://sourceforge.net/projects/collada-dom/
准备好你的IDE/编译器,Windows平台下推荐Visual Studio 8,LINUX/UNIX平台下看各路英豪自己的了。
推荐下载安装包,会省掉不必要的重新编译的工作。我向来最讨厌重新编译别人的库,一来是时间宝贵,编译的时候自己不可能看到任何有意义的东西,二来很多时候编写这些库的时候引用了特定版本的其它库,导致自己还需要去下载其它的库,非常麻烦。
安装好后记得在VC的工程目录加入COLLADA的头文件和库文件文件夹路径,否则什么都找不到。
开始
首先在C++源文件中加入COLLADA DOM所需要的头文件
#include <dom/domCOLLADA.h>
下面写代码,打开一个DAE XML文件。
{
DAE *collada_dom = new DAE();//创建一个DOM解析器
daeInt error = collada_dom->load("file:///C:/Test/colladaDocument.dae");//打开一个放在C盘Test文件夹下一个名为colladaDocument.dae的文档
error = collada_com->unload();//关闭刚才打开的文档
return 0;//程序返回
}
现在来点复杂的,读取一个几何体。在实际编码前,我们需要理解一个概念,就是Shape与Instance的区别。假如场景中有10000个立方体,那么我们其实只需要储存8个顶点、向量、三角形索引,然后我们指定这10000个立方体各自的变换、Shader参数就可以了。使用COLLADA DOM处理场景中几何体的思路就是,先获得Geometry(也就是我们所知道的Shape),而后获得Instance。在对unload()的调用前增加下面一行代码,
这个时候我们就获得了几何体的确切数目,然后遍历获得各自的数据。再添加一个循环,
{
domGeometry *thisGeometry = 0;
m_dae->getDatabase()->getElement((daeElement**)&thisGeometry,currentGeometry,NULL, "geometry");
domMesh *thisMesh = thisGeometry->getMesh();
}
先不要继续添加代码,先最好定义一种我们的程序要使用的物体格式。比如,可以这样,
{
string m_sName;
size_t m_iVertexNum;
size_t m_iNormalNum;
float* m_pVertices;
float* m_pNormals;
size_t m_iTriangleNum;
};
我们就可以直接调用glDrawArrays去绘制这个物体。以后为了提高效率甚至可以把所有顶点都上传到Vertex Buffer Object中,这样就不需要每次绘制的时候把顶点、向量、纹理坐标都上传一遍了。下面继续补全代码,
for(int currentGeometry=0;currentGeometry<geometryElementCount;currentGeometry++)
{
CObject* pShape = new CObject;
domGeometry *thisGeometry = 0;
m_dae->getDatabase()->getElement((daeElement**)&thisGeometry,currentGeometry,NULL, "geometry"); //逐个的找到每个Geometry Shape
domMesh *thisMesh = thisGeometry->getMesh();//取得Mesh
domListOfFloats vertexArray = thisMesh->getSource_array()[0]->getFloat_array()->getValue();//取得储存顶点的数组
domListOfFloats normalArray = thisMesh->getSource_array()[1]->getFloat_array()->getValue();//取得储存向量的数组
domListOfUInts indexArray = thisMesh->getTriangles_array()[0]->getP()->getValue();//取得三角形索引
pShape->m_iTriangleNum = indexArray.getCount() / 6;//看下面的解释
pShape->m_iVertexNum = vertexArray.getCount() / 3;//每个顶点由3个数字组成
pShape->m_iNormalNum = normalArray.getCount() / 3;//每个向量也由3个数字组成
printf("%u %u %u\n", pShape->m_iTriangleNum, pShape->m_iVertexNum, pShape->m_iNormalNum);//再次打印一下
ObjectShapes.push_back(pShape);
}
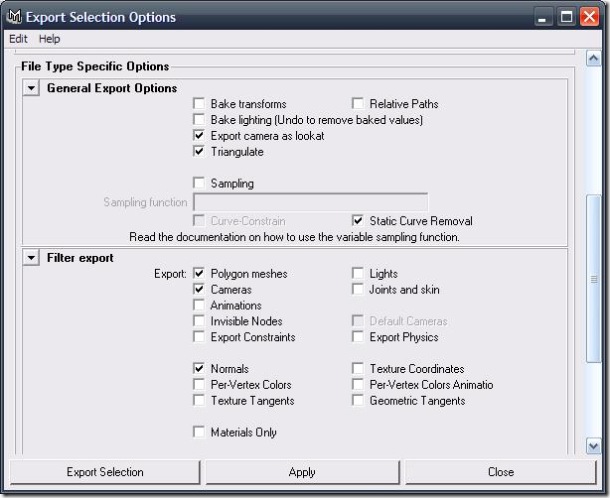
我们知道从MAYA导出的OBJ格式可以不是三角形,通过COLLADA插件导出的物体也一样,我们可以选择三角化或者保持原样。假如我们不选择三角化,那么对于一个简单的CUBE来说,它的表示可能是这样的,
<input semantic="VERTEX" source="#pCubeShape1-vertices" offset="0"/>
<input semantic="NORMAL" source="#pCubeShape1-normals" offset="1"/>
<vcount>4 4 4 4 4 4</vcount>
<p>0 0 1 1 3 2 2 3 2 4 3 5 5 6 4 7 4 8 5 9 7 10 6 11 6 12 7 13 1 14 0 15 1 16 7 17 5 18 3 19 6 20 0 21 2 22 4 23</p>
</polylist>
这里vcount的意思是每个POLYGON由多少个顶点向量对组成,列表可以让大家明白的更容易一些,
| Polygon | Vertex Index | Normal Index |
| 0 | 0 1 3 2 | 0 1 2 3 |
| 1 | 2 3 5 4 | 4 5 6 7 |
也就是说,索引数值遵照“顶点 向量 顶点 向量”这样的顺序排列,即使有了UV也一样。
<input semantic="VERTEX" source="#pCubeShape1-vertices" offset="0"/>
<input semantic="NORMAL" source="#pCubeShape1-normals" offset="1"/>
<p>0 0 1 1 2 3 1 1 3 2 2 3 2 4 3 5 4 7 3 5 5 6 4 7 4 8 5 9 6 11 5 9 7 10 6 11 6 12 7 13 0 15 7 13 1 14 0 15 1 16 7 17 3 19 7 17 5 18 3 19 6 20 0 21 4 23 0 21 2 22 4 23</p>
</triangles>
三角化后一切看似都变多了,其实原理依旧,
| Triangle | Vertex Index | Normal Index |
| 0 | 0 1 2 | 0 1 3 |
| 1 | 1 3 2 | 1 2 3 |
了解了这个之后,让我们再次把代码补全,将所有三角化后几何体按照顺序储存到数组里去让OpenGL直接渲染。
for(int currentGeometry=0;currentGeometry<geometryElementCount;currentGeometry++)
{
CObject* pShape = new CObject;
domGeometry *thisGeometry = 0;
m_dae->getDatabase()->getElement((daeElement**)&thisGeometry,currentGeometry,NULL, "geometry"); //逐个的找到每个Geometry Shape
domMesh *thisMesh = thisGeometry->getMesh();//取得Mesh
domListOfFloats vertexArray = thisMesh->getSource_array()[0]->getFloat_array()->getValue();//取得储存顶点的数组
domListOfFloats normalArray = thisMesh->getSource_array()[1]->getFloat_array()->getValue();//取得储存向量的数组
domListOfUInts indexArray = thisMesh->getTriangles_array()[0]->getP()->getValue();//取得三角形索引
pShape->m_iTriangleNum = indexArray.getCount() / 6;//看下面的解释
pShape->m_iVertexNum = vertexArray.getCount() / 3;//每个顶点由3个数字组成
pShape->m_iNormalNum = normalArray.getCount() / 3;//每个向量也由3个数字组成
printf("%u %u %u\n", pShape->m_iTriangleNum, pShape->m_iVertexNum, pShape->m_iNormalNum);//再次打印一下
pShape->m_pVertices = new float[pShape->m_iTriangleNum*3*3];
pShape->m_pNormals = new float[pShape->m_iTriangleNum*3*3];
ObjectShapes.push_back(pShape);
size_t _V[3],_N[3];
for( size_t i = 0; i < cube.m_iTriangleNum; i++ ){
size_t offset = i*6;
_V[0] = indexArray.get(offset+0);
_N[0] = indexArray.get(offset+1);
_V[1] = indexArray.get(offset+2);
_N[1] = indexArray.get(offset+3);
_V[2] = indexArray.get(offset+4);
_N[2] = indexArray.get(offset+5);
offset = i*3*3;
for( size_t j=0; j < 3; j++ ){
pShape->m_pVertices[offset+0] = vertexArray.get(_V[0]*3+0);
pShape->m_pVertices[offset+1] = vertexArray.get(_V[0]*3+1);
pShape->m_pVertices[offset+2] = vertexArray.get(_V[0]*3+2);
pShape->m_pVertices[offset+3] = vertexArray.get(_V[1]*3+0);
pShape->m_pVertices[offset+4] = vertexArray.get(_V[1]*3+1);
pShape->m_pVertices[offset+5] = vertexArray.get(_V[1]*3+2);
pShape->m_pVertices[offset+6] = vertexArray.get(_V[2]*3+0);
pShape->m_pVertices[offset+7] = vertexArray.get(_V[2]*3+1);
pShape->m_pVertices[offset+8] = vertexArray.get(_V[2]*3+2);
pShape->m_pNormals[offset+0] = normalArray.get(_N[0]*3+0);
pShape->m_pNormals[offset+1] = normalArray.get(_N[0]*3+1);
pShape->m_pNormals[offset+2] = normalArray.get(_N[0]*3+2);
pShape->m_pNormals[offset+3] = normalArray.get(_N[1]*3+0);
pShape->m_pNormals[offset+4] = normalArray.get(_N[1]*3+1);
pShape->m_pNormals[offset+5] = normalArray.get(_N[1]*3+2);
pShape->m_pNormals[offset+6] = normalArray.get(_N[2]*3+0);
pShape->m_pNormals[offset+7] = normalArray.get(_N[2]*3+1);
pShape->m_pNormals[offset+8] = normalArray.get(_N[2]*3+2);
}
}
}
这样,我们就可以使用OpenGL渲染了,
glEnableClientState(GL_NORMAL_ARRAY);
for( int i=0; i<ObjectShapes.size(); i++ ){
glVertexPointer(3,GL_FLOAT,0,ObjectShapes[i]->m_pVertices);
glNormalPointer(GL_FLOAT,0,ObjectShapes[i]->m_pNormals);
glDrawArrays(GL_TRIANGLES,0,ObjectShapes[i]->m_iTriangleNum*3);
}
glDisableClientState(GL_VERTEX_ARRAY);
glDisableClientState(GL_NORMAL_ARRAY);
在这里可能会有疑问,为什么不使用索引的方式绘制,而是把所有的三角形全部分开,因为导出的场景向量与顶点的数目、位置都不统一,导致索引“顾此失彼”全然无序,虽然说可以修正,但是那样代码量就多了起来,而且无法应用OOCSX的方法简化复杂几何体。
关于调试方法
COLLADA DOM在操作过程中几乎都是与指针打交道,在开始不熟悉的情况下频频访问违规出错等等是很正常的,只要注意老老实实的调用getElementName()、getTypeName()、getCount()查看当前操作对象的名称和元素数据,而后逐步的找到自己需要的资源。
性能建议
COLLADA DOM的底层使用的是SAX进行XML文件的访问操作,构建于LibXML2库之上,所以我推荐从DAE文件头开始依次处理Geometry、Visual Scene等等,减少运行库在来回搜索的损耗。默认COLLADA DOM是静态库,导致链接后的程序着实非常巨大,所以推荐使用动态链接。


