企业级开发基础之MSMQ
2009-02-28 23:51 Henry Cui 阅读(2725) 评论(12) 编辑 收藏 举报首先要说的这是一篇非常基础的文章,我只是把自己零碎的一些东西给整理起来,不过我相信整理这些基础知识还是很有必要的。
基础概念:
消息:两台计算机之间的传送数据的基本单位。
消息队列:消息传输过程中保存消息的容器。
消息队列网络:能够相互间来回发送消息的一组计算机。
消息被发送到队列中。“消息队列”是在消息的传输过程中保存消息的容器。消息队列管理器在将消息从它的源中继到它的目标时充当中间人。队列的主要目的是提供路由并保证消息的传递;如果发送消息时接收者不可用,消息队列会保留消息,直到可以成功地传递它。
队列类型
队列一般分为两大类,一种是用户创建的队列,一种是系统队列。
用户创建的队列:
公共队列:在整个“消息队列”网络中复制,并且有可能由网络连接的所有站点访问。
专用队列:不在整个网络中发布。相反,它们仅在所驻留的本地计算机上可用。专用队列只能由知道队列的完整路径名或标签的应用程序访问。
管理队列:包含确认在给定“消息队列”网络中发送的消息回执的消息。指定希望 MessageQueue 组件使用的管理队列(如果有的话)。
响应队列:包含目标应用程序接收到消息时返回给发送应用程序的响应消息。指定希望 MessageQueue 组件使用的响应队列(如果有的话)。
系统生成的队列:
日记队列:可选地存储发送消息的副本和从队列中移除的消息副本。每个“消息队列”客户端上的单个日记队列存储从该计算机发送的消息副本。在服务 器上为每个队列创建了一个单独的日记队列。此日记跟踪从该队列中移除的消息。
死信队列:存储无法传递或已过期的消息的副本。
报告队列:包含指示消息到达目标所经过的路由的消息,还可以包含测试消息。每台计算机上只能有一个报告队列。
专用系统队列:是一系列存储系统执行消息处理操作所需的管理和通知消息的专用队列。
创建和使用队列
首先我们需要先去安装MSMQ的环境,MSMQ的安装就跟安装IIS的步骤差不多,这里就不去举例了。.net中提供了方便我们操作MSMQ的组件—System.Messaging。创建和使用队列消息的可以通过MessageQueue去实现,其中里面有几个重要的方法。
创建队列MessageQueue.Create
Create方法有两个重载:
1) Message.Create(string path) :创建非事务性队列;
2) Message.Create(string path, bool transactional):指定创建事务性或者非事务性队列;
创建各种类别的队列是通过path参数不同的表现来实现的:
1) 公用队列:MachineName\QueueName
2) 专用队列:MachineName\Private$\QueueName
3) 日记队列:MachineName\QueueName\Journal$
其中MachineName表示目标机器名称,QueueName表示队列名称。要注意的是,在创建队列时先判断是否已经存在队列,还有就是权限问题。
下面编写一个简单的QueueHelp类:
namespace HenllyeeMSMQ
{
public class QueueHelp
{
/// <summary>
/// 创建非事务队列
/// </summary>
/// <param name="strPath">路径</param>
public static bool CreateMQ(string strPath)
{
if(MessageQueue.Exists(strPath))
return false;
try
{
MessageQueue.Create(strPath);
return true;
}
catch
{
return false;
}
}
public static bool CreateMQTrans(string strPath) { if (MessageQueue.Exists(strPath)) return false; try { MessageQueue.Create(strPath,true); return true; } catch { return false; } } } }
调用的例子:
namespace HenllyeeMSMQ
{
class Program
{
static void Main(string[] args)
{
//Create Queue
string strQueueName = @".\Henllyee";
string strQueueNamePrivate = @".\Private$\Henllyee";
if (QueueHelp.CreateMQ(strQueueName)) Console.WriteLine("Create '{0}' Success", strQueueName);
if (QueueHelp.CreateMQ(strQueueNamePrivate)) Console.WriteLine("Create '{0}' Success", strQueueNamePrivate);
Console.Read();
}
}
}
创建和发送消息
通过Message类可以来创建队列消息,Message.Body属性是我们来设置消息的内容的。同时我们可以指定消息的序列化格式,一般有三种序列化的格式:
XmlMessageFormatter
BinaryMessageFormatter
ActiveXMessageFormatter
一般的时候我们都会采用xml的方式来格式化。这三个格式化器都是在Messaging命名空间下面。
下面编写了一个简单的实体类Employee,看怎么发送一个实例到队列中去的:
namespace HenllyeeMSMQ
{
public class Employee
{
/// <summary>
/// 名
/// </summary>
public string FirstName { get; set; }
/// <summary>
/// 姓
/// </summary>
public string LastName { get; set; }
/// <summary>
/// 年龄
/// </summary>
public int Age { get; set; }
public Employee()
{
FirstName = "Henllyee";
LastName = "Cui";
Age = 22;
}
public Employee(string strFirstName, string strLastName, int age)
{
this.FirstName = strFirstName;
this.LastName = strLastName;
this.Age = age;
}
}
}
我们继续在原来已经创建的队列中传递消息:
Employee emp = new Employee();
Message empMsg = new Message(emp, new XmlMessageFormatter(new Type[]{typeof(Employee)}));
try
{
MessageQueue empQue = new MessageQueue(strQueueNamePrivate);
empQue.Send(empMsg);
Console.WriteLine("Send Success!");
}
catch (Exception e)
{
Console.WriteLine(e.Message);
}
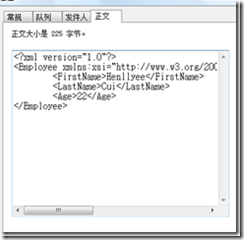
我们可以看写队列里面: 通过正文中我们也可以查看到队列消息内容
 发送消息的方法:Send方法有多个重载,可以用来指定发送事务队列消息,这里就不再举例了。
下面我们看下如何获取消息:
try
{
MessageQueue empQueRe = new MessageQueue(strQueueNamePrivate);
empQueRe.Formatter = new XmlMessageFormatter(new Type[] { typeof(Employee) });
Message msgRe = empQueRe.Receive();
Employee empRe = (Employee)msgRe.Body;
Console.WriteLine("Employee's Name:{0},Age:{1}", empRe.FirstName + empRe.LastName, empRe.Age);
}
catch(Exception e)
{
Console.WriteLine(e.Message);
}
其他方法
1.我们可以通过GetAllMessages来获取一个队列中的所有消息(返回一个消息数组)
2.Purge()方法来清空所有的消息
3.可以通过Message的Priority属性来设置消息发送的优先级别
推荐文章:你可以通过看Bēniaǒ的ASP.NET中使用MSMQ进行消息处理系列文章中看到消息队列更详细的讲解。


【推荐】国内首个AI IDE,深度理解中文开发场景,立即下载体验Trae
【推荐】编程新体验,更懂你的AI,立即体验豆包MarsCode编程助手
【推荐】抖音旗下AI助手豆包,你的智能百科全书,全免费不限次数
【推荐】轻量又高性能的 SSH 工具 IShell:AI 加持,快人一步
· 从 HTTP 原因短语缺失研究 HTTP/2 和 HTTP/3 的设计差异
· AI与.NET技术实操系列:向量存储与相似性搜索在 .NET 中的实现
· 基于Microsoft.Extensions.AI核心库实现RAG应用
· Linux系列:如何用heaptrack跟踪.NET程序的非托管内存泄露
· 开发者必知的日志记录最佳实践
· TypeScript + Deepseek 打造卜卦网站:技术与玄学的结合
· Manus的开源复刻OpenManus初探
· 写一个简单的SQL生成工具
· AI 智能体引爆开源社区「GitHub 热点速览」
· C#/.NET/.NET Core技术前沿周刊 | 第 29 期(2025年3.1-3.9)