
使用js编写基础的数据结构
作为一条咸鱼,大学的数据结构这门课肯定没咋上,能逃课就逃课了,这就造成很尴尬的局面----我数据结构很垃圾。虽然从事前端初级工程师不咋用得到这个东西,但是它就是一个底子,就是基础,不学不行啊,所以工作之余把我用js学习写的这些东西发上来保存一下以防丢失。
一、栈
首先,第一个学的数据结构肯定是栈,因为是最好理解,也最容易学习的。
栈,又称堆栈,是一种运算受限的线性表。其限制是仅允许在表的一端进行插入和删除运算,这一端被称为栈顶,相对地,把另一端称为栈底。向一个栈插入新元素又称作进栈、入栈或压栈,它是把新元素放到栈顶元素的上面,使之成为新的栈顶元素;从一个栈删除元素又称作出栈或退栈,它是把栈顶元素删除掉,使其相邻的元素成为新的栈顶元素。(来自百度百科)
形象点说,就是拿了一个口径跟硬币一样大的量筒,入栈就是把一个硬币放进去,最先放进去的那个硬币就在量筒的最低端,取不出来,最后放进去的硬币就在量筒的最上端,能取出来。出栈就是把最上面的那个硬币取出来。在这个量筒中只能这么执行,不能出现其他骚操作(比如把量筒砸了),但是你可以通过透明的量筒壁来数一数到底量筒中放入了几个硬币。
首先我们先定义一个 Stack 类:
class Stack{
  constructor(){
    this.items = []
  }
}
我们使用一个js中的数组作为载体(量筒),对其进行限制模拟一个栈。
入栈操作:
add(node){
  this.items.push(node)
}
因为只能在最后面进行添加和取出,所以我们添加元素直接添加在最后面。
出栈操作:
pop(){
  this.items.pop()
}
同理,将数组的最后一位删除,这样就模拟了栈的出栈入栈,限制了数组的删除和添加只能在最后一位进行操作。
那么想知道量筒最上面那个硬币长什么样子呢?我们只需要获取到这个数组,也就是栈的最后入栈的那个元素就行。
get peek(){
  return this.items[this.items.length-1]
}
还有判断一个栈是否为空,则只需要判断这个数组的长度是否为0:
get isEmpty(){
  return this.items.length === 0
}
如果想知道这个栈里面有多少元素呢:
get size(){
  return this.items.length
}
再如果不需要这个栈里面的数据的话呢,就清除了吧:
clear(){
  this.items = []
}
最后可以将栈内的所有元素依次打印出来:
print(){
  console.log(this.items.toString())
}
将上面代码整理一下,一个用js实现的栈类就出来了:
class Stack {
  constructor() {
    this.items = []
  }
  // 添加
  add(node) {
    this.items.push(node)
  }
  // 出栈
  pop() {
    this.items.pop()
  }
  // 末位
  get peek() {
    return this.items[this.items.length - 1]
  }
  // 是否为空栈
  get isEmpty() {
    return this.items.length === 0
  }
  // 获取尺寸
  get size() {
    return this.items.length
  }
  // 清空栈
  clear() {
    this.items = []
  }
  // 打印栈内内容
  print() {
    console.log(this.items.toString())
  }
}
ok,用js实现一个栈数据结构已经完成,就这么轻松,接着学习稍微有点难度的链表。
二、链表
链表是一种物理存储单元上非连续、非顺序的存储结构,数据元素的逻辑顺序是通过链表中的指针链接次序实现的。链表由一系列结点(链表中每一个元素称为结点)组成,结点可以在运行时动态生成。每个结点包括两个部分:一个是存储数据元素的数据域,另一个是存储下一个结点地址的指针域。
说通俗一点,就是跟火车一样,每一列车厢都有自己的空间用来坐人,这就是数据域,也有一个铰接去跟下一节车厢进行连接,这就是指针域,用来绑定下一个车厢的。
在这里开始之前,我们先创建一个节点类Node:
class Node{
  contructor(element){
    this.element = element
    this.next = null
  }
}
这里的 element 就是设计的数据域,这里的 next 就是设计的指针域,用来指定下一个节点是哪一个。
ok,开始,创建一个链表类:
class LinkedList{
  constructor(){
    this.head = null
    this.length = 0
  }
}
因为链表是一个有序的数据结构,我们用 head 标示其第一个节点,length 表示链表的长度。
第一个要实现的功能肯定是添加元素到链表的最后面:
addEnd(ele){
  const node = new Node(ele)
  let current = null
  if(this.head === null){    // 如果链表为空,直接把需要添加的节点放在head
    this.head = node
  }
  else{
    current = this.head
    while(current.next){    //  在这里寻找链表的最后一个节点
      current = current.next
    }
    current.next = node
  }
  this.length ++
}
对于初学者来说,这个插入可能有点抽象,我画个图。
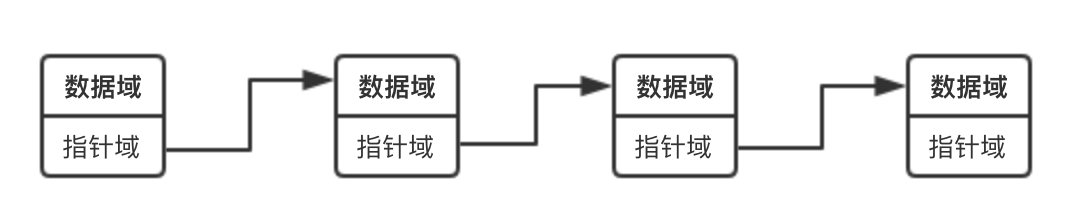
在上面这个图中,将链表的形象画一下,大概就是这样,指针域就是next,指向下一个节点,数据域就是 element,存储数据用。所以在链表的最后面添加一个节点的时候,只需要将链表目前最后面的节点的next指向需要添加的节点就ok了。
但是不可能每一次都把节点添加到链表的最后面,所以肯定得有一个插入操作,传入一个参数表示要插入的位置:
insert(ele,position){
  const node = new Node(ele)
  let current = this.head, previous = null, index = 0

  if(position>=0 && position < this.length){ // 因为插入位置必须小于链表的长度并且不小于0
     if(position === 0){  // 直接插入头部
       node.next = current
       this.head = node
     }
     else{
       while(index++ < position){  // 从0开始找,找到需要插入的位置
         previous = current
         current = current.next
       }
       previous.next = node
       node.next = current
     }
     this.length ++
     return true
  }
  console.log('请输入正确的位置')
  return false
}
在链表的插入中,如果要将一个节点插入两个节点(A和B)之间,只需要将前面的节点A的next指向需要添加的节点,并且将需要添加的节点的next指向后面的节点B就ok了,看下图。
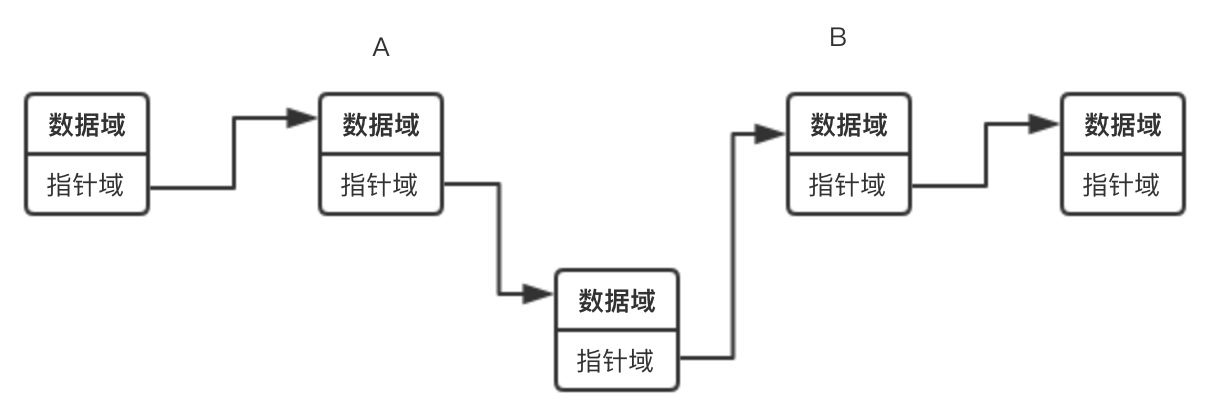
在原本的链表中,A节点的next指向的是B节点的next。这样子就实现了一个节点的插入。
再来写链表的删除:
removeAt(position){
  if(position>=0 && position< this.length){
    let current = this.head,previous = null, index = 0
    if(position === 0){
      this.head = this.head.next
    }
    else{
      while(index++<position){
        previous = current
        current = current.next
      }
      previous.next = current
    }
    this.length--
    return true
  }
  console.log('请输入正确的位置')
  return false
}
用上面的图来看吧,删除是怎么删除的呢?需要删除的节点的上一个节点是A,next是节点B,只需要将节点A的next指向B就ok了。
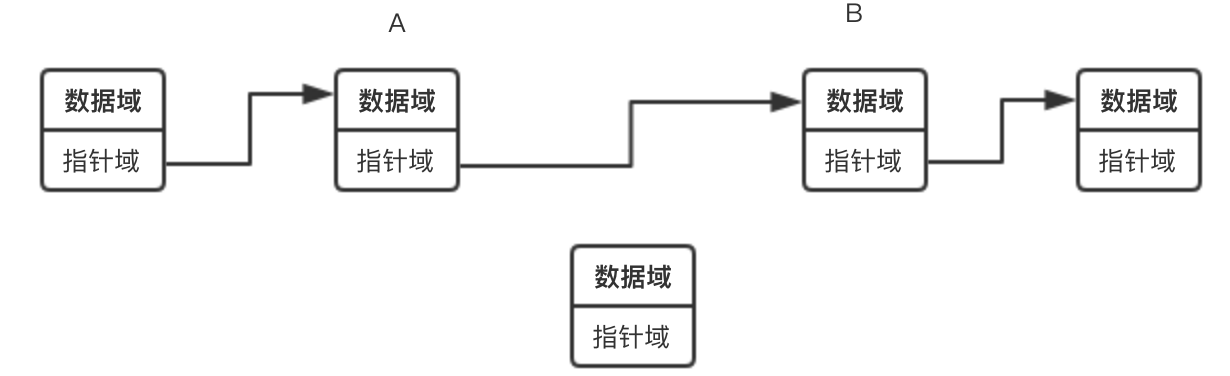
ok,这样就删除了,再看看代码,是找到需要删除的位置之后,将当前位置的节点的上一个节点的next指向该节点的next。
再接着写根据内容查找节点所在的位置:
findIndex(ele){
  let current = this.head, index = 0
  while(current){
    if(ele === current.element) return index
    index ++
    current = current.next
  }
  return -1
}
这个很好理解,遍历列表,找到对应内容的节点所在的位置。
继续写根据内容删除节点:
remove(ele){
  let index = this.findIndex(ele)
  this.removeAt(index)
}
这个方法是将上面的删除和根据位置查找两个方法进行了一个组合封装。
然后是判断链表是否有数据:
get isEmpty(){
  return this.head === null
}
再获取链表的长度:
get size(){
  return this.length
}
最后是打印链表内容:
print(){
  let current = this.head
  if(this.length === 0){
    console.log('链表为空')
  }
  while(current.next){
    console.log(current.element)
    current = current.next
  }
}
将上面的代码整理一下,一个链表类就出来了:
class LinkedList {
    constructor() {
        this.head = null
        this.length = 0
    }

    // 添加
    addEnd(ele) {
        const node = new Node(ele)
        let current = null
        if (this.head === null) {
            this.head = node
            this.length++
        } else {
            current = this.head
            while (current.next) {
                current = current.next
            }
            current.next = node
            this.length++
        }
    }

    // 插入
    insert(ele, position) {
        if (position >= 0 && position < this.length) {
            const node = new Node(ele)
            let current = this.head, previous = null, index = 0
            if (position === 0) {
                this.head = node
                node.next = current
            } else {
                while (index++ < position) {
                    previous = current
                    current = current.next
                }
                previous.next = node
                node.next = current
            }
            this.length++
            return true
        }
        return false
    }

    // 根据位置删除
    removeAt(position) {
        if (position > -1 && position < this.length) {
            let current = this.head, previous = null, index = 0
            if (position == 0) {
                this.head = current.next
            } else {
                while (index++ < position) {
                    previous = current
                    current = current.next
                }
                previous.next = current.next
            }
            this.length--
            return current.element
        }
        return null
    }

    // 根据内容查找位置
    findIndex(ele) {
        let current = this.head, index = 0
        while (current) {
            if (ele === current.element) {
                return index + 1
            }
            index++
            current = current.next
        }
        return -1
    }

    // 根据内容删除
    remove(ele) {
        let index = this.findIndex(ele)
        this.removeAt(index)
    }

    // 是否为空
    isEmpty() {
        return this.head === null
    }

    // 长度
    size() {
        return this.length
    }

    // 打印链表内容
  print(){
    let current = this.head
    if(this.length === 0){
      console.log('链表为空')
    }
    while(current.next){
      console.log(current.element)
      current = current.next
    }
  }
}
ok,一个完整的链表类出来了,比起栈,链表稍微复杂了一点,毕竟跟指针有关。c语言中的指针可以形象的表现出来,在js中,指针已经被封装在最底层了,所以我们只能使用一个next属性模拟指针。
链表相比数组最重要的优点,那就是无需移动链表中的元素,就能轻松地添加和移除元素。因此,当你需要添加和移除很多元素 时,最好的选择就是链表,而非数组。
三、双向链表
上面写的链表是单向的,只能从一个节点寻找到它的下一个节点,而双向链表则可以让一个节点找到它的上一个节点和下一个节点。
开始,先写一个Node类:
class Node{
  constructor(element){
    this.element = element
    this.last = null
    this.next = null
  }
}
相比于单向链表的节点,我们添加一个属性:last,用来指向它的上一个节点。
创建一个双向链表类:
class DoubleLinkedList{
  constructor(){
    this.head = null
    this.tail = null
    this.length = 0
  }
}
在链表类的实例属性中,我们添加一个属性:tail,表示双向链表的最后一个节点。
好了,开始写添加一个节点到链表的最末端:
addEnd(ele){
  const node = new Node(ele)
  let current = null

  if(this.head === null){
    this.head = node
  }
  else if(this.tail === null ){
    this.tail = node
    this.tail.last = this.head
    this.head.next = this.tail
  }
  else{
    current = this.tail
    node.last = current
    current.next = node
    this.tail = node
  }
  this.length++
  return
}
和单向链表不同的是,双向链表往最后面添加的时候是直接使用 this.tail 进行操作,不需要像单项列表那样一个一个找,知道找到最后一个。
接着写插入:
insert(ele, position){
  if(position>=0 && position<this.length){
    const node = new Node(ele)
    let current = this.head, previous = null, index = 0
    if(position === 0){
      this.head = node
      node.next = current
      current.last = node
    }
    else if(position === this.length - 1){
      current = this.tail
      node.last = current
      current.next = node
      this.tail = node
    }
    else{
      while(index++ < position){
        previous = current
        current = current.next
      }
      previous.next = node
      node.last = previous
      node.next = current
      current.last = node
    }
    this.length++
    return true
  }
  return false
}
跟单项列表一样,只是在插入的过程中多了一个last的指向操作。
接着是根据位置参数进行删除:
removeAt(position){
  if(position >= 0 && position < this.length){
    let current = this.head, previous = null, index = 0
    if(position === 0) {
      this.head = current.next
      this.head.last = null
    }
    else if(position === this.length - 1){
      this.tail = this.tail.last
      this.tail.next = null
    }
    else{
      while(index++ < position){
        previous = current
        current = current.next
      }
      previous.next = current
      current.last = previous
    }
    this.length--
    return true
  }
  return false
}
其他的操作都跟单向链表一样了,整理一下上面的代码:
class DoubleLinkedList{
  constructor() {
    this.head = null
    this.tail = null
    this.length = 0
  }
  addEnd(ele){
    const node = new Node(ele)
    let current = null

    if(this.head === null){
      this.head = node
    }
    else if(this.tail === null ){
      this.tail = node
      this.tail.last = this.head
      this.head.next = this.tail
    }
    else{
      current = this.tail
      node.last = current
      current.next = node
      this.tail = node
    }
    this.length++
    return
  }
  insert(ele, position){
    if(position>=0 && position<this.length){
      const node = new Node(ele)
      let current = this.head, previous = null, index = 0
      if(position === 0){
        this.head = node
        node.next = current
        current.last = node
      }
      else if(position === this.length - 1){
        current = this.tail
        node.last = current
        current.next = node
        this.tail = node
      }
      else{
        while(index++ < position){
          previous = current
          current = current.next
        }
        previous.next = node
        node.last = previous
        node.next = current
        current.last = node
      }
      this.length++
      return true
    }
    return false
  }
  removeAt(position){
    if(position >= 0 && position < this.length){
      let current = this.head, previous = null, index = 0
      if(position === 0) {
        this.head = current.next
        this.head.last = null
      }
      else if(position === this.length - 1){
        this.tail = this.tail.last
        this.tail.next = null
      }
      else{
        while(index++ < position){
          previous = current
          current = current.next
        }
        previous.next = current
        current.last = previous
      }
      this.length--
      return true
    }
    return false
  }
}
再将单向链表的其他操作方法添加进去,一个完整的双向链表类也诞生啦。
四、队列
队列是一种特殊的线性表,特殊之处在于它只允许在表的前端(front)进行删除操作,而在表的后端(rear)进行插入操作,和栈一样,队列是一种操作受限制的线性表。进行插入操作的端称为队尾,进行删除操作的端称为队头。
顾名思义,队列就跟我们平时的排队进景区一样,先来的人排在前面,后面来的人排在后面,而且前面的人也是最先离开队列进入景区的 。
开始写代码,先创建一个队列类:
class Queue{
  constructor(){
    this.items = []
  }
}
跟栈一样,我们也有一个数组进行限制操作来模拟队列。
首先肯定是添加一个元素进入队列,直接将元素添加在数组的最后边:
enqueue(node) {
  this.items.push(node)
}
然后是出队列,也就是删除数组的第一个元素:
dequeue() {
  this.items.shift()
}
获取下一个要出队列的元素:
get front(){
  return this.items[0]
}
获取整个队列的长度:
get size(){
  return this.items.length
}
获取队列是否为空:
get isEmpty(){
  return this.items.length === 0
}
清空整个队列:
clear(){
  this.items = []
}
打印队列所有内容:
print(){
  console.log(this.items.toString())
}
将上面的所有整理一下:
class Queue {
  constructor() {
    this.items = []
  }
  // 添加
  enqueue(node) {
    this.items.push(node)
  }
  // 出队列
  dequeue() {
    this.items.shift()
  }
  // 取首位
  get front() {
    return this.items[0]
  }
  // 取长度
  get size() {
    return this.items.length
  }
  // 是否为空
  get isEmpty() {
    return this.items.length === 0
  }
  // 清空
  clear() {
    this.items = []
  }
  // 打印队列内容
  print() {
    console.log(this.items.toString())
  }
}
一个完整的队列类出来了,队列跟栈一样都是受限制的数据结构,也比较好理解。
但是这样的队列只能满足正常需求,比如人家是vip大会员呢,人家肯定不能跟一群普通人一起去排队吧,不能从最后面插入,这样vip特权将没有任何意义,所以就出来一个优先队列,接下来学习一下。
五、优先队列
在优先队列中,元素被赋予优先级。当访问元素时,具有最高优先级的元素最先删除。优先队列具有最高级先出的行为特征。
直接上代码,先创建一个优先队列:
class PriorityQueue{
  constructor(){
    this.items = []
  }
}
优先队列的特点就是优先,所以我们在入队列的时候需要多添加一个参数:优先级。优先队列相比于普通队列的唯一的不同就在于入队列的时候有一个优先级的判断,其他操作都跟普通队列操作相同。
enqueue(node, priority){
  priority = priority || 99999999999
  const queueNode = { node, priority }
  if (this.isEmpty) { // 这里的判断是否为空还是使用普通队列的方法就ok
    this.items.push(queueNode)
  }
  else{
    // 在队列中找到要插入的位置,优先级数越小,优先级越高
    const preIndex = this.items.findIndex(item => queueNode.priority < item.priority)
    if(preIndex>-1){
      this.items.splice(preIndex, 0, queueNode)
    }
    else{  // preIndex为-1的时候说明没有找到比添加的新节点的优先级低的,直接插入最后面
      this.items.push(queueNode)
    }
  }
}
六、循环队列
为充分利用向量空间,克服"假溢出"现象的方法是:将向量空间想象为一个首尾相接的圆环,并称这种向量为循环向量。存储在其中的队列称为循环队列。
循环队列相比普通队列,修改的地方也就在于查询某个位置的参数时的不同。
// 获取真实位置
getIndex(index){
  return index % this.items.length
}

// 获取真实数据
find(index){
  return !this.isEmpty ? this.items[this.getIndex(index)] : null
}
七、集合
集合是由一组无序且唯一(不能重复)的项组成的。
在ES6中,js已经内置了Set类型的实现,但是出于学习目的,还是自己写一下吧。
首先创建一个集合类:
class Set{
  constructor(){
    this.items = {}
  }
}
因为集合中的所有项不能有重复的,所以首先写一个判断有无重复的方法:
has(value){
  return this.items.hasOwnProperty(value)
}
开始写添加项:
add(value){
  if(!this.has(value)){
    this.items[value] = value
    return true
  }
  return false
}
接着写删除某一个项:
remove(value){
  if(this.has(value)){
    delete this.items[value]
    return true
  }
  return false
}
获取集合的长度:
get size(){
  return Object.keys(this.items).length
}
获取集合的值:
get values(){
  return Object.keys(this.items)
}
初中数学中我们就学习了集合,两个集合之间会产生并集,交集和差集,还有判断一个集合是否是另外一个集合的子集,来写一下这四个方法。
首先写两个集合的并集:
union(otherSet){
  const unionSet = new Set()
  this.values().forEach(v => unionSet.add(v))
  otherSet.values().forEach(v => unionSet.add(v))
  return unionSet
}
交集:
intersection(otherSet){
  const intersectionSet = new Set()
  this.values().forEach(v => {
    if(otherSet.has(v)){
      intersection.add(v)
    }
  })
  return intersectionSet
}
差集:
difference(otherSet){
  const differenceSet = new Set()
  this.values().forEach(v => {
    if(!otherSet.has(v)) differenceSet.add(v)
  })
  return differenceSet
}
判断是否是子集:
subset(otherSet) {
  if (this.size > otherSet.size) {
    return false
  } else {
    return !this.values.some(v => !otherSet.has(v))
  }
}
ok,集合差不多写完了,代码整理一下:
class Set {
  constructor() {
    this.items = {}
  }
  has(value) {
    return this.items.hasOwnProperty(value)
  }
  add(value) {
    if (!this.has(value)) {
      this.items[value] = value
      return true
    }
    return false
  }
  remove(value) {
    if (this.has(value)) {
      delete this.items[value]
      return true
    }
    return false
  }
  get size() {
    return Object.keys(this.items).length
  }
  get values() {
    return Object.keys(this.items)
  }
  // 并集
  union(otherSet) {
    const unionSet = new Set()
    this.values.forEach(v => unionSet.add(v))
    otherSet.values.forEach(v => unionSet.add(v))
    return unionSet
  }
  // 交集
  intersection(otherSet) {
    const intersectionSet = new Set()
    this.values.forEach(v => {
      if (otherSet.has(v)) {
        intersectionSet.add(v)
      }
    })
    return intersectionSet
  }
  // 差集
  difference(otherSet) {
    const differenceSet = new Set()
    this.values.forEach(v => {
      if (!otherSet.has(v)) {
        differenceSet.add(v)
      }
    })
    return differenceSet
  }
  // 子集(判断是否是otherSet的子集)
  subset(otherSet) {
    if (this.size > otherSet.size) {
      return false
    } else {
      return !this.values.some(v => !otherSet.has(v))
    }
  }
}
其实这个类写的是内容缺的不少,比如在创建一个Set实例的时候不能直接传参,那么我们改一改constructor方法:
constructor(...params){
  this.items = {}
  if(params.length === 1 && params[0] instanceof Array){
     params[0].map(v => this.add(v))
  }
  else{
    params.map(v => {
      this.add(v)
    })
  }
}
这样就可以在创新一个新实例的时候传入参数并初始化。
八、字典
字典(dictionary)是一些元素的集合。每个元素有一个称作key 的域,不同元素的key 各不相同。有关字典的操作有:插入具有给定关键字值的元素、在字典中寻找具有给定关键字值的元素、删除具有给定关键字值的元素。
字典在js的实现就是Object,没有什么太大的区别,正常使用几乎一致,就写一点来模拟一下。
创建一个字典类:
class Dictionary{
  constructor(){
    this.items = {}
  }
}
首先是写入一个数据:
set(key,value){
  this.items[key] = value
}
再是获取一个数据:
get(key){
  return this.items[key]
}
然后是删除一个字段:
remove(key){
  delete this.items[key]
}
获取所有的key值:
get keys(){
  return Object.keys(this.items)
}
获取所有的value值:
get values(){
  return Object.values(this.items)
}
整理一下全部代码:
class Dictionary {
  constructor() {
    this.items = {}
  }
  set(key, value) {
    this.items[key] = value
  }
  get(key) {
    return this.items[key]
  }
  remove(key) {
    delete this.items[key]
  }
  get keys() {
    return Object.keys(this.items)
  }
  get values() {
    /**
     * ES7: return Object.values(this.items)
     */
    return Object.keys(this.items).reduce((arr, current, index) => {
      arr.push(this.items[current])
      return arr
    }, [])
  }
}
字典和js中的Object几乎相同,所以不必要太多描述,出于学习的目的稍微模拟实现一下就行。
九、散列
把任意长度的输入通过散列算法变换成固定长度的输出,该输出就是散列值。
散列算法的作用是尽可能快地在数据结构中找到一个值,其也是字典类的一种散列表现方式。上面的字典类中如果需要找到一个值(get方法)是需要对字典进行遍历查找,而散列是对每一个值有一个特定的数字进行存储,当需要查找某个值的时候直接去找其对应的数字就行了。
第一个散列类我们使用最常用的“lose lose”散列函数,其是将参数中所有字母的ASCII码进行相加。先来创建一个散列类:
class HashTable{
  constructor() {
    this.table = []
  }
}
首先依据“lose lose”散列函数来给每个需要存储的参数编写一个求存储数值的方法:
static loseloseHashCode(key){
  let hash = 0
  for (let codePoint of key) {
    hash += codePoint.charCodeAt()
  }
  return hash % 37
}
写入数值:
put(key, value) {
  const position = HashTable.loseloseHashCode(key)this.table[position] = value
}
获取值:
get(key) {
  return this.table[HashTable.loseloseHashCode(key)]
}
最后是删除一个不需要的值:
remove(key) {
  this.table[HashTable.loseloseHashCode(key)] = undefined
}
ok,再整理一下代码:
class HashTable {
  constructor() {
    this.table = []
  }
  static loseloseHashCode(key) {
    let hash = 0
    for (let codePoint of key) {
      hash += codePoint.charCodeAt()
    }
    return hash % 37
  }
  // 修改和增加元素
  put(key, value) {
    const position = HashTable.loseloseHashCode(key)this.table[position] = value
  }

  get(key) {
    return this.table[HashTable.loseloseHashCode(key)]
  }

  remove(key) {
    this.table[HashTable.loseloseHashCode(key)] = undefined
  }

}
大功告成,这样子就完成了一个HashTable类。在HashTable类中,我们移除一个字段不需要删除这个位置,只需要用undefined来占位就行,因为每一个数值对应一个位置,如果删除了这个位置,后面的所有数值都会前进一个位置,就会影响整个排列。
之前这个“lose lose”散列函数有一个问题就是,如果存储 “ab” 和 “ba” 这两个值呢,得到的key值是相同的,这样子第二个存储的值会将第一个覆盖,这肯定不是我们想要的,所以就有了解决这个冲突的办法。
首先看解决这个冲突的第一个办法:分离链接。
分离链接是将同一个位置的不同值根据写入顺序形成一个单向链表,这样就不会发生冲突了。
这样子的话,写入就变成了:
put(key,value){
  const position = HashTable.loseloseHashCode(key)
  if (this.table[position] === undefined) {
    this.table[position] = new LinkedList()
  }
  this.table[position].append({ key, value })
}
然后是获取:
get(key) {
  const position = HashTable.loseloseHashCode(key)
  if (this.table[position] === undefined) return undefined
  const getElementValue = node => {
    if (!node && !node.element) return undefined
    if (Object.is(node.element.key, key)) {
      return node.element.value
    } else {
      return getElementValue(node.next)
    }
  }
  return getElementValue(this.table[position].head)
}
移出:
remove(key) {
  const position = HashTable.loseloseHashCode(key)
  if (this.table[position] === undefined) return undefined

  const getElementValue = node => {
    if (!node && !node.element) return false
    if (Object.is(node.element.key, key)) {
      this.table[position].remove(node.element)
      if (this.table[position].isEmpty) {
        this.table[position] = undefined
      }
      return true
    } else {
      return getElementValue(node.next)
    }
  }

  return getElementValue(this.table[position].head)
}
这样子就完成了一个分离链接的散列类,整理一下代码:
class HashTable {
  constructor() {
    this.table = []
  }
  static loseloseHashCode(key) {
    let hash = 0
    for (let codePoint of key) {
      hash += codePoint.charCodeAt()
    }
    return hash % 37
  }
  // 修改和增加元素
  put(key, value) {
    const position = HashTable.loseloseHashCode(key)
    if (this.table[position] === undefined) {
      this.table[position] = new LinkedList()
    }
    this.table[position].append({ key, value })
  }

  get(key) {
    const position = HashTable.loseloseHashCode(key)
    if (this.table[position] === undefined) return undefined
    const getElementValue = node => {
      if (!node && !node.element) return undefined
      if (Object.is(node.element.key, key)) {
        return node.element.value
      } else {
        return getElementValue(node.next)
      }
    }
    return getElementValue(this.table[position].head)
  }

  remove(key) {
    const position = HashTable.loseloseHashCode(key)
    if (this.table[position] === undefined) return undefined
    const getElementValue = node => {
      if (!node && !node.element) return false
      if (Object.is(node.element.key, key)) {
        this.table[position].remove(node.element)
        if (this.table[position].isEmpty) {
          this.table[position] = undefined
        }
        return true
      } else {
        return getElementValue(node.next)
      }
    }
    return getElementValue(this.table[position].head)
  }
}
ok,大功告成!分离链接的核心在于每一个存储数字的位置都是一个单向链表,这样子在找一个值得时候,首先找到其所在的位置,然后从该位置的链表的头部开始查找,相比直接查找位置,这样子效率是慢了,但是确实是解决了冲突问题。
接下来看第二种解决冲突的办法:线性探查。
线性探查就比较粗暴了,当想向表中某个位置加人一个新元素的时候,如果索引为 index 的位置已经被占据了,就尝试 index+1的位置。如果index+1 的位置也被占据了,就尝试 index+2 的位置,以此类推。
直接改写插入的方法:
put(key,value){
  const position = HashTable.loseloseHashCode(key)
  if (this.table[position] === undefined) this.table[position] = { key, value }
  else {
    let index = ++position
    while (this.table[index] !== undefined) index++
    this.table[index] = { key, value }
  }
}
获取:
get(key) {
  const position = HashTable.loseloseHashCode(key)
  const getElementValue = index => {
    if (this.table[index] === undefined) return undefined
    if (Object.is(this.table[index].key, key)) return this.table[index].value
    else return getElementValue(index + 1)
  }
  return getElementValue(position)
}
移除:
remove(key) {
  const position = HashTable.loseloseHashCode(key)
  const removeElementValue = index => {
    if (this.table[key] === undefined) return false
    if (Object.is(this.table[index].key, key)) {
      this.table[index] = undefined
      return true
    }
    else
      return this.removeElementValue(index + 1)
  }
  return removeElementValue(position)
}
整理一下,
class HashTable {
  constructor() {
    this.table = []
  }
  static loseloseHashCode(key) {
    let hash = 0
    for (let codePoint of key) {
      hash += codePoint.charCodeAt()
    }
    return hash % 37
  }
  // 修改和增加元素
  put(key, value) {
    const position = HashTable.loseloseHashCode(key)
    if (this.table[position] === undefined) this.table[position] = { key, value }
    else {
      let index = ++position
      while (this.table[index] !== undefined) index++
      this.table[index] = { key, value }
    }
  }

  get(key) {
    const position = HashTable.loseloseHashCode(key)
    const getElementValue = index => {
      if (this.table[index] === undefined) return undefined
      if (Object.is(this.table[index].key, key)) return this.table[index].value
      else return getElementValue(index + 1)
    }
    return getElementValue(position)
  }

  remove(key) {
    const position = HashTable.loseloseHashCode(key)
    const removeElementValue = index => {
      if (this.table[key] === undefined) return false
      if (Object.is(this.table[index].key, key)) {
        this.table[index] = undefined
        return true
      } else return this.removeElementValue(index + 1)
    }
    return removeElementValue(position)
  }
}
其实线性探查是最简单粗暴的,就你占我位置了,那我去下一个位置,总能找到一个没有被占用的,但是这个方法在数值过多的情况下回就突显缺点:慢,因为如果有上亿的数据,最坏的可能是插入一次需要查找一亿次,这就很浪费时间,所以大佬们就会去寻找更简单的散列函数来处理存入的位置,例如 djb2 、sdbm等等。
接下来介绍一下 djb2 散列函数:
static djb2HashCode(key) {
  let hash = 5381
  for (let codePoint of key) {
    hash = hash * 33 + codePoint.charCodeAt()
  }
  return hash % 1013
}
djb2 函数比 “lose lose” 函数的冲突少的多,能更有效的节约处理冲突的时间。
十、树
