短信猫软件的实现(C#)<十一>软件实现(完结篇)
短信猫软件终于完成,虽然不很完善,但已可以完成所需的大多功能。在软件完成期间有很多的支持,在这里感谢大家的支持,谢谢大家。
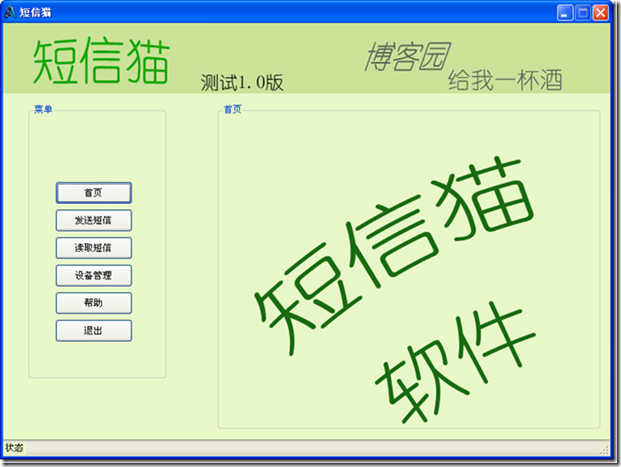
运行主界面:
界面实现:Form1,主界面 上方pictureBox控件,下方用splitContainer控件分为两个部分,左边嵌套菜单窗体,右边嵌套对应每个菜单项要显示的窗体;Form2,菜单窗体;其他Form,对应菜单项窗体。
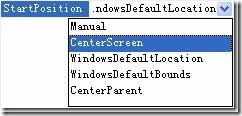
Form1:设置MaxmizeBox属性为False,使最大化按钮无效;设置AutoSizeMode属性为GrowAndShrink,不能手动调整窗体的大小;设置Start Position属性为CenterScreen。


构造函数完成窗体的嵌套1: public Form1()2: {3: InitializeComponent();4:5: //菜单窗体6: f2 = new Form2();7: f2.TopLevel = false;8: f2.FormBorderStyle = FormBorderStyle.None;9: f2.Parent = this.splitContainer1.Panel1;10: f2.Show();11: f2.F2Event += new Form2.F2EventHandler(f2_F2Event); //绑定Form2事件12:13: //首页窗体14: f3 = new Form3();15: f3.TopLevel = false;16: f3.FormBorderStyle = FormBorderStyle.None;17: f3.Parent = this.splitContainer1.Panel2;18: f3.Show();19: f3.BringToFront();20:21: //发送短信窗体22: f4 = new Form4();23: f4.TopLevel = false;24: f4.FormBorderStyle = FormBorderStyle.None;25: f4.Parent = this.splitContainer1.Panel2;26: f4.Show();27:28: //读取短信窗体29: f5 = new Form5();30: f5.TopLevel = false;31: f5.FormBorderStyle = FormBorderStyle.None;32: f5.Parent = this.splitContainer1.Panel2;33: f5.Show();34:35: //设备管理窗体36: f6 = new Form6();37: f6.TopLevel = false;38: f6.FormBorderStyle = FormBorderStyle.None;39: f6.Parent = this.splitContainer1.Panel2;40: f6.Show();41:42: //帮助窗体43: f7 = new Form7();44: f7.TopLevel = false;45: f7.FormBorderStyle = FormBorderStyle.None;46: f7.Parent = this.splitContainer1.Panel2;47: f7.Show();48: }Form2:菜单窗体,仅有6个菜单按钮,单击时引发相应事件(退出按钮除外,退出按钮单击后只运行Application.Exit();即退出程序)
1: private void button_Click(object sender, EventArgs e)2: {3: GSMEventArgs ge = new GSMEventArgs();4: ge.Message = ((Button)sender).Text;5: if (F2Event != null)6: {7: F2Event(this, ge);8: }9: }ge传递按钮信息到主窗体,由主窗体处理相关信息
1: void f2_F2Event(object sender, GSMEventArgs e)2: {3: switch (e.Message)4: {5: case "首页":6: f3.BringToFront(); //首页窗体移至最前7: break;8:9: case "发送短信":10: f4.BringToFront(); //发送短信窗体移至最前11: break;12:13: case "读取短信":14: f5.BringToFront(); //读取短信窗体移至最前15: break;16:17: case "设备管理":18: f6.BringToFront(); //设备管理窗体移至最前19: break;20:21: case "帮助":22: f7.BringToFront(); //帮助窗体移至最前23: break;24:25: default: break;26:27: }28: }事件F2Event对应代码
1: //委托2: public delegate void F2EventHandler(object sender, GSMEventArgs e);3:4: //事件5: public event F2EventHandler F2Event;类GSMEventArgs 代码(位于Form1代码的下面)
1: public class GSMEventArgs : EventArgs2: {3: public string Message;4: }类 GSMEventArgs用于在不同窗体的事件传递有关信息
然后每个窗体上放上对应控件,界面设计完成!
首页和退出功能上面已经完成,下面不再讲解
- 设备类实例化:使用设备类前要添加对GSMMODEM.Dll的引用并:
1: using GSMMODEM;
设备类完成短信的发送、接收、和读取;要允许多个窗体访问;C#中没有全局变量的概念,所有变量都必须在类中定义;所以本程序采用了一个替代方案
在类Program(位于文件Program.cs中)中定义并实例化静态设备对象,代码如下
1: static class Program2: {3: public static GSMModem gm = new GSMModem(); //设备类,全局变量,方便不同窗体使用 添加代码,定义并实例化设备类4:5: /// <summary>6: /// 应用程序的主入口点。7: /// </summary>8: [STAThread]9: static void Main()10: {11: Application.EnableVisualStyles();12: Application.SetCompatibleTextRenderingDefault(false);13: Application.Run(new Form1());14: }15: }这样,在所有窗体中均可访问这个设备对象。访问方式:Program.gm
- 设备管理:设备管理目前只支持单个猫的控制,需要可以自己添加。
设备管理完成设备端口、波特率设置及设备的打开与关闭。Form6为设备管理串口,可以完成设备的设置与管理,设置波特率和串口号,及是否自动打开设备
构造函数添加控件初始化代码:
1: //初始化控件comboBox12: foreach (string s in SerialPort.GetPortNames())3: {4: comboBox1.Items.Add(s);5: }6: if (comboBox1.Items.Count > 0)7: {8: //comboBox1.SelectedIndex = 0;9: }10: else11: {12: label3.Text = "未检测到串口";13: }14:15: //初始化控件comboBox216: //comboBox2.SelectedIndex = 0;串口号用静态方法SerialPort.GetPortNames()扫描得到,是当前电脑注册表里的串口号。
设置文件位于Properties文件夹下,双击Settings.settings文件进入设置的管理窗口,添加ComPort、BaudRate、AutoOpen属性,类型分别为:string、string、bool;用于程序设置;
1: private void Form6_Load(object sender, EventArgs e)2: {3: comboBox1.SelectedText = Properties.Settings.Default.ComPort; //读取设置4:5: comboBox2.SelectedText = Properties.Settings.Default.BaudRate;6:7: checkBox1.Checked = Properties.Settings.Default.AutoOpen;8:9: //设备属性初始化10: Program.gm.ComPort = Properties.Settings.Default.ComPort;11: Program.gm.BaudRate = Convert.ToInt32(Properties.Settings.Default.BaudRate);12: Program.gm.AutoDelMsg = true;13:14: if (Properties.Settings.Default.AutoOpen) //根据设置决定是否打开设备15: {16: button1_Click(sender, e); //调用button1的事件,完成设备的打开17: }18: }窗体加载时写入上次程序关闭时的(设置文件中的)端口号、波特率、是否自动打开设备;若自动打开为true则打开设备
1: private void button1_Click(object sender, EventArgs e)2: {3: if (Program.gm.IsOpen == false)4: {5: try6: {7: Program.gm.Open();8: label3.Text = "打开成功";9: label3.ForeColor = Color.Green;10:11: button1.Text = "关闭设备";12: }13: catch14: {15: label3.Text = "打开失败";16: label3.ForeColor = Color.Red;17: }18: }19: else20: {21: try22: {23: Program.gm.Close();24: label3.Text = "关闭成功";25: label3.ForeColor = Color.Red;26:27: button1.Text = "打开设备";28: }29: catch30: {31: label3.Text = "关闭失败";32: label3.ForeColor = Color.Yellow;33: }34: }35: }button1_Click事件完成设备的打开、关闭。
当comboBox1、comboBox2、checkBox1选项改变时,写入设置并保存设置
1: private void checkBox1_CheckedChanged(object sender, EventArgs e)2: {3: Properties.Settings.Default.AutoOpen = checkBox1.Checked; //更改设置文件4:5: Properties.Settings.Default.Save(); //保存设置文件6: }三个事件的代码一致,其他两个仅多出了设备类属性的改变,这里就不贴出来了,详见工程项目文件的源代码
- 发送短信:窗体Form4完成短信的发送。
发送短信 目标号码部分:用listview控件实现,添加按钮完成单个号码的添加
1: private void button6_Click(object sender, EventArgs e)2: {3: Form9 adNum = new Form9();4: adNum.Owner = this;5:6: //事件 传值7: adNum.AddNumEvent += new Form9.AddNumEventHandler(adNum_AddNumEvent);8:9: adNum.ShowDialog();10: }Form9是添加号码窗体 通过事件AddNumEvent完成号码等信息的传递
1: void adNum_AddNumEvent(object sender, GSMEventArgs e)2: {3: string[] s = e.Message.Split(',');4:5: listView2.Items.Add(s[1]);6: listView2.Items[listView2.Items.Count - 1].SubItems.Add(s[0]);7: listView2.Items[listView2.Items.Count - 1].SubItems.Add(s[2]);8: }Form9中对应代码:
1: private void button1_Click(object sender, EventArgs e)2: {3: if (Regex.IsMatch(textBox2.Text, @"^(1[3|5|8][0-9][0-9][0-9][0-9][0-9][0-9][0-9][0-9][0-9])$"))4: {5: //引发事件6: if (AddNumEvent != null)7: {8: GSMEventArgs ge = new GSMEventArgs();9: ge.Message = textBox1.Text + "," + textBox2.Text + "," + textBox3.Text;10: AddNumEvent(this, ge);11: }12: this.Close();13: }14: else15: {16: MessageBox.Show("手机号码不正确");17: }18: }事件的定义:
1: //委托2: public delegate void AddNumEventHandler(object sender, GSMEventArgs e);3:4: //事件5: public event AddNumEventHandler AddNumEvent;这样即完成了listview的号码添加。
删除号码:
1: private void button7_Click(object sender, EventArgs e)2: {3: ListView.SelectedIndexCollection numToRemove = listView2.SelectedIndices;4: try5: {6: int j = 0;7: foreach (int i in numToRemove)8: {9: listView2.Items.RemoveAt(i - j);10: j = j + 1;11: }12: }13: catch (Exception ex)14: {15: MessageBox.Show(ex.Message);16: }17: }这是从listview控件中删除对应条目,完成手机号码删除。
另外还有号码导入功能,完成多个号码的添加,目前只能从excel中导入;而且需要满足格式要求。代码如下:
1: private void button8_Click(object sender, EventArgs e)2: {3: //xPath指示excel文件路径4: string xPath = null;5: OpenFileDialog openFileDialog1 = new OpenFileDialog();6: openFileDialog1.Filter = "Excel Files(*.xls)|*.xls";7: openFileDialog1.Title = "导入手机号码";8: listView2.SelectedItems.Clear();9: // Show the Dialog.10: // If the user clicked OK in the dialog and11: // a .CUR file was selected, open it.12: if (openFileDialog1.ShowDialog() == DialogResult.OK)13: {14: xPath = openFileDialog1.FileName;15: string strCon;16: strCon = "Provider=Microsoft.Jet.OLEDB.4.0;Data Source=" + xPath + ";Extended Properties='Excel 8.0;HDR=False;IMEX=1'";17: OleDbConnection OleConn = new OleDbConnection(strCon);18: string sql = "SELECT * FROM [Sheet1$]";19: DataSet ds = new DataSet();20: try21: {22: OleConn.Open();23: OleDbDataAdapter da = new OleDbDataAdapter(sql, strCon);24: da.Fill(ds, "sheet1");25: OleConn.Close();26: }27: catch28: {29: MessageBox.Show("无法打开!\n请关闭其他打开此文件的程序后再试");30: }31: DataTable dt = ds.Tables[0];32: try33: {34: foreach (DataRow row in dt.Rows)35: {36: string str = row["手机号码"].ToString();37: if (Regex.IsMatch(str, @"^(1[3|5|8][0-9][0-9][0-9][0-9][0-9][0-9][0-9][0-9][0-9])$"))38: {39: ListViewItem lvi = new ListViewItem(str);40: lvi.SubItems.Add(row["姓名"].ToString());41: lvi.SubItems.Add(row["备注"].ToString());42: listView2.Items.Add(lvi);43: }44: else45: {46: MessageBox.Show("表格第二列不是手机号码或是有错误号码!\n请检查后再试");47: break;48: }49: }50: }51: catch52: {53: MessageBox.Show("程序支持文件为前三列都有内容的xls表格\n第一列“姓名”,第二列“手机号码”,第三列“备注”");54: }55: }56:57: }excel文件第一行前三列内容:第一列“姓名”,第二列“手机号码”,第三列“备注”,这样才能正常导入号码。
发送部分,类 MsgList负责存储要发送的短信及目的号码,对多存储255个号码(同一条短信)
1: //类 MsgList 每次发送创建对象,开启另一线程 根据此类的数据发送短信2: class MsgList3: {4: public MsgList(string[] phonelist, string msg)5: {6: PhoneList = phonelist;7: Msg = msg;8: }9:10: //号码列表11: public string[] PhoneList;12:13: //短信内容14: public string Msg;15: }下面是发送按钮的函数,首先判断字数及号码是否符合规范,上一条是否发送完成(群发 多个号码一条短信)如果完成,则准备发送:更改进度条和前面标签控件的相应属性,以给用户指示发送的状态。最后创建另外线程发送短信。
1: private void button9_Click(object sender, EventArgs e)2: {3: if (textBox1.Text.Length > 70)4: {5: MessageBox.Show("短信字数太长");6: return;7: }8: else if (textBox1.Text.Length == 0)9: {10: MessageBox.Show("不允许发送空短信");11: }12: else if (listView2.Items.Count == 0||listView2.Items.Count>255)13: {14: MessageBox.Show("没有号码或是号码超过255个");15: }16: else if (msgList != null)17: {18: MessageBox.Show("上一条尚未发送完成!无法发送");19: }20: else21: {22: //发送短信时 对应有控件显示23: progressBar1.Visible = true;24: progressBar1.Minimum = 0;25: progressBar1.Maximum = listView2.Items.Count;26: progressBar1.Value = 0;27:28: label5.Visible = true;29: label5.Text = "正在发送";30: label5.ForeColor = Color.Black;31:32: string[] s = new string[255]; //最多255条号码33: for (int i = 0; i < listView2.Items.Count; i++)34: {35: s[i] = listView2.Items[i].Text;36: }37: msgList = new MsgList(s, textBox1.Text); //赋值38: SendOneMsg = new SendEventHandler(OnSendOneMsg); //实例化SendOneMsg,以每次发送完一条短信回调OnSendOneMsg函数39:40: Thread threadSendMsg = new Thread(SendMsg);41: threadSendMsg.Start(); //创建并运行新线程42: }43: }新建线程对应的函数:
1: private void SendMsg()2: {3: foreach (string s in msgList.PhoneList)4: {5: if (s != null && s.Length != 0)6: {7: try8: {9: Program.gm.SendMsg(s, msgList.Msg);10: GSMEventArgs ge = new GSMEventArgs();11: ge.Message = s;12: //SendOneMsg(this, ge);13: Invoke(SendOneMsg,this,ge);14: }15: catch16: {17: GSMEventArgs ge = new GSMEventArgs();18: ge.Message = "发送失败" + s;19: Invoke(SendOneMsg, this, ge);20: return;21: }22: }23: else24: {25: GSMEventArgs ge = new GSMEventArgs();26: ge.Message = "发送完成";27: Invoke(SendOneMsg, this, ge);28: }29: }30: }发送一条或是失败、完成均调用SendOneMsg指向的函数OnSendOneMsg
OnSendOneMsg函数:
1: void OnSendOneMsg(object sender, GSMEventArgs ge)2: {3: if (ge.Message.Substring(0, 4) == "发送失败")4: {5: label5.Text = "发送失败";6: label5.ForeColor = Color.Red;7: }8: else if (ge.Message.Substring(0, 4) == "发送完成")9: {10: //发送完成,控件隐藏11: label5.Visible = false;12: progressBar1.Visible = false;13: label5.Text = "发送完成";14: label5.ForeColor = Color.Green;15:16: msgList = null;17: }18: else19: {20: progressBar1.Value += 1;21: }22: }判断发送一条,或者失败,或者完成而改变控件属性,通知用户短信发送的当前状态。
1: //委托 完成窗体的变化 事件2: delegate void SendEventHandler(object sender, GSMEventArgs ge);3:4: //异步调用 每发送一条调用一次5: SendEventHandler SendOneMsg = null;这是对应委托和回调的声明,两个参数object sender, GSMEventArgs ge传递相关信息。
至此发送窗体部分完成。
- 读取短信: 读取信息窗体Form5
读取信收到短信: 收到短信,在设备OnRecieved事件中调用ReadNewMsg方法读取信息,回调主线程函数完成相应控件的更改
回调声明和实例化:1: //委托 收到短信时回调2: delegate void RecievedMsgHandler(string s);3: RecievedMsgHandler RecievedMsg = null;在Form5_Load中完成实例化和事件OnRecieved的绑定。
1: private void Form5_Load(object sender, EventArgs e)2: {3:4: //添加事件,收到短信5: Program.gm.OnRecieved += new GSMMODEM.GSMModem.OnRecievedHandler(gm_OnRecieved);6: //实例化回调函数7: RecievedMsg = new RecievedMsgHandler(UpdateCtrols);8:9: }在事件OnRecieved中完成已读短信的保存和回调相应函数:
1: void gm_OnRecieved(object sender, EventArgs e)2: {3: string s = Program.gm.ReadNewMsg();4:5: //把收到短信内容写入文件6: using (StreamWriter sw = File.AppendText("已收短信.txt"))7: {8: sw.WriteLine(s);9: sw.Close();10: }11:12: //回调13: Invoke(RecievedMsg, s);14: }RecievedMsg指向的方法是UpdateCtrols,其完成listview控件属性更改,在界面显示短信内容。
1: private void UpdateCtrols(string s)2: {3: listView3.Items.Add(s.Split(',')[1]);4: listView3.Items[listView3.Items.Count - 1].SubItems.Add(s.Split(',')[3]);5: listView3.Items[listView3.Items.Count - 1].SubItems.Add(s.Split(',')[0]);6: listView3.Items[listView3.Items.Count - 1].SubItems.Add(s.Split(',')[2]);7: }控件listview3添加入手机号码列,短信内容列 和不显示的短信中心及时间字符串(用于详细信息显示)。这样新短息就能正常读取,保存并显示在listview中。
读取设备中已收到,但未读短信:设备打开时可能已有未读信息,这里解决这一问题,设备打开时从设备管理窗体引发一个事件,通知本窗体设备被打开,相关代码如下:
1: //委托 事件 通知其他窗体,设备打开2: public delegate void GSMOpenHandler(object sender, GSMEventArgs ge);3:4: public event GSMOpenHandler GSMOpen = null;委托和事件 用来通知其他窗体设备打开。事件引发代码:
1: //新线程 事件引发2: Thread thread = new Thread(GSMOpened);3: thread.Start();这两句代码添加在设备打开的下方,设备打开后即开启另一个线程(事件要读取未读信息,可能要较长时间),引发事件。私有方法GSMOpened代码
1: //新线程函数 事件引发执行2: private void GSMOpened()3: {4: if (GSMOpen != null)5: {6: GSMOpen(this, new GSMEventArgs("设备成功打开"));7: }8: }引发事件,通知其他窗体。
本窗体相关内容:响应事件,在其中读取并保存未读信息,回调相关函数显示未读信息
1: void f6_GSMOpen(object sender, GSMEventArgs ge)2: {3: string[] strs = null;4: try5: {6: strs = Program.gm.GetUnreadMsg();7: if (strs == null) return;8: }9: catch(Exception ex)10: {11: MessageBox.Show(ex.Message);12: }13:14: foreach (string s in strs)15: {16: if (s == null || s.Length == 0) //未读信息已读完17: {18: return;19: }20:21: //把收到短信内容写入文件22: using (StreamWriter sw = File.AppendText("已收短信.txt"))23: {24: sw.WriteLine(s);25: sw.Close();26: }27:28: Invoke(HaveUnreadMsg,s);29: }30: }事件代码:HaveUnreadMsg指向的是UpdateCtrols方法,让listview做出相关显示。
详细信息、回复:详细信息和回复功能相同,显示详细信息窗体(其中包含回复所需控件)
1: //详细信息2: private void button19_Click(object sender, EventArgs e)3: {4: if (listView3.SelectedItems.Count == 0)5: {6: MessageBox.Show("没有选择项");7: return;8: }9:10: Form8 f8 = new Form8(listView3.SelectedItems[0].SubItems[2].Text,11: listView3.SelectedItems[0].SubItems[3].Text,12: listView3.SelectedItems[0].SubItems[0].Text,13: listView3.SelectedItems[0].SubItems[1].Text);14: f8.TopLevel = false;15: f8.FormBorderStyle = FormBorderStyle.None;16: f8.Parent = this.Parent;17: f8.Show();18:19: f8.BringToFront();20: }Form8即使是详细信息窗体 其通过构造函数完成参数的传递
Form8构造函数1: /// <summary>2: /// 构造函数 传递参数3: /// </summary>4: /// <param name="msgCenter">短信中心</param>5: /// <param name="time">时间字符串</param>6: /// <param name="phone">手机号码</param>7: /// <param name="msg">短信内容</param>8: public Form8(string msgCenter,string time,string phone,string msg)9: {10: InitializeComponent();11:12: //13: textBox1.Text = msgCenter;14: textBox2.Text = time.Substring(0, 4) + "-" + time.Substring(4, 2) + "-" + time.Substring(6, 2) + " " +15: time.Substring(8, 2) + ":" + time.Substring(10, 2) + ":" + time.Substring(12);16: textBox3.Text = phone;17: textBox4.Text = msg;18: }Form8中的回复按钮
1: private void button1_Click(object sender, EventArgs e)2: {3: if (textBox5.Text == null || textBox5.Text.Length == 0)4: {5: MessageBox.Show("不允许发送空短信");6: }7: else if (textBox5.Text.Length > 70)8: {9: MessageBox.Show("短信字数过长");10: }11: else12: {13: label6.Visible = true;14: try15: {16: Program.gm.SendMsg(textBox3.Text, textBox5.Text);17: }18: catch19: {20: MessageBox.Show("发送失败");21: }22: label6.Visible = false;23:24: this.Close();25: }26: }仅完成单条信息发送,而且还会阻塞主线程,这个可以做进一步改进。
读取信息部分完成,这一部分完成的质量最不好,希望大家不要介意,这里只为大家提供了一个使用示例。
- 帮助:帮助部分仅有一个窗体,未加入其他内容,在这里就不做讲解了。
短信猫软件的实现(C#)系列文章到此全部结束了,类库如有错误或是严重Bug还会更新,更新时会更新相应文件并在文章最后予以说明,或是添加其他文章对其说明,关于程序的bug或是不足之处,欢迎拍砖。
程序中肯定有不少错误或是Bug,欢迎大家提出宝贵意见,谢谢大家支持了啊。
附件:工程项目文件


