Professional C# 6 and .NET Core 1.0 - Chapter 43 WebHooks and SignalR
本文内容为转载,重新排版以供学习研究。如有侵权,请联系作者删除。
转载请注明本文出处:Professional C# 6 and .NET Core 1.0 - Chapter 43 WebHooks and SignalR
-----------------------------------------------------------------------
What’s In This Chapter?
- Overview of SignalR
- Creating a SignalR hub
- Creating a SignalR client with HTML and JavaScript
- Creating a SignalR .NET client
- Using groups with SignalR
- Overview of WebHooks
- Creating WebHook receivers for GitHub and Dropbox
Wrox.com Code Downloads for This Chapter
The wrox.com code downloads for this chapter are found at www.wrox.com/go/professionalcsharp6 on the Download Code tab. The code for this chapter is divided into the following major examples:
- Chat Server using SignalR
- WPF Chat Client using SignalR
- SaaS WebHooks Receiver Sample
Overview
With .NET you can use events to get notifications. You can register an event handler method with an event, also known as subscribing to events, and as soon as the event is fired from another place, your method gets invoked. Events cannot be used with web applications.
Previous chapters have covered a lot about web applications and web services. What was common with these applications and services is that the request was always started from the client application. The client makes an HTTP request and receives a response.
What if the server has some news to tell? There’s nothing like events that you can subscribe to, or are there? With the web technologies you’ve seen so far, this can be resolved by the client polling for new information. The client has to make a request to the server to ask whether new information is available. Depending on the request interval defined, this way of communication results in either a high load of requests on the network that just result in “no new information is available,” or the client misses actual information and when asking for new information receives information that is already old.
If the client is itself a web application, the direction of the communication can be turned around, and the server can send messages to the client. This is how WebHooks work.
With clients behind a firewall, using the HTTP protocol there’s no way for the server to initiate a connection to the client. The connection always needs to be started from the client side. Because HTTP connections are stateless, and clients often can’t connect to ports other than port 80, WebSockets can help. WebSockets are initiated with an HTTP request, but they’re upgraded to a WebSocket connection where the connection stays open. Using the WebSockets protocol, the server can send information to the client over the open connection as soon as the server has new information.
NOTE Using WebSockets from lower-level API calls is discussed in Chapter 25, “Networking.”
SignalR is an ASP.NET web technology that offers an easy abstraction over WebSockets. Using SignalR is a lot easier than programming using the sockets interface. Also, if the client does not support the WebSocket API, SignalR automatically switches to a polling mechanism without you having to change the program.
NOTE At the time of this writing, SignalR for ASP.NET Core 1.0 is not yet available. That’s why this chapter shows using SignalR 2 using ASP.NET 4.6 and ASP.NET Web API 2. Check http://www.github.com/ProfessionalCSharp for additional samples with SignalR 3 for ASP.NET Core 1.0 as SignalR 3 becomes available.
WebHooks is a technology that is offered by many SaaS (Software as a Service) providers. You can register with such a provider, provide a public Web API to the service provider, and this way the service provider can call back as soon as new information is available.
This chapter covers both SignalR and WebHooks. As these technologies complement each other, they can also be used in combination.
Architecture of SignalR
SignalR consists of multiple NuGet packages that can be used on the server and the client side.
|
NuGet Package |
Description |
|
Microsoft.AspNet.SignalR |
This package references other packages for the server-side implementation. |
|
Microsoft.AspNet.SignalR.Core |
This is the core package for SignalR. This package contains the Hub class |
|
Microsoft.AspNet.SignalR.SystemWeb |
This NuGet package contains extensions for ASP.NET 4.x to define the routes. |
|
Microsoft.AspNet.SignalR.JavaScript |
This NuGet package contains JavaScript libraries for SignalR clients. |
|
Microsoft.AspNet.SignalR.Client |
This NuGet package contains types for .NET clients. A HubProxy is used to connect to a Hub. |
With SignalR, the server defines a hub where clients connect to (see Figure 43.1). The hub keeps a connection to every client. Using the hub, you can send a message to every client connected. You can either send messages to all clients, or select specific clients or groups of clients to send messages to.

Figure 43.1
A Simple Chat Using SignalR
The first SignalR sample application is a chat application, which is easy to create with SignalR. With this application, multiple clients can be started to communicate with each other via the SignalR hub. When one of the client applications sends a message, all the connected clients receive this message in turn.
The server application is written with ASP.NET 4.6, one of the clients is created with HTML and JavaScript, and the other client application is a .NET application using WPF for the user interface.
Creating a Hub
As previously mentioned, ASP.NET Core is not supported with SignalR—at least at the time of this writing. That’s why you start creating a hub with a new ASP.NET Web Application, select the Empty ASP.NET 4.6 template, and name it ChatServer. After creating the project, add a new item and select SignalR Hub class (see Figure 43.2). Adding this item also adds the NuGet packages that are needed server side.
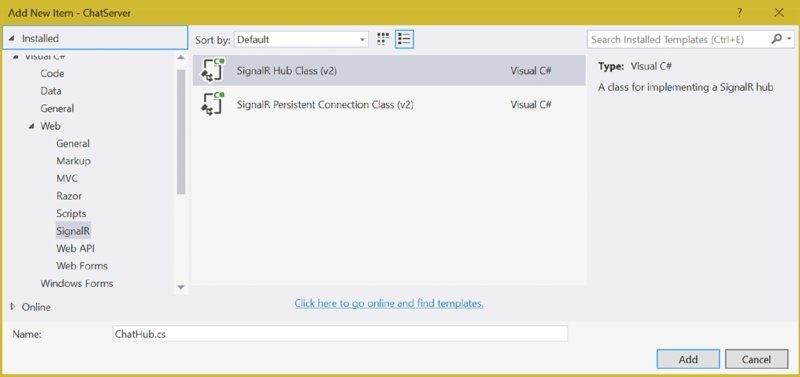
Figure 43.2
To define the URL for SignalR, you can create an OWIN Startup class (using the OWIN Startup Class item template) and add the invocation to MapSignalR to the Configuration method. The MapSignalR method defines the signalR URI as a path for requests to the SignalR hubs (code file ChatServer/Startup.cs):
using Microsoft.Owin;
using Owin;
[assembly: OwinStartup(typeof(ChatServer.Startup))]
namespace ChatServer
{
  public class Startup
  {
    public void Configuration(IAppBuilder app)
    {
      app.MapSignalR();
    }
  }
}
The main functionality of SignalR is defined with the hub. The hub is indirectly invoked by the clients, and in turn the clients are called. The class ChatHub derives from the base class Hub to get the needed hub functionality. The method Send is defined to be invoked by the client applications sending a message to the other clients. You can use any method name with any number of parameters. The client code just needs to match the method name as well as the parameters. To send a message to the clients, the Clients property of the Hub class is used. The Clients property returns an IHubCallerConnectContext<dynamic> that allows sending messages to specific clients or to all connected clients. The sample code invokes the BroadcastMessage with all connected clients using the All property. The All property (with the Hub class as the base class) returns a dynamic object. This way you can invoke any method name you like with any number of parameters; the client code just needs to match this (code file ChatServer/ChatHub.cs):
public class ChatHub: Hub
{
  public void Send(string name, string message)
  {
    Clients.All.BroadcastMessage(name, message);
  }
}
NOTE The dynamic type is explained in Chapter 16, “Reflection, Metadata, and Dynamic Programming.”
NOTE Instead of using the dynamic type within the hub implementation, you can also define your own interface with methods that are invoked in the client. How this can be done is shown later in this chapter in the “Grouping Connections” sections, when grouping functionality is added.
Creating a Client with HTML and JavaScript
With the help of the SignalR JavaScript library, you can easily create a HTML/JavaScript client to use the SignalR hub. The client code connects to the
SignalR hub, invokes the Send method, and adds a handler to receive the BroadcastMessage method.
For the user interface, two simple input elements are defined to allow entering the name and the message to send, a button to call the Send method, and an unordered list where all the messages received are shown (code file ChatServer/ChatWindow.html):
Enter your name <input type="text" id="name" />
<br />
Message <input type="text" id="message" />
<button type="button" id="sendmessage">Send</button>
<br />
<ul id="messages">
</ul>
The scripts that need to be included are shown in the following code snippet. The versions might differ with your implementation. jquery.signalR defines the client side functionality for the SignalR implementation. The hub proxy is used to make the call to the SignalR server. The reference to the script signalr/hubs contain automatically generated scripting code that creates hub proxies that matches the custom code from the hub code (code file ChatServer/ChatWindow.html):
<script src="Scripts/jquery-1.11.3.js"></script>
<script src="Scripts/jquery.signalR-2.2.0.js"></script>
<script src="signalr/hubs"></script>
After including the script files, custom script code can be created to make the call to the hub, and to receive the broadcasts. In the following code snippet, $.connection.chatHub returns a hub proxy to invoke the methods of the ChatHub class in turn. chat is a variable defined to in turn use this variable instead of accessing $.connection.chatHub. Assigning a function to chat.client.broadcastMessage defines the function that is invoked when the BroadcastMessage is called by the server-side hub code. As the BroadcastMessage method passes two string parameters for the name and the message, the declared function matches the same parameters. The parameter values are added to the unordered list item within a list item element. After defining the implementation of the broadcastMessage call, you make a connection to the server by starting the connection with $.connection.hub.start(). As soon as the start of the connection is completed, the function assigned to the done function is invoked. Here, the click handler to the sendmessage button is defined. When you clicking this button, a message to the server is sent using chat.server.send, passing two string values (code file ChatServer/ChatWindow.html):
<script> $(function () { var chat = $.connection.chatHub; chat.client.broadcastMessage = function (name, message) { var encodedName = $('<div />').text(name).html(); var encodedMessage = $('<div />').text(message).html(); $('#messages').append('<li>' + encodedName + ': ' + encodedMessage + '</li>'); }; $.connection.hub.start().done(function () { $('#sendmessage').click(function () { chat.server.send($('#name').val(), $('#message').val()); $('#message').val(''); $('#message').focus(); }); }); }); </script>
When you run the application, you can open multiple browser windows—even using different browsers—you can enter names and messages for a chat (see Figure 43.3).

Figure 43.3
When you use the Internet Explorer Developer Tools (press F12 while Internet Explorer is open) you can use Network Monitoring to see the upgrade from the HTTP protocol to the WebSocket protocol, as shown in Figure 43.4.
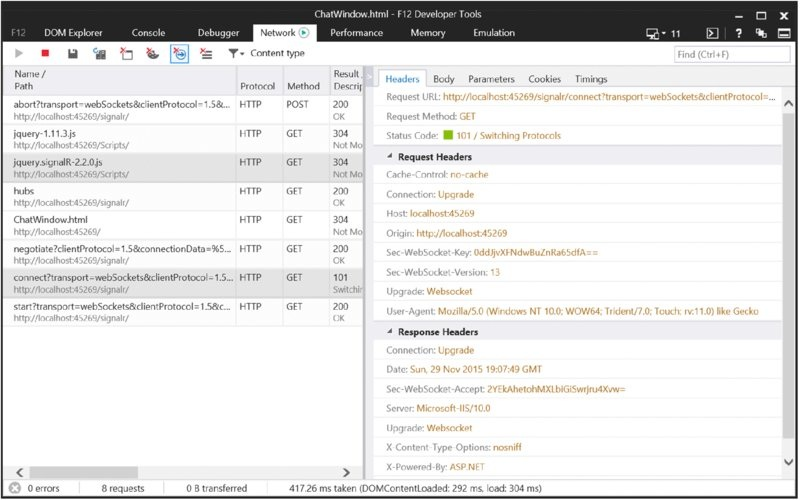
Figure 43.4
Creating SignalR .NET Clients
The sample .NET client application to use the SignalR server is a WPF application. The functionality is similar to the HTML/JavaScript application shown earlier. This application makes use of these NuGet packages and namespaces:
NuGet Packages
Microsoft.AspNet.SignalR.Client
Microsoft.Extensions.DependencyInjection
Newtonsoft.Json
Namespaces
Microsoft.AspNet.SignalR.Client
Microsoft.Extensions.DependencyInjection
System
System.Collections.ObjectModel
System.Net.Http
System.Windows
The user interface of the WPF application defines two TextBox, two Button, and one ListBox element to enter the name and message, to connect to the service hub, and to show a list of received messages (code file WPFChatClient/MainWindow.xaml):
<TextBlock Text="Name" />
<TextBox Text="{Binding ViewModel.Name, Mode=TwoWay}" />
<Button Content="Connect" Command="{Binding ViewModel.ConnectCommand}" />
<TextBlock Text="Message" />
<TextBox Text="{Binding ViewModel.Message, Mode=TwoWay}" />
<Button Content="Send" Command="{Binding ViewModel.SendCommand,
Mode=OneTime}" />
<ListBox ItemsSource="{Binding ViewModel.Messages, Mode=OneWay}" />
In the startup code of the application, the dependency injection container is defined, and services as well as view models are registered (code file WPFChatClient/App.xaml.cs):
public partial class App: Application
{
  protected override void OnStartup(StartupEventArgs e)
  {
    base.OnStartup(e);
    IServiceCollection services = new ServiceCollection();
    services.AddTransient<ChatViewModel>();
    services.AddTransient<GroupChatViewModel>();
    services.AddSingleton<IMessagingService, MessagingService>();
    Container = services.BuildServiceProvider();
  }
  public IServiceProvider Container { get; private set; }
}
Within the code-behind file of the view, the ChatViewModel is assigned to the ViewModel property using the dependency injection container (code file WPFChatClient/MainWindow.xaml.cs):
public partial class MainWindow: Window
{
  public MainWindow()
  {
    InitializeComponent();
    this.DataContext = this;
  }
  public ChatViewModel ViewModel { get; } =
    (App.Current as App).Container.GetService<ChatViewModel>();
}
NOTE WPF is covered in detail in Chapter 34, “Windows Desktop Applications with WPF.” The Model-View-ViewModel (MVVM) pattern is explained in Chapter 31, “Patterns with XAML Apps.”
The hub-specific code is implemented in the class ChatViewModel. First, have a look at the bound properties and commands. The property Name is bound to enter the chat name, the Message property to enter the message. The ConnectCommand property maps to the OnConnect method to initiate the connection to the server; the SendCommand property maps to the OnSendMessage method to send a chat message (code file WPFChatClient/ViewModels/ChatViewModel.cs):
public sealed class ChatViewModel: IDisposable
{
  private const string ServerURI ="http://localhost:45269/signalr";
  private readonly IMessagingService _messagingService;
  public ChatViewModel(IMessagingService messagingService)
  {
    _messagingService = messagingService;
    ConnectCommand = new DelegateCommand(OnConnect);
    SendCommand = new DelegateCommand(OnSendMessage);
  }
  public string Name { get; set; }
  public string Message { get; set; }
  public ObservableCollection<string> Messages { get; } =
    new ObservableCollection<string>();
  public DelegateCommand SendCommand { get; }
  public DelegateCommand ConnectCommand { get; }
  // etc.
}
The OnConnect method initiates the connection to the server. First, a new HubConnection object passing the URL to the server is created. With the HubConnection, the proxy can be created using CreateHubProxy, passing the name of the hub. Using the proxy, methods of the service can be called. To register with messages that are returned from the server, the On method is invoked. The first parameter passed to the On method defines the method name that is called by the server; the second parameter defines a delegate to the method that is invoked. The method OnMessageReceived has the parameters specified with the generic parameter arguments of the On method: two strings. To finally initiate the connection, the Start method on the HubConnection instance is invoked (code file WPFChatClient/ViewModels/ChatViewModel.cs):
private HubConnection _hubConnection;
private IHubProxy _hubProxy;
public async void OnConnect()
{
  CloseConnection();
  _hubConnection = new HubConnection(ServerURI);
  _hubConnection.Closed += HubConnectionClosed;
  _hubProxy = _hubConnection.CreateHubProxy("ChatHub");
  _hubProxy.On<string, string>("BroadcastMessage", OnMessageReceived);
  try
  {
    await _hubConnection.Start();
  }
  catch (HttpRequestException ex)
  {
    _messagingService.ShowMessage(ex.Message);
  }
  _messagingService.ShowMessage("client connected");
}
Sending messages to SignalR requires only calls to the Invoke method of the IHubProxy. The first parameter is the name of the method that should be invoked by the server; the following parameters are the parameters of the method on the server (code file WPFChatClient/ViewModels/ChatViewModel.cs):
public void OnSendMessage()
{
  _hubProxy.Invoke("Send", Name, Message);
}
When receiving a message, the OnMessageReceived method is invoked. Because this method is invoked from a background thread, you need to switch back to the UI
thread that updates bound properties and collections (code file
WPFChatClient/ViewModels/ChatViewModel.cs):
public void OnMessageReceived(string name, string message)
{
  App.Current.Dispatcher.Invoke(() =>
  {
    Messages.Add($"{name}: {message}");
  });
}
When you run the application, you can receive and send messages from the WPF client as shown in Figure 43.5. You can also open the web page simultaneously and communicate between them.
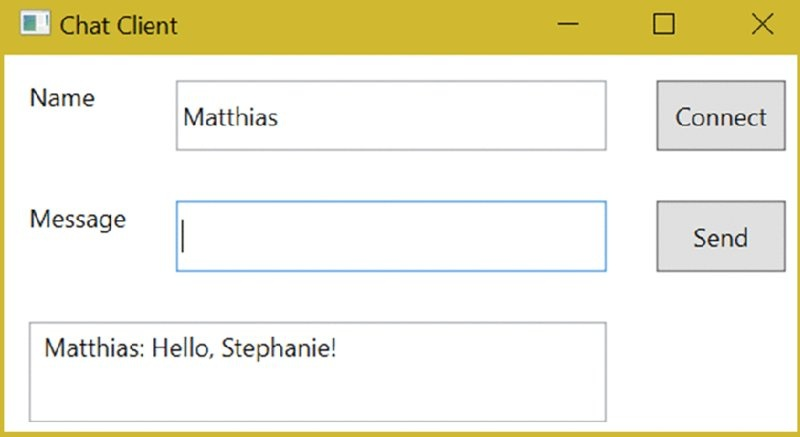
Figure 43.5
Grouping Connections
Usually you don’t want to communicate among all clients, but you instead want to communicate among a group of clients. There’s support out of the box for such a scenario with SignalR.
In this section, you add another chat hub with grouping functionality and also have a look at other options that are possible using SignalR hubs. The WPF client application is extended to enter groups and send a message to a selected group.
Extending the Hub with Groups
To support a group chat, you create the class GroupChatHub. With the previous hub, you saw how to use the dynamic keyword to define the message that is sent to the clients. Instead of using the dynamic type, you can also create a custom interface as shown in the following code snippet. This interface is used as a generic parameter with the base class Hub (code file ChatServer/GroupChatHub.cs):
public interface IGroupClient
{
  void MessageToGroup(string groupName, string name, string message);
}
public class GroupChatHub: Hub<IGroupClient>
{
  // etc.
}
AddGroup and LeaveGroup are methods defined to be called by the client. Registering the group, the client sends a group name with the AddGroup method. The Hub class defines a Groups property where connections to groups can be registered. The Groups property of the Hub class returns IGroupManager. This interface defines two methods: Add and Remove. Both of these methods need a group name and a connection identifier to add or remove the specified connection to the group. The connection identifier is a unique identifier associated with a client connection. The client connection identifier—as well as other information about the client—can be accessed with the Context property of the Hub class. The
following code snippet invokes the Add method of the IGroupManager to register a group with the connection, and the Remove method to unregister a group (code file ChatServer/GroupChatHub.cs):
public Task AddGroup(string groupName) =>
  Groups.Add(Context.ConnectionId, groupName);
public Task LeaveGroup(string groupName) =>
  Groups.Remove(Context.ConnectionId, groupName);
NOTE The Context property of the Hub class returns an object of type HubCallerContext. With this class, you can not only access the connection identifier associated with the connection, but you can access other information about the client, such as the header, query string, and cookie information from the HTTP request and also information about the user. This information can be used for user authentication.
Invoking the Send method—this time with three parameters including the group—sends information to all connections that are associated with the group. The Clients property is now used to invoke the Group method. The Group method accepts a group string to send the MessageToGroup message to all connections associated with the group name. With an overload of the Group method you can add connection IDs that should be excluded. Because the Hub implements the interface IGroupClient, the Groups method returns the IGroupClient. This way, the MessageToGroup method can be invoked using compile-time support (code file ChatServer/GroupChatHub.cs):
public void Send(string group, string name, string message)
{
  Clients.Group(group).MessageToGroup(group, name, message);
}
Several other extension methods are defined to send information to a list of client connections. You’ve seen the Group method to send messages to a group of connections that’s specified by a group name. With this method, you can exclude client connections. For example, the client who sent the message might not need to receive it. The Groups method accepts a list of group names where a message should be sent to. You’ve already seen the All property to send a message to all connected clients. Methods to exclude sending the message to the caller are OthersInGroup and OthersInGroups. These methods send a message to one specific group excluding the caller, or a message to a list of groups excluding the caller.
You can also send messages to a customized group that’s not based on the built-in grouping functionality. Here, it helps to override the methods OnConnected, OnDisconnected, and OnReconnected. The OnConnected method is invoked every time a client connects; the OnDisconnected method is invoked when a client disconnects. Within these methods, you can access the Context property of the Hub class to access client information as well as the client-associated connection ID. Here, you can write the connection information to a shared state to have your server scalable using multiple instances, accessing the same shared state. You can also select clients based on your own business logic, or implement priorities when sending messages to privilege specific clients.
public override Task OnConnected()
{
  return base.OnConnected();
}
public override Task OnDisconnected(bool stopCalled)
{
  return base.OnDisconnected(stopCalled);
}
Extending the WPF Client with Groups
After having the grouping functionality with the hub ready, you can extend the WPF client application. For the grouping features, another XAML page associated with the GroupChatViewModel class is defined.
The GroupChatViewModel class defines some more properties and commands compared to the ChatViewModel defined earlier. The NewGroup property defines the group the user registers to. The SelectedGroup property defines the group that is used with the continued communication, such as sending a message to the group or leaving the group. The SelectedGroup property needs change notification to update the user interface on changing this property; that’s why the INotifyPropertyChanged interface is implemented with the GroupChatViewModel class, and the set accessor of the property SelectedGroup fires a notification. Commands to join and leave the group are defined as well: the EnterGroupCommand and LeaveGroupCommand properties (code file WPFChatClient/ViewModels/GroupChatViewModel.cs):
public sealed class GroupChatViewModel: IDisposable, INotifyPropertyChanged
{
  private readonly IMessagingService _messagingService;
  public GroupChatViewModel(IMessagingService messagingService)
  {
    _messagingService = messagingService;
    ConnectCommand = new DelegateCommand(OnConnect);
    SendCommand = new DelegateCommand(OnSendMessage);
    EnterGroupCommand = new DelegateCommand(OnEnterGroup);
    LeaveGroupCommand = new DelegateCommand(OnLeaveGroup);
  }
  private const string ServerURI ="http://localhost:45269/signalr";
  public event PropertyChangedEventHandler PropertyChanged;
  public string Name { get; set; }
  public string Message { get; set; }
  public string NewGroup { get; set; }
  private string _selectedGroup;
  public string SelectedGroup
  {
    get { return _selectedGroup; }
    set
    {
      _selectedGroup = value;
      PropertyChanged?.Invoke(this, new PropertyChangedEventArgs(
        nameof(SelectedGroup)));
    }
  }
  public ObservableCollection<string> Messages { get; } =
    new ObservableCollection<string>();
  public ObservableCollection<string> Groups { get; } =
    new ObservableCollection<string>();
  public DelegateCommand SendCommand { get; }
  public DelegateCommand ConnectCommand { get; }
  public DelegateCommand EnterGroupCommand { get; }
  public DelegateCommand LeaveGroupCommand { get; }
  // etc.
}
The handler methods for the EnterGroupCommand and LeaveGroupCommand commands are shown in the following code snippet. Here, the AddGroup and RemoveGroup methods are called within the group hub (code file WPFChatClient/ViewModels/GroupChatViewModel.cs):
public async void OnEnterGroup()
{
  try
  {
    await _hubProxy.Invoke("AddGroup", NewGroup);
    Groups.Add(NewGroup);
    SelectedGroup = NewGroup;
  }
  catch (Exception ex)
  {
    _messagingService.ShowMessage(ex.Message);
  }
}
public async void OnLeaveGroup()
{
  try
  {
    await _hubProxy.Invoke("RemoveGroup", SelectedGroup);
    Groups.Remove(SelectedGroup);
  }
  catch (Exception ex)
  {
    _messagingService.ShowMessage(ex.Message);
  }
}
Sending and receiving the messages is very similar to the previous sample, with the difference that the group information is added now (code file WPFChatClient/ViewModels/GroupChatViewModel.cs):
public async void OnSendMessage()
{
  try
  {
    await _hubProxy.Invoke("Send", SelectedGroup, Name, Message);
  }
  catch (Exception ex)
  {
    _messagingService.ShowMessage(ex.Message);
  }
}
public void OnMessageReceived(string group, string name, string message)
{
  App.Current.Dispatcher.Invoke(() =>
  {
    Messages.Add($"{group}-{name}: {message}");
  });
}
When you run the application, you can send messages for all groups that have been joined and see received messages for all registered groups, as shown in Figure 43.6.
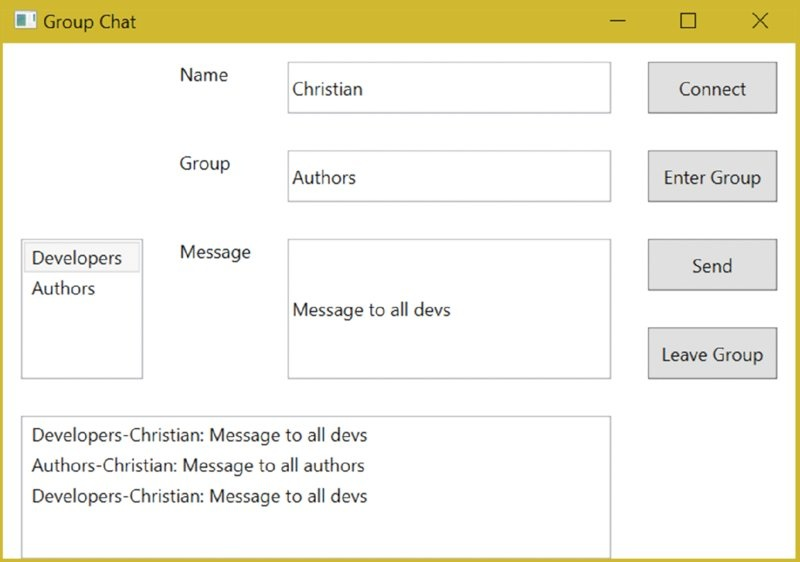
Figure 43.6
Architecture of WebHooks
WebHooks offer publish/subscribe functionality with web applications. That’s the only similarity between WebHooks and SignalR. Otherwise, WebHooks and SignalR are very different and can take advantage of each other. Before discussing how they can be used together, let’s get into an overview of WebHooks.
With WebHooks, an SaaS (Software as a Service) service can call into your website. You just need to register your site with the SaaS service. The SaaS service than calls your website (see Figure 43.7). In your website, the receiver controller receives all messages from WebHooks senders and forwards it to the corresponding receiver. The receiver verifies security to check whether the message is from the registered sender, and then it forwards the message to the handler. The handler contains your custom code to process the request.
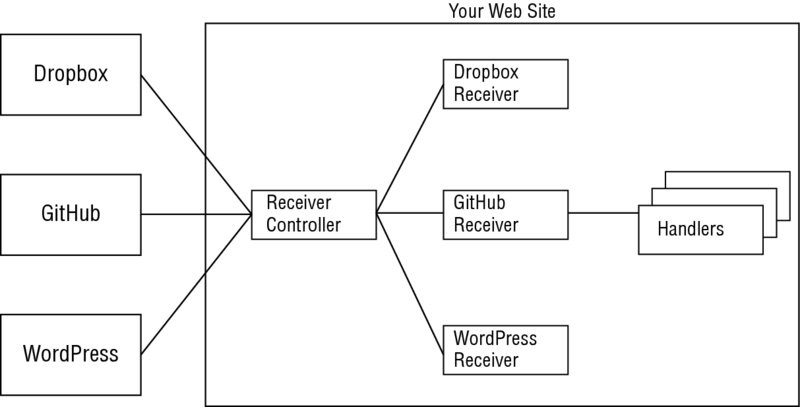
Figure 43.7
Contrary to the SignalR technology, the sender and receiver are not always connected. The receiver just offers a service API that is invoked by the sender when needed. The receiver needs to be available on a public Internet address.
The beauty of WebHooks is the ease of use on the receiver side and the support it receives from many SaaS providers, such as Dropbox, GitHub, WordPress, PayPal, Slack, SalesForce, and others. More new providers are coming every week.
Creating a sender is not as easy as creating a receiver, but there’s also great support with an ASP.NET Framework. A sender needs a registration option for WebHook receivers, which is typically done using a Web UI. Of course you can also create a Web API instead to register programmatically. With the registration, the sender receives a secret from the receiver together with the URL it needs to call into. This secret is verified by the receiver to only allow senders with this secret. As events occur with the sender, the sender fires a WebHook, which in reality involves invoking a web service of the receiver and passing (mostly) JSON information.
Microsoft’s ASP.NET NuGet packages for WebHooks make it easy to implement receivers for different services by abstracting the differences. It’s also easy to create the ASP.NET Web API service that verifies the secrets sent by the senders and forward the calls to custom handlers.
To see the ease of use and the beauty of WebHooks, a sample application is shown to create Dropbox and GitHub receivers. When creating multiple receivers you see what’s different between the providers and what functionality is offered by the NuGet packages. You can create a receiver to other SaaS providers in a similar manner.
Creating Dropbox and GitHub Receivers
To create and run the Dropbox and GitHub receiver example, you need both a GitHub and a Dropbox account. With GitHub you need admin access to a repository. Of course, for learning WebHooks, it’s fine to use just one of these technologies. What’s needed with all the receivers, no matter what service you use, is for you to have a way to make your website publicly available—for example, by publishing to Microsoft Azure.
Dropbox (http://www.dropbox.com) offers a file store in the cloud. You can save your files and directories and also share them with others. With WebHooks you can receive information about changes in your Dropbox storage—for example, you can be notified when files are added, modified, and deleted.
GitHub (http://www.github.com) offers source code repositories. .NET Core and ASP.NET Core 1.0 are available in public repositories on GitHub, and so is the source code for this book (http://www.github.com/ProfessionalCSharp/ProfessionalCSharp6). With the GitHub WebHook you can receive information about push events or about all changes to the repository, such as forks, updates to Wiki pages, issues, and more.
Creating a Web Application
Start by creating an ASP.NET Web Application named SaasWebHooksReceiverSample. Select MVC with the ASP.NET 4.6 Templates and add Web API to the options (see Figure 43.8).
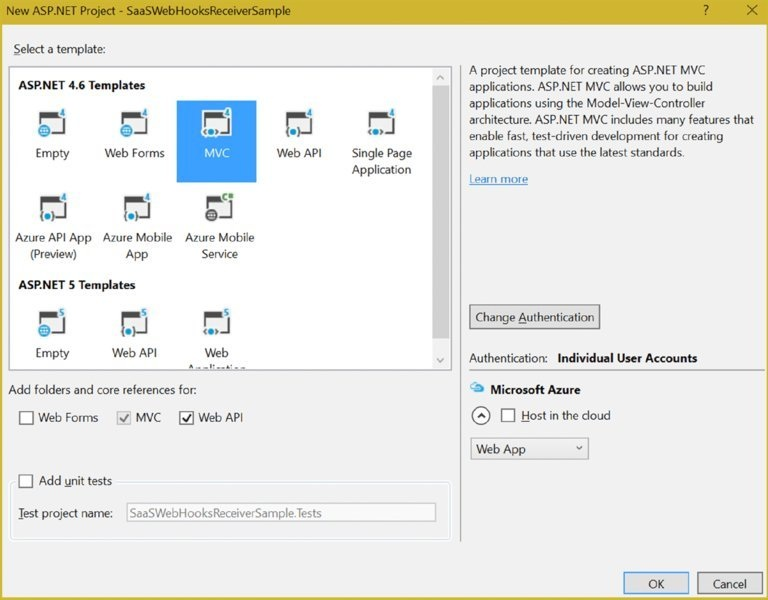
Figure 43.8
Next, add the NuGet packages Microsoft.AspNet.WebHooks.Receivers.Dropbox and Microsoft.AspNet .WebHooks.Receivers.GitHub. These are the NuGet packages that support receiving messages from Dropbox and GitHub. With the NuGet package manager you’ll find many more NuGet packages that support other SaaS services.
Configuring WebHooks for Dropbox and GitHub
You can initialize WebHooks for Dropbox by invoking the extension method InitializeReceiveDropboxWebHooks and initialize WebHooks for GitHub by invoking the extension method InitializeReceiveGitHubWebHooks. You invoke these methods with HttpConfiguration in the startup code (code file SaaSWebHooksReceiverSample/App_Start/WebApiConfig.cs):
using System.Web.Http;
namespace SaaSWebHooksReceiverSample
{
  public static class WebApiConfig
  {
    public static void Register(HttpConfiguration config)
    {
      config.MapHttpAttributeRoutes();
      config.Routes.MapHttpRoute(
        name:"DefaultApi",
        routeTemplate:"api/{controller}/{id}",
        defaults: new { id = RouteParameter.Optional }
      );
      config.InitializeReceiveDropboxWebHooks();
      config.InitializeReceiveGitHubWebHooks();
    }
  }
}
To only allow messages from the defined SaaS services, secrets are used. You can configure these secrets with the application settings. The key for the settings is predefined from the code in the NuGet packages. For Dropbox, the key MS_WebHookReceiverSecret_Dropbox is used, with GitHub MS_WebHookReceiverSecret_GitHub. Such a secret needs to be at least 15 characters long.
In case you would like to use different Dropbox accounts or different GitHub repositories, you can use different secrets to define multiple secrets with identifiers, as shown in the following code snippet (code file SaaSWebHooksReceiverSample/Web.config):
<appSettings>
  <add key="webpages:Version" value="3.0.0.0" />
  <add key="webpages:Enabled" value="false" />
  <add key="ClientValidationEnabled" value="true" />
  <add key="UnobtrusiveJavaScriptEnabled" value="true" />
  <add key="MS_WebHookReceiverSecret_Dropbox"
    value="123451234512345123456789067890,
    dp1=987654321000987654321000988" />
  <add key="MS_WebHookReceiverSecret_Github"
    value="123456789012345678901234567890,
    gh1=98765432109876543210, gh2=8765432109876543210" />
</appSettings>
Implementing the Handler
The functionality of the WebHook is implemented in the WebHookHandler. What can be done in this handler? You can write the information to a database, to a file, to invoke other services, and so on. Just be aware that the implementation shouldn’t take too long—just a few seconds. In cases where the implementation takes too long, the sender might resend the request. For longer activities, it’s best to write the information to a queue and work through the queue after the method is finished—for example, by using a background process.
For the sample application receiving an event, a message is written into the Microsoft Azure Storage queue. For using this queuing system you need to create a Storage account at http://portal.azure.com. With the sample application, the Storage account is named professionalcsharp. For using Microsoft Azure Storage, you can add the NuGet package WindowsAzure.Storage to the project.
After creating the Azure Storage account, open the portal and copy the account name and primary access key, and add this information to the configuration file (code file SaaSWebHooksSampleReceiver/web.config):
<add key="StorageConnectionString"
<add key="StorageConnectionString"
  value="DefaultEndpointsProtocol=https;
    AccountName=add your account name;AccountKey=add your account key==" />
To send a message to the queue, you create the QueueManager. In the constructor, you create a CloudStorageAccount object by reading the configuration files from the configuration file. The CloudStorageAccount allows accessing the different Azure Storage facilities such as queue, table, and blob storage. The method CreateCloudQueueClient returns a CloudQueueClient that allows creating queues and writing messages to queues. If the queue does not yet exist, it is created by CreateIfNotExists. The AddMessage of the queue writes a message (code file SaaSWebHooksSampleReceiver/WebHookHandlers/QueueManager.cs):
public class QueueManager
{
  private CloudStorageAccount _storageAccount;
  public QueueManager()
  {
    _storageAccount = CloudStorageAccount.Parse(
      ConfigurationManager.AppSettings["StorageConnectionString"]);
  }
  public void WriteToQueueStorage(string queueName, string actions,
    string json)
  {
    CloudQueueClient client = _storageAccount.CreateCloudQueueClient();
    CloudQueue queue = client.GetQueueReference(queueName);
    queue.CreateIfNotExists();
    var message = new CloudQueueMessage(actions +"—-" + json);
    queue.AddMessage(message);
  }
}
Next, let’s get into the most important part of the WebHook implementation: the custom handlers for the Dropbox and GitHub events. A WebHook handler derives from the base class WebHookHandler and overrides the abstract method ExecuteAsync from the base class. With this method, you receive the receiver and the context from the WebHook. The receiver contains the information about the SaaS service—for example, github and dropbox with the sample code. After the responsible receiver received the event, all the handlers are invoked one after the other. If every handler is used for a different service, it’s best to check the receiver first and compare it to the corresponding service before executing the code. With the sample code, both handlers invoke the same functionality with the only difference being different queue names. Here, just one handler would suffice. However, because you usually have different implementations based on the SaaS service, two handlers have been implemented in the sample code where each checks for the receiver name. With the WebHookHandlerContext you can access a collection of actions, which is a list of reasons why the WebHook was fired, information about the request from the caller, and the JSON object that was sent from the service. The actions and the JSON object are written to the Azure Storage queue (code file SaaSWebHooksSampleReceiver/WebHookHandlers/GithubWebHookHandler.cs):
public class GithubWebHookHandler: WebHookHandler
{
  public override Task ExecuteAsync(string receiver,
    WebHookHandlerContext context)
  {
    if ("GitHub".Equals(receiver,
StringComparison.CurrentCultureIgnoreCase))
    {
      QueueManager queue = null;
      try
      {
        queue = new QueueManager();
        string actions = string.Join(",", context.Actions);
        JObject incoming = context.GetDataOrDefault<JObject>();
        queue.WriteToQueueStorage("githubqueue", actions,
incoming.ToString());
      }
      catch (Exception ex)
      {
        queue?.WriteToQueueStorage("githubqueue","error", ex.Message);
      }
    }
    return Task.FromResult<object>(null);
  }
}
With the implementation in a production scenario you can already read information from the JSON object and react accordingly. However, remember that you should do the work within the handler within a few seconds. Otherwise the service can resend the WebHook. This behavior is different based on the providers.
With the handlers implemented, you can build the project and publish the application to Microsoft Azure. You can publish directly from the Solution Explorer in Visual Studio. Select the project, choose the Publish context menu, and select a Microsoft Azure App Service target.
NOTE Publishing your website to Microsoft Azure is explained in Chapter 45, “Deploying Websites and Services.”
After publishing you can configure Dropbox and GitHub. For these configurations, the site already needs to be publicly available.
Configuring the Application with Dropbox and GitHub
To enable WebHooks with Dropbox, you need to create an app in the Dropbox App Console at https://www.dropbox.com/developers/apps, as shown in Figure 43.9.
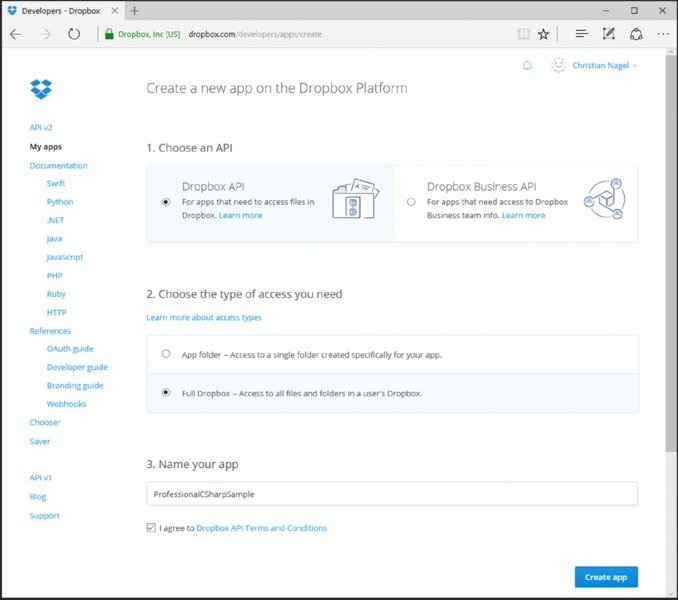
Figure 43.9
To receive WebHooks from Dropbox, you need to register the public URI of your website. When you host the site with Microsoft Azure, the host name is <hostname>.azurewebsites.net. The service of the receiver listens at /api/webhooks/incoming/provider—for example, with Dropbox at https://professionalcsharp.azurewebsites.net/api/webhooks/incoming/dropbox.
In case you registered more than one secret, other than the URIs of the other secrets, add the secret key to the URI, such as /api/webhooks/incoming/dropbox/dp1.
Dropbox verifies a valid URI by sending a challenge that must be returned. You can try that out with your receiver that is configured for Dropbox to access the URI hostname/api/webhooks/incoming/dropbox/?challenge=12345, which should return the string 12345.
To enable WebHooks with GitHub, open the Settings of a GitHub repository (see Figure 43.10). There you need to add a payload link, which is http://<hostname>/api/webhooks/incoming/github with this project. Also, don’t forget to add the secret, which must be the same as defined in the configuration file. With the GitHub configuration, you can select either application/json or Form-based application/x-www-form-urlencoded content from GitHub. With the events, you can select to receive just push events, all events, or select individual events.
NOTE If you use an ASP.NET Web App, you can use a Wizard to enable WebHooks with GitHub.
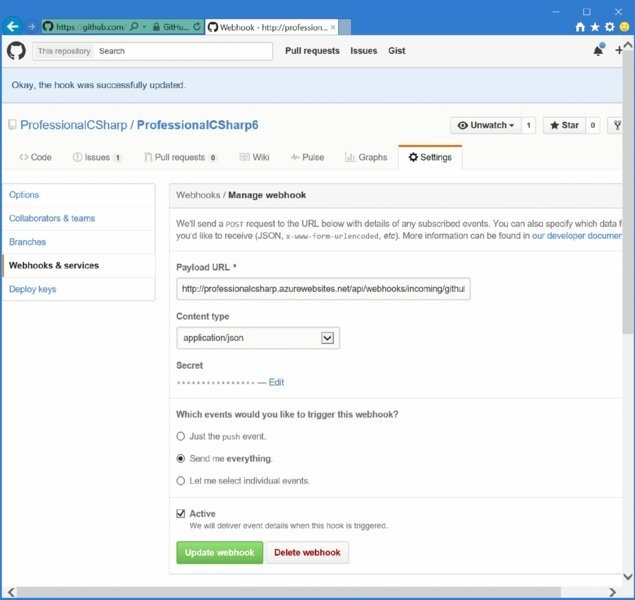
Figure 43.10
Running the Application
With the configured public web application, as you make changes to your Dropbox folder or changes in your GitHub repository, you will find new messages arriving in the Microsoft Azure Storage queue. From within Visual Studio, you can directly access the queue using the Cloud Explorer. Selecting your storage account within the Storage Accounts tree entry, you can see the Queues entry that shows all the generated queues. When you open the queue, you can see messages like the one
shown in Figure 43.11.
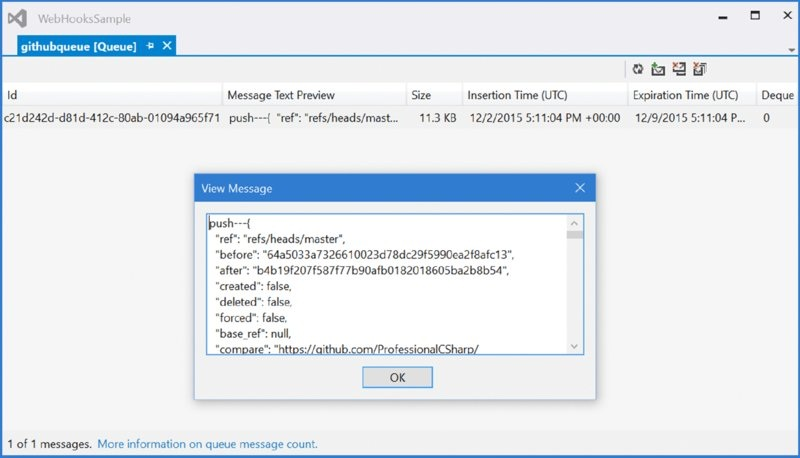
Figure 43.11
Summary
This chapter described publish/subscribe mechanisms with web applications. With SignalR there’s an easy way to make use of the WebSocket technology that keeps a network connection open to allow passing information from the server to the client. SignalR also works with older clients in that as a fallback polling is used if WebSockets is not available.
You’ve seen how to create SignalR hubs and communicate both from a JavaScript as well as a .NET client. With SignalR’s support of groups, you’ve seen how the server can send information to a group of clients. With the sample code you’ve seen how to chat between multiple clients using SignalR. Similarly, you can use SignalR with many other scenarios—for example, if you have some information from devices that call Web APIs with the server, you can inform connected clients with this information.
In the coverage of WebHooks you’ve seen another technology based on a publish/subscribe mechanism. WebHooks is unlike SignalR in that it can be used only with receivers available with public Internet addresses because the senders (typically SaaS services) publish information by calling web services. With the features of WebHooks, you’ve seen that many SaaS services provide WebHooks, and it’s easy to create receivers that receive information from these services.
To get WebHooks forwarded to clients that are behind the firewall, you can combine WebHooks with SignalR. You just need to pass on WebHook information to connected SignalR clients.
The next chapter gives you information about Windows Communication Foundation (WCF), a mature technology that is based on SOAP and offers advanced features for communication.


