
K8S脉络整理(015)-Helm包管理器\示例\创建自己的chart
Why Helm
每个成功的软件平台都有一个优秀的打包系统,比如 Debian、Ubuntu 的 apt,Redhat、Centos 的 yum。而 Helm 则是 Kubernetes 上的包管理器。
本章我们将讨论为什么需要 Helm,它的架构和组件,以及如何使用 Helm。
Why Helm
Helm 到底解决了什么问题?为什么 Kubernetes 需要 Helm?
答案是:Kubernetes 能够很好地组织和编排容器,但它缺少一个更高层次的应用打包工具,而 Helm 就是来干这件事的。
先来看个例子。
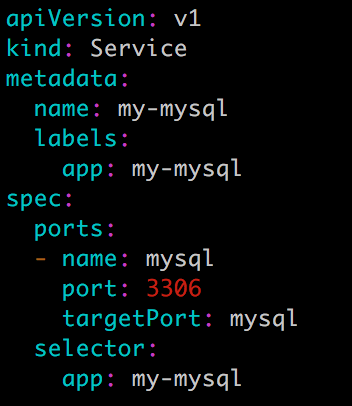
比如对于一个 MySQL 服务, Kubernetes 需要部署下面这些对象: service secret PVC deployment
-
Service,让外界能够访问到 MySQL。
![782.png]()
-
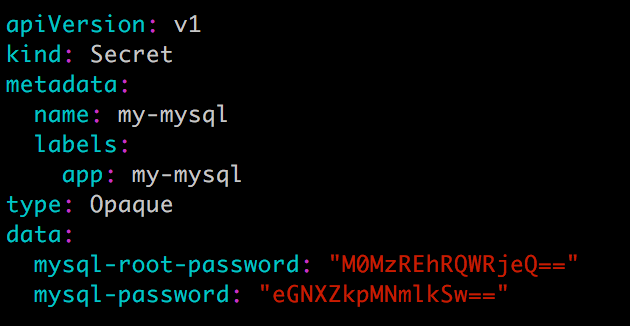
Secret,定义 MySQL 的密码。
![783.png]()
-
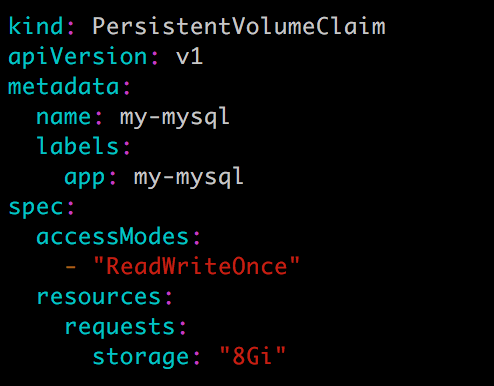
PersistentVolumeClaim,为 MySQL 申请持久化存储空间。
![784.png]()
-
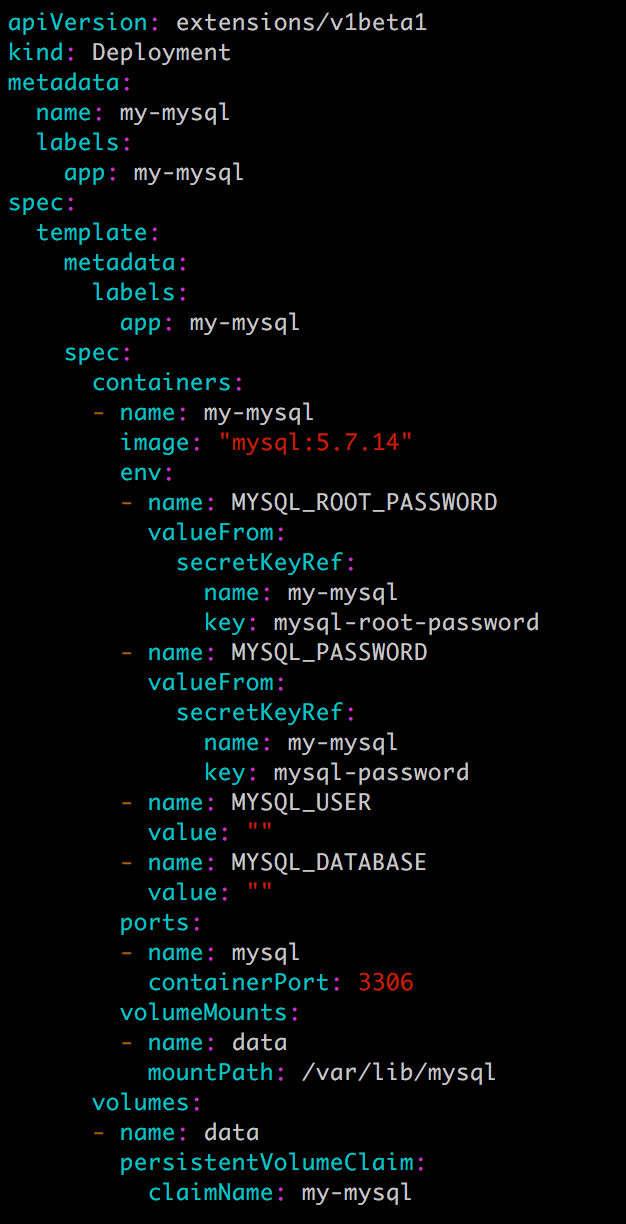
Deployment,部署 MySQL Pod,并使用上面的这些支持对象。
![785.png]()
我们可以将上面这些配置保存到对象各自的文件中,或者集中写进一个配置文件,然后通过 kubectl apply -f 部署。
到目前为止,Kubernetes 对服务的部署支持得都挺好,如果应用只由一个或几个这样的服务组成,上面的部署方式完全足够了。
但是,如果我们开发的是微服务架构的应用,组成应用的服务可能多达十个甚至几十上百个,这种组织和管理应用的方式就不好使了:
-
很难管理、编辑和维护如此多的服务。每个服务都有若干配置,缺乏一个更高层次的工具将这些配置组织起来。
-
不容易将这些服务作为一个整体统一发布。部署人员需要首先理解应用都包含哪些服务,然后按照逻辑顺序依次执行
kubectl apply。即缺少一种工具来定义应用与服务,以及服务与服务之间的依赖关系。 -
不能高效地共享和重用服务。比如两个应用都要用到 MySQL 服务,但配置的参数不一样,这两个应用只能分别拷贝一套标准的 MySQL 配置文件,修改后通过
kubectl apply部署。也就是说不支持参数化配置和多环境部署。 -
不支持应用级别的版本管理。虽然可以通过
kubectl rollout undo进行回滚,但这只能针对单个 Deployment,不支持整个应用的回滚。 -
不支持对部署的应用状态进行验证。比如是否能通过预定义的账号访问 MySQL。虽然 Kubernetes 有健康检查,但那是针对单个容器,我们需要应用(服务)级别的健康检查。
Helm 能够解决上面这些问题,Helm 帮助 Kubernetes 成为微服务架构应用理想的部署平台。
下一节我们讨论 Helm 的架构。
Helm 架构
在实践之前,我们先来看看 Helm 的架构。
Helm 有两个重要的概念:chart 和 release。
chart 是创建一个应用的信息集合,包括各种 Kubernetes 对象的配置模板、参数定义、依赖关系、文档说明等。
chart 是应用部署的自包含逻辑单元。可以将 chart 想象成 apt、yum 中的软件安装包。
release 是 chart 的运行实例,代表了一个正在运行的应用。
当 chart 被安装到 Kubernetes 集群,就生成一个 release。chart 能够多次安装到同一个集群,每次安装都是一个 release。 --name=指定release名称
Helm 是包管理工具,这里的包就是指的 chart。
Helm 能够:
- 从零创建新 chart。
- 与存储 chart 的仓库交互,拉取、保存和更新 chart。
- 在 Kubernetes 集群中安装和卸载 release。
- 更新、回滚和测试 release。
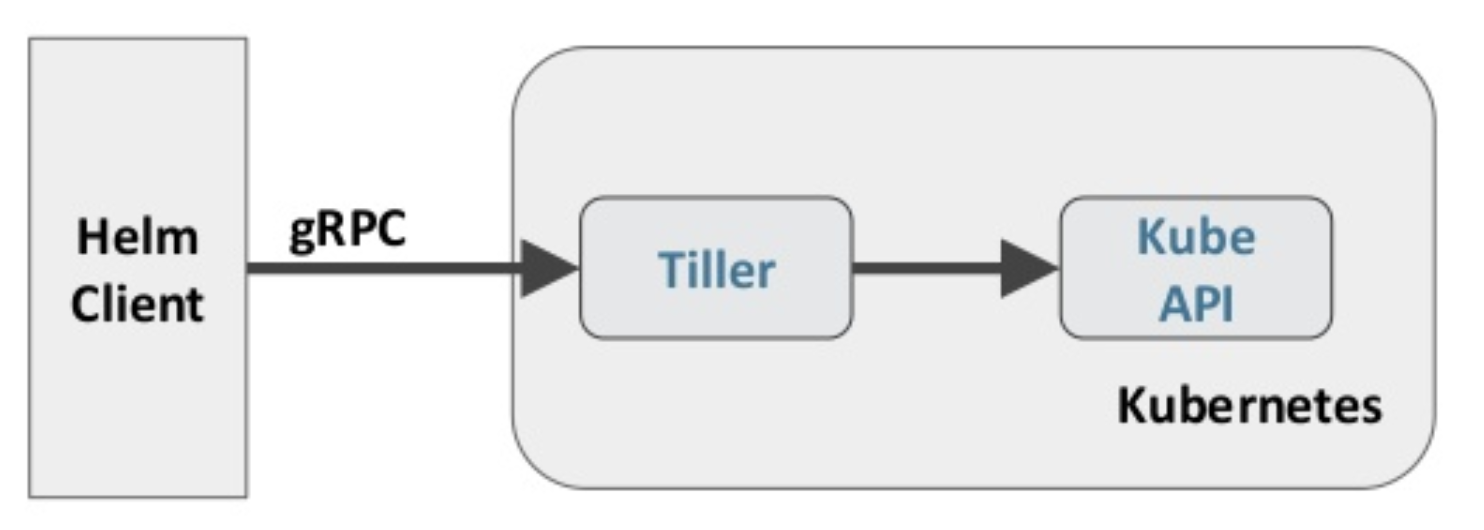
Helm 包含两个组件:Helm 客户端 和 Tiller 服务器。
Helm 客户端是终端用户使用的命令行工具,用户可以:
- 在本地开发 chart。
- 管理 chart 仓库。
- 与 Tiller 服务器交互。
- 在远程 Kubernetes 集群上安装 chart。
- 查看 release 信息。
- 升级或卸载已有的 release。
Tiller 服务器运行在 Kubernetes 集群中,它会处理 Helm 客户端的请求,与 Kubernetes API Server 交互。Tiller 服务器负责:
- 监听来自 Helm 客户端的请求。
- 通过 chart 构建 release。
- 在 Kubernetes 中安装 chart,并跟踪 release 的状态。
- 通过 API Server 升级或卸载已有的 release。
简单的讲:Helm 客户端负责管理 chart;Tiller 服务器负责管理 release。
下一节我们将安装和部署 Helm。
Helm 客户端
通常,我们将 Helm 客户端安装在能够执行 kubectl 命令的节点上,只需要下面一条命令:
curl https://raw.githubusercontent.com/kubernetes/helm/master/scripts/get | bash
安装后,执行 helm version 验证。
daweij@master:~$ curl https://raw.githubusercontent.com/kubernetes/helm/master/scripts/get | bash
  % Total    % Received % Xferd  Average Speed   Time    Time     Time  Current
                                 Dload  Upload   Total   Spent    Left  Speed
100  6689  100  6689    0     0   6634      0  0:00:01  0:00:01 --:--:--  6629
Downloading https://kubernetes-helm.storage.googleapis.com/helm-v2.8.2-linux-amd64.tar.gz
Preparing to install into /usr/local/bin
[sudo] password for daweij:
helm installed into /usr/local/bin/helm
Run 'helm init' to configure helm.
daweij@master:~$ helm version
Client: &version.Version{SemVer:"v2.8.2", GitCommit:"a80231648a1473929271764b920a8e346f6de844", GitTreeState:"clean"}
Error: cannot connect to Tiller
目前只能查看到客户端的版本,服务器还没有安装。
helm 有很多子命令和参数,为了提高使用命令行的效率,通常建议安装 helm 的 bash 命令补全脚本,方法如下:
helm completion bash > .helmrc
echo "source .helmrc" >> .bashrc
重新登录后就可以通过 Tab 键补全 helm 子命令和参数了。
daweij@master:~$ helm completion bash > .helmrc
daweij@master:~$ echo "source .helmrc" >> .bashrc
daweij@master:~$ logout
root@master:/# su - daweij
daweij@master:~$ helm
completion  dependency  history     inspect     list        repo        search      template    verify
create      fetch       home        install     package     reset       serve       test        version
delete      get         init        lint        plugin      rollback    status      upgrade
daweij@master:~$ helm install --
--ca-file=                    --kube-context=               --timeout=
--cert-file=                  --name=                       --tls
--debug                       --namespace=                  --tls-ca-cert=
--dep-up                      --name-template=              --tls-cert=
--devel                       --no-hooks                    --tls-key=
--dry-run                     --replace                     --tls-verify
--home=                       --repo=                       --values=
--host=                       --set=                        --verify
--key-file=                   --tiller-connection-timeout=  --version=
--keyring=                    --tiller-namespace=           --wait
Tiller 服务器
Tiller 服务器安装非常简单,只需要执行 helm init:
daweij@master:~$ helm init
Creating /home/daweij/.helm
Creating /home/daweij/.helm/repository
Creating /home/daweij/.helm/repository/cache
Creating /home/daweij/.helm/repository/local
Creating /home/daweij/.helm/plugins
Creating /home/daweij/.helm/starters
Creating /home/daweij/.helm/cache/archive
Creating /home/daweij/.helm/repository/repositories.yaml
Adding stable repo with URL: https://kubernetes-charts.storage.googleapis.com
Adding local repo with URL: http://127.0.0.1:8879/charts
$HELM_HOME has been configured at /home/daweij/.helm.

Tiller (the Helm server-side component) has been installed into your Kubernetes Cluster.

Please note: by default, Tiller is deployed with an insecure 'allow unauthenticated users' policy.
For more information on securing your installation see: https://docs.helm.sh/using_helm/#securing-your-helm-installation
Happy Helming!
Tiller 本身也是作为容器化应用运行在 Kubernetes Cluster 中的:
daweij@master:~$ kubectl get svc tiller-deploy --namespace=kube-system
NAME            TYPE        CLUSTER-IP      EXTERNAL-IP   PORT(S)     AGE
tiller-deploy   ClusterIP   10.233.21.116   <none>        44134/TCP   9m
daweij@master:~$ kubectl get deployment tiller-deploy --namespace=kube-system
NAME            DESIRED   CURRENT   UP-TO-DATE   AVAILABLE   AGE
tiller-deploy   1         1         1            0           9m
daweij@master:~$ kubectl get pod tiller-deploy-865dd6c794-g74qv --namespace=kube-system
NAME                             READY     STATUS             RESTARTS   AGE
tiller-deploy-865dd6c794-g74qv   0/1       ImagePullBackOff   0          10m
可以看到 Tiller 的 Service、Deployment 和 Pod。
因无法FAN墙,镜像下载失败:
daweij@master:~$ kubectl describe pod tiller-deploy-865dd6c794-g74qv --namespace=kube-system
......
Events:
  Type     Reason                 Age               From               Message
  ----     ------                 ----              ----               -------
  Normal   Scheduled              10m               default-scheduler  Successfully assigned tiller-deploy-865dd6c794-g74qv to node2
  Normal   SuccessfulMountVolume  10m               kubelet, node2     MountVolume.SetUp succeeded for volume "default-token-7m87c"
  Normal   SandboxChanged         9m                kubelet, node2     Pod sandbox changed, it will be killed and re-created.
  Warning  Failed                 8m (x3 over 9m)   kubelet, node2     Error: ErrImagePull
  Normal   BackOff                8m (x6 over 9m)   kubelet, node2     Back-off pulling image "gcr.io/kubernetes-helm/tiller:v2.8.2"
  Normal   Pulling                7m (x4 over 10m)  kubelet, node2     pulling image "gcr.io/kubernetes-helm/tiller:v2.8.2"
  Warning  Failed                 7m (x4 over 9m)   kubelet, node2     Failed to pull image "gcr.io/kubernetes-helm/tiller:v2.8.2": rpc error: code = Unknown desc = Error response from daemon: Get https://gcr.io/v2/: net/http: request canceled while waiting for connection (Client.Timeout exceeded while awaiting headers)
  Warning  Failed                 5s (x36 over 9m)  kubelet, node2     Error: ImagePullBackOff
镜像为:
gcr.io/kubernetes-helm/tiller:v2.8.2
dockerhub中比较新的可以用:
docker pull jiang7865134/tiller:v2.8.2
docker tag jiang7865134/tiller:v2.8.2 gcr.io/kubernetes-helm/tiller:v2.8.2
现在, helm version 已经能够查看到服务器的版本信息了。
daweij@master:~$ helm version
Client: &version.Version{SemVer:"v2.8.2", GitCommit:"a80231648a1473929271764b920a8e346f6de844", GitTreeState:"clean"}
Server: &version.Version{SemVer:"v2.8.2", GitCommit:"a80231648a1473929271764b920a8e346f6de844", GitTreeState:"clean"}
Helm 部署完毕,下一节开始使用 Helm。
Helm 安装成功后,可执行 helm search 查看当前可安装的 chart。
daweij@master:~$ helm search
NAME                                   CHART VERSION    APP VERSION      DESCRIPTION
stable/acs-engine-autoscaler           2.1.3            2.1.1            Scales worker nodes within agent pools
stable/aerospike                       0.1.7            v3.14.1.2        A Helm chart for Aerospike in Kubernetes
stable/anchore-engine                  0.1.4            0.1.6            Anchore container analysis and policy evaluatio...
stable/artifactory                     7.0.6            5.9.1            Universal Repository Manager supporting all maj...
stable/artifactory-ha                  0.1.3            5.9.1            Universal Repository Manager supporting all maj...
stable/aws-cluster-autoscaler          0.3.3                             Scales worker nodes within autoscaling groups.
stable/bitcoind                        0.1.1            0.15.1           Bitcoin is an innovative payment network and a ...
stable/buildkite                       0.2.2            3                Agent for Buildkite
stable/burrow                          0.4.2            0.17.1           Burrow is a permissionable smart contract machine
stable/centrifugo                      2.0.1            1.7.3            Centrifugo is a real-time messaging server.
stable/cert-manager                    0.2.4            0.2.3            A Helm chart for cert-manager
这个列表很长,这里只截取了一部分。大家不禁会问,这些 chart 都是从哪里来的?
前面说过,Helm 可以像 apt 和 yum 管理软件包一样管理 chart。apt 和 yum 的软件包存放在仓库中,同样的,Helm 也有仓库。
daweij@master:~$ helm repo list
NAME      URL
stable    https://kubernetes-charts.storage.googleapis.com
local     http://127.0.0.1:8879/charts
Helm 安装时已经默认配置好了两个仓库:stable 和 local。
stable 是官方仓库,local 是用户存放自己开发的 chart 的本地仓库。
helm search 会显示 chart 位于哪个仓库,比如 local/cool-chart 和 stable/acs-engine-autoscaler。
用户可以通过 helm repo add 添加更多的仓库,比如企业的私有仓库,仓库的管理和维护方法请参考官网文档 https://docs.helm.sh
与 apt 和 yum 一样,helm 也支持关键字搜索:
daweij@master:~$ helm search mysql
NAME                             CHART VERSION    APP VERSION    DESCRIPTION
stable/mysql                     0.3.6                           Fast, reliable, scalable, and easy to use open-...
stable/percona                   0.3.1                           free, fully compatible, enhanced, open source d...
stable/percona-xtradb-cluster    0.1.3            5.7.19         free, fully compatible, enhanced, open source d...
stable/gcloud-sqlproxy           0.3.1                           Google Cloud SQL Proxy
stable/mariadb                   2.1.17           10.1.32        Fast, reliable, scalable, and easy to use open-...
daweij@master:~$
包括 DESCRIPTION 在内的所有信息,只要跟关键字匹配,都会显示在结果列表中。
安装 chart 也很简单,执行如下命令可以安装 MySQL。
helm install stable/mysql
如果看到如下报错,通常是因为 Tiller 服务器的权限不足。
daweij@master:~$ helm install stable/mysql
Error: no available release name found
daweij@master:~$ helm install stable/mysql:0.3.6
Error: failed to download "stable/mysql:0.3.6"
执行如下命名添加权限:
kubectl create serviceaccount --namespace kube-system tiller
kubectl create clusterrolebinding tiller-cluster-rule --clusterrole=cluster-admin --serviceaccount=kube-system:tiller

查看
daweij@master:~$ kubectl get serviceaccount tiller --namespace=kube-system
NAME      SECRETS   AGE
tiller    1         1h
daweij@master:~$ kubectl describe clusterrolebinding tiller-cluster-rule
Name:         tiller-cluster-rule
Labels:       <none>
Annotations:  <none>
Role:
  Kind:  ClusterRole
  Name:  cluster-admin
Subjects:
  Kind            Name    Namespace
  ----            ----    ---------
  ServiceAccount  tiller  kube-system
编辑应用:
kubectl patch deployment --namespace kube-system tiller-deploy -p '{"spec":{"template":{"spec":{"serviceAccount":"tiller"}}}}'
或kubectl edit deploy --namespace kube-system tiller-deploy
中添加serviceAccount: tiller
然后再次执行
helm install stable/mysql
添加权限后,报错如下:(下述为k8s集群创建时导致的问题(node4后添加))
daweij@master:~$ helm install stable/mysql
Error: forwarding ports: error upgrading connection: error dialing backend: dial tcp: lookup node4 on 172.16.0.1:53: server misbehaving
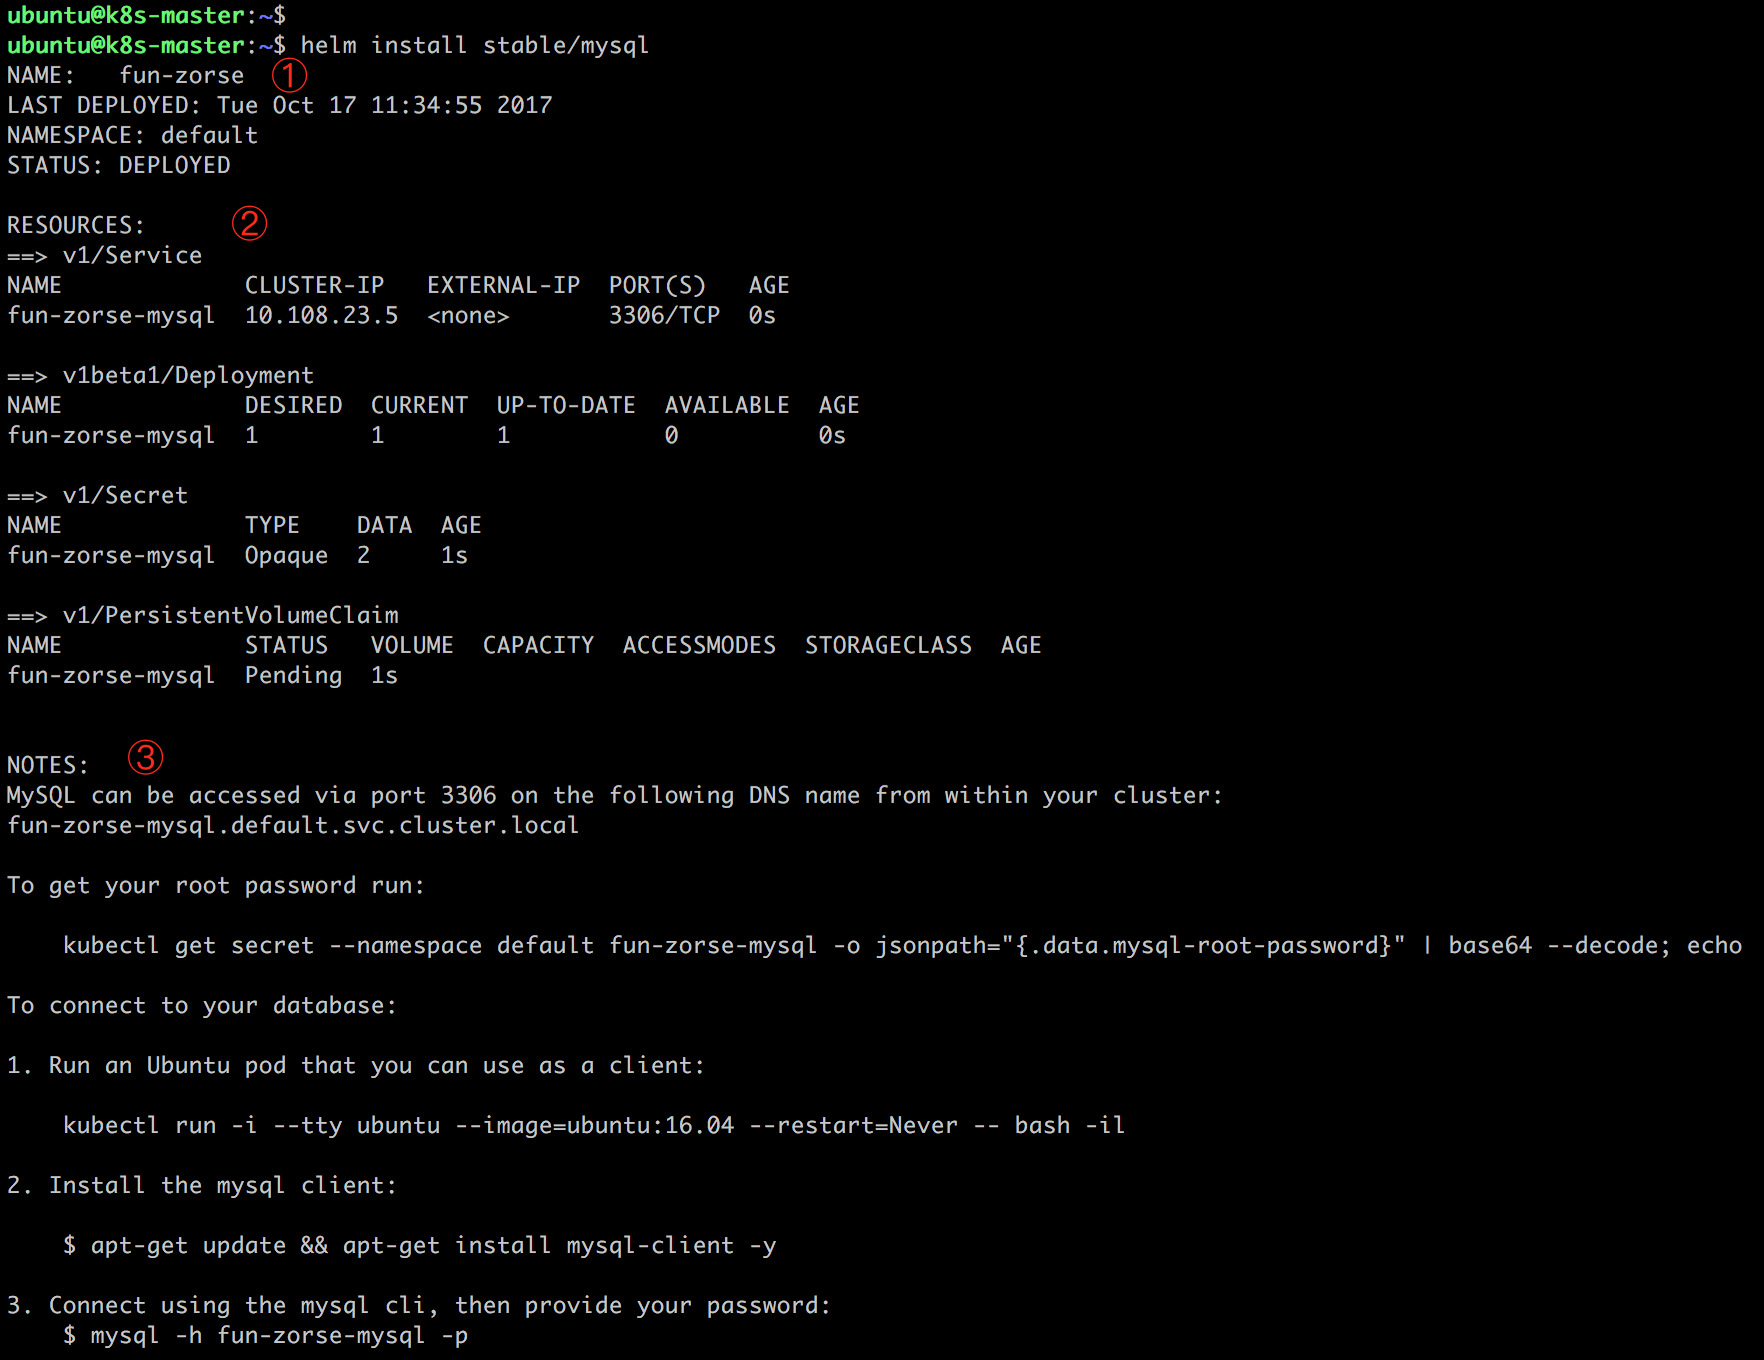
输出分为三部分:
① chart 本次部署的描述信息:
NAME 是 release 的名字,因为我们没用 -n 参数指定,Helm 随机生成了一个,这里是 fun-zorse。
NAMESPACE 是 release 部署的 namespace,默认是 default,也可以通过 --namespace 指定。
STATUS 为 DEPLOYED,表示已经将 chart 部署到集群。
② 当前 release 包含的资源:Service、Deployment、Secret 和 PersistentVolumeClaim,其名字都是 fun-zorse-mysql,命名的格式为 ReleasName-ChartName。
③ NOTES 部分显示的是 release 的使用方法。比如如何访问 Service,如何获取数据库密码,以及如何连接数据库等。
通过 kubectl get 可以查看组成 release 的各个对象:


daweij@master:~/helm$ kubectl get service limping-angelfish-mysql
NAME                      TYPE        CLUSTER-IP     EXTERNAL-IP   PORT(S)    AGE
limping-angelfish-mysql   ClusterIP   10.233.43.76   <none>        3306/TCP   44s
daweij@master:~/helm$ kubectl get deployment limping-angelfish-mysql
NAME                      DESIRED   CURRENT   UP-TO-DATE   AVAILABLE   AGE
limping-angelfish-mysql   1         1         1            0           1m
daweij@master:~/helm$ kubectl get pod limping-angelfish-mysql-5645f4b999-5lk8s
NAME                                       READY     STATUS     RESTARTS   AGE
limping-angelfish-mysql-5645f4b999-5lk8s   0/1       Init:0/1   0          1m
daweij@master:~/helm$ kubectl get pvc limping-angelfish-mysql
NAME                      STATUS    VOLUME    CAPACITY   ACCESS MODES   STORAGECLASS   AGE
limping-angelfish-mysql   Pending                                                      1m
因为还没有准备 PersistentVolume,当前 release 还不可用。
helm list 显示已经部署的 release,helm delete 可以删除 release。
daweij@master:~/helm$ helm list limping-angelfish
NAME                 REVISION    UPDATED                     STATUS      CHART          NAMESPACE
limping-angelfish    1           Tue Apr 24 13:33:42 2018    DEPLOYED    mysql-0.3.6    default
daweij@master:~/helm$ helm delete limping-angelfish
release "limping-angelfish" deleted
Helm 的使用方法像极了 apt 和 yum,用 Helm 来管理 Kubernetes 应用非常方便。
chart 是 Helm 的应用打包格式,下节我们详细介绍。
chart 是 Helm 的应用打包格式。chart 由一系列文件组成,这些文件描述了 Kubernetes 部署应用时所需要的资源,比如 Service、Deployment、PersistentVolumeClaim、Secret、ConfigMap 等。
单个的 chart 可以非常简单,只用于部署一个服务,比如 Memcached;chart 也可以很复杂,部署整个应用,比如包含 HTTP Servers、 Database、消息中间件、cache 等。
chart 将这些文件放置在预定义的目录结构中,通常整个 chart 被打成 tar 包,而且标注上版本信息,便于 Helm 部署。
下面我们将详细讨论 chart 的目录结构以及包含的各类文件。
chart 目录结构
以前面 MySQL chart 为例。一旦安装了某个 chart,我们就可以在 ~/.helm/cache/archive 中找到 chart 的 tar 包。
daweij@master:~/helm$ ll ~/.helm/cache/archive/
total 16
drwxr-xr-x 2 daweij daweij 4096 3月  29 11:09 ./
drwxr-xr-x 3 daweij daweij 4096 3月  28 10:00 ../
-rw-r--r-- 1 daweij daweij 5533 3月  29 13:08 mysql-0.3.6.tgz
daweij@master:~/helm$ tar -xzf /home/daweij/.helm/cache/archive/mysql-0.3.6.tgz
daweij@master:~/helm$ ls
k01-chart  mysql  ns-helmtest.yml  uat
daweij@master:~/helm$ cd mysql/
daweij@master:~/helm/mysql$ tree
.
├── Chart.yaml
├── README.md
├── templates
│   ├── configmap.yaml
│   ├── deployment.yaml
│   ├── _helpers.tpl
│   ├── NOTES.txt
│   ├── pvc.yaml
│   ├── secrets.yaml
│   └── svc.yaml
└── values.yaml

1 directory, 10 files
daweij@master:~/helm/mysql$
解压后,MySQL chart 目录结构如上。
目录名就是 chart 的名字(不带版本信息),这里是 mysql,包含如下内容:
Chart.yaml
YAML 文件,描述 chart 的概要信息。
daweij@master:~/helm/mysql$ cat Chart.yaml
description: Fast, reliable, scalable, and easy to use open-source relational database
  system.
engine: gotpl
home: https://www.mysql.com/
icon: https://www.mysql.com/common/logos/logo-mysql-170x115.png
keywords:
- mysql
- database
- sql
maintainers:
- email: viglesias@google.com
  name: Vic Iglesias
name: mysql
sources:
- https://github.com/kubernetes/charts
- https://github.com/docker-library/mysql
version: 0.3.6
name 和 version 是必填项,其他都是可选。
README.md
Markdown 格式的 README 文件,相当于 chart 的使用文档,此文件为可选。
daweij@master:~/helm/mysql$ cat README.md
# MySQL

[MySQL](https://MySQL.org) is one of the most popular database servers in the world. Notable users include Wikipedia, Facebook and Google.

## Introduction

This chart bootstraps a single node MySQL deployment on a [Kubernetes](http://kubernetes.io) cluster using the [Helm](https://helm.sh) package manager.

## Prerequisites

- Kubernetes 1.6+ with Beta APIs enabled
- PV provisioner support in the underlying infrastructure

## Installing the Chart

To install the chart with the release name `my-release`:

```bash
$ helm install --name my-release stable/mysql
```

The command deploys MySQL on the Kubernetes cluster in the default configuration. The [configuration](#configuration) section lists the parameters that can be configured during installation.

By default a random password will be generated for the root user. If you'd like to set your own password change the mysqlRootPassword
in the values.yaml.

You can retrieve your root password by running the following command. Make sure to replace [YOUR_RELEASE_NAME]:

    printf $(printf '\%o' `kubectl get secret [YOUR_RELEASE_NAME]-mysql -o jsonpath="{.data.mysql-root-password[*]}"`)

> **Tip**: List all releases using `helm list`

## Uninstalling the Chart

To uninstall/delete the `my-release` deployment:

```bash
$ helm delete my-release
```

The command removes all the Kubernetes components associated with the chart and deletes the release.

## Configuration

The following table lists the configurable parameters of the MySQL chart and their default values.

| Parameter                            | Description                               | Default                                              |
| ------------------------------------ | ----------------------------------------- | ---------------------------------------------------- |
| `imageTag`                           | `mysql` image tag.                        | Most recent release                                  |
| `imagePullPolicy`                    | Image pull policy                         | `IfNotPresent`                                       |
| `mysqlRootPassword`                  | Password for the `root` user.             | `nil`                                                |
| `mysqlUser`                          | Username of new user to create.           | `nil`                                                |
| `mysqlPassword`                      | Password for the new user.                | `nil`                                                |
| `mysqlDatabase`                      | Name for new database to create.          | `nil`                                                |
| `livenessProbe.initialDelaySeconds`  | Delay before liveness probe is initiated  | 30                                                   |
| `livenessProbe.periodSeconds`        | How often to perform the probe            | 10                                                   |
| `livenessProbe.timeoutSeconds`       | When the probe times out                  | 5                                                    |
| `livenessProbe.successThreshold`     | Minimum consecutive successes for the probe to be considered successful after having failed. | 1 |
| `livenessProbe.failureThreshold`     | Minimum consecutive failures for the probe to be considered failed after having succeeded.   | 3 |
| `readinessProbe.initialDelaySeconds` | Delay before readiness probe is initiated | 5                                                    |
| `readinessProbe.periodSeconds`       | How often to perform the probe            | 10                                                   |
| `readinessProbe.timeoutSeconds`      | When the probe times out                  | 1                                                    |
| `readinessProbe.successThreshold`    | Minimum consecutive successes for the probe to be considered successful after having failed. | 1 |
| `readinessProbe.failureThreshold`    | Minimum consecutive failures for the probe to be considered failed after having succeeded.   | 3 |
| `persistence.enabled`                | Create a volume to store data             | true                                                 |
| `persistence.size`                   | Size of persistent volume claim           | 8Gi RW                                               |
| `persistence.storageClass`           | Type of persistent volume claim           | nil  (uses alpha storage class annotation)           |
| `persistence.accessMode`             | ReadWriteOnce or ReadOnly                 | ReadWriteOnce                                        |
| `persistence.existingClaim`          | Name of existing persistent volume        | `nil`                                                |
| `persistence.subPath`                | Subdirectory of the volume to mount       | `nil`                                                |
| `resources`                          | CPU/Memory resource requests/limits       | Memory: `256Mi`, CPU: `100m`                         |
| `configurationFiles`                 | List of mysql configuration files         | `nil`                                                |

Some of the parameters above map to the env variables defined in the [MySQL DockerHub image](https://hub.docker.com/_/mysql/).

Specify each parameter using the `--set key=value[,key=value]` argument to `helm install`. For example,

```bash
$ helm install --name my-release \
  --set mysqlRootPassword=secretpassword,mysqlUser=my-user,mysqlPassword=my-password,mysqlDatabase=my-database \
    stable/mysql
```

The above command sets the MySQL `root` account password to `secretpassword`. Additionally it creates a standard database user named `my-user`, with the password `my-password`, who has access to a database named `my-database`.

Alternatively, a YAML file that specifies the values for the parameters can be provided while installing the chart. For example,

```bash
$ helm install --name my-release -f values.yaml stable/mysql
```

> **Tip**: You can use the default [values.yaml](values.yaml)

## Persistence

The [MySQL](https://hub.docker.com/_/mysql/) image stores the MySQL data and configurations at the `/var/lib/mysql` path of the container.

By default a PersistentVolumeClaim is created and mounted into that directory. In order to disable this functionality
you can change the values.yaml to disable persistence and use an emptyDir instead.

> *"An emptyDir volume is first created when a Pod is assigned to a Node, and exists as long as that Pod is running on that node. When a Pod is removed from a node for any reason, the data in the emptyDir is deleted forever."*

## Custom MySQL configuration files

The [MySQL](https://hub.docker.com/_/mysql/) image accepts custom configuration files at the path `/etc/mysql/conf.d`. If you want to use a customized MySQL configuration, you can create your alternative configuration files by passing the file contents on the `configurationFiles` attribute. Note that according to the MySQL documentation only files ending with `.cnf` are loaded.

```yaml
configurationFiles:
  mysql.cnf: |-
    [mysqld]
    skip-host-cache
    skip-name-resolve
    sql-mode=STRICT_TRANS_TABLES,NO_ZERO_IN_DATE,NO_ZERO_DATE,ERROR_FOR_DIVISION_BY_ZERO,NO_AUTO_CREATE_USER,NO_ENGINE_SUBSTITUTION
  mysql_custom.cnf: |-
    [mysqld]
```
LICENSE
文本文件,描述 chart 的许可信息,此文件为可选。
requirements.yaml
chart 可能依赖其他的 chart,这些依赖关系可通过 requirements.yaml 指定,比如:
此处可参考kube-prometheus,要求./charts/中包含依赖的各chart的压缩包
daweij@master:~/prometheus-operator/helm/kube-prometheus$ ls
charts  Chart.yaml  README.md  requirements.bak  requirements.yaml  templates  values.yaml
daweij@master:~/prometheus-operator/helm/kube-prometheus$ pwd
/home/daweij/prometheus-operator/helm/kube-prometheus
daweij@master:~/prometheus-operator/helm/kube-prometheus$ cd charts/
daweij@master:~/prometheus-operator/helm/kube-prometheus/charts$ ls
alertmanager-0.0.13.tgz                     exporter-kube-dns-0.1.5.tgz   exporter-kubelets-0.2.7.tgz    exporter-kube-scheduler-0.1.6.tgz  exporter-node-0.2.0.tgz  prometheus-0.0.24.tgz
exporter-kube-controller-manager-0.1.7.tgz  exporter-kube-etcd-0.1.8.tgz  exporter-kubernetes-0.1.6.tgz  exporter-kube-state-0.1.15.tgz     grafana-0.0.24.tgz
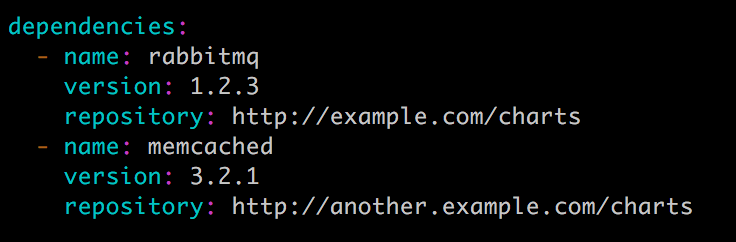
在安装过程中,依赖的 charts 也会被一起安装。
values.yaml
chart 支持在安装的时根据参数进行定制化配置,而 values.yaml 则提供了这些配置参数的默认值。
daweij@master:~/helm/mysql$ cat values.yaml
## mysql image version
## ref: https://hub.docker.com/r/library/mysql/tags/
##
image: "mysql"
imageTag: "5.7.14"

## Specify password for root user
##
## Default: random 10 character string
# mysqlRootPassword: testing

## Create a database user
##
# mysqlUser:
# mysqlPassword:

## Allow unauthenticated access, uncomment to enable
##
# mysqlAllowEmptyPassword: true

## Create a database
##
# mysqlDatabase:

## Specify an imagePullPolicy (Required)
## It's recommended to change this to 'Always' if the image tag is 'latest'
## ref: http://kubernetes.io/docs/user-guide/images/#updating-images
##
imagePullPolicy: IfNotPresent

livenessProbe:
  initialDelaySeconds: 30
  periodSeconds: 10
  timeoutSeconds: 5
  successThreshold: 1
  failureThreshold: 3

readinessProbe:
  initialDelaySeconds: 5
  periodSeconds: 10
  timeoutSeconds: 1
  successThreshold: 1
  failureThreshold: 3

## Persist data to a persistent volume
persistence:
  enabled: true
  ## database data Persistent Volume Storage Class
  ## If defined, storageClassName: <storageClass>
  ## If set to "-", storageClassName: "", which disables dynamic provisioning
  ## If undefined (the default) or set to null, no storageClassName spec is
  ##   set, choosing the default provisioner.  (gp2 on AWS, standard on
  ##   GKE, AWS & OpenStack)
  ##
  # storageClass: "-"
  accessMode: ReadWriteOnce
  size: 8Gi

## Configure resource requests and limits
## ref: http://kubernetes.io/docs/user-guide/compute-resources/
##
resources:
  requests:
    memory: 256Mi
    cpu: 100m

# Custom mysql configuration files used to override default mysql settings
configurationFiles:
#  mysql.cnf: |-
#    [mysqld]
#    skip-name-resolve


## Configure the service
## ref: http://kubernetes.io/docs/user-guide/services/
service:
  ## Specify a service type
  ## ref: https://kubernetes.io/docs/concepts/services-networking/service/#publishing-services---service-types
  type: ClusterIP
  port: 3306
  # nodePort: 32000
templates 目录
各类 Kubernetes 资源的配置模板都放置在这里。Helm 会将 values.yaml 中的参数值注入到模板中生成标准的 YAML 配置文件。
模板是 chart 最重要的部分,也是 Helm 最强大的地方。模板增加了应用部署的灵活性,能够适用不同的环境,我们后面会详细讨论。
templates/NOTES.txt
chart 的简易使用文档,chart 安装成功后会显示此文档内容。
daweij@master:~/helm/mysql/templates$ cat NOTES.txt
MySQL can be accessed via port 3306 on the following DNS name from within your cluster:
{{ template "mysql.fullname" . }}.{{ .Release.Namespace }}.svc.cluster.local

To get your root password run:

    MYSQL_ROOT_PASSWORD=$(kubectl get secret --namespace {{ .Release.Namespace }} {{ template "mysql.fullname" . }} -o jsonpath="{.data.mysql-root-password}" | base64 --decode; echo)

To connect to your database:

1. Run an Ubuntu pod that you can use as a client:

    kubectl run -i --tty ubuntu --image=ubuntu:16.04 --restart=Never -- bash -il

2. Install the mysql client:

    $ apt-get update && apt-get install mysql-client -y

3. Connect using the mysql cli, then provide your password:
    $ mysql -h {{ template "mysql.fullname" . }} -p

To connect to your database directly from outside the K8s cluster:
    {{- if contains "NodePort" .Values.service.type }}
    MYSQL_HOST=$(kubectl get nodes --namespace {{ .Release.Namespace }} -o jsonpath='{.items[0].status.addresses[0].address}')
    MYSQL_PORT=$(kubectl get svc --namespace {{ .Release.Namespace }} {{ template "mysql.fullname" . }} -o jsonpath='{.spec.ports[0].nodePort}')

    {{- else if contains "ClusterIP" .Values.service.type }}
    MYSQL_HOST=127.0.0.1
    MYSQL_PORT={{ default "3306" .Values.service.port }}

    # Execute the following commands to route the connection:
    export POD_NAME=$(kubectl get pods --namespace {{ .Release.Namespace }} -l "app={{ template "mysql.fullname" . }}" -o jsonpath="{.items[0].metadata.name}")
    kubectl port-forward $POD_NAME {{ default "3306" .Values.service.port }}:{{ default "3306" .Values.service.port }}

    {{- end }}

    mysql -h ${MYSQL_HOST} -P${MYSQL_PORT} -u root -p${MYSQL_ROOT_PASSWORD}
与模板一样,可以在 NOTE.txt 中插入配置参数,Helm 会动态注入参数值。
chart 模板
chart 模板的用法可参考:helm--chart模板文件简单语法使用
Helm 通过模板创建 Kubernetes 能够理解的 YAML 格式的资源配置文件,我们将通过例子来学习如何使用模板。
以 templates/secrets.yaml 为例:
apiVersion: v1
kind: Secret
metadata:
  name: {{ template "mysql.fullname" . }}
  labels:
    app: {{ template "mysql.fullname" . }}
    chart: "{{ .Chart.Name }}-{{ .Chart.Version }}"
    release: "{{ .Release.Name }}"
    heritage: "{{ .Release.Service }}"
type: Opaque
data:
  {{ if .Values.mysqlRootPassword }}
  mysql-root-password:  {{ .Values.mysqlRootPassword | b64enc | quote }}
  {{ else }}
  mysql-root-password: {{ randAlphaNum 10 | b64enc | quote }}
  {{ end }}
  {{ if .Values.mysqlPassword }}
  mysql-password:  {{ .Values.mysqlPassword | b64enc | quote }}
  {{ else }}
  mysql-password: {{ randAlphaNum 10 | b64enc | quote }}
  {{ end }}
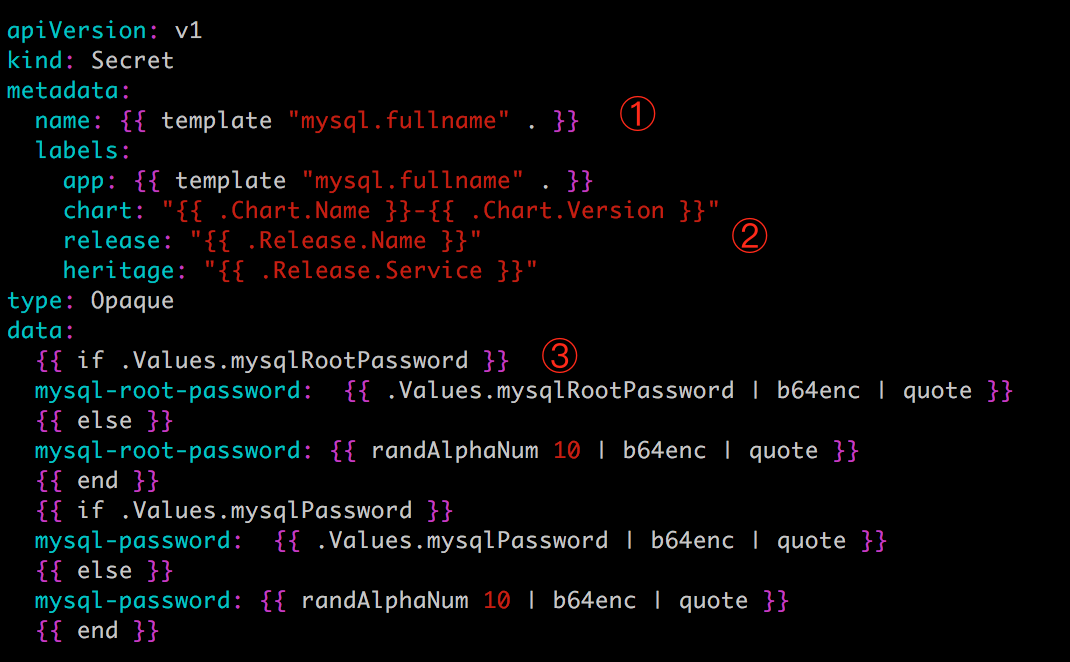
从结构看,文件的内容非常像 Secret 配置,只是大部分属性值变成了{{ xxx }}。这些 {{ xxx }} 实际上是模板的语法。
Helm 采用了 Go 语言的模板来编写 chart。Go 模板非常强大,支持变量、对象、函数、流控制等功能。
下面我们通过解析 templates/secrets.yaml 快速学习模板。
① {{ template "mysql.fullname" . }} 定义 Secret 的 name。
关键字 template 的作用是引用一个子模板 mysql.fullname。这个子模板是在 templates/_helpers.tpl 文件中定义的。
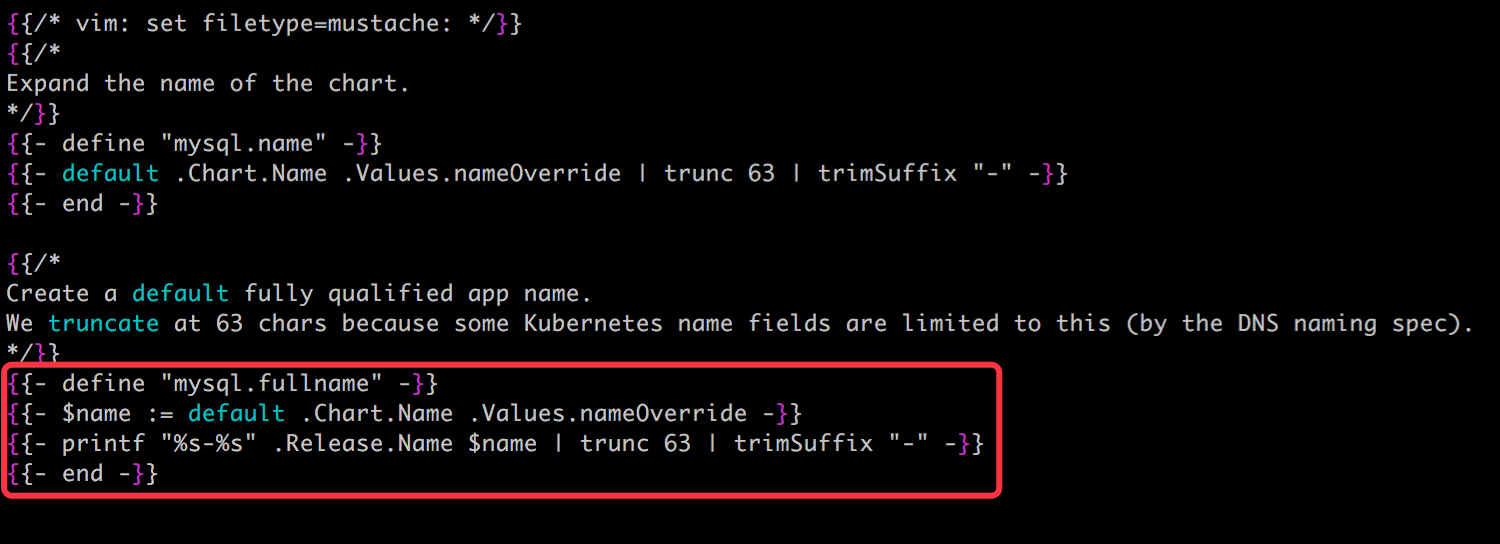
这个定义还是很复杂的,因为它用到了模板语言中的对象、函数、流控制等概念。
现在看不懂没关系,这里我们学习的重点是:如果存在一些信息多个模板都会用到,则可在 templates/_helpers.tpl 中将其定义为子模板,然后通过 templates 函数引用。
这里 mysql.fullname 是由 release 与 chart 二者名字拼接组成。
根据 chart 的最佳实践,所有资源的名称都应该保持一致,对于我们这个 chart,无论 Secret 还是 Deployment、PersistentVolumeClaim、Service,它们的名字都是子模板 mysql.fullname 的值。
② Chart 和 Release 是 Helm 预定义的对象,每个对象都有自己的属性,可以在模板中使用。如果使用下面命令安装 chart:
helm install stable/mysql -n my
那么:{{ .Chart.Name }} 的值为 mysql。{{ .Chart.Version }} 的值为 0.3.0。{{ .Release.Name }} 的值为 my。{{ .Release.Service }} 始终取值为 Tiller。{{ template "mysql.fullname" . }} 计算结果为 my-mysql。
③ 这里指定 mysql-root-password 的值,不过使用了 if-else 的流控制,其逻辑为:
如果 .Values.mysqlRootPassword 有值,则对其进行 base64 编码;否则随机生成一个 10 位的字符串并编码。
Values 也是预定义的对象,代表的是 values.yaml 文件。而 .Values.mysqlRootPassword 则是 values.yaml 中定义的 mysqlRootPassword参数:
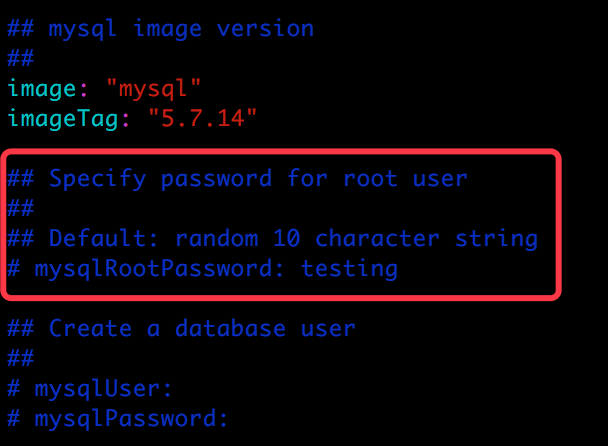
因为 mysqlRootPassword 被注释掉了,没有赋值,所以逻辑判断会走 else,即随机生成密码。
randAlphaNum、b64enc、quote 都是 Go 模板语言支持的函数,函数之间可以通过管道 | 连接。{{ randAlphaNum 10 | b64enc | quote }} 的作用是首先随机产生一个长度为 10 的字符串,然后将其 base64 编码,最后两边加上双引号。
templates/secrets.yaml 这个例子展示了 chart 模板主要的功能,我们最大的收获应该是:模板将 chart 参数化了,通过 values.yaml 可以灵活定制应用。
无论多复杂的应用,用户都可以用 Go 模板语言编写出 chart。无非是使用到更多的函数、对象和流控制。对于初学者,我的建议是尽量参考官方的 chart。
根据二八定律,这些 chart 已经覆盖了绝大部分情况,而且采用了最佳实践。如何遇到不懂的函数、对象和其他语法,可参考官网文档 https://docs.helm.sh
有了上面 chart 结构和模板的知识后,下节我们将重新实践一次 MySQL chart,相信会有更多收获。
学习了 chart 结构和模板的知识后,重新实践一次 MySQL chart,相信会有更多收获。
chart 安装前的准备
作为准备工作,安装之前需要先清楚 chart 的使用方法。这些信息通常记录在 values.yaml 和 README.md 中。
除了下载源文件查看,执行 helm inspect values 可能是更方便的方法。
daweij@master:~/helm/mysql$ helm inspect values stable/mysql
## mysql image version
## ref: https://hub.docker.com/r/library/mysql/tags/
##
image: "mysql"
imageTag: "5.7.14"

## Specify password for root user
##
## Default: random 10 character string
# mysqlRootPassword: testing

## Create a database user
##
# mysqlUser:
# mysqlPassword:

## Allow unauthenticated access, uncomment to enable
##
# mysqlAllowEmptyPassword: true

## Create a database
##
# mysqlDatabase:

## Specify an imagePullPolicy (Required)
## It's recommended to change this to 'Always' if the image tag is 'latest'
## ref: http://kubernetes.io/docs/user-guide/images/#updating-images
##
imagePullPolicy: IfNotPresent

livenessProbe:
  initialDelaySeconds: 30
  periodSeconds: 10
  timeoutSeconds: 5
  successThreshold: 1
  failureThreshold: 3

readinessProbe:
  initialDelaySeconds: 5
  periodSeconds: 10
  timeoutSeconds: 1
  successThreshold: 1
  failureThreshold: 3

## Persist data to a persistent volume
persistence:
  enabled: true
  ## database data Persistent Volume Storage Class
  ## If defined, storageClassName: <storageClass>
  ## If set to "-", storageClassName: "", which disables dynamic provisioning
  ## If undefined (the default) or set to null, no storageClassName spec is
  ##   set, choosing the default provisioner.  (gp2 on AWS, standard on
  ##   GKE, AWS & OpenStack)
  ##
  # storageClass: "-"
  accessMode: ReadWriteOnce
  size: 8Gi

## Configure resource requests and limits
## ref: http://kubernetes.io/docs/user-guide/compute-resources/
##
resources:
  requests:
    memory: 256Mi
    cpu: 100m

# Custom mysql configuration files used to override default mysql settings
configurationFiles:
#  mysql.cnf: |-
#    [mysqld]
#    skip-name-resolve


## Configure the service
## ref: http://kubernetes.io/docs/user-guide/services/
service:
  ## Specify a service type
  ## ref: https://kubernetes.io/docs/concepts/services-networking/service/#publishing-services---service-types
  type: ClusterIP
  port: 3306
  # nodePort: 32000
输出的实际上是 values.yaml 的内容。
阅读注释就可以知道 MySQL chart 支持哪些参数,安装之前需要做哪些准备。
其中有一部分是关于存储的:
## Persist data to a persistent volume
persistence:
  enabled: true
  ## database data Persistent Volume Storage Class
  ## If defined, storageClassName: <storageClass>
  ## If set to "-", storageClassName: "", which disables dynamic provisioning
  ## If undefined (the default) or set to null, no storageClassName spec is
  ##   set, choosing the default provisioner.  (gp2 on AWS, standard on
  ##   GKE, AWS & OpenStack)
  ##
  # storageClass: "-"
  accessMode: ReadWriteOnce
  size: 8Gi
chart 定义了一个 PersistentVolumeClaim,申请 8G 的 PersistentVolume。
由于我们的实验环境不支持动态供给,所以得预先创建好相应的 PV,其配置文件 mysql-pv.yml 内容为:
daweij@master:~/helm$ cat mysql-pv.yml
apiVersion: v1
kind: PersistentVolume
metadata:
  name: mysql-pv
spec:
  accessModes:
    - ReadWriteOnce
  capacity:
    storage: 8Gi
  persistentVolumeReclaimPolicy: Retain
  nfs:
    path: /nfsdata/mysql-pv
    server: 172.28.2.211
创建 PV mysql-pv:
daweij@master:~/helm$ kubectl apply -f mysql-pv.yml
persistentvolume "mysql-pv" created
daweij@master:~/helm$ kubectl get pv
NAME       CAPACITY   ACCESS MODES   RECLAIM POLICY   STATUS      CLAIM     STORAGECLASS   REASON    AGE
mysql-pv   8Gi        RWO            Retain           Available                                      5s
接下来就可以安装 chart 了。
定制化安装 chart
除了接受 values.yaml 的默认值,我们还可以定制化 chart,比如设置 mysqlRootPassword。
Helm 有两种方式传递配置参数:
-
指定自己的 values 文件。
通常的做法是首先通过helm inspect values mysql > myvalues.yaml生成 values 文件,然后设置mysqlRootPassword,之后执行helm install --values=myvalues.yaml mysql。 -
通过
--set直接传入参数值,比如:
helm install stable/mysql --set mysqlRootPassword=abc123 -n my
mysqlRootPassword 设置为 abc123。另外,-n 设置 release 为 my,各类资源的名称即为my-mysql。
通过 helm list 和 helm status 可以查看 chart 的最新状态。
daweij@master:~/helm$ helm install mysql --set mysqlRootPassword=abc123 -n my
NAME:   my
LAST DEPLOYED: Tue Apr 24 11:53:25 2018
NAMESPACE: default
STATUS: DEPLOYED

RESOURCES:
==> v1/Secret
NAME      TYPE    DATA  AGE
my-mysql  Opaque  2     55s

==> v1/PersistentVolumeClaim
NAME      STATUS  VOLUME    CAPACITY  ACCESS MODES  STORAGECLASS  AGE
my-mysql  Bound   mysql-pv  8Gi       RWO           55s

==> v1/Service
NAME      TYPE       CLUSTER-IP     EXTERNAL-IP  PORT(S)   AGE
my-mysql  ClusterIP  10.233.47.112  <none>       3306/TCP  55s

==> v1beta1/Deployment
NAME      DESIRED  CURRENT  UP-TO-DATE  AVAILABLE  AGE
my-mysql  1        1        1           0          55s

==> v1/Pod(related)
NAME                       READY  STATUS    RESTARTS  AGE
my-mysql-6d8949f555-kpcwm  0/1    Init:0/1  0         55s


NOTES:
MySQL can be accessed via port 3306 on the following DNS name from within your cluster:
my-mysql.default.svc.cluster.local

To get your root password run:

    MYSQL_ROOT_PASSWORD=$(kubectl get secret --namespace default my-mysql -o jsonpath="{.data.mysql-root-password}" | base64 --decode; echo)

To connect to your database:

1. Run an Ubuntu pod that you can use as a client:

    kubectl run -i --tty ubuntu --image=ubuntu:16.04 --restart=Never -- bash -il

2. Install the mysql client:

    $ apt-get update && apt-get install mysql-client -y

3. Connect using the mysql cli, then provide your password:
    $ mysql -h my-mysql -p

To connect to your database directly from outside the K8s cluster:
    MYSQL_HOST=127.0.0.1
    MYSQL_PORT=3306

    # Execute the following commands to route the connection:
    export POD_NAME=$(kubectl get pods --namespace default -l "app=my-mysql" -o jsonpath="{.items[0].metadata.name}")
    kubectl port-forward $POD_NAME 3306:3306

    mysql -h ${MYSQL_HOST} -P${MYSQL_PORT} -u root -p${MYSQL_ROOT_PASSWORD}

daweij@master:~/helm$ helm list my
NAME    REVISION    UPDATED                     STATUS      CHART          NAMESPACE
my      1           Tue Apr 24 11:53:25 2018    DEPLOYED    mysql-0.3.6    default
daweij@master:~/helm$ helm status my
LAST DEPLOYED: Tue Apr 24 11:53:25 2018
NAMESPACE: default
STATUS: DEPLOYED

RESOURCES:
==> v1/Service
NAME      TYPE       CLUSTER-IP     EXTERNAL-IP  PORT(S)   AGE
my-mysql  ClusterIP  10.233.47.112  <none>       3306/TCP  1m

==> v1beta1/Deployment
NAME      DESIRED  CURRENT  UP-TO-DATE  AVAILABLE  AGE
my-mysql  1        1        1           0          1m

==> v1/Pod(related)
NAME                       READY  STATUS    RESTARTS  AGE
my-mysql-6d8949f555-kpcwm  0/1    Init:0/1  0         1m

==> v1/Secret
NAME      TYPE    DATA  AGE
my-mysql  Opaque  2     1m

==> v1/PersistentVolumeClaim
NAME      STATUS  VOLUME    CAPACITY  ACCESS MODES  STORAGECLASS  AGE
my-mysql  Bound   mysql-pv  8Gi       RWO           1m


NOTES:
MySQL can be accessed via port 3306 on the following DNS name from within your cluster:
my-mysql.default.svc.cluster.local

To get your root password run:

    MYSQL_ROOT_PASSWORD=$(kubectl get secret --namespace default my-mysql -o jsonpath="{.data.mysql-root-password}" | base64 --decode; echo)

To connect to your database:

1. Run an Ubuntu pod that you can use as a client:

    kubectl run -i --tty ubuntu --image=ubuntu:16.04 --restart=Never -- bash -il

2. Install the mysql client:

    $ apt-get update && apt-get install mysql-client -y

3. Connect using the mysql cli, then provide your password:
    $ mysql -h my-mysql -p

To connect to your database directly from outside the K8s cluster:
    MYSQL_HOST=127.0.0.1
    MYSQL_PORT=3306

    # Execute the following commands to route the connection:
    export POD_NAME=$(kubectl get pods --namespace default -l "app=my-mysql" -o jsonpath="{.items[0].metadata.name}")
    kubectl port-forward $POD_NAME 3306:3306

    mysql -h ${MYSQL_HOST} -P${MYSQL_PORT} -u root -p${MYSQL_ROOT_PASSWORD}
PVC 已经 Bound,Deployment 也 AVAILABLE。
升级和回滚 release
release 发布后可以执行 helm upgrade 对其升级,通过 --values 或 --set 应用新的配置。比如将当前的 MySQL 版本升级到 5.7.15:
helm upgrade --set imageTag=5.7.15 my mysql
等待一些时间,升级成功。
helm history 可以查看 release 所有的版本。通过 helm rollback 可以回滚到任何版本。
helm history my

helm rollback my 1
回滚成功,MySQL 恢复到 5.7.14。
下一节我们学习如何开发自己的 chart。
开发自己的 chart
Kubernetes 给我们提供了大量官方 chart,不过要部署微服务应用,还是需要开发自己的 chart,下面就来实践这个主题。
创建 chart
执行 helm create mychart 的命令创建 chart mychart:
daweij@master:~/helm$ helm create mychart
Creating mychart
daweij@master:~/helm$ tree mychart/
mychart/
├── charts
├── Chart.yaml
├── templates
│   ├── deployment.yaml
│   ├── _helpers.tpl
│   ├── ingress.yaml
│   ├── NOTES.txt
│   └── service.yaml
└── values.yaml

2 directories, 7 files
daweij@master:~/helm$
Helm 会帮我们创建目录 mychart,并生成了各类 chart 文件。这样我们就可以在此基础上开发自己的 chart 了。
新建的 chart 默认包含一个 nginx 应用示例,values.yaml 内容如下:
daweij@master:~/helm$ cat mychart/values.yaml
# Default values for mychart.
# This is a YAML-formatted file.
# Declare variables to be passed into your templates.

replicaCount: 1

image:
  repository: nginx
  tag: stable
  pullPolicy: IfNotPresent

service:
  type: ClusterIP
  port: 80

ingress:
  enabled: false
  annotations: {}
    # kubernetes.io/ingress.class: nginx
    # kubernetes.io/tls-acme: "true"
  path: /
  hosts:
    - chart-example.local
  tls: []
  #  - secretName: chart-example-tls
  #    hosts:
  #      - chart-example.local

resources: {}
  # We usually recommend not to specify default resources and to leave this as a conscious
  # choice for the user. This also increases chances charts run on environments with little
  # resources, such as Minikube. If you do want to specify resources, uncomment the following
  # lines, adjust them as necessary, and remove the curly braces after 'resources:'.
  # limits:
  #  cpu: 100m
  #  memory: 128Mi
  # requests:
  #  cpu: 100m
  #  memory: 128Mi

nodeSelector: {}

tolerations: []

affinity: {}
开发时建议大家参考官方 chart 中的模板、values.yaml、Chart.yaml,里面包含了大量最佳实践和最常用的函数、流控制,这里就不一一展开了。
调试 chart
只要是程序就会有 bug,chart 也不例外。Helm 提供了 debug 的工具:helm lint 和 helm install --dry-run --debug。
helm lint 会检测 chart 的语法,报告错误以及给出建议。
比如我们故意在 values.yaml 的第 8 行漏掉了一个 :,
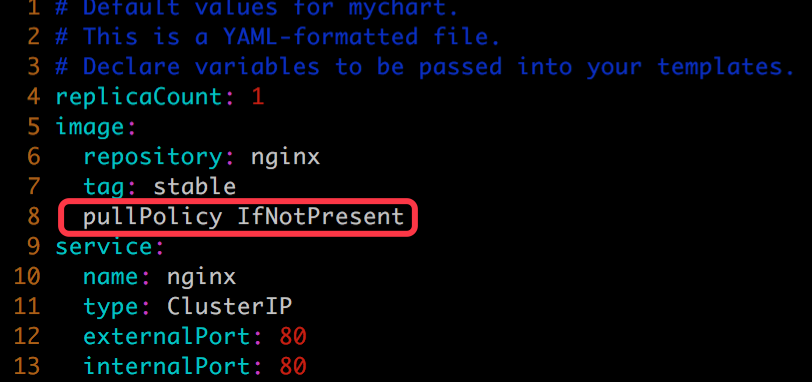
helm lint mychart 会指出这个语法错误。
daweij@master:~/helm$ helm lint mychart
==> Linting mychart
[INFO] Chart.yaml: icon is recommended
[ERROR] values.yaml: unable to parse YAML
    error converting YAML to JSON: yaml: line 11: could not find expected ':'

Error: 1 chart(s) linted, 1 chart(s) failed
mychart 目录被作为参数传递给 helm lint。错误修复后则能通过检测。
daweij@master:~/helm$ vim mychart/values.yaml
daweij@master:~/helm$ helm lint mychart
==> Linting mychart
[INFO] Chart.yaml: icon is recommended

1 chart(s) linted, no failures
helm install --dry-run --debug 会模拟安装 chart,并输出每个模板生成的 YAML 内容。
helm install --dry-run mychart --debug
daweij@master:~/helm$ helm install --dry-run mychart --debug
[debug] Created tunnel using local port: '36539'

[debug] SERVER: "127.0.0.1:36539"

[debug] Original chart version: ""
[debug] CHART PATH: /home/daweij/helm/mychart

NAME:   ideal-frog
REVISION: 1
RELEASED: Tue Apr 24 13:43:52 2018
CHART: mychart-0.1.0
USER-SUPPLIED VALUES:
{}

COMPUTED VALUES:
affinity: {}
image:
  pullPolicy: IfNotPresent
  repository: nginx
  tag: stable
ingress:
  annotations: {}
  enabled: false
  hosts:
  - chart-example.local
  path: /
  tls: []
nodeSelector: {}
replicaCount: 1
resources: {}
service:
  port: 80
  type: ClusterIP
tolerations: []

HOOKS:
MANIFEST:

---
# Source: mychart/templates/service.yaml
apiVersion: v1
kind: Service
metadata:
  name: ideal-frog-mychart
  labels:
    app: mychart
    chart: mychart-0.1.0
    release: ideal-frog
    heritage: Tiller
spec:
  type: ClusterIP
  ports:
    - port: 80
      targetPort: http
      protocol: TCP
      name: http
  selector:
    app: mychart
    release: ideal-frog
---
# Source: mychart/templates/deployment.yaml
apiVersion: apps/v1beta2
kind: Deployment
metadata:
  name: ideal-frog-mychart
  labels:
    app: mychart
    chart: mychart-0.1.0
    release: ideal-frog
    heritage: Tiller
spec:
  replicas: 1
  selector:
    matchLabels:
      app: mychart
      release: ideal-frog
  template:
    metadata:
      labels:
        app: mychart
        release: ideal-frog
    spec:
      containers:
        - name: mychart
          image: "nginx:stable"
          imagePullPolicy: IfNotPresent
          ports:
            - name: http
              containerPort: 80
              protocol: TCP
          livenessProbe:
            httpGet:
              path: /
              port: http
          readinessProbe:
            httpGet:
              path: /
              port: http
          resources:
            {}
daweij@master:~/helm$
我们可以检视这些输出,判断是否与预期相符。
同样,mychart 目录作为参数传递给 helm install --dry-run --debug。
其他常用命令
删除
helm delete --purge release-name
更新
helm upgrade release-name chart-dest-name
下一节讨论如何安装并将 chart 添加到仓库。
管理和安装 chart
安装 chart
当我们觉得准备就绪,就可以安装 chart,Helm 支持四种安装方法:
-
安装仓库中的 chart,例如:
helm install stable/nginx -
通过 tar 包安装,例如:
helm install ./nginx-1.2.3.tgz -
通过 chart 本地目录安装,例如:
helm install ./nginx -
通过 URL 安装,例如:
helm install https://example.com/charts/nginx-1.2.3.tgz - 用于2,将当前目录打包为tgz: helm package -d tardest 待压缩chart1 待压缩chart2
daweij@master:~/prometheus-operator$ mkdir -p helm/kube-prometheus/charts
daweij@master:~/prometheus-operator$ helm package -d helm/kube-prometheus/charts helm/alertmanager helm/grafana helm/prometheus  helm/exporter-kube-dns helm/exporter-kube-scheduler helm/exporter-kubelets helm/exporter-node helm/exporter-kube-controller-manager helm/exporter-kube-etcd helm/exporter-kube-state helm/exporter-kubernetes
Successfully packaged chart and saved it to: helm/kube-prometheus/charts/alertmanager-0.0.13.tgz
Successfully packaged chart and saved it to: helm/kube-prometheus/charts/grafana-0.0.24.tgz
Successfully packaged chart and saved it to: helm/kube-prometheus/charts/prometheus-0.0.24.tgz
Successfully packaged chart and saved it to: helm/kube-prometheus/charts/exporter-kube-dns-0.1.5.tgz
Successfully packaged chart and saved it to: helm/kube-prometheus/charts/exporter-kube-scheduler-0.1.6.tgz
Successfully packaged chart and saved it to: helm/kube-prometheus/charts/exporter-kubelets-0.2.7.tgz
Successfully packaged chart and saved it to: helm/kube-prometheus/charts/exporter-node-0.2.0.tgz
Successfully packaged chart and saved it to: helm/kube-prometheus/charts/exporter-kube-controller-manager-0.1.7.tgz
Successfully packaged chart and saved it to: helm/kube-prometheus/charts/exporter-kube-etcd-0.1.8.tgz
Successfully packaged chart and saved it to: helm/kube-prometheus/charts/exporter-kube-state-0.1.15.tgz
Successfully packaged chart and saved it to: helm/kube-prometheus/charts/exporter-kubernetes-0.1.6.tgz
daweij@master:~/prometheus-operator$
这里我们使用本地目录安装:
daweij@master:~/helm$ helm install mychart
NAME:   pondering-nightingale
LAST DEPLOYED: Tue Apr 24 13:49:02 2018
NAMESPACE: default
STATUS: DEPLOYED

RESOURCES:
==> v1beta2/Deployment
NAME                           DESIRED  CURRENT  UP-TO-DATE  AVAILABLE  AGE
pondering-nightingale-mychart  1        1        1           0          55s

==> v1/Pod(related)
NAME                                            READY  STATUS   RESTARTS  AGE
pondering-nightingale-mychart-6bf647878f-dkbss  0/1    Pending  0         55s

==> v1/Service
NAME                           TYPE       CLUSTER-IP    EXTERNAL-IP  PORT(S)  AGE
pondering-nightingale-mychart  ClusterIP  10.233.53.80  <none>       80/TCP   55s


NOTES:
1. Get the application URL by running these commands:
  export POD_NAME=$(kubectl get pods --namespace default -l "app=mychart,release=pondering-nightingale" -o jsonpath="{.items[0].metadata.name}")
  echo "Visit http://127.0.0.1:8080 to use your application"
  kubectl port-forward $POD_NAME 8080:80

daweij@master:~/helm$
当 chart 部署到 Kubernetes 集群,便可以对其进行更为全面的测试。
将 chart 添加到仓库
chart 通过测试后可以将其添加到仓库,团队其他成员就能够使用。
任何 HTTP Server 都可以用作 chart 仓库,下面演示在 k8s-node1 172.28.2.211 上搭建仓库。
-
在
k8s-node1上启动一个 httpd 容器。root@node1:~# mkdir /var/www root@node1:~# docker run -d -p 8080:80 -v /var/www/:/usr/local/apache2/htdocs/ httpd 096cc6292f59f3d6c26fbaaf5964b28e018adb4395111b14321a4c5d5a6b388e root@node1:~# curl http://172.28.2.211:8080 <html><body><h1>It works!</h1></body></html>
-
通过
helm package将mychart打包。daweij@master:~/helm$ helm package -d ./ mychart Successfully packaged chart and saved it to: mychart-0.1.0.tgz
-
执行
helm repo index生成仓库的 index 文件。
helm repo index myrepo/ --url http://172.28.2.211:8080/charts
daweij@master:~/helm$ helm package -d ./ mychart Successfully packaged chart and saved it to: mychart-0.1.0.tgz daweij@master:~/helm$ mkdir myrepo daweij@master:~/helm$ mv mychart-0.1.0.tgz myrepo/ daweij@master:~/helm$ helm repo index myrepo/ --url http://172.28.2.211:8080/charts daweij@master:~/helm$
4.Helm 会扫描 myrepo 目录中的所有 tgz 包并生成 index.yaml。--url 指定的是新仓库的访问路径。
新生成的 index.yaml 记录了当前仓库中所有 chart 的信息:
daweij@master:~/helm$ cat myrepo/index.yaml
apiVersion: v1
entries:
  mychart:
  - apiVersion: v1
    appVersion: "1.0"
    created: 2018-04-24T13:55:44.146115111+08:00
    description: A Helm chart for Kubernetes
    digest: fbf433ad49d3623fd1fec2cdec3d65022e472bb30b67463bd0f52c484177632e
    name: mychart
    urls:
    - http://172.28.2.211:8080/charts/mychart-0.1.0.tgz
    version: 0.1.0
generated: 2018-04-24T13:55:44.14525528+08:00
当前只有 mychart 这一个 chart。
5.将 mychart-0.1.0.tgz 和 index.yaml 上传到 node1 的 /var/www/charts 目录。
root@node1:~# mkdir /var/www/charts
root@node1:~# scp root@172.28.2.210:/home/daweij/helm/myrepo/* /var/www/charts/
root@172.28.2.210's password:
index.yaml                                                                      100%  396     0.4KB/s   00:00
mychart-0.1.0.tgz                                                               100% 2562     2.5KB/s   00:00
root@node1:~# ls /var/www/charts/
index.yaml  mychart-0.1.0.tgz
6.通过 helm repo add 将新仓库添加到 Helm。
helm repo add newrepo http://172.28.2.211:8080/charts
daweij@master:~/helm$ helm repo add newrepo http://172.28.2.211:8080/charts
"newrepo" has been added to your repositories
daweij@master:~/helm$ helm repo list
NAME       URL
stable     https://kubernetes-charts.storage.googleapis.com
local      http://127.0.0.1:8879/charts
newrepo    http://172.28.2.211:8080/charts
daweij@master:~/helm$
7.仓库命名为 newrepo,Helm 会从仓库下载 index.yaml。
现在已经可以 repo search 到 mychart 了。
daweij@master:~/helm$ helm search mychart
NAME               CHART VERSION    APP VERSION    DESCRIPTION
local/mychart      0.1.0            1.0            A Helm chart for Kubernetes
newrepo/mychart    0.1.0            1.0            A Helm chart for Kubernetes
除了 newrepo/mychart,这里还有一个 local/mychart。
这是因为在执行第 2 步打包操作的同时,mychart 也被同步到了 local 的仓库。
已经可以直接从新仓库安装 mychart 了。
daweij@master:~/helm$ helm install newrepo/mychart
NAME:   wandering-squid
LAST DEPLOYED: Tue Apr 24 14:26:49 2018
NAMESPACE: default
STATUS: DEPLOYED

RESOURCES:
==> v1/Service
NAME                     TYPE       CLUSTER-IP     EXTERNAL-IP  PORT(S)  AGE
wandering-squid-mychart  ClusterIP  10.233.59.173  <none>       80/TCP   55s

==> v1beta2/Deployment
NAME                     DESIRED  CURRENT  UP-TO-DATE  AVAILABLE  AGE
wandering-squid-mychart  1        1        1           0          55s

==> v1/Pod(related)
NAME                                      READY  STATUS             RESTARTS  AGE
wandering-squid-mychart-6bf48c89d6-gcfgz  0/1    ContainerCreating  0         55s


NOTES:
1. Get the application URL by running these commands:
  export POD_NAME=$(kubectl get pods --namespace default -l "app=mychart,release=wandering-squid" -o jsonpath="{.items[0].metadata.name}")
  echo "Visit http://127.0.0.1:8080 to use your application"
  kubectl port-forward $POD_NAME 8080:80

daweij@master:~/helm$
如果以后仓库添加了新的 chart,需要用 helm repo update 更新本地的 index。
daweij@master:~/helm$ helm repo update
Hang tight while we grab the latest from your chart repositories...
...Skip local chart repository
...Successfully got an update from the "newrepo" chart repository
...Unable to get an update from the "stable" chart repository (https://kubernetes-charts.storage.googleapis.com):
    Get https://kubernetes-charts.storage.googleapis.com/index.yaml: dial tcp 172.217.27.144:443: i/o timeout
Update Complete. ⎈ Happy Helming!⎈
这个操作相当于 Ubutun 的 apt-get update。
小结
本章我们学习了 Kubernetes 包管理器 Helm。
Helm 让我们能够像 apt 管理 deb 包那样安装、部署、升级和删除容器化应用。
Helm 由客户端和 Tiller 服务器组成。客户端负责管理 chart,服务器负责管理 release。
chart 是 Helm 的应用打包格式,它由一组文件和目录构成。其中最重要的是模板,模板中定义了 Kubernetes 各类资源的配置信息,Helm 在部署时通过 values.yaml 实例化模板。
Helm 允许用户开发自己的 chart,并为用户提供了调试工具。
用户可以搭建自己的 chart 仓库,在团队中共享 chart。
Helm 帮助用户在 Kubernetes 上高效地运行和管理微服务架构应用,Helm 非常重要。
综上,常用的helm命令

 浙公网安备 33010602011771号