
asp.net控件设计时支持(3)
2007-05-14 23:23 Clingingboy 阅读(6054) 评论(9) 编辑 收藏 举报 示例代码
都已经忘了更新了,感觉非常愧疚啊.现在努力补上
上篇很偷懒的写了自动格式设置.
把没讲完的补上.
一.智能标记
先看一张图.
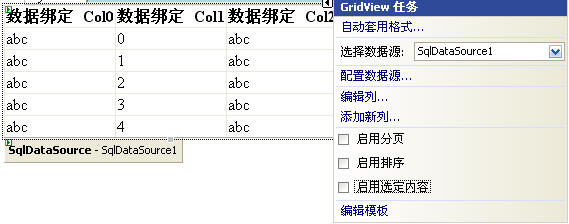
GridView右侧的小三角可以很轻松的帮助我们设置常用的属性,如下面的启动分页,启用排序等,通过这样的方式我们可以很快的完成工作。我们称这样的任务菜单为智能标记.
下面来看看如何实现
1.重写ControlDesigner的ActionLists属性
你必须重写这个属性,返回你自定义的智能标记集合(即DesignerActionListCollection),这里假设CustomControlActionList为自定义的智能
 public class SampleControlDesigner : ControlDesigner
 {
{

 public SampleControlDesigner() : base()
 {
{
 } //创建一个自定义操作列表集合 public override DesignerActionListCollection ActionLists { get { DesignerActionListCollection actionLists = new DesignerActionListCollection(); actionLists.Add(new CustomControlActionList(this)); return actionLists; } }
  }
}2.CustomControlActionList 自定义项列表
2.1项列表分类
(1)标题面板
(2)属性面板
(3)方法面板
类图如下

看个效果图,你就明白怎么回事了

2.2实现
(1)继承DesignerActionList类,重写GetSortedActionItems方法添加自定义项面板集合,即2.1的三种项面板
public override DesignerActionItemCollection GetSortedActionItems() { if (items == null) { items = new DesignerActionItemCollection(); // 添加标题面板 items.Add(new DesignerActionHeaderItem("快速设置面板测试:")); //添加属性相关面板 items.Add(new DesignerActionPropertyItem("Visible", "是否显示")); items.Add(new DesignerActionPropertyItem("Width", "设置宽度")); items.Add(new DesignerActionPropertyItem("Height", "设置高度")); // 添加方法相关面板 items.Add(new DesignerActionMethodItem(this, "FormatBlue", "定义背景为蓝色", true)); items.Add(new DesignerActionMethodItem(this, "FormatRed", "定义背景为红色", true)); items.Add(new DesignerActionMethodItem(this, "FormatWhite", "定义背景为白色", true)); } return items; }(2)属性,方法项面板的实现
如果你设置属性的话,则必须在CustomControlActionList定义属性,方法也相同,代码如下
以上步骤完成以后就大功告成了,接着则与相关控件关联起来就可以了,效果图在上面已经看过了.
[DesignerAttribute(typeof(SampleControlDesigner))]二.模板编辑器

上面的模板编辑界面相信大家都很熟悉吧.设置支持怎么少的了模板呢.设置时模板编辑实现比较简单,下面来看下如何实现
这里自定义的模板控件不再列出
1.重写ControlDesigner类的TemplateGroups返回自定义模板组集合即(TemplateGroupCollection)
添加步骤跟表格的添加类似,td add tr然后table add td
模板则是TemplateGroup add TemplateDefinition 然后TemplateGroupCollection add TemplateGroup
代码如下
这里注意TemplateDefinition构造函数的最后一个属性,true则在设计时编辑只能添加服务器控件
2.初始化启用设计时模板编辑
我们还需要在Initialize方法中调用SetViewFlags方法启用设计时模板编辑
public override void Initialize(IComponent component) { base.Initialize(component); SetViewFlags(ViewFlags.TemplateEditing, true); }3.提供默认矩形标识符,为控件提供说明
如下图,DataList默认情况下给予如下提示

我们可以通过重写GetDesignTimeHtml方法调用CreatePlaceHolderDesignTimeHtml方法创建一个矩形标识符来实现
public override string GetDesignTimeHtml() { return CreatePlaceHolderDesignTimeHtml("右击或选择编辑模板面板来编辑模板内容"); }好了,完成了,接着要做的就是与相关模板控件关联起来了
先写到这里,估计大家也不会可以留意这方面的东西,平时大家都太忙了,上面功能有跟没有没多大关系,不过常用控件属性和功能,有设计时支持一定会让使用的更加有效. 明天继续写


【推荐】国内首个AI IDE,深度理解中文开发场景,立即下载体验Trae
【推荐】编程新体验,更懂你的AI,立即体验豆包MarsCode编程助手
【推荐】抖音旗下AI助手豆包,你的智能百科全书,全免费不限次数
【推荐】轻量又高性能的 SSH 工具 IShell:AI 加持,快人一步
· .NET Core 中如何实现缓存的预热?
· 从 HTTP 原因短语缺失研究 HTTP/2 和 HTTP/3 的设计差异
· AI与.NET技术实操系列:向量存储与相似性搜索在 .NET 中的实现
· 基于Microsoft.Extensions.AI核心库实现RAG应用
· Linux系列:如何用heaptrack跟踪.NET程序的非托管内存泄露
· TypeScript + Deepseek 打造卜卦网站:技术与玄学的结合
· 阿里巴巴 QwQ-32B真的超越了 DeepSeek R-1吗?
· 【译】Visual Studio 中新的强大生产力特性
· 10年+ .NET Coder 心语 ── 封装的思维:从隐藏、稳定开始理解其本质意义
· 【设计模式】告别冗长if-else语句:使用策略模式优化代码结构