SDN模拟器ONOS Install Guide
ONOS Install Guide
Date:2018-03-06                                  Author:BurlyLuo
Mail:olaf.luo@foxmail.com                        recommend browser :Firefox
What is ONOS?
ONOS stands for Open Network Operating System. ONOS provides the control plane for a software-defined network (SDN), managing network components, such as switches and links, and running software programs or modules to provide communication services to end hosts and neighboring networks.

    If you are familiar with server operating systems, you will find that ONOS provides some analogous types of functionality, including APIs and abstractions, resource allocation, and permissions, as well as user-facing software such as a CLI, a GUI, and system applications.
    If you are familiar with traditional "inside the box" switch operating systems, you will find that ONOS manages your entire network rather than a single device, which can dramatically simplify management, configuration, and deployment of new software, hardware and services.
    If you are familiar with SDN controllers, you should feel right at home because the ONOS platform and applications act as an extensible, modular, distributed SDN controller.

<From ONOS wiki:https://wiki.onosproject.org/>
为了在本地获得一个快捷的ONOS环境,我们可以采用官网封装好的virtualbox 虚拟镜像来快速部署ONOS环境。
http://onlab.vicci.org/onos/vm/onos-tutorial-1.0.0r161-ovf.zip
下边开始安装步骤的介绍:
1.下载当前版本的VirtualBox安装包。链接:http://sw.bos.baidu.com/sw-search-sp/software/6bda11b7d3256/VirtualBox-5.1.30.18389-Win.exe
//推荐使用VirtualBox,因为相比于VMWare来说,一是:免费,二是:相对对物理机的资源消耗更少。
2.下载ONOS官网封装好的ONOS zip包。链接:http://onlab.vicci.org/onos/vm/onos-tutorial-1.0.0r161-ovf.zip
//下载完成的zip文件解压开来以后可以看到如下文件:onos-tutorial-1.0.0.ovf 和 onos-tutorial-1.0.0.vmdk //注意核实//
3.在VirtualBox中导入ONOS包onos-tutorial-1.0.0.ovf。
主要步骤截图:
First Step:

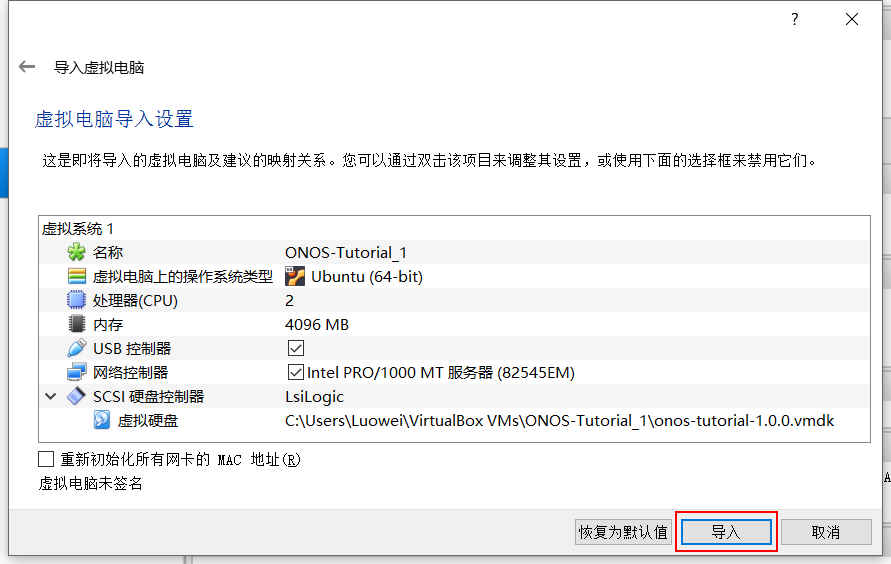
2:浏览文件onos-tutorial-1.0.0.ovf进入VirtualBox。如下图:
[首次安装请保持所有选项默认]

点击导入即可。
导入完成以后:
登录虚拟机内的 Guest OS 帐号和密码如下:
USERNAME:tutorial1
PASSWORD:tutorial1
打开以后界面如下:

打开以后双击快捷方式ONOS和Mininet来迅速启动一个SDN的控制器ONOS和Mininet[An Instant Virtual Network on your Laptop (or other PC)]

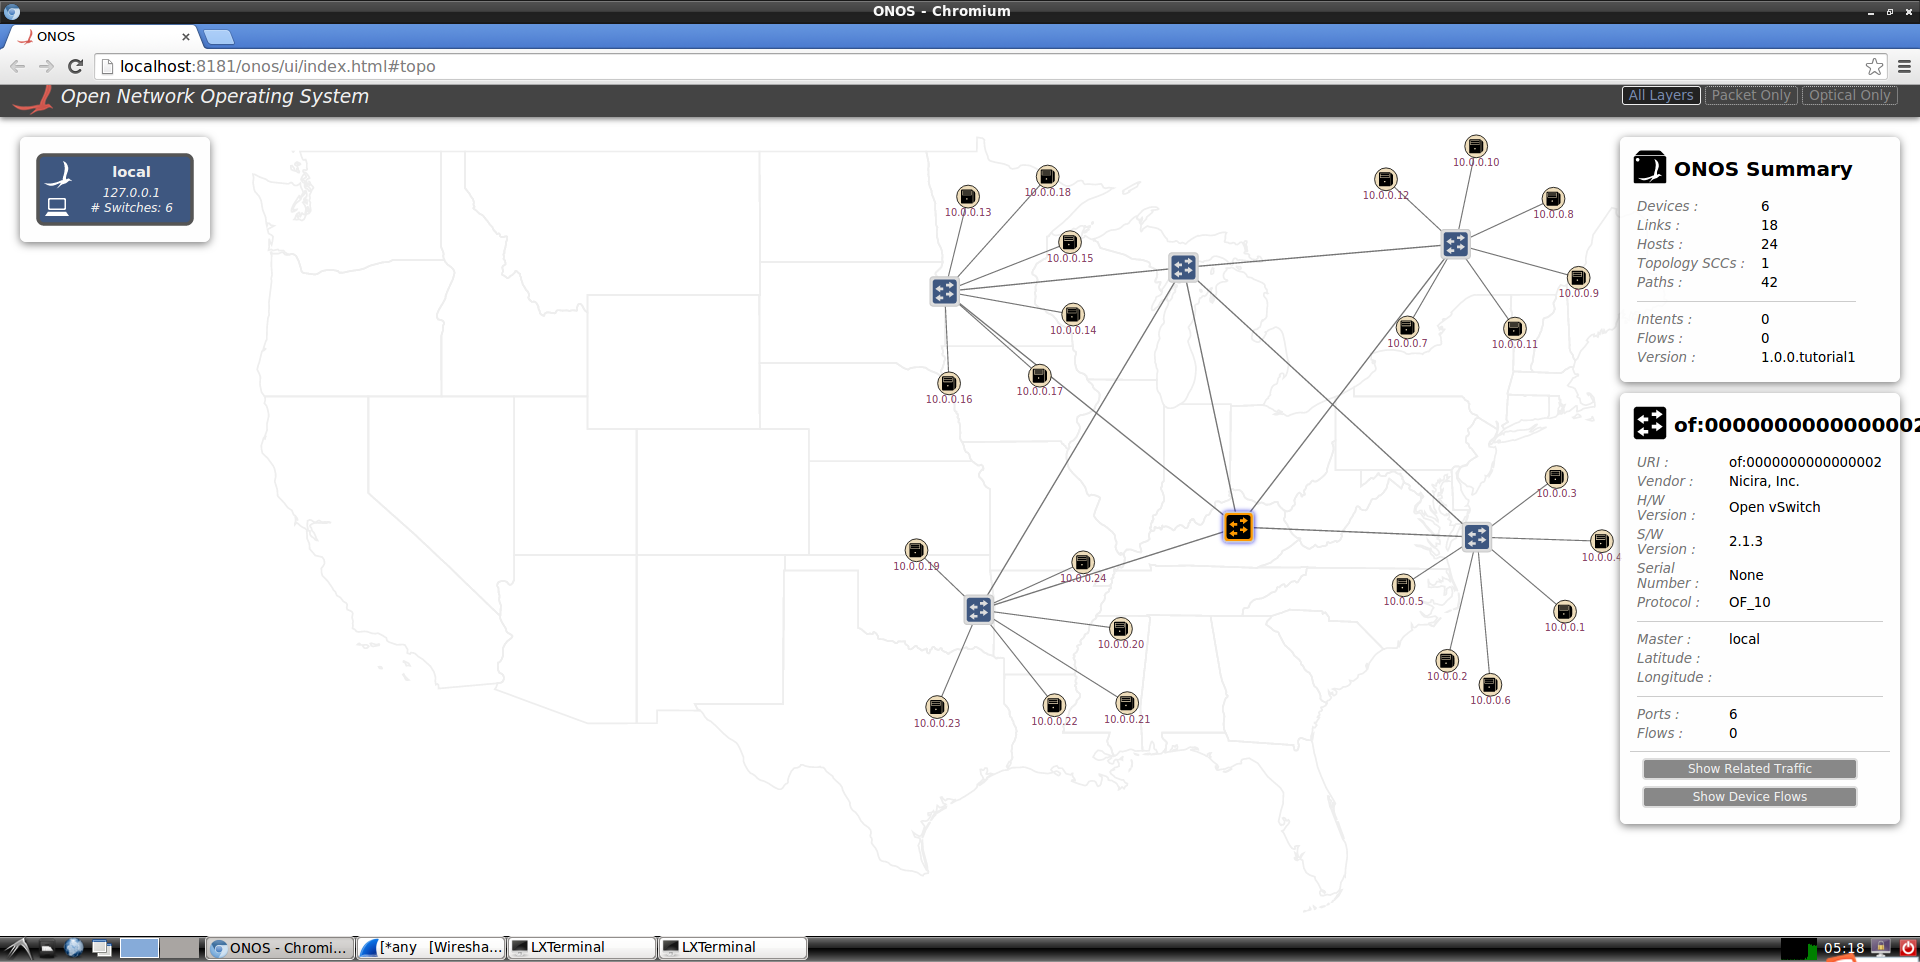
本实验所有的联系都是使用相同的网络拓扑 ( 如下图所示 ) 。网络中有 6 台交换机, 4 台外边的交换机上连接了 6 台主机,这 4 台交换机又连接到中间互连
的 2 台交换机上。
打开ONOS的Gui之前还得做一个动作,来激活ONOS-GUI的feature:
在ONOS的CLI中安装ONOS-GUI的feature。
ONOS>feature:install onos-gui
//这时候查看8181端口处于LISTEN状态。//
双击桌面ONOS GUI快捷方式即可进入ONOS的图形化界面。

关于Mininet添加交换机和host过程如下:
//
*** Creating network
*** Adding controller
*** Adding hosts:
h11 h12 h13 h14 h15 h16 h21 h22 h23 h24 h25 h26 h31 h32 h33 h34 h35 h36 h41 h42 h43 h44 h45 h46
*** Adding switches:
s1 s2 s11 s12 s13 s14
*** Adding links:
(h11, s11) (h12, s11) (h13, s11) (h14, s11) (h15, s11) (h16, s11) (h21, s12) (h22, s12) (h23, s12) (h24, s12) (h25, s12) (h26, s12) (h31, s13) (h32, s13) (h33, s13) (h34, s13) (h35, s13) (h36, s13) (h41, s14) (h42, s14) (h43, s14) (h44, s14) (h45, s14) (h46, s14) (s1, s2) (s11, s1) (s11, s2) (s12, s1) (s12, s2) (s13, s1) (s13, s2) (s14, s1) (s14, s2)
*** Configuring hosts
h11 h12 h13 h14 h15 h16 h21 h22 h23 h24 h25 h26 h31 h32 h33 h34 h35 h36 h41 h42 h43 h44 h45 h46
*** Starting controller
c0
*** Starting 6 switches
s1 s2 s11 s12 s13 s14
*** Starting CLI:
mininet>
//
mininet> nodes
available nodes are:
c0 h11 h12 h13 h14 h15 h16 h21 h22 h23 h24 h25 h26 h31 h32 h33 h34 h35 h36 h41 h42 h43 h44 h45 h46 s1 s11 s12 s13 s14 s2
mininet> net
h11 h11-eth0:s11-eth3
h12 h12-eth0:s11-eth4
h13 h13-eth0:s11-eth5
h14 h14-eth0:s11-eth6
h15 h15-eth0:s11-eth7
h16 h16-eth0:s11-eth8
h21 h21-eth0:s12-eth3
h22 h22-eth0:s12-eth4
h23 h23-eth0:s12-eth5
h24 h24-eth0:s12-eth6
h25 h25-eth0:s12-eth7
h26 h26-eth0:s12-eth8
h31 h31-eth0:s13-eth3
h32 h32-eth0:s13-eth4
h33 h33-eth0:s13-eth5
h34 h34-eth0:s13-eth6
h35 h35-eth0:s13-eth7
h36 h36-eth0:s13-eth8
h41 h41-eth0:s14-eth3
h42 h42-eth0:s14-eth4
h43 h43-eth0:s14-eth5
h44 h44-eth0:s14-eth6
h45 h45-eth0:s14-eth7
h46 h46-eth0:s14-eth8
s1 lo: s1-eth1:s2-eth1 s1-eth2:s11-eth1 s1-eth3:s12-eth1 s1-eth4:s13-eth1 s1-eth5:s14-eth1
s2 lo: s2-eth1:s1-eth1 s2-eth2:s11-eth2 s2-eth3:s12-eth2 s2-eth4:s13-eth2 s2-eth5:s14-eth2
s11 lo: s11-eth1:s1-eth2 s11-eth2:s2-eth2 s11-eth3:h11-eth0 s11-eth4:h12-eth0 s11-eth5:h13-eth0 s11-eth6:h14-eth0 s11-eth7:h15-eth0 s11-eth8:h16-eth0
s12 lo: s12-eth1:s1-eth3 s12-eth2:s2-eth3 s12-eth3:h21-eth0 s12-eth4:h22-eth0 s12-eth5:h23-eth0 s12-eth6:h24-eth0 s12-eth7:h25-eth0 s12-eth8:h26-eth0
s13 lo: s13-eth1:s1-eth4 s13-eth2:s2-eth4 s13-eth3:h31-eth0 s13-eth4:h32-eth0 s13-eth5:h33-eth0 s13-eth6:h34-eth0 s13-eth7:h35-eth0 s13-eth8:h36-eth0
s14 lo: s14-eth1:s1-eth5 s14-eth2:s2-eth5 s14-eth3:h41-eth0 s14-eth4:h42-eth0 s14-eth5:h43-eth0 s14-eth6:h44-eth0 s14-eth7:h45-eth0 s14-eth8:h46-eth0
c0
mininet> links
h11-eth0<->s11-eth3 (OK OK)
h12-eth0<->s11-eth4 (OK OK)
h13-eth0<->s11-eth5 (OK OK)
h14-eth0<->s11-eth6 (OK OK)
h15-eth0<->s11-eth7 (OK OK)
h16-eth0<->s11-eth8 (OK OK)
h21-eth0<->s12-eth3 (OK OK)
h22-eth0<->s12-eth4 (OK OK)
h23-eth0<->s12-eth5 (OK OK)
h24-eth0<->s12-eth6 (OK OK)
h25-eth0<->s12-eth7 (OK OK)
h26-eth0<->s12-eth8 (OK OK)
h31-eth0<->s13-eth3 (OK OK)
h32-eth0<->s13-eth4 (OK OK)
h33-eth0<->s13-eth5 (OK OK)
h34-eth0<->s13-eth6 (OK OK)
h35-eth0<->s13-eth7 (OK OK)
h36-eth0<->s13-eth8 (OK OK)
h41-eth0<->s14-eth3 (OK OK)
h42-eth0<->s14-eth4 (OK OK)
h43-eth0<->s14-eth5 (OK OK)
h44-eth0<->s14-eth6 (OK OK)
h45-eth0<->s14-eth7 (OK OK)
h46-eth0<->s14-eth8 (OK OK)
s1-eth1<->s2-eth1 (OK OK)
s11-eth1<->s1-eth2 (OK OK)
s11-eth2<->s2-eth2 (OK OK)
s12-eth1<->s1-eth3 (OK OK)
s12-eth2<->s2-eth3 (OK OK)
s13-eth1<->s1-eth4 (OK OK)
s13-eth2<->s2-eth4 (OK OK)
s14-eth1<->s1-eth5 (OK OK)
s14-eth2<->s2-eth5 (OK OK)
mininet>
4.实现不同host之间的互访,还得激活一个ONOS的feature  Reactive Forwarding
在未激活该feature时候,做ping测试,发现:
mininet> h11 ping -c3 h41
PING 10.0.0.19 (10.0.0.19) 56(84) bytes of data.
From 10.0.0.1 icmp_seq=1 Destination Host Unreachable
From 10.0.0.1 icmp_seq=2 Destination Host Unreachable
From 10.0.0.1 icmp_seq=3 Destination Host Unreachable
--- 10.0.0.19 ping statistics ---
3 packets transmitted, 0 received, +3 errors, 100% packet loss, time 2009ms
//同一网段的不同host之间竟然不通。//
"Reactive Forwarding" 是一个非常简单的 SDN 应用程序,它为每一个被送到控制器的数据包安装流表。但是此应用默认没有被加载。使用如下命令查看已经被加载的应用程序列表:
这里顺便看一下刚才就好的ONOS—GUI的feature:
onos> list | grep onos-gui
158 | Active |  80 | 1.0.0            | onos-gui
onos>
//激活Forwarding 的feature//
ONOS>feature:install onos-app-fwd
查看是否激活的该feature:
onos> list | grep fwd
152 | Active |  80 | 1.0.0            | onos-app-fwd             //已经激活该feature//
onos>
此时在Mininet中做ping测试:
mininet> h11 ping h12
PING 10.0.0.2 (10.0.0.2) 56(84) bytes of data.
64 bytes from 10.0.0.2: icmp_seq=1 ttl=64 time=10.2 ms
64 bytes from 10.0.0.2: icmp_seq=2 ttl=64 time=2.06 ms
^C
--- 10.0.0.2 ping statistics ---
2 packets transmitted, 2 received, 0% packet loss, time 1001ms
rtt min/avg/max/mdev = 2.069/6.183/10.297/4.114 ms
mininet>
//此时ping通//
此时做所有主机之间互ping测试:pingall
结果如下:
mininet> pingall
*** Ping: testing ping reachability
h11 -> h12 h13 h14 h15 h16 h21 h22 h23 h24 h25 h26 h31 h32 h33 h34 h35 h36 h41 h42 h43 h44 h45 h46
h12 -> h11 h13 h14 h15 h16 h21 h22 h23 h24 h25 h26 h31 h32 h33 h34 h35 h36 h41 h42 h43 h44 h45 h46
h13 -> h11 h12 h14 h15 h16 h21 h22 h23 h24 h25 h26 h31 h32 h33 h34 h35 h36 h41 h42 h43 h44 h45 h46
h14 -> h11 h12 h13 h15 h16 h21 h22 h23 h24 h25 h26 h31 h32 h33 h34 h35 h36 h41 h42 h43 h44 h45 h46
h15 -> h11 h12 h13 h14 h16 h21 h22 h23 h24 h25 h26 h31 h32 h33 h34 h35 h36 h41 h42 h43 h44 h45 h46
h16 -> h11 h12 h13 h14 h15 h21 h22 h23 h24 h25 h26 h31 h32 h33 h34 h35 h36 h41 h42 h43 h44 h45 h46
h21 -> h11 h12 h13 h14 h15 h16 h22 h23 h24 h25 h26 h31 h32 h33 h34 h35 h36 h41 h42 h43 h44 h45 h46
h22 -> h11 h12 h13 h14 h15 h16 h21 h23 h24 h25 h26 h31 h32 h33 h34 h35 h36 h41 h42 h43 h44 h45 h46
h23 -> h11 h12 h13 h14 h15 h16 h21 h22 h24 h25 h26 h31 h32 h33 h34 h35 h36 h41 h42 h43 h44 h45 h46
h24 -> h11 h12 h13 h14 h15 h16 h21 h22 h23 h25 h26 h31 h32 h33 h34 h35 h36 h41 h42 h43 h44 h45 h46
h25 -> h11 h12 h13 h14 h15 h16 h21 h22 h23 h24 h26 h31 h32 h33 h34 h35 h36 h41 h42 h43 h44 h45 h46
h26 -> h11 h12 h13 h14 h15 h16 h21 h22 h23 h24 h25 h31 h32 h33 h34 h35 h36 h41 h42 h43 h44 h45 h46
h31 -> h11 h12 h13 h14 h15 h16 h21 h22 h23 h24 h25 h26 h32 h33 h34 h35 h36 h41 h42 h43 h44 h45 h46
h32 -> h11 h12 h13 h14 h15 h16 h21 h22 h23 h24 h25 h26 h31 h33 h34 h35 h36 h41 h42 h43 h44 h45 h46
h33 -> h11 h12 h13 h14 h15 h16 h21 h22 h23 h24 h25 h26 h31 h32 h34 h35 h36 h41 h42 h43 h44 h45 h46
h34 -> h11 h12 h13 h14 h15 h16 h21 h22 h23 h24 h25 h26 h31 h32 h33 h35 h36 h41 h42 h43 h44 h45 h46
h35 -> h11 h12 h13 h14 h15 h16 h21 h22 h23 h24 h25 h26 h31 h32 h33 h34 h36 h41 h42 h43 h44 h45 h46
h36 -> h11 h12 h13 h14 h15 h16 h21 h22 h23 h24 h25 h26 h31 h32 h33 h34 h35 h41 h42 h43 h44 h45 h46
h41 -> h11 h12 h13 h14 h15 h16 h21 h22 h23 h24 h25 h26 h31 h32 h33 h34 h35 h36 h42 h43 h44 h45 h46
h42 -> h11 h12 h13 h14 h15 h16 h21 h22 h23 h24 h25 h26 h31 h32 h33 h34 h35 h36 h41 h43 h44 h45 h46
h43 -> h11 h12 h13 h14 h15 h16 h21 h22 h23 h24 h25 h26 h31 h32 h33 h34 h35 h36 h41 h42 h44 h45 h46
h44 -> h11 h12 h13 h14 h15 h16 h21 h22 h23 h24 h25 h26 h31 h32 h33 h34 h35 h36 h41 h42 h43 h45 h46
h45 -> h11 h12 h13 h14 h15 h16 h21 h22 h23 h24 h25 h26 h31 h32 h33 h34 h35 h36 h41 h42 h43 h44 h46
h46 -> h11 h12 h13 h14 h15 h16 h21 h22 h23 h24 h25 h26 h31 h32 h33 h34 h35 h36 h41 h42 h43 h44 h45
*** Results: 0% dropped (552/552 received)
5.该方式安装的ONOS本身集成了wireshark工具,如果需要使用到抓包分析的话,可以直接使用,非常方便。
顺便提一下,该封装的虚机默认使用的是NAT模式的网络,如果对VirtualBox的几种网络类型熟悉的话,可以自己更改虚拟网卡的连接方式来实现一些便捷的功能。比如笔者在使用该方式安装的时候就把网络更改为桥接方式,[对于新手不建议做此操作]
更多操作请访问:https://wiki.onosproject.org/display/ONOS/Application+tutorial
wireshak user guide:https://www.wireshark.org/docs/wsug_html_chunked/index.html
wireshark抓包附例。
注意:在虚机中使用wireshark要特别的注意,当抓包结束以后,别忘了stop抓包,否则可能会出现内存被沾满而系统崩溃。
6.如有疑问可邮件联系。
########################################################################
#Date:2018-03-08                                        Author:BurlyLuo#
#Mail:olaf.luo@foxmail.com                              Version:v1.0   #
########################################################################
非商业用途转载无需作者授权,但务必在文章标题下面注明作者 罗伟(Burly Luo)以及可点击的本博客地址超级链接 http://www.cnblogs.com/BurlyLuo/,谢谢合作.


