9.2.4 .net core 通过ViewComponent封装控件
我们在.net core中还使用了ViewComponent方式生成控件。ViewComponent也是asp.net core的新特性,是对页面部分的渲染,以前PartialView的功能,可以使用ViewComponent来实现。
View Component包含2个部分,一个是类(继承于ViewComponent),和它返回的结果Razor视图(和普通的View视图一样)。
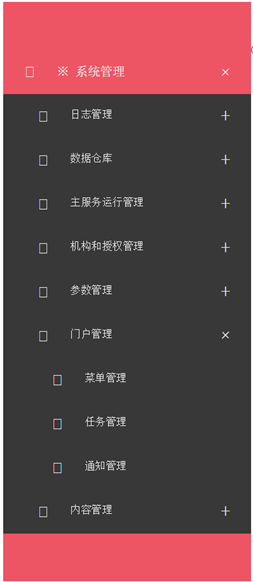
我们还是来看一下以侧边菜单控件为例子,怎么创建一个ViewComponent。侧边菜单控件如下图:

控件的主要逻辑是按照用户和应用程序代码,获取所有已经按照父子结构组织的菜单,传送到页面展示。
上面已经提到,View Component包含2个部分,一个是类,这个类也继承于ViewComponent类。子控件最主要的是重写ViewComponent类的Invoke/InvokeAsync方法:
 1     public class SideMenuViewComponent : ViewComponent
 2     {
 3         private IMenuAppService service;
 4         public SideMenuViewComponent(IMenuAppService service)
 5         {
 6             this.service = service;
 7         }
 8
 9         public IViewComponentResult Invoke(string appCode, UserInfo userInfo)
10         {
11             IEnumerable<MenuDto> menuItems = this.service.GetHierarchy(appCode, userInfo);
12
13             return View("SideMenu", menuItems);
14         }
15     }
再来看ViewComponent的第二部分,就是Razor视图,这里是SideMenu.cshtml:
 1 @using MicroStrutLibrary.Presentation.Web.Controls
 2 @using MicroStrutLibrary.AppService.Portal
 3 @using Microsoft.AspNetCore.Html
 4
 5 @model  IEnumerable<MenuDto>
 6 @{
 7     var controlId = System.Guid.NewGuid().ToString("N");
 8 }
 9
10 @functions
11 {
12     public IHtmlContent RenderChildren(IEnumerable<MenuDto> menuItems)
13     {
14         string result = "<ul class=\"submenu\" style=\"display: none;\">";
15
16         foreach (MenuDto itemInfo in menuItems)
17         {
18             var url = Url.Content(string.IsNullOrWhiteSpace(itemInfo.Url) ? "#" : itemInfo.Url);
19             var icon = string.IsNullOrWhiteSpace(itemInfo.IconClass) ? "fa fa-list-ul" : itemInfo.IconClass;
20             var leaf = (itemInfo.IsLeaf && (itemInfo.Children == null || itemInfo.Children.Count() < 1));
21
22             result += "<li>";
23             result += $"<a href=\"{Html.Raw(url)}\" target=\"{itemInfo.Target}\" title=\"{itemInfo.MenuDesc}\" data-feature=\"{itemInfo.WinFeature}\" data-leaf=\"{leaf.ToString().ToLower()}\"><i class=\"${Html.Raw(icon)}\"></i><span>{itemInfo.MenuName}</span></a>";
24             if (!leaf)
25             {
26                 result += RenderChildren(itemInfo.Children).ToString();
27             }
28         }
29
30         result += "</ul>";
31         return new HtmlString(result);
32     }
33 }
34 <div id="@(controlId)" class="jquery-accordion-menu red">
35     <div class="jquery-accordion-menu-header">
36     </div>
37     <ul>
38         @foreach (MenuDto itemInfo in Model)
39         {
40             var url = Url.Content(string.IsNullOrWhiteSpace(itemInfo.Url) ? "#" : itemInfo.Url);
41             var icon = string.IsNullOrWhiteSpace(itemInfo.IconClass) ? "fa fa-list-ul" : itemInfo.IconClass;
42             var leaf = (itemInfo.IsLeaf && (itemInfo.Children == null || itemInfo.Children.Count() < 1));
43
44             <li>
45                 <a href="@Html.Raw(url)" target="@itemInfo.Target" title="@itemInfo.MenuDesc" data-feature="@itemInfo.WinFeature" data-leaf="@(leaf.ToString().ToLower())">
46                     <i class="@Html.Raw(icon)"></i>
47                     <span>@itemInfo.MenuName</span>
48                 </a>
49                 @if (!leaf)
50                 {
51                     @RenderChildren(itemInfo.Children)
52                 }
53             </li>
54         }
55     </ul>
56     <div class="jquery-accordion-menu-footer">
57     </div>
58 </div>
59 <script>
60     require(['jquery', 'accordionmenu'], function ($) {
61         var $sidebar = $("#@(controlId)");
62
63         $sidebar.jqueryAccordionMenu();
64
65         $("a", $sidebar).click(function (e) {
66             var $this = $(this);
67
68             if (!$this.data("leaf")) {
69                 e.preventDefault();
70             } else {
71                 var feature = $this.data("feature");
72
73                 if (feature) {
74                     e.preventDefault();
75                     window.open($this.attr("href"), $this.attr("target"), feature);
76                 }
77             }
78         });
79         $("li", $sidebar).click(function () {
80             $("li.active", $sidebar).removeClass("active");
81             $(this).addClass("active");
82         });
83     });
84 </script>
Cshtml中,我们用到了@functions的写法,其实就是相当于在cshtml中编写cs的方法,一般这个方法要求返回的是IHtmlContent。
进阶:资源性视图的应用
按照以往的惯例,我们依旧还一个进阶,说明下ViewComponent中的cshtml作为嵌入的资源该如何写。
其实做法和TagHelper是一样的。首先是嵌入式资源方式,需要在project.json中按照如下方式编写:
"buildOptions": {
"embed": [ "Components/**/*.cshtml", "TagHelpers/**/*.cshtml" ]
}
然后再写一个扩展方法,同上个文档的EmbeddedFileServiceCollectionExtensions,最后是在Startup.cs中使用这个扩展方法。
因为我们的ViewComponet和TagHelper都在同一个WebControls项目中,因此进阶部分的代码根本不需要再写了。这里再重复说明的原因是,在没有写过上述代码的情况下,如何将ViewComponent的Cshtml作为嵌入的资源。


