.NET Core玩转机器学习
ML.NET 专门为.NET开发者提供了一套跨平台的开源的机器学习框架。
ML.NET支持.NET开发者不需要过度专业的机器学习开发经验,就能轻松地训练自己的模型,并且嵌入到自己的应用中。一切尽在.NET之中。ML.NET早期是由Microsoft Research开发,近十年来逐步集成到一个大体系中被众多Microsoft产品使用,如大家熟知的Windows、Bing、PowerPoint、Excel之类。
ML.NET的第一个预览版提供了分类器(如文本分类、情感分析)和回归(如价格预测)等实用的机器学习模型。第一版发布后在既有功能之上又新增了关于训练模型的.NET API,使用这些模型进行预测,就像框架中算法、转换、数据结构一类核心组件一样的开发体验。
接下来用个示例,一起进入快速上手的实践中来。
-
安装.NET SDK
为了创建一个.NET应用,首先下载 .NET SDK。
-
创建应用
使用如下命令初始化项目,创建一个控制台应用程序,目标为myApp:
dotnet new console -o myApp cd myApp -
安装ML.NET包
使用如下命令安装Microsoft.ML包:
dotnet add package Microsoft.ML -
下载数据集
假设我们使用机器学习来预测鸢尾花的类型,比如有setosa、versicolor、virginica三种,基于特征有四种:花瓣长度、花瓣宽度, 萼片长度、萼片宽度。
去UCI Machine Learning Repository: Iris Data Set下载一个现成的数据集,复制粘贴其中的数据到任何一个文本编辑器中,然后保存命名为iris-data.txt到myApp目录中。
粘贴完文本内容应该是如下格式,每一行表示不同鸢尾花的样本,数值的部分从左到右依次是萼片长度、萼片宽度、花瓣长度、花瓣宽度,最后是鸢尾花的类型。
5.1,3.5,1.4,0.2,Iris-setosa
4.9,3.0,1.4,0.2,Iris-setosa
4.7,3.2,1.3,0.2,Iris-setosa
...
如果是使用了Visual Studio,将iris-data.txt添加至项目中,需要进行如下配置确保运行时数据集文件在输出的目录中。

-
编写代码
打开Program.cs文件,输入以下代码:
using Microsoft.ML;
using Microsoft.ML.Runtime.Api;
using Microsoft.ML.Trainers;
using Microsoft.ML.Transforms;
using System;

namespace myApp
{
    class Program
    {
        // STEP 1: Define your data structures

        // IrisData is used to provide training data, and as
        // input for prediction operations
        // - First 4 properties are inputs/features used to predict the label
        // - Label is what you are predicting, and is only set when training
        public class IrisData
        {
            [Column("0")]
            public float SepalLength;

            [Column("1")]
            public float SepalWidth;

            [Column("2")]
            public float PetalLength;

            [Column("3")]
            public float PetalWidth;

            [Column("4")]
            [ColumnName("Label")]
            public string Label;
        }

        // IrisPrediction is the result returned from prediction operations
        public class IrisPrediction
        {
            [ColumnName("PredictedLabel")]
            public string PredictedLabels;
        }

        static void Main(string[] args)
        {
            // STEP 2: Create a pipeline and load your data
            var pipeline = new LearningPipeline();

            // If working in Visual Studio, make sure the 'Copy to Output Directory'
            // property of iris-data.txt is set to 'Copy always'
            string dataPath = "iris-data.txt";
            pipeline.Add(new TextLoader<IrisData>(dataPath, separator: ","));

            // STEP 3: Transform your data
            // Assign numeric values to text in the "Label" column, because only
            // numbers can be processed during model training
            pipeline.Add(new Dictionarizer("Label"));

            // Puts all features into a vector
            pipeline.Add(new ColumnConcatenator("Features", "SepalLength", "SepalWidth", "PetalLength", "PetalWidth"));

            // STEP 4: Add learner
            // Add a learning algorithm to the pipeline.
            // This is a classification scenario (What type of iris is this?)
            pipeline.Add(new StochasticDualCoordinateAscentClassifier());

            // Convert the Label back into original text (after converting to number in step 3)
            pipeline.Add(new PredictedLabelColumnOriginalValueConverter() { PredictedLabelColumn = "PredictedLabel" });

            // STEP 5: Train your model based on the data set
            var model = pipeline.Train<IrisData, IrisPrediction>();

            // STEP 6: Use your model to make a prediction
            // You can change these numbers to test different predictions
            var prediction = model.Predict(new IrisData()
            {
                SepalLength = 3.3f,
                SepalWidth = 1.6f,
                PetalLength = 0.2f,
                PetalWidth = 5.1f,
            });

            Console.WriteLine($"Predicted flower type is: {prediction.PredictedLabels}");
        }
    }
}
-
运行应用
使用如下命令行运行程序:
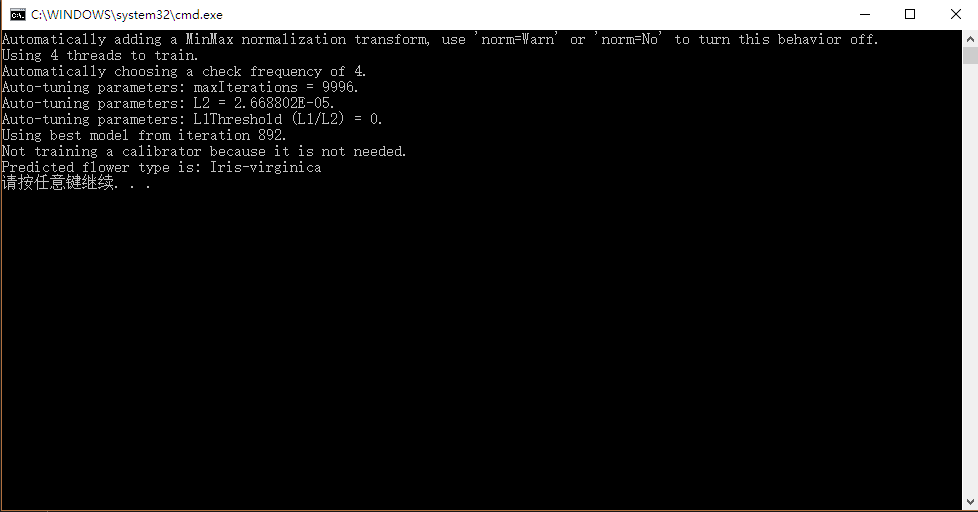
dotnet run在最后一行将输出对花的预测结果,你可以修改传给Predict函数各种鸢尾花的特征值看看有什么不同的结果。

恭喜,你已经跨入使用ML.NET进行机器学习的门槛了!


