四大组件-服务
Service
服务是Android中实现程序后台运行的解决方案。
主要用于在后台处理一些耗时的逻辑,或者某些需要长期运行的任务,比如下载。
服务依赖于创建服务时所在的应用程序进程,当应用程序进程被关掉后,所有依赖于该进程的服务也会停止运行。
服务中的代码也是运行在主线程中的。
1.创建一个服务
通过Android Studio来创建服务
右键包名然后 New>Service>Service
创建时有两个属性可以勾选,
Exported属性表示其他程序访问这个服务,Enabled属性用于表示是否启用这个服务。
注意:每个服务都需要在AndroidManifest.xml中进行注册才能生效。Android Studio 已经帮我们创建好了。
    <application
        <service
            android:name=".MyService"
            android:enabled="true"
            android:exported="true">
        </service>
    </application>
这个是创建好的类: 关于onBind()方法,之后再活动和服务之间的通信会用到
public class MyService extends Service {
    public MyService() {
    }

    @Override
    public IBinder onBind(Intent intent) {
        // TODO: Return the communication channel to the service.
        throw new UnsupportedOperationException("Not yet implemented");
    }
Service 中常用的几个方法:
- onCreate() :服务创建时调用
- onStartCommand() :服务每次启动时调用
- onDestroy() :服务销毁时调用 ,一般用于回收资源
2.开启和关闭服务
- 开启服务:
   Intent startIntent=new Intent(MainActivity.this,MyService.class);
   startService(startIntent);
首次启启动时会创建一个Service实例,并一次调用onCreate()和onStartCommand()方法进入运行状态,如果再次调用StartService()启动Service,将不会再创建新的Service对象,而是会重用前面创建的Service对象,并调用onStartCommand()方法。
- 关闭服务:
   Intent stoptIntent=new Intent(MainActivity.this,MyService.class);
   stopService(stoptIntent);
另外也可以通过在服务中调用 stopSelf() 来关闭服务
3.Service和Activity之间的通信
我们需要通过Service中的 onBind()方法来实现通信。
比如说我们要实现下载功能,我们需要创建一个内部Binder类,并通过内部类对象来对下载进行管理
public class MyService extends Service {

    private DownLoadBinder mBinder=new DownLoadBinder();
    @Override
    public IBinder onBind(Intent intent) {
        return mBinder;
    }

    class DownLoadBinder extends Binder{

        public  int progress=0;
        public void startDownLoad(){

          new Thread(new Runnable() { //在子线程中执行
                @Override
                public void run() {
                    Log.d("MyService", "startDownload executed");
                    while (progress <= 100) {

                        try { //模拟耗时操作
                            Thread.sleep(1000);
                        } catch (InterruptedException e) {
                            e.printStackTrace();
                        }
                        progress++;
                    }
                }
            }).start();
        }
        public int getProgress(){
            return progress;
        }
    }
}
然后在MainActivity中需要修改的是:
创建ServiceConnection匿名类和自定义的Binder类,并通过向下转型得到DownLoadBinder的实例
    private MyService.DownLoadBinder downLoadBinder;
    //监听活动和服务的连接状况,如果成功则回调onServiceConnected()
    private ServiceConnection connection=new ServiceConnection() {
        @Override
        public void onServiceConnected(ComponentName name, IBinder service) {
              Log.d(TAG, "onServiceConnected: ");
              downLoadBinder=(MyService.DownLoadBinder)service;
              downLoadBinder.startDownLoad();//开始下载
        }

        @Override
        public void onServiceDisconnected(ComponentName name) {
            Log.d(TAG, "onServiceDisconnected: ");
        }
    };
- 绑定服务:
  Intent bindIntent=new Intent(MainActivity.this,MyService.class);
  bindService(bindIntent,connection,BIND_AUTO_CREATE);
但三个参数BIND_AUTO_CREATE,表示在活动和服务进行绑定之后自动创建服务,
这样会使服务中的onCreate()执行,但是startCommand()不会执行,
- 解绑服务:
unbindService(connection);当解除绑定后服务也就紧跟着销毁了
接下来我们就可以调用 downLoadBinder 的相关方法进行操作,实现在活动中调用服务中方法
比如 获取当前下载进度:
downLoadBinder.getProgress()
注:服务可以跟整个应用程序中任意一个Activity进行绑定,并获取Binder实例。
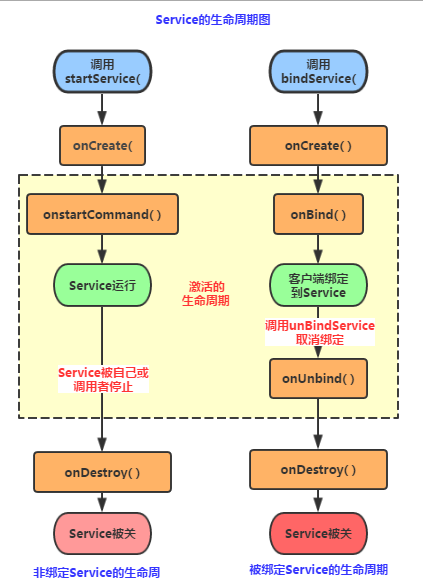
4.服务的生命周期

注:图片来自 菜鸟教程 http://www.runoob.com/w3cnote/android-tutorial-service-1.html
当我们对一个服务即调用了startService()方法,又调用了bindService()方法
Android 系统的机制是,一个服务只要被启动或者被绑定后,就会一直处于运行状态,必须要两种状态同时不满足,服务才会销毁。
所以我们需要通过同时调用stopService()和unbindService()方法来销毁这个服务。
5.前台服务
服务的系统优先级相对来说还是比较低的,所有当系统出现内存不足的情况下,就有可能会回收掉正在后台运行的服务。当我们需要服务一直保持运行状态时,就可以考虑使用前台服务。
前台服务和普通服务的最大区别就是,前台服务会在状态栏一直显示一个通知。常见的有(网易云音乐、360...)
    @Override
    public void onCreate() {
        //前台服务
        Intent intent=new Intent(this,MainActivity.class);
        PendingIntent pi=PendingIntent.getActivities(this,0,new Intent[]{ intent},0);
        notificationBuilder= new NotificationCompat.Builder(this);
        notificationBuilder.setContentTitle("Download") ; //标题
        notificationBuilder.setWhen(System.currentTimeMillis()); //通知被创建的时间
        notificationBuilder.setSmallIcon(R.mipmap.ic_launcher);  //状态栏通知图标
        notificationBuilder.setProgress(100,1,false);  //条形进度条显示
        notificationBuilder.setAutoCancel(true);
        notificationBuilder.setContentIntent(pi); //点击通知事件
        //发送通知,并将服务变为前台服务
        startForeground(1,notificationBuilder.build());
    }
接着我们可以调用setProgress()方法来更新进度条
 notificationBuilder.setProgress(100,progress,false);
 notificationBuilder.setContentText(progress+"/100");
重点就是startForeground() ,这个方法会将服务变为前台服务,并在系统状态栏中显示出来。
6.IntentService
IntentService可以简单地创建一个异步的、会自动停止的服务。
创建MyIntentService
public class MyIntentService extends IntentService {

    private static final String TAG = "MyIntentService";

    public MyIntentService(){
        super(""); //必须调用父类的有参构造函数,否则会抛异常
    }

    @Override
    protected void onHandleIntent(Intent intent) {
        Log.d(TAG, "onHandleIntent: ");
        Log.d(TAG,"Thread name :"+ Thread.currentThread().getName());
    }

    @Override
    public void onDestroy() {
        Log.d(TAG, "onDestroy: ");
        super.onDestroy();
    }
}
最后不要忘了在AndroidManifest.xml中进行注册服务
<service android:name=".MyIntentService"/>
启动服务:
                Intent intentService=new Intent(this,MyIntentService.class);
                startService(intentService);
注意:
IntentService 运行完毕后是自动停止。
MyIntentService 中必须调用父类的有参构造函数,否则会抛异常


 浙公网安备 33010602011771号